One-Sentence Summary: If you’re concerned about declining skin elasticity and increased wrinkles, try stimulating these 5 acupoints daily to improve blood circulation: LI4, SP6, ST36, LR3, and LI20.
Introduction
Don’t you sometimes sigh while looking at your face in the mirror, thinking “It wasn’t like this yesterday”? Skin aging is a natural process everyone wants to avoid, but it progresses faster than expected due to hormonal changes, stress, sleep deprivation, and environmental pollution. Wrinkles, sagging skin, and dull complexion can shake your confidence beyond being merely cosmetic concerns.
In traditional Chinese medicine, the root causes of skin aging are seen as “Qi and blood deficiency” and “reduced blood circulation.” When blood flow to the face decreases, skin cells don’t receive adequate oxygen and nutrients, causing loss of elasticity, and impaired waste elimination accelerates aging. Fortunately, by consistently stimulating specific acupoints, you can dilate capillaries, improve facial blood flow, enhance your body’s natural healing capacity, and promote skin regeneration. You can see significant results from just a 5-minute self-massage routine, and the best part is you can do it anytime, anywhere, without any extra cost or special tools.
5 Acupoints Effective for Skin Aging
1. LI4 — The Starting Point for Immunity Enhancement and Skin Regeneration
Location: The center of the webbing between your thumb and index finger (thumb-index webspace) where the bones meet WHO Code: LI4 Technique: Use the thumb of the opposite hand to apply pressure the size of a coin in circular motions for 1 minute. Start with light pressure and gradually increase the intensity. Work on both hands, and pressing for 5 minutes before bed is also beneficial. Effects: Connected to the Large Intestine meridian, LI4 is known as the “universal acupoint” and excels at boosting immunity, reducing inflammation, and improving facial complexion. It accelerates metabolism, speeds up skin cell regeneration, and helps detoxify the body by improving constipation. With regular stimulation, you can achieve even skin tone and restore natural luster.
2. SP6 — Hormone Balance and Skin Hydration
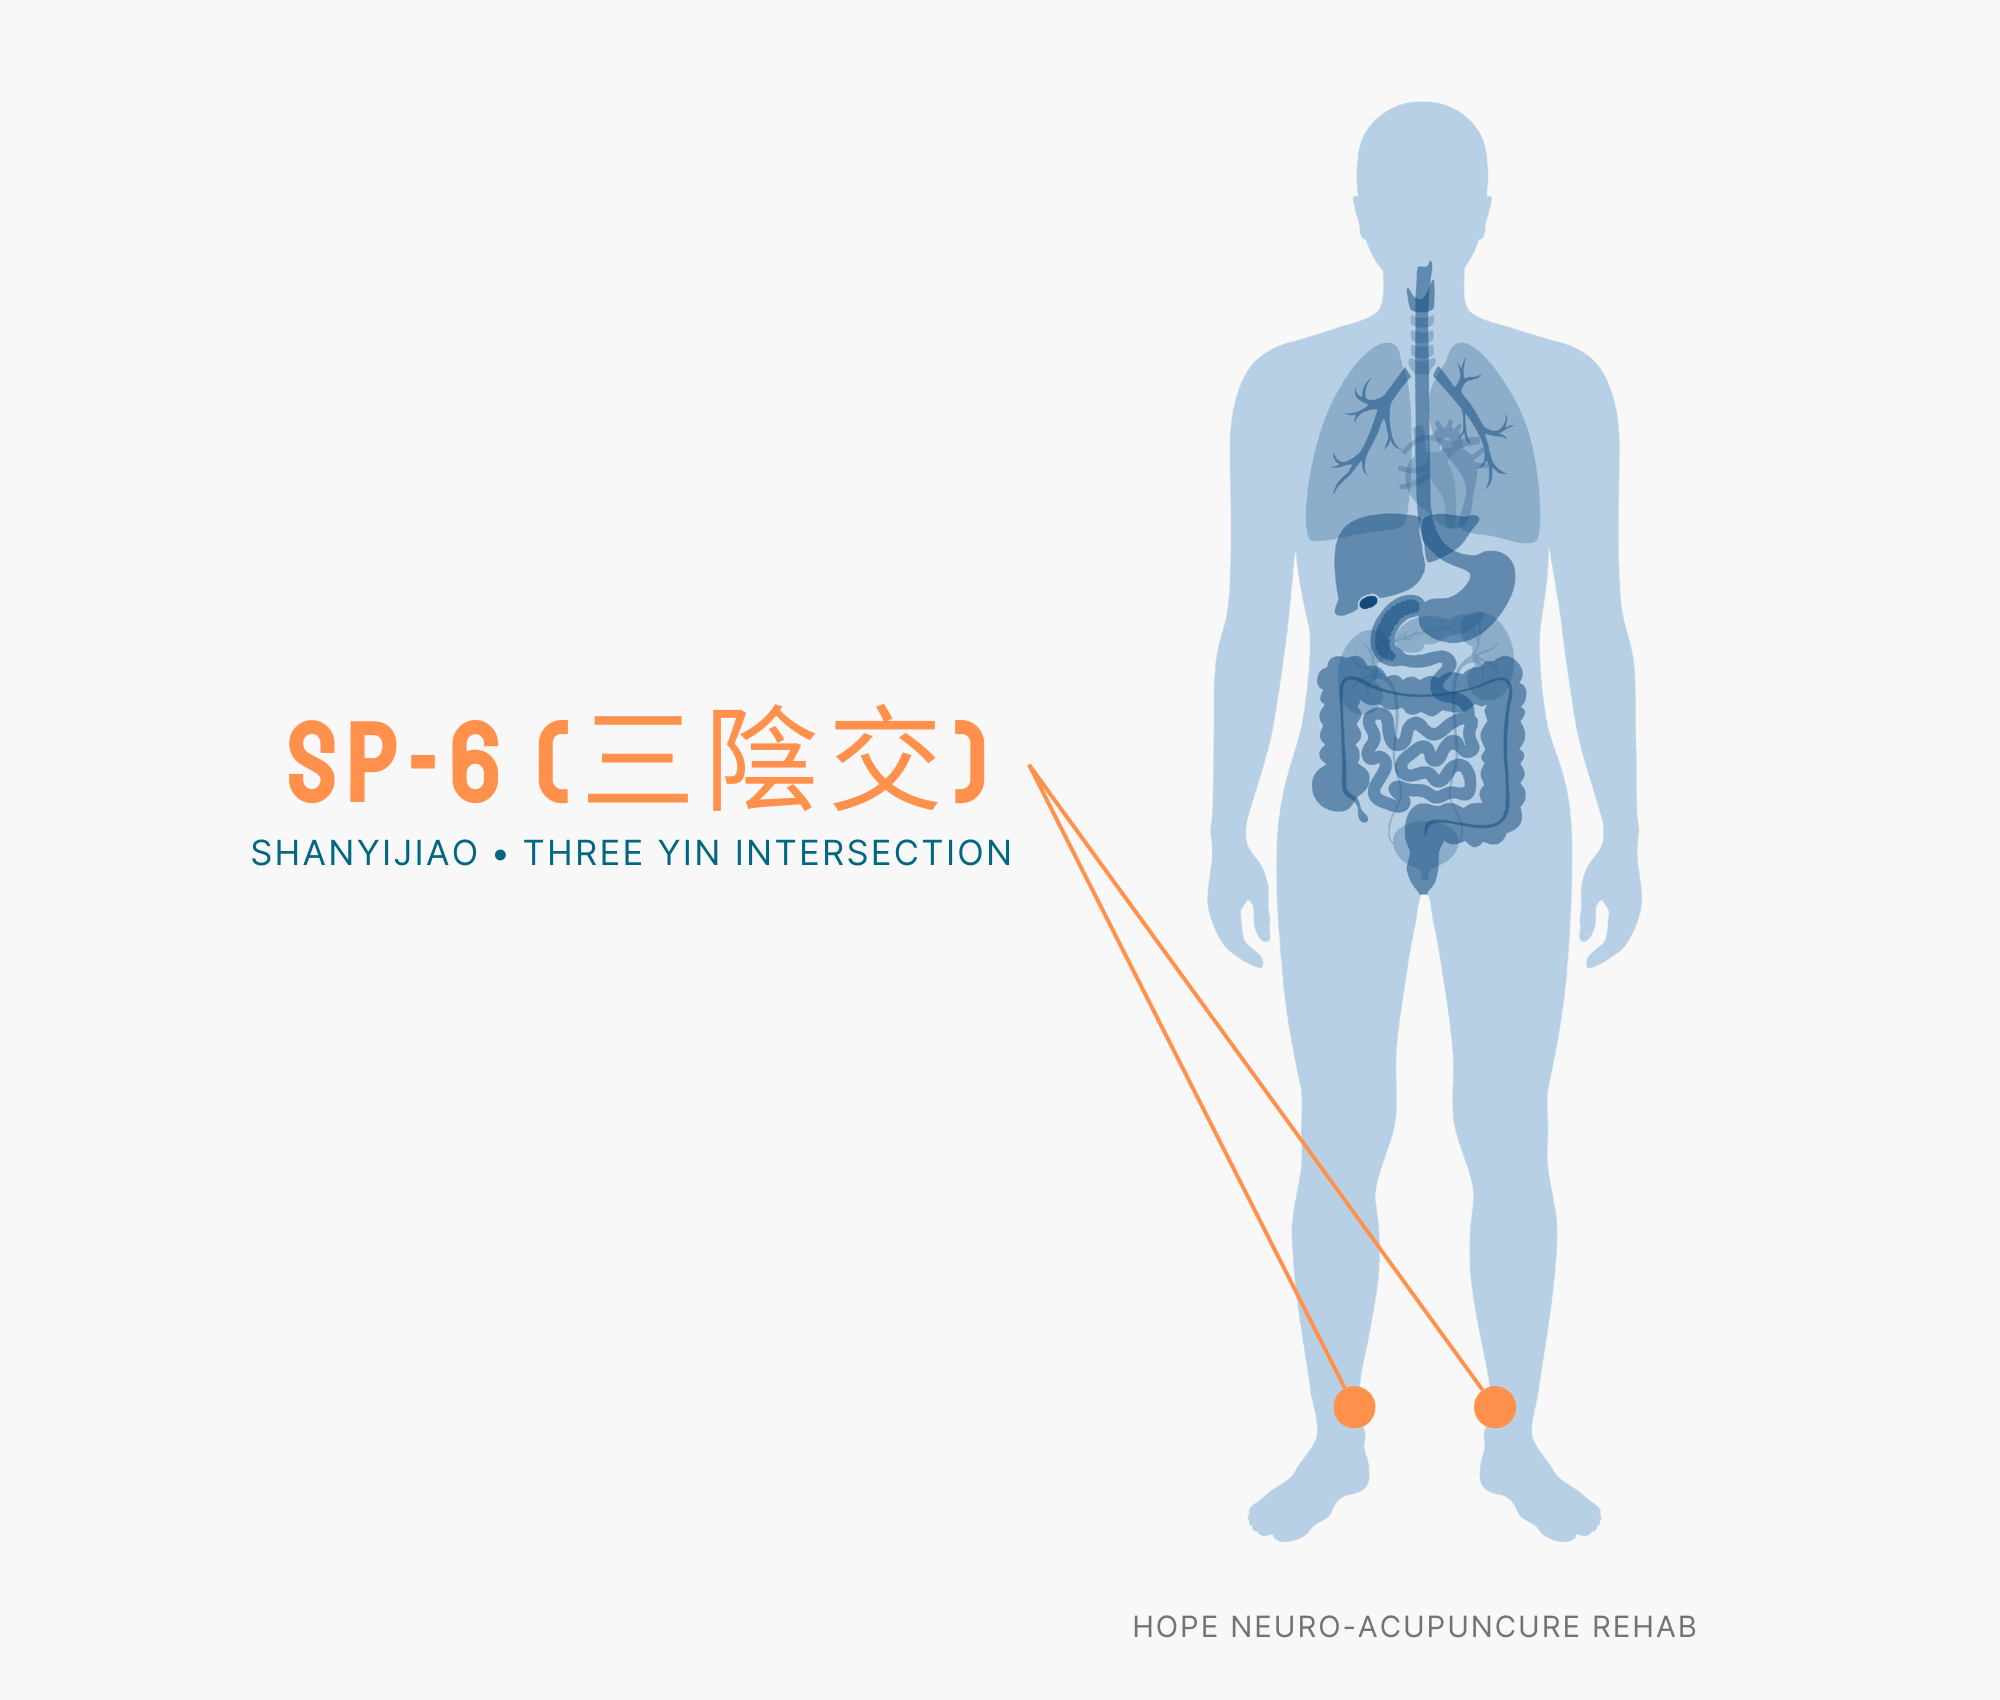
Location: On the inner side of the leg, about 3 finger widths (approximately 10cm) above the inner ankle bone (medial malleolus) WHO Code: SP6 Technique: Slowly press with your thumb while breathing deeply to promote blood circulation. Work on each leg for 1-2 minutes once a day. Stimulating this point in the evening also helps induce better sleep. Effects: SP6 is where the Liver, Spleen, and Kidney meridians meet, playing a crucial role in hormone regulation. For women, it normalizes estrogen secretion, alleviates dry skin, and increases skin’s moisture retention. Improved blood circulation reduces facial puffiness and restores skin elasticity.
3. ST36 — Whole-Body Immunity Boost and Skin Vitality
Location: On the outer side below the knee, about 3 finger widths (approximately 10cm) below the depression below the kneecap WHO Code: ST36 Technique: Slowly press vertically with your thumb until you feel a slight warming sensation. Work on each leg for 1-2 minutes, 1-2 times daily. The effect is even greater when combined with moxibustion (heat therapy). Effects: Called the “leg’s tonic herb,” ST36 strengthens Qi and blood throughout the body. It improves digestion and nutrient absorption, and activates immune cells to effectively improve inflammatory skin conditions like acne and dermatitis. It promotes metabolism to help eliminate skin waste and slows the skin aging process with consistent stimulation.
4. LR3 — Stress Relief and Skin Elasticity Recovery
Location: On the top of the foot, in the valley between the first and second toe bones, about 2cm above the ankle WHO Code: LR3 Technique: Slowly press with your thumb for about 1 minute. Avoid painful pressure; maintain a “firm yet comfortable” intensity. Work on both feet, and it’s best to stimulate this point daily, especially in the evening on stressful days. Effects: LR3 opens the Liver’s Qi and blood flow, making it an excellent point for stress relief. It improves dull and lifeless complexion caused by chronic stress and promotes detoxification by activating liver function. It relieves blood vessel constriction to increase facial blood flow, and with consistent stimulation, restores skin elasticity and radiance.
5. LI20 — Maximized Skin Benefits Through Direct Facial Stimulation
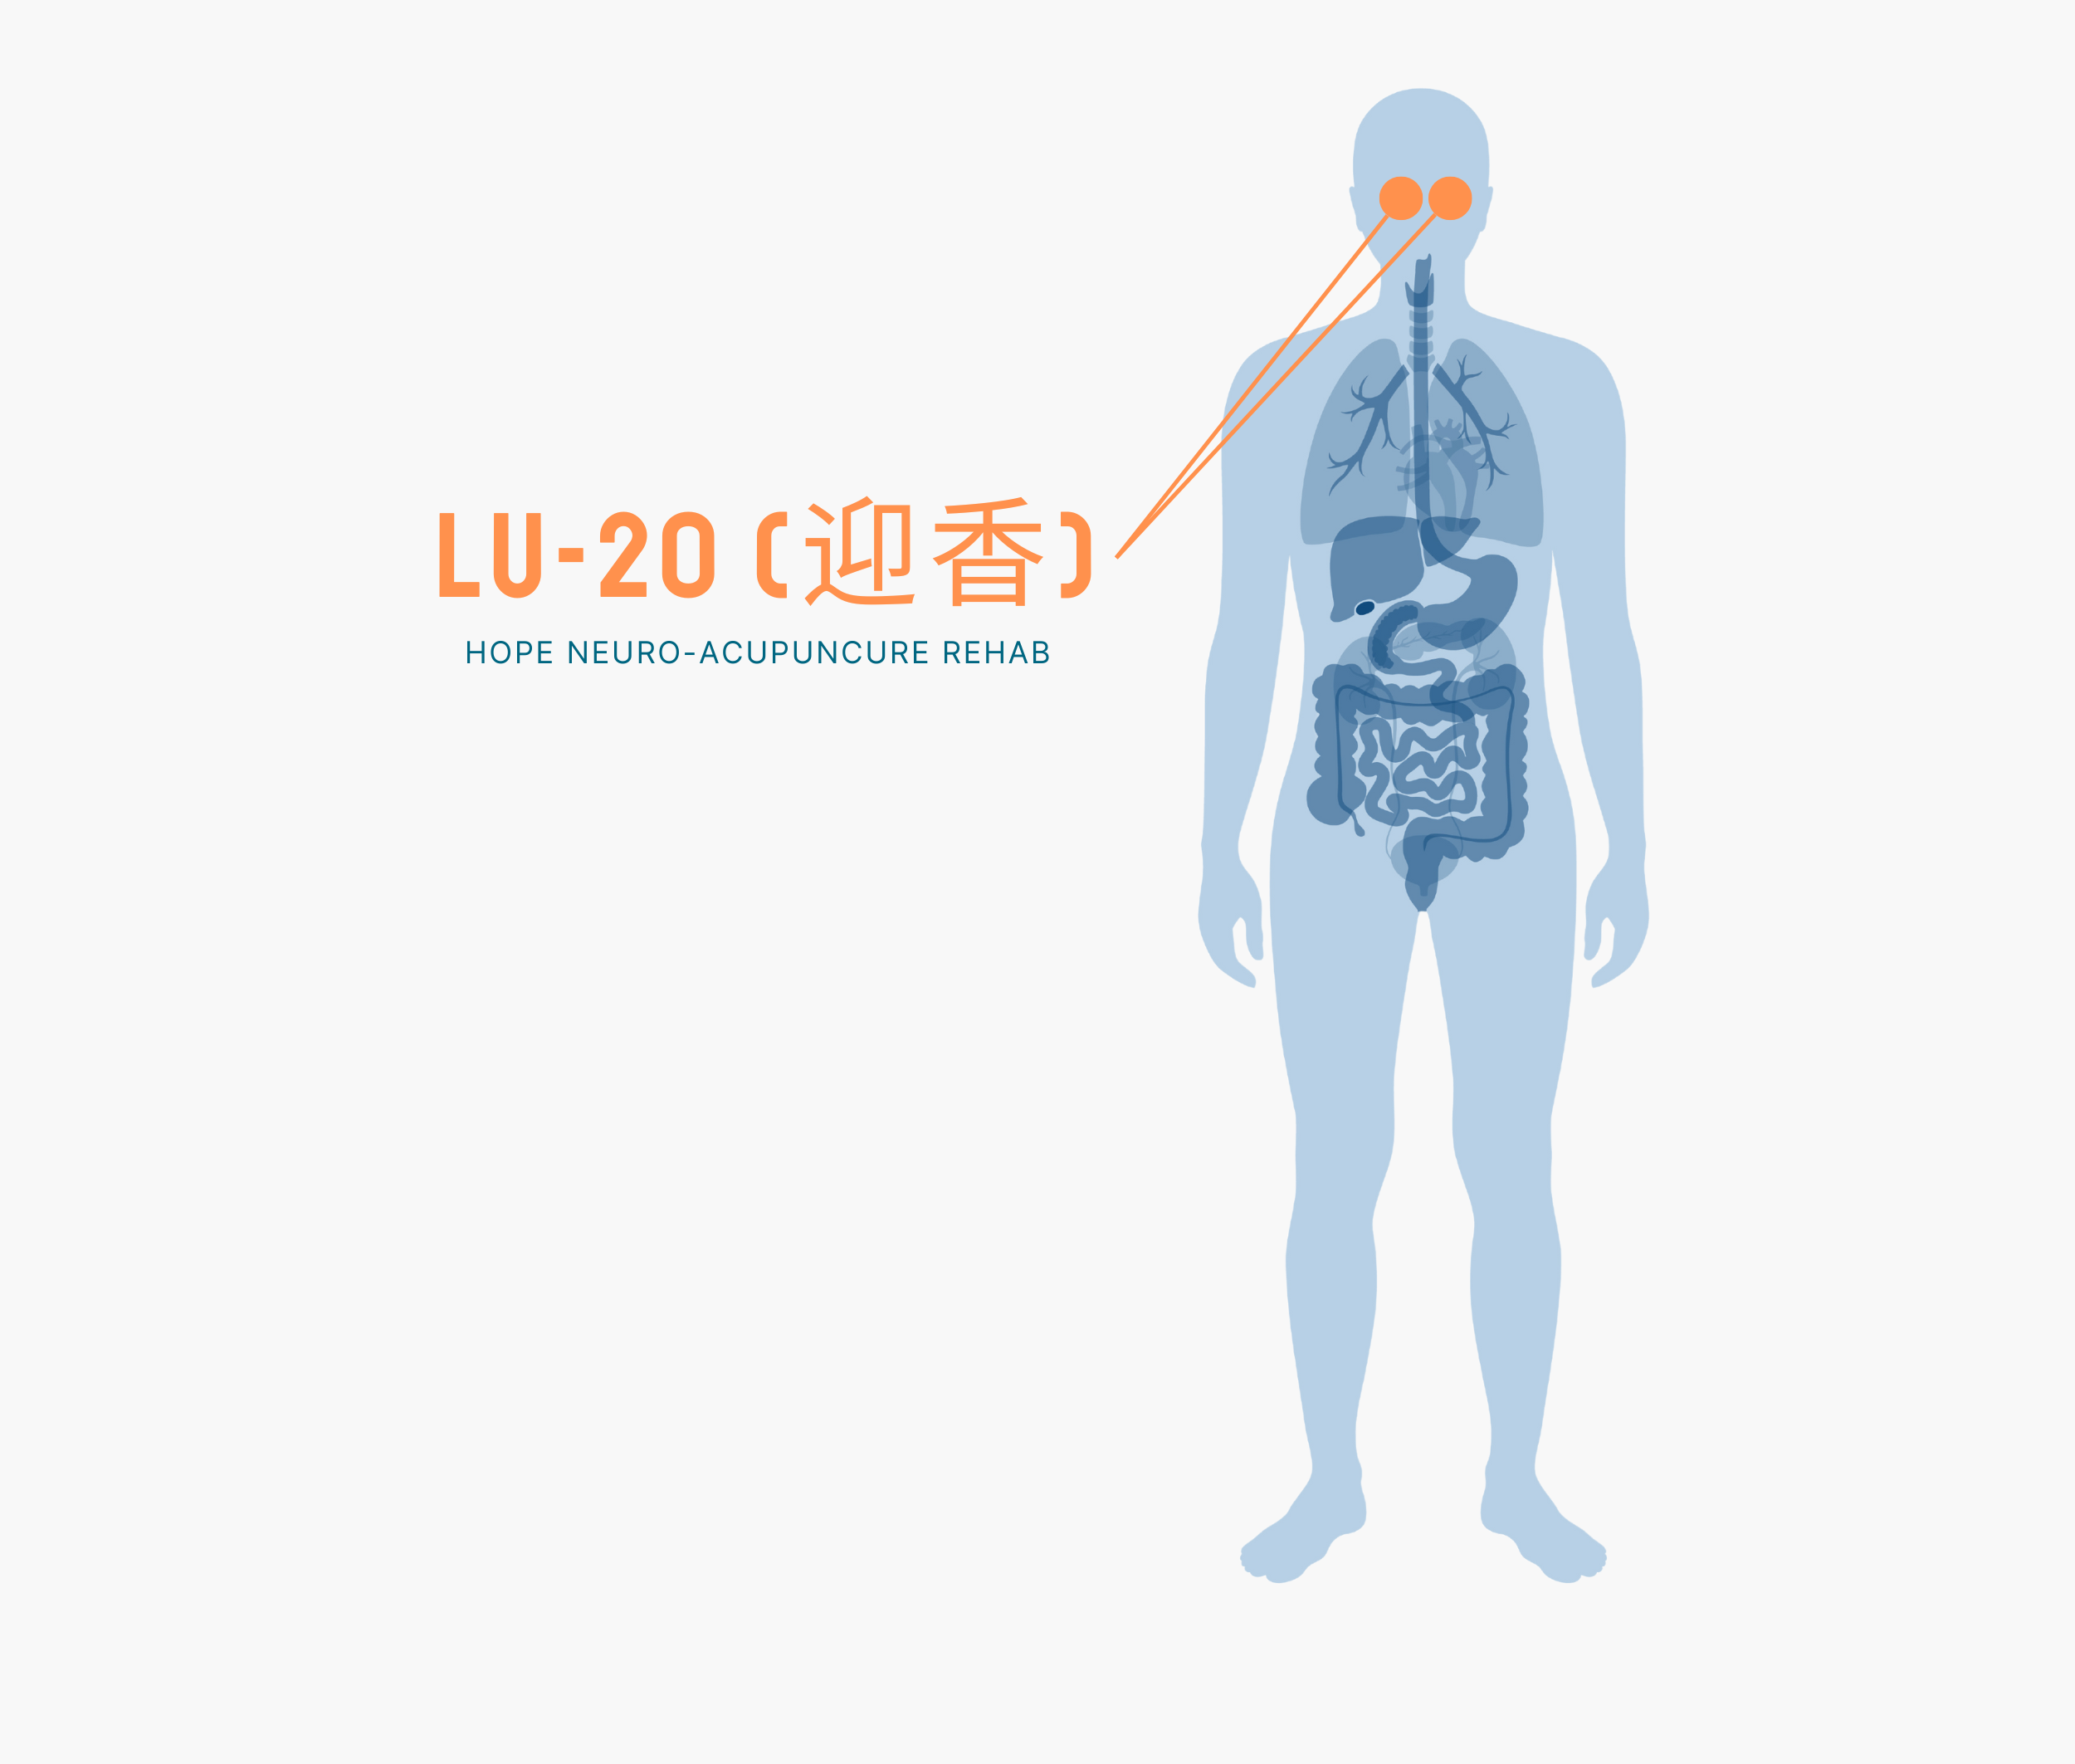
Location: Above the nasolabial fold (smile lines) beside the nose, about 1cm below the nostril WHO Code: LI20 Technique: Gently massage in circular motions with your index or middle finger. Since facial blood vessels are delicate, avoid strong pressure and use light touch for about 1 minute. Apply a thin layer of essence after skincare and then stimulate this point to improve product absorption. Effects: LI20, the endpoint of the Large Intestine meridian, is the key point for improving facial complexion. It dilates capillaries around the nose and cheeks to directly improve facial blood flow and promotes even skin tone. It’s particularly effective for reducing nasolabial folds and brings vibrant, youthful expression back to facial skin with consistent stimulation.
5-Minute Self-Massage Routine
Morning Routine (Before work, about 5 minutes):
LI4 (Both hands) — 1 minute: Extend your hands with the webspace facing upward, slowly massage in circles with the opposite thumb
LI20 (Both sides) — 1 minute: Gently massage beside the nose in circles with your index finger to awaken facial complexion
ST36 (Both legs) — 1.5 minutes: Sit in a chair, extend your legs, and slowly press vertically with your thumb
LR3 (Both feet) — 1.5 minutes: Extend your feet and press firmly with your thumb
Evening Routine (Before bed, about 5 minutes):
SP6 (Both legs) — 1 minute: Lie in bed, bend your legs comfortably, and slowly press vertically with your thumb
LR3 (Both feet) — 1 minute: Extend your feet and stimulate while stretching toward your legs
LI4 (Both hands) — 1 minute: Bring your hands together at your chest and massage in circles with the opposite thumb
ST36 (Both legs) — 1 minute: Extend your legs while lying down and slowly press to promote better sleep
Key Tips: Combining deep belly breathing with acupressure increases relaxation response and doubles the effectiveness. Repeating the routine at the same time daily synchronizes with your body’s natural rhythm and hormone cycle for faster results.
⚠️ Medical Disclaimer: This article is provided for informational purposes only and does not replace professional medical diagnosis or treatment. If symptoms persist or are severe, consult a healthcare professional.
🤰 Pregnancy Warning: Among the acupoints mentioned above, LI4, SP6, and LR3 may trigger uterine contractions in pregnant women. If you are pregnant or may be pregnant, consult a healthcare professional before practicing these techniques.
One-line summary: Shoulder stiffness can be quickly relieved through acupressure on 5 key acupoints: Jianjing (SI12), Quchi (LI11), Hegu (LI4), Fengchi (GB20), and Jianliao (TE14).
Introduction
Shoulder stiffness that comes from sitting and working for long periods is truly bothersome and inconvenient. Caused by various factors such as muscle tension, poor posture, and stress, shoulder stiffness greatly reduces your quality of daily life. In traditional medicine, shoulder stiffness is diagnosed as poor blood circulation and qi stagnation. By stimulating specific acupoints, you can relax tense muscles and promote blood circulation. In this article, I’ll explain in detail the 5 most effective acupoints for relieving shoulder stiffness and self-acupressure methods.
The 5 Acupoints Explained
1. Jianjing (肩井) — SI12 Location: The highest point where the shoulder muscle rises (midpoint between the 7th cervical vertebra and the shoulder tip) How to find it: When you bend your neck forward, take the protruding bone below your neck as a reference point and move about 2-3cm toward the shoulder. Acupressure method: Tap and press with your thumb or rub in circular motions. Repeat pressing for 3-5 seconds and resting for 1 second. Benefits: The ‘representative acupoint’ for shoulder stiffness that immediately relaxes tense muscles around the scapula. Particularly effective for stubborn shoulder stiffness.
2. Quchi (曲池) — LI11 Location: The outer end of the elbow crease when your elbow is bent How to find it: Bend your arm so the inside of your elbow is visible, then locate the outer end of the elbow crease. Acupressure method: Press with your thumb, gently pushing your finger toward the elbow as you apply acupressure. Benefits: Promotes blood circulation in the upper arm and relieves tension extending to the shoulder. Excellent for shoulder stiffness caused by prolonged keyboard use.
3. Hegu (合谷) — LI4 Location: The webbing between the thumb and index finger, moving toward the thumb along the index finger bone How to find it: Spread your thumb and index finger apart and find the highest point between the two fingers. Acupressure method: Tap and press with the opposite thumb or rub in circular motions. Continue for 30 seconds to 1 minute. Benefits: A ‘universal’ acupoint that relieves pain and tension throughout the body. Improves blood circulation in the entire upper body from head to arms.
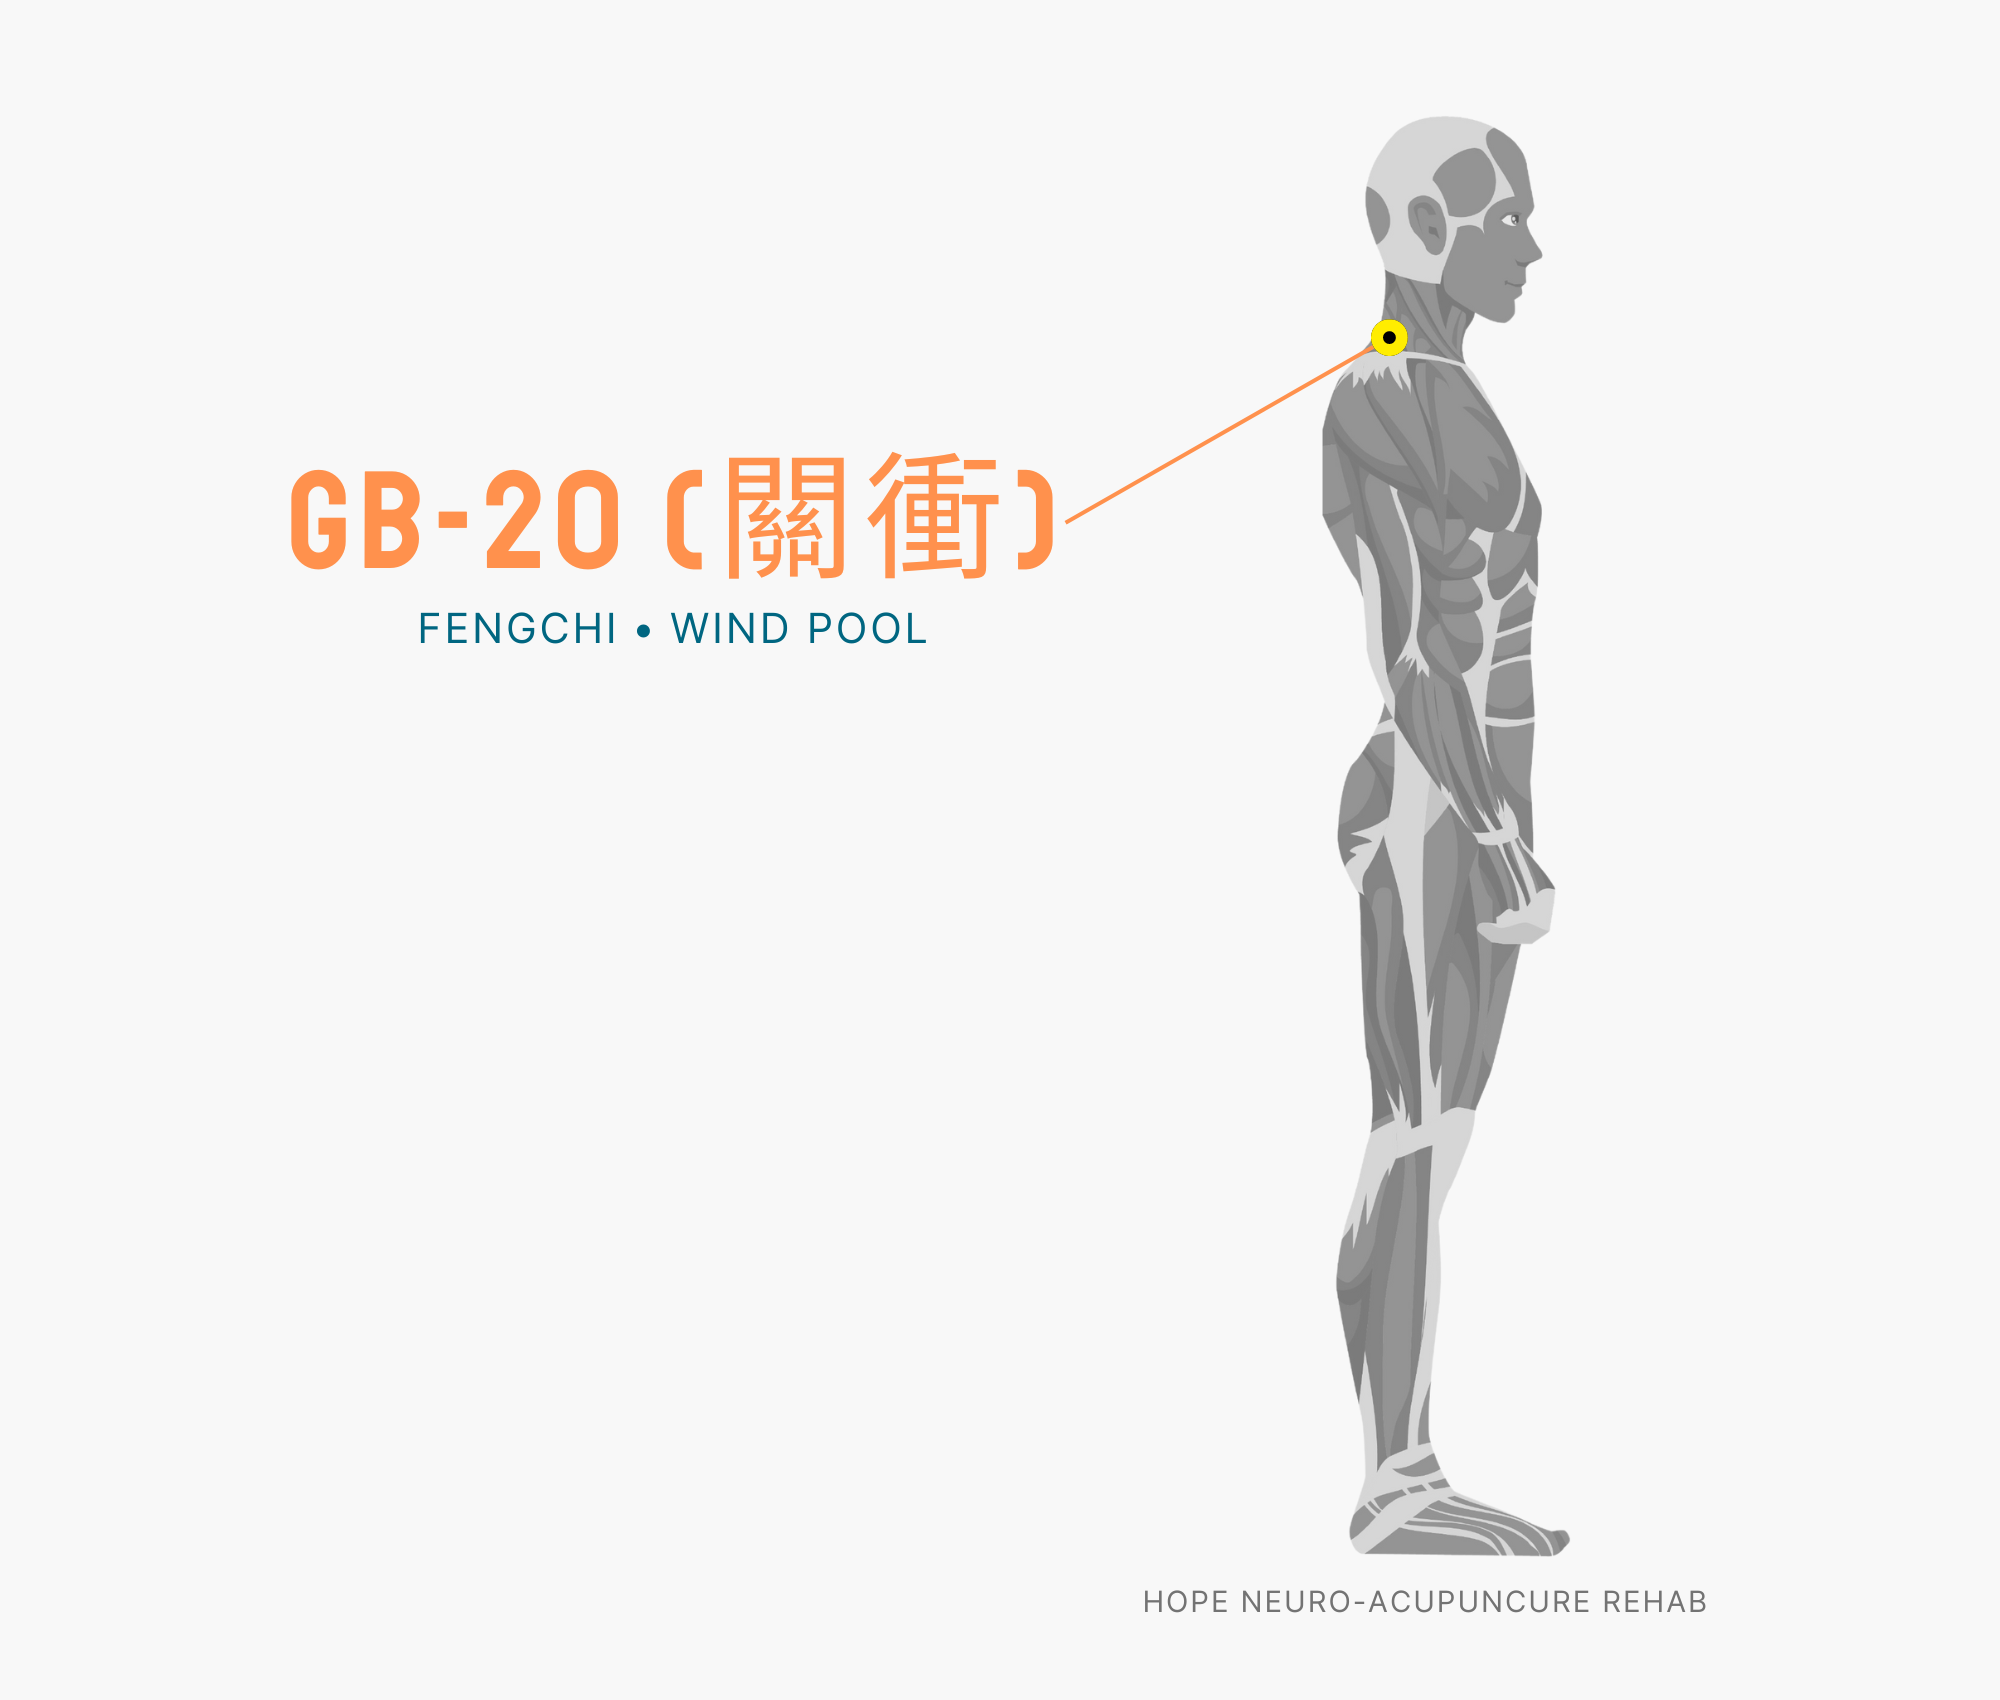
4. Fengchi (風池) — GB20 Location: The back of the neck, about 2-3cm below the hollow area beneath the ear How to find it: From the center of the back of your neck (cervical vertebra 1), move about 2-3cm to each side. Pressing with your finger creates a hollow sensation. Acupressure method: Press simultaneously with both thumbs, applying acupressure with a slight upward lift toward the head. Benefits: An acupoint that connects the neck and shoulder, particularly effective at relieving shoulder stiffness caused by neck tension. Also effective for headache relief.
5. Jianliao (肩髎) — TE14 Location: The back of the shoulder, the hollow area above the shoulder blade (scapula) How to find it: About 2-3cm back from the shoulder tip. This is the hollow area that appears when you raise your arm. Acupressure method: Tap and press with four fingers or apply acupressure by making circular motions with your finger joints. Benefits: Acts directly on the deep muscles around the shoulder blade and relieves severe shoulder stiffness. Particularly effective for shoulder tension after exercise.
5-Minute Self-Acupressure Routine
5-Minute Acupressure Program (Recommended morning/evening)
Step 1 (1 minute): Jianjing (SI12) 30 seconds on each side → Release the most important acupoint first.
Step 2 (1 minute): Fengchi (GB20) 30 seconds on each side → Simultaneously relieves tension in the neck and shoulders.
Step 3 (1 minute): Jianliao (TE14) 30 seconds on each side → Releases tension in the deep muscle layers.
Step 4 (1 minute): Quchi (LI11) 30 seconds on each side → Improves qi flow connecting the arm and shoulder.
Step 5 (1 minute): Hegu (LI4) 30 seconds on each side → Finally circulates qi and blood throughout the body.
Acupressure tips: It’s more effective to warm your hands with warm water before starting. Don’t press so hard that it causes pain—aim for an intensity that creates a ‘sore yet pleasant’ sensation.
⚠️ Medical Disclaimer: This article is written for informational health purposes and does not replace professional medical diagnosis or treatment. If symptoms persist or are severe, please consult with a healthcare professional.
🤰 Pregnancy Warning: Of the above acupoints, Hegu (LI4) may trigger uterine contractions in pregnant women. If you are pregnant or may be pregnant, please consult with a professional before proceeding. Jianjing, Quchi, Fengchi, and Jianliao are safe for pregnant women to use.
Summary: Rib pain can be effectively relieved through daily acupressure on five acupoints: BL17, LV14, LV13, BL18, and GB34, which help alleviate pain and improve blood circulation.
Introduction
Rib pain that throbs on the sides and makes breathing difficult—this condition that can hamper daily activities is experienced by many people. Rib pain typically develops from a combination of factors including intercostal nerve irritation, muscle tension, poor postural habits, and stress. Fortunately, Traditional Chinese Medicine has long provided effective acupoints that can relieve this pain. In particular, five acupoints that can be easily stimulated at home promote blood circulation and help relax muscles, providing immediate relief. Self-care that you can do with your own hands without medication—let’s begin.
Five Effective Acupoints for Rib Pain
1. BL17 (Diaphragm Shu)
Location: Below the 7th thoracic vertebra, approximately 1.5-2cm to the sides of the spine
How to locate: Feel the lower edge of the rib cage below the epigastrium, then find the area next to the spine at that height.
Acupressure technique: Use both thumbs to simultaneously stimulate both sides of the spine, pressing and releasing for 3-5 seconds repeatedly, or massage in circular motions. Start with gentle pressure and gradually increase the intensity.
Benefits: BL17 is known as “the connecting point of the thorax” and is a primary acupoint for relieving chest pain, cough, and digestive discomfort. It effectively improves breathing difficulties and chest tightness caused by rib pain.
2. LV14 (Cycle Gate)
Location: Below the 6th rib, at the level of the nipple line (directly below the nipple)
How to locate: When your arm is at your side, find the space between the ribs at the height of your nipple.
Acupressure technique: Gently massage in circular motions with four fingers, or repeatedly press with your thumb for 3-5 seconds. Avoid excessive pressure and exhale deeply as you proceed.
Benefits: As an important acupoint on the Liver meridian, it directly alleviates pain in the sides and around the ribs. It also relieves muscle tension caused by stress, providing comprehensive pain improvement.
3. LV13 (Bamboo Gate)
Location: At the end of the 11th rib, on the midaxillary line (the vertical line where the arm meets the body when lowered)
How to locate: When you raise your arm to the side, find the end of the longest rib—this is LV13.
Acupressure technique: Slowly press with your thumb or middle finger, holding the pressure for 3-5 seconds before releasing. It’s most effective to press while exhaling.
Benefits: It strengthens spleen function and relieves the uncomfortable sensation and pain below the sides of the rib cage. It brings immediate relief, especially when lower rib pain is severe.
4. BL18 (Liver Shu)
Location: Below the 9th thoracic vertebra, approximately 1.5-2cm to the sides of the spine
How to locate: Follow the lower edge of the rib cage and feel along the side of the spine to find BL18.
Acupressure technique: Similar to BL17, simultaneously stimulate both sides of the spine with both thumbs, or perform rolling massage with a massage stick.
Benefits: It strengthens liver function and relieves muscle tension caused by stress. It’s particularly effective for alleviating pain on the lateral side of the body and rib pain.
5. GB34 (Yang Mound Spring)
Location: On the outer side below the knee, in the small depression below the head of the fibula (calf bone)
How to locate: Slightly bend your leg and feel the outer side below your knee—the soft area below the bone is GB34.
Acupressure technique: Press with your thumb for 3-5 seconds, or apply deep pressure with a round massage stick. Alternate stimulating both legs.
Benefits: Known as “the meeting point of the Gallbladder,” it regulates qi flow throughout the body. It’s a remote acupoint that comprehensively improves pain around the sides and ribs, as well as fatigue.
5-Minute Self-Acupressure Routine
Setup: Perform this in a comfortable seated or lying position. It helps to apply a thin layer of warm oil to your fingers to reduce friction.
BL17 — 1 minute Simultaneously stimulate both sides of the spine with both thumbs. Press for 3-5 seconds × 8 repetitions
LV14 — 1 minute Gently massage the side of the chest with your thumb. Repeat in circular motions 10 times
LV13 — 1 minute Press deeply, holding for 3-5 seconds × 8 repetitions. Exhale slowly as you proceed
BL18 — 1 minute Alternate stimulating both sides of the spine with both thumbs. Total of 10 repetitions
Precautions: If you feel pain, reduce the pressure, and don’t hold your breath. Daily acupressure at the same time produces better results.
🤰 Pregnancy Warning: Among the acupoints above, LV14 and BL18 may trigger uterine contractions in pregnant women. If you are pregnant or might be pregnant, be sure to consult with a healthcare professional before practicing these techniques.
⚠️ Medical Disclaimer: This article is written for informational purposes and does not replace professional medical diagnosis or treatment. If symptoms persist or worsen, especially if thoracic disease is a possibility, please consult with a healthcare professional.
One-line summary: Applying acupressure to 5 points—Taiyang, Baihui, Fengchi, Sanyinjiao, and Neiguan—twice daily for 1 minute each improves cerebral blood flow and relieves nervous tension, enhancing concentration.
Introduction
Most people have experienced blurred vision and scattered thoughts while studying or working. Modern people often accumulate brain fatigue and experience sharply declining concentration due to stress, sleep deprivation, and prolonged screen exposure.
In traditional Chinese medicine, this decline in concentration is viewed as “deficiency of Qi (氣)” and “poor cerebral blood circulation.” Fortunately, stimulating acupoints distributed throughout the body can promote blood supply to the brain, relax nervous tension, reduce stress hormones, and naturally restore concentration. An added benefit is that it can be performed anytime with just a finger, without the need for medication.
Detailed Guide to 5 Acupoints
1. Taiyang Acupoint (EX-HN5)
Location: At the midpoint of the line connecting the outer end of the eyebrow and the outer corner of the eye, in the temple area.
Acupressure Method: Apply gentle, circular pressure with both fingers simultaneously. Rather than pressing hard, maintain pressure at a level where slight discomfort and comfort coexist. Perform for 30 seconds to 1 minute per session.
Benefits: Taiyang is a remarkable acupoint that immediately relieves head fatigue. It particularly alleviates temporal lobe fatigue and migraines caused by prolonged concentration and increases oxygen supply to the brain, enhancing focus.
2. Baihui Acupoint (GV20)
Location: At the highest point of the vertex. It is located where a vertical line connecting both ears intersects with a vertical line drawn from the center between the eyebrows.
Acupressure Method: Apply pressure with both fingers or thumbs at a level of mild tenderness. Press for 5 seconds, then rest for 5 seconds, repeating this pattern. Practicing for about 1 minute per session provides a feeling of mental refreshment.
Benefits: Baihui, commonly called “the acupoint that cures a hundred diseases,” stimulates the central nervous system of the brain, clarifying the mind and enhancing memory. People with high blood pressure and dizziness also experience improvement through acupressure.
3. Fengchi Acupoint (GB20)
Location: On both sides of the neck, where the base of the skull meets the upper cervical region. Located in the hollow areas beneath the occipital bone.
Acupressure Method: Apply pressure with both thumbs, positioning them lightly against the back of the neck. Press deeply but within a pain-free range, pressing for 5 seconds and resting for 5 seconds in repetition. Perform for about 1 minute per session.
Benefits: Fengchi is located near the carotid and vertebral arteries supplying the brain, making it very effective for improving cerebral circulation. It relieves neck stiffness and supplies fresh oxygen to the brain, enhancing concentration and memory.
4. Sanyinjiao Acupoint (SP6)
Location: Approximately 4 cm above the inner ankle bone (about 3-4 finger widths), on the inner aspect of the calf.
Acupressure Method: Using the thumb, gradually increase pressure, pressing for 5 seconds and resting for 5 seconds in repetition. Perform for 1 minute on each leg.
Benefits: Sanyinjiao is an acupoint that improves blood circulation throughout the body. It increases blood flow to the brain, relieves nervous tension, and simultaneously alleviates stress-induced digestive issues and anxiety.
5. Neiguan Acupoint (PC6)
Location: At the center of the inner wrist, approximately 5 cm above the wrist crease toward the elbow.
Acupressure Method: Apply pressure with the opposite thumb using a rhythm of pressing for 3 seconds and resting for 1 second, continuing for 30 seconds to 1 minute. Perform on both arms, taking care not to press too firmly.
Benefits: Neiguan is known as an acupoint connecting the heart and brain. It reduces stress hormones (cortisol), stabilizes the nervous system, and effectively alleviates concentration loss caused by anxiety.
5-Minute Self-Acupressure Routine
Perform the following steps in order upon waking in the morning or during the afternoon 2-3 PM energy slump.
Step 1 (1 minute): Taiyang acupoint: 30 seconds on each side
Step 2 (1 minute): Baihui acupoint: 1 minute
Step 3 (1 minute): Fengchi acupoint: 30 seconds on each side
Step 4 (1.5 minutes): Sanyinjiao acupoint: 45 seconds on each leg
Step 5 (0.5 minutes): Neiguan acupoint: 15 seconds on each arm
This 5-minute routine improves cerebral blood flow and calms the nervous system. Practicing twice daily—morning and evening—allows you to feel improvement in concentration within 1-2 weeks.
🤰 Pregnant Woman Alert: Among the above acupoints, Sanyinjiao (SP6) can trigger uterine contractions in pregnant women. If you are pregnant or might be pregnant, consult with a professional before performing this acupoint. The other 4 acupoints (Taiyang, Baihui, Fengchi, and Neiguan) can be safely stimulated.
⚠️ Medical Disclaimer: This article is written for informational purposes about health and does not substitute for professional medical diagnosis or treatment. If you experience severe or persistent concentration loss, or if other neurological symptoms are present, please consult with a healthcare professional. If you experience severe pain or discomfort during acupressure, stop immediately.
One-line summary: Rhinitis can be relieved within 1-2 weeks by pressing five acupoints—Yingxiang, Hegu, Taiyang, Yintang, and Tongqian—2-3 times daily to reduce nasal congestion and sneezing.
Introduction
Rhinitis that gets worse in spring is truly frustrating—nasal congestion makes concentration difficult, and nighttime snoring can be bothersome. Even with medication, there’s no fundamental solution, and repeated sneezing and nasal discharge make daily life inconvenient. In traditional Chinese medicine, rhinitis is viewed as “lung qi deficiency” and “pathogenic wind invasion.” By stimulating specific acupoints, you can strengthen lung function and improve blood circulation around the nose. Scientific research also shows that acupoint pressure helps regulate immune response and reduce nasal inflammation. Now, manage your rhinitis symptoms directly with just your fingertips, without relying on medication.
Five Effective Acupoints for Relieving Rhinitis
1. Yingxiang (LI20) — Instant Relief for Nasal Congestion
Location: Just outside the nostril, where the wrinkles on the side of the ala of the nose converge
WHO Code: LI20 (Large Intestine 20)
Pressure technique: Using your index or middle finger, gently press both sides of the ala of the nose simultaneously, directing the pressure slightly upward. Press for 1-2 minutes per session, maintaining comfortable breathing. Practice this 3 times daily when you feel nasal congestion.
Benefits: Known as the “nasal acupoint,” Yingxiang most quickly relieves nasal congestion, runny nose, and loss of smell caused by rhinitis. You’ll feel immediate results within 5-10 minutes after pressure, with your nasal passages opening up.
Location: Between the thumb and index finger, at the highest point of the muscle on the back of the hand
WHO Code: LI4 (Large Intestine 4)
Pressure technique: Press vertically with the opposite thumb or massage in circular motions. Apply continuous pressure for about 1-2 minutes until you feel a slight warmth. Stimulate both hands for equal duration.
Benefits: Known as a “universal acupoint,” Hegu strengthens lung function and boosts overall immunity. By addressing the root cause of rhinitis—lung qi deficiency—it reduces nasal allergic reactions long-term. It also relieves headaches and facial pain simultaneously.
Location: The temple, approximately 1.5 cm inward from the outer edge of the eye toward the ear
WHO Code: EX-HN5 (Extra Head 5, Extra point)
Pressure technique: Using both middle fingers, gently massage both temples simultaneously in circular motions. Repeat 3 times for 30 seconds to 1 minute each. Gentle massage is more effective than firm pressure. Pressing too hard may worsen headaches.
Benefits: When nasal congestion blocks the nose, pressure builds at the temples causing headaches. Stimulating Taiyang releases this tension. It also improves migraines and eye fatigue while promoting blood circulation to the brain.
4. Yintang (EX-HN3) — Relieve Nasal Congestion & Stress Together
Location: The glabella, the indented area in the center of the skin and muscle between the two eyebrows
WHO Code: EX-HN3 (Extra Head 3, Extra point)
Pressure technique: Using your thumb or middle finger, slowly press the glabella vertically for about 1-2 minutes. Start with moderate pressure, then gradually deepen it within a comfortable range. It’s important to maintain deep breathing.
Benefits: Yintang promotes blood circulation to the brain and activates the parasympathetic nervous system. It relieves not only nasal congestion but also stress-related headaches, insomnia, and poor concentration while releasing overall forehead tension.
5. Tongqian (BL7) — Restore Lung Function & Prevent Recurrence
Location: On the crown of the head, approximately 1.5 cm in front of Baihui (GV20). You can locate it by following the center line of the head downward from your hair parting.
WHO Code: BL7 (Bladder 7)
Pressure technique: Tongqian can be difficult to locate, so first find Baihui (the center of the crown between the two ears), then press the point about 1-1.5 cm in front. Massage in circular motions with your middle finger for about 1 minute or apply gentle pressure.
Benefits: Tongqian is an important acupoint connected to the Lung meridian that directly strengthens lung function. It’s most effective for improving the lung constitution—the root cause of rhinitis—and consistent stimulation prevents rhinitis recurrence. It also helps improve asthma and cough symptoms.
5-Minute Self-Acupoint Massage Routine — Practice Once Daily in the Morning
Recommended time: After waking in the morning or 1 hour before bedtime
Yingxiang (LI20) — 1 minute Gently press both sides of the ala of the nose simultaneously until you feel nasal fullness.
Yintang (EX-HN3) — 1 minute Slowly press the glabella vertically, then gently lift. Repeat 3 times.
Hegu (LI4) — 1 minute Press both Hegu points simultaneously for about 1 minute until warmth is felt.
Taiyang (EX-HN5) — 1 minute Gently massage both temples in circular motions. 30 seconds × 2 rounds.
Tongqian (BL7) — 1 minute Gently massage the area below the center of the crown in circular motions.
Important notes: The complete routine takes 5-6 minutes. Drinking warm water after massage enhances results. Practice daily for the first 1-2 weeks, then reduce to 3-4 times per week once symptoms improve.
⚠️ Medical Disclaimer: This article is provided for health information purposes and does not replace professional medical diagnosis or treatment. If symptoms persist or are severe, please consult a healthcare professional. Bacterial rhinitis, sinusitis, and allergic rhinitis require comprehensive treatment.
🤰 Pregnancy Warning: Among the acupoints above, Hegu (LI4) may trigger uterine contractions in pregnant women. If you are pregnant or may be pregnant, avoid stimulating Hegu and practice only Yingxiang, Yintang, Taiyang, and Tongqian. If you have concerns, consult a healthcare professional before practicing.
One-line summary: If you apply acupressure to 5 acupoints—LI4, SP6, LR3, BL60, and ST36—for 5 minutes daily, you can promote blood circulation and improve cold hands and feet, fatigue, and numbness.
Blood Circulation Problems: Can Acupoints Be the Answer?
Are your hands and feet cold and heavy, or do you struggle with fatigue all day? Poor blood circulation is common in modern life, but if left untreated, it can worsen your health. In Traditional Chinese Medicine, these blood circulation problems are viewed as “insufficient flow of qi and blood,” and stimulating specific acupoints to improve the flow of meridians is considered important. Acupoint acupressure is a natural therapy that activates the body’s own self-healing power without medication, and has the advantage of being easy to perform anytime, anywhere. In this article, I will introduce in detail 5 of the most effective acupoints for improving blood circulation and how to apply acupressure to them.
5 Effective Acupoints for Improving Blood Circulation
1. Hegu (LI4) — The Representative Acupoint of the Large Intestine Meridian
Location: It is located at the highest point on the back of the hand between the thumb and index finger (between the 1st and 2nd metacarpal bones).
Acupressure Method: Press vertically with the thumb of your opposite hand and hold for 3-5 seconds, then slowly release. Perform 10 times per session, twice daily. Pressure that produces mild discomfort is most effective.
Benefits: Hegu is known as the “universal acupoint” and promotes qi and blood circulation throughout the body. It improves blood circulation and relieves headaches, shoulder tension, and digestive discomfort. It also helps strengthen immunity.
Caution: Pregnant women should avoid this acupoint.
2. Sanyinjiao (SP6) — The Central Point for Blood and Women’s Health
Location: It is located on the inner side of the shin, approximately 10 cm (three finger widths) above the inner ankle bone.
Acupressure Method: Press vertically and firmly with your thumb and hold for 5 seconds. Perform 15 times per session on both sides, and it is most effective when done in the evening.
Benefits: It promotes active blood circulation and improves lower extremity swelling, coldness, and numbness. It is particularly effective at regulating menstrual cycles and relieving menstrual pain, and also helps improve skin health and sleep quality.
Caution: Pregnant women should avoid this acupoint.
3. Taichong (LR3) — The Guardian of Liver Function and Circulation
Location: It is located in the hollow area on the top of the foot between the big toe and second toe, approximately 2 cm above the base of the toes.
Acupressure Method: Press slowly with your thumb while making circular motions. Apply pressure for 20-30 seconds per session, once or twice daily. Apply pressure in a comfortable position without bending your foot.
Benefits: It activates liver function and promotes blood detoxification and circulation. It relieves worsening blood circulation due to stress, headaches, and eye fatigue, and is excellent for emotional stability.
Caution: Pregnant women should avoid this acupoint.
4. Kunlun (BL60) — The Key to Lower Extremity Blood Circulation
Location: It is located in the hollow area between the outer ankle bone and the Achilles tendon. It can be seen on the back of the ankle.
Acupressure Method: Press firmly with your thumb while moving up and down. Apply continuous pressure for approximately 1 minute per session, twice daily. Apply pressure evenly to both ankles.
Benefits: It directly improves blood circulation in the legs and feet. It rapidly relieves cold feet, calf cramps, leg swelling, and lower extremity numbness. It also helps improve lower back pain.
5. Zusanli (ST36) — The Tonic for Immunity and Circulation
Location: It is located on the outer side of the shin, approximately 12 cm (four finger widths) below the knee crease on the outside of the knee.
Acupressure Method: Press vertically with your thumb at a pressure that produces mild discomfort. Repeat for 30 seconds, 3-5 times per session, once or twice daily.
Benefits: It replenishes qi (energy) throughout the body and activates blood circulation. It is excellent for fatigue recovery, strengthening immunity, improving digestion, and stabilizing blood pressure, and is the ideal acupoint for fatigue recovery in those whose work involves prolonged standing or sitting.
5-Minute Self-Acupressure Routine for Improving Blood Circulation
It is more effective when performed at the same time each day. Evening (7 pm–9 pm) is ideal.
Hegu (LI4) — 1 minute Apply pressure alternately to both hands. Repeat 10 times per hand at moderate pressure.
Zusanli (ST36) — 1 minute Apply pressure alternately to both legs for 30 seconds each.
Sanyinjiao (SP6) — 1 minute Apply pressure alternately to the inner side of both ankles, 15 times each.
Taichong (LR3) — 1 minute Apply pressure in circular motions slowly to both feet.
Kunlun (BL60) — 1 minute Finish by applying firm pressure to the back of both ankles.
Tip: If your nails are long, you can use your knuckles or a massage stick instead. After acupressure, drink warm water and get adequate rest.
⚠️ Medical Disclaimer: This article is written for informational purposes and does not replace professional medical diagnosis or treatment. If you have underlying conditions that cause poor blood circulation (such as diabetes, vascular disease, or heart disease), please consult a healthcare professional. If symptoms persist or are severe, please seek treatment from a traditional medicine practitioner or physician.
🤰 Pregnant Women Alert: Among the acupoints listed above, Hegu (LI4), Sanyinjiao (SP6), Taichong (LR3), and Kunlun (BL60) can trigger uterine contractions in pregnant women. If you are pregnant or may be pregnant, please consult a traditional medicine practitioner before proceeding, and use only Zusanli (ST36) or receive professional treatment.