한 줄 요약: 가래를 없애려면 폐 기능을 돕는 열결(LU7), 척택(LU11)과 호흡 중추인 간사(CV17), 족삼리(ST36), 풍문(GV16)을 매일 지압하세요.
도입부
목 안에 가래가 걸려 있는 답답함, 자주 헛기침을 하는 불편함을 경험해본 분들이 많으실 겁니다. 특히 감기 후에는 몇 주간 가래가 남아 스트레스가 되곤 합니다. 한의학에서는 가래를 ‘담(痰)’이라 하며, 폐의 기능 저하와 습한 환경에서 비롯된다고 봅니다. 다행히 혈자리 지압은 폐의 기능을 활성화하고 기도를 깨끗이 하는 데 매우 효과적입니다. 이 글에서 소개하는 5가지 혈자리는 한의학과 현대 침술학에서 가장 널리 인정하는 것들입니다. 약 없이도 손과 손가락만으로 언제든 지압할 수 있어, 회사나 집에서 부담 없이 실천할 수 있습니다.
혈자리 5곳 각각
1. 열결(LU7) — 폐 경맥의 마스터 포인트
WHO 코드: LU7 | 중국명: 列缺 위치: 손목 주름 위쪽 엄지손가락과 검지 사이의 라인을 따라 올라가 팔뚝 안쪽에 위치합니다. 엄지손가락의 맥박이 느껴지는 부위 위쪽입니다. 지압법: 반대쪽 엄지손가락으로 약 10초간 천천히 누르되, 통증을 느낄 정도의 강도로 3-5회 반복합니다. 효과: 폐 경맥의 주요 혈자리로, 가래와 기침을 직접 치료하는 데 가장 효과적입니다. 코막힘, 천식, 감기 증상 완화에도 탁월합니다.
2. 척택(LU11) — 폐의 열을 내리는 응급 혈자리
WHO 코드: LU11 | 중국명: 少商 위치: 손 엄지손가락의 손톱 바깥쪽 모서리(새끼손가락 쪽)에서 약 3mm 떨어진 부위입니다. 지압법: 반대손 손톱으로 살짝 눌러 자극하거나, 손가락 끝으로 원을 그리며 마사지합니다. 하루 2-3회, 각 30초 정도 자극합니다. 효과: 폐의 발열을 내리고 기도의 염증을 완화합니다. 가래가 누렇거나 고름 같을 때 특히 효과적이며, 급성 기침과 목의 통증을 빠르게 완화합니다.
3. 간사(CV17) — 호흡과 기의 중추
WHO 코드: CV17 | 중국명: 膈俞 위치: 가슴 중앙, 양쪽 유두를 연결한 선 위 흉골 중앙입니다. 정확히는 목에서 내려오는 우흉골 사이의 함몰 부위입니다. 지압법: 손가락 관절을 이용해 천천히 3-5분간 원형으로 마사지합니다. 깊지 않게 부드러운 압력을 유지합니다. 효과: 폐와 심장의 기혈을 조절하는 중추 혈자리입니다. 가래로 인한 답답함, 깊은 숨을 쉬기 어려움을 신속히 완화하며, 호흡 기능을 정상화합니다.
4. 족삼리(ST36) — 면역력과 폐 기능을 동시에 강화
WHO 코드: ST36 | 중국명: 足三里 위치: 무릎 바깥쪽, 무릎 아래 오목한 부위에서 손가락 4개 폭 아래쪽입니다. 정강이뼈 바깥쪽 가장자리를 따라 내려오면 쉽게 찾을 수 있습니다. 지압법: 엄지손가락으로 10-15초간 꾹 누르고, 10초 쉬고를 반복합니다. 하루 1-2회, 한쪽 다리에 5분 정도 지압합니다. 효과: 면역계를 활성화하는 가장 유명한 혈자리입니다. 가래의 근본 원인인 면역 저하를 개선하고, 감기 예방과 회복을 촉진합니다. 소화 기능도 함께 개선됩니다.
5. 풍문(GV16) — 목과 머리의 기혈 순환을 돕는 혈자리
WHO 코드: GV16 | 중국명: 風府 위치: 목 뒤 중앙, 머리 뒤쪽 목뼈 아래 오목한 부위입니다. 귀 뒤 목 라인을 따라 아래로 내려오면 찾을 수 있습니다. 지압법: 양손 손가락 끝으로 가볍게 원을 그리며 3-5분간 마사지합니다. 목 근육이 이완될 때까지 천천히 진행합니다. 효과: 목의 경직을 풀고 기도 주변의 기혈 순환을 개선합니다. 가래로 인한 답답함을 빠르게 완화하고, 목감기와 인후통을 치료합니다.
5분 셀프 지압 루틴
바쁜 아침이나 저녁에 5분만 투자하면 충분합니다. 다음 순서로 진행하세요:
열결(LU7) — 1분 양쪽 손목을 엄지손가락으로 각각 30초씩 지압합니다. 폐 기능의 문을 여는 첫 번째 단계입니다.
척택(LU11) — 30초 양쪽 엄지손가락을 손톱 가장자리에서 살살 자극합니다. 가래의 열을 빠르게 내립니다.
간사(CV17) — 1분 가슴 중앙을 손가락 관절로 원을 그리며 마사지합니다. 깊은 호흡을 의식하면서 진행합니다.
족삼리(ST36) — 1분 30초 양쪽 무릎 아래를 각각 45초씩 지압합니다. 앉아서 편하게 진행할 수 있습니다.
풍문(GV16) — 1분 목 뒤를 부드럽게 마사지하며 마무리합니다. 이 시점에서 호흡이 훨씬 편해질 것을 느낄 수 있습니다.
팁: 매일 같은 시간에 같은 순서로 지압하면 신체가 패턴을 인식해 더 빠른 반응을 보입니다. 저녁 취침 전이 가장 이상적입니다.
⚠️ 의료 면책조항: 이 글은 건강 정보 제공 목적으로 작성되었으며, 전문적인 의료 진단이나 치료를 대체하지 않습니다. 증상이 지속되거나 심한 경우 반드시 의료 전문가와 상담하세요.
한 줄 요약: 발바닥 통증(족저근막염)은 곤륜·용천·족삼리 등 5개 혈자리의 지압으로 혈액 순환 개선과 통증 완화가 가능하며, 하루 2회 5분 루틴으로 꾸준히 관리하면 효과적입니다.
발바닥 통증, 왜 발생하고 왜 혈자리 지압이 도움될까요?
아침에 일어나 첫 발을 디딜 때 느껴지는 발바닥의 찌릿한 통증, 하루 종일 서 있는 직업군에게는 만성적인 불편함이 됩니다. 이를 족저근막염이라 하는데, 발 아치를 지지하는 근막에 염증이 생겨 통증이 발생합니다. 한의학에서는 발바닥 통증을 “기혈 순환 부족”으로 봅니다. 발은 우리 몸의 축소판이라 불릴 정도로 많은 경혈이 집중되어 있으며, 특정 혈자리를 자극하면 혈액 순환을 촉진하고 기의 흐름을 원활하게 하여 통증 완화와 자연 치유력 강화가 가능합니다.
발바닥 통증 완화의 5대 혈자리
1. 곤륜(崑崙, BL60) — 발 통증의 명약
위치: 발의 바깥쪽, 발목 뒤 복숭아뼈와 아킬레스건 사이의 움푹한 부분입니다. 발목을 돌려봤을 때 가장 튀어나온 뼈(외측 복숭아뼈) 뒤쪽입니다.
지압법: 엄지손가락으로 위아래로 문지르거나 원형으로 30초 정도 자극합니다. 약간 아프면서 시원한 느낌이 들 정도가 적당합니다. 양발 모두 3-5분씩 시행합니다.
효과: 족저근막염뿐 아니라 발 전체의 통증, 발목 통증, 요통 완화에 효과적입니다. 혈액 순환을 촉진해 발의 부종과 피로를 덜어줍니다.
2. 용천(涌泉, KI1) — 발바닥 통증의 직접 치료점
위치: 발바닥의 중앙, 발가락을 구부렸을 때 보조개가 생기는 지점입니다. 발의 1/3 지점에 위치합니다.
지압법: 엄지손가락으로 위에서 아래로 누르면서 동시에 원을 그리듯 자극합니다. 강한 압력보다는 꾸준한 자극이 중요합니다. 양발 각각 3-5분 시행합니다.
효과: 발바닥 전체의 혈액 순환을 개선하고, 족저근막에 직접적인 영양 공급을 촉진합니다. 발의 피로 회복과 통증 완화에 가장 직접적인 효과를 제공합니다.
3. 족삼리(足三里, ST36) — 전신 면역력과 혈액순환
위치: 무릎 바로 아래, 바깥쪽 오목한 부분에서 손가락 4개 너비만큼 아래에 위치합니다. 정확히는 무릎 외측 경혈(눈)에서 손가락 3개 아래입니다.
지압법: 엄지손가락이나 볼펜 끝으로 수직으로 눌렀다 떼기를 반복합니다. 약간 통증이 느껴질 정도의 압력으로 양쪽 다리 각각 3-5분씩 시행합니다.
One-line summary: Stimulating 5 acupoints—Neiguan, Shenmen, Taichong, Hegu, and Dazhui—can quickly relieve panic disorder symptoms including heart palpitations, anxiety, and shortness of breath.
Panic Disorder and the Effects of Acupoint Acupressure
Sudden heart palpitations, a suffocating sensation, overwhelming fear of dying—the suffering of those experiencing panic disorder is very real. While modern medical treatment is important, acupoint stimulation from Traditional Chinese Medicine, proven over thousands of years, can provide rapid calming effects during acute symptom episodes. In particular, acupoints like Neiguan and Shenmen are very effective at stabilizing both mind and body, and regulating excessive nervous system responses. By managing acupoints through acupressure before stress and anxiety accumulate, you can significantly reduce the frequency and intensity of panic attacks.
5 Effective Acupoints for Panic Disorder Relief
1. Neiguan (內關) — PC6 (Pericardium 6)
Location: On the inner forearm, in the slight depression between two tendons about 2cm above the wrist crease toward the elbow.
Technique: Apply slow, steady pressure with your thumb for 5 seconds, then release for 5 seconds. A slight tenderness (tender point sensation) is appropriate. Repeat for 1 minute.
Effects: Neiguan is the most important acupoint for stabilizing the heart and calming the spirit. It quickly relieves anxiety, heart palpitations, nausea, and insomnia. This is the first acupoint to press during or in anticipation of a panic attack.
2. Shenmen (神門) — HT7 (Heart 7)
Location: Located at the wrist crease on the pinky finger side. It is the slight depression when the wrist is flexed.
Technique: Gently massage with your thumb in circular motions for 2-3 minutes. Avoid pressing too hard; a comfortable sensation is ideal.
Effects: Shenmen means “the gate of the spirit,” and it addresses emotional unrest, insomnia, poor memory, and heart palpitations. Pressing it at night promotes better sleep, and stimulating it before stressful situations enhances psychological stability.
3. Taichong (太衝) — LR3 (Liver 3)
Location: On the top of the foot, in the depression between the first and second metatarsal bones, about 2cm up from the ankle toward the toes.
Technique: Press firmly with your thumb for 5-10 seconds, then release. A slight soreness is normal. Apply for 1 minute on each foot.
Effects: It normalizes liver function and relieves tension caused by stress. It improves throat discomfort, chest tightness, and irritability that appear in panic disorder. It also excels at emotional stabilization and anger management.
4. Hegu (合谷) — LI4 (Large Intestine 4)
Location: In the depression on the palm side between the thumb and index finger where the two bones meet.
Technique: Press firmly with the opposite thumb, maintaining a pressure level where slight soreness is felt (7-8/10 intensity) for 1-2 minutes. Apply to both hands.
Effects: It relieves overall body tension and stress-related pain (neck, shoulders, head). It boosts immunity and calms excessive nervous system responses. It quickly alleviates body stiffness and muscle pain caused by panic disorder. (Pregnant women must consult a professional.)
5. Dazhui (大椎) — GV14 (Governing Vessel 14)
Location: When bending the neck forward, it is in the slight depression just below the most prominent cervical vertebra (7th cervical vertebra).
Technique: Sit and reach your opposite hand around the back of the neck. Slowly press with your thumb or two fingers (index and middle) for 2-3 minutes. It is more effective with assistance from another person.
Effects: It promotes stability of the entire nervous system and strengthens immunity. It enhances bodily resistance weakened by stress and improves chronic fatigue and nervous irritability. It is effective at reducing the fundamental cause of panic disorder—nervous sensitivity.
5-Minute Self-Acupressure Routine
Every morning or evening, or when you feel panic symptoms, proceed in this order:
Neiguan (PC6) — 1 minute: 30 seconds on each arm. Apply slow pressure while breathing deeply.
Shenmen (HT7) — 1 minute: 30 seconds on each hand. Massage in circular motions at a comfortable intensity.
Taichong (LR3) — 1 minute: 30 seconds on each foot. Apply firm pressure.
Hegu (LI4) — 1 minute: 30 seconds on each hand. Stimulate with the strongest pressure.
Dazhui (GV14) — 1 minute: Massage slowly in circular motions at the back of the neck.
Tip: Combining deep breathing activates the parasympathetic nervous system, doubling the relaxation effect. It is good to rest for 10-15 minutes after acupressure.
⚠️ Medical Disclaimer: This article is written for informational health purposes and does not replace professional medical diagnosis or treatment. Panic disorder requires medical diagnosis and appropriate treatment, so if symptoms persist or are severe, consult a psychiatrist or healthcare professional. Acupoint acupressure should be used only as a complementary aid to medical treatment.
🤰 Pregnancy Warning: Among the acupoints listed above, Hegu (LI4), Taichong (LR3), and some acupoints with bleeding risk may trigger uterine contractions in pregnant women. If you are pregnant or may be pregnant, consult a Traditional Chinese Medicine practitioner or obstetrician before applying these techniques.
One-line summary: Pressing five acupoints—ST36, ST40, LI4, SP6, and CV9—for 5 minutes daily improves metabolism and digestive function, helping with weight management.
Introduction
Weight management is one of the most common concerns for people today. If you’ve tried various diets but found their effects limited, try acupressure using traditional medicine acupoints. In Eastern medicine, obesity is viewed as a metabolic slowdown caused by “phlegm accumulation” (accumulation of dampness and phlegm). Stimulating specific acupoints can activate digestive function, improve energy circulation in the body, and naturally regulate appetite. The five acupoints introduced in this article are the areas most commonly used in traditional medicine clinics for weight management treatment. Since you can practice using only your fingers anytime, anywhere without complicated equipment, try starting today.
Five Acupoints Effective for Weight Management
1. ST36 (Zusanli)
Location: Below the outer side of the knee, approximately four finger-widths below the depression beside the tibia (shinbone). When the knee is bent, it is located approximately 10cm below the indentation beside the knee (ST36 point) in the direction toward the ankle.
Acupressure technique: Press slowly with your thumb, maintaining pressure for 3-5 seconds. Repeat 3-5 times, gradually releasing pressure as you exhale. Avoid pressing too hard; a pressure level that creates a mild soreness is appropriate.
Benefits: ST36 is known as the “longevity acupoint” because it promotes overall health. It particularly strengthens digestive function, promotes metabolism, and enhances immunity. Regular acupressure increases basal metabolic rate, aiding weight loss.
2. ST40 (Fenglong)
Location: On the outer side of the tibia, at the midpoint between the highest bone on the outer ankle (lateral malleolus) and the knee. Find it by tracing the tibia in the center of the outer calf.
Acupressure technique: Press vertically with your thumb or middle finger, maintaining pressure for 5 seconds, then slowly release. Repeat this 5-10 times. If it’s difficult to press with one hand, overlapping your thumbs from both hands is more effective.
Benefits: ST40 is also known as the “obesity acupoint.” It removes phlegm accumulation, normalizes spleen and stomach function, and improves digestive disorders and abdominal bloating. Additionally, it promotes metabolism and directly helps reduce body fat.
3. LI4 (Hegu)
Location: In the webbing between the thumb and index finger (on the back of the hand), at the highest point where the bones meet. It’s easy to find by facing your palm down and spreading your thumb and index finger.
Acupressure technique: Press slowly with the thumb of your opposite hand, applying pressure as if penetrating about 1cm deep. Press for 3-5 seconds and slowly release. Repeat 5-10 times on both sides.
Benefits: LI4 is a powerful acupoint that promotes energy circulation throughout the body. It accelerates metabolism, reduces overeating caused by stress, and improves digestive function. It is also effective for improving constipation. (⚠️ Avoid if pregnant)
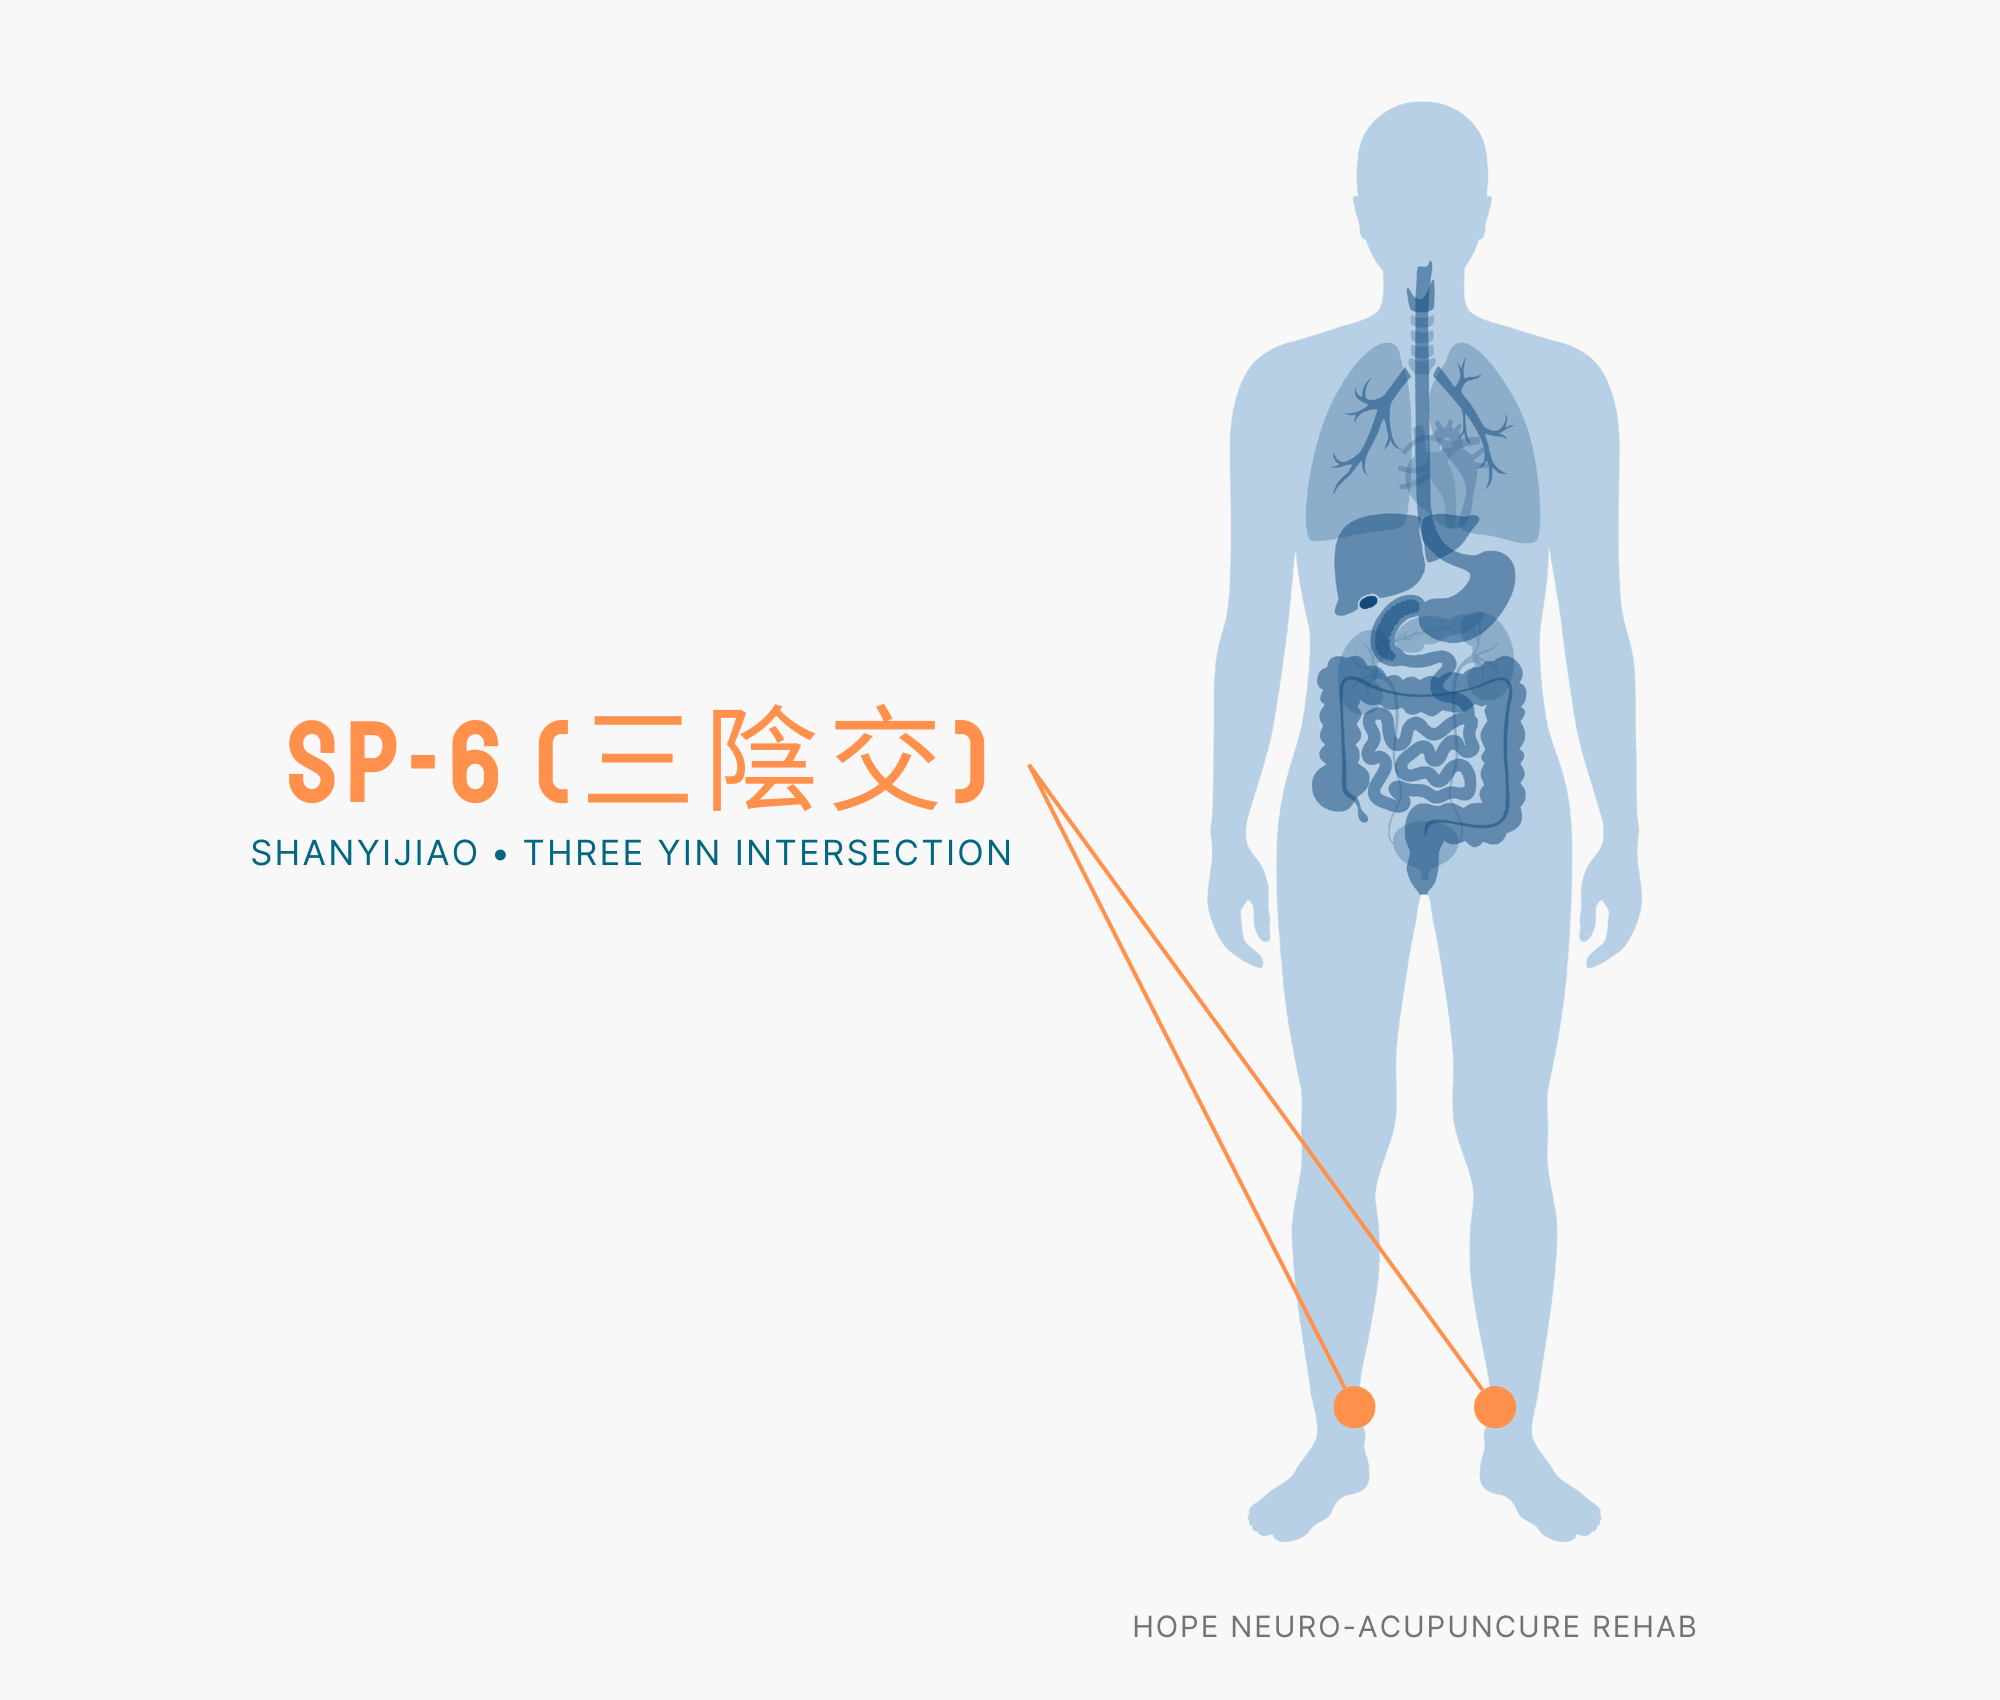
4. SP6 (Sanyinjiao)
Location: At a point approximately four finger-widths (about 10cm) above the highest bone on the inner ankle (medial malleolus), in the direction toward the toes. Find it by tracing the inner edge of the tibia.
Acupressure technique: Press gently with your thumb, maintaining pressure with a slight downward sensation. Press for 3-5 seconds while exhaling, then slowly release while inhaling. Repeat 5-10 times on each side.
Benefits: SP6 is an important acupoint that regulates the function of the spleen, liver, and kidneys. It strengthens digestive function, balances hormones to improve swelling, and promotes metabolism. It is particularly effective for weight concentrated in the abdominal area. (⚠️ Avoid if pregnant)
5. CV9 (Shuifen)
Location: It is on the midline (centerline of the body) above the navel, at a point approximately two finger-widths (about 1.5-2cm) above the navel. It’s easy to find by lying down and feeling above the navel.
Acupressure technique: It’s best to apply acupressure while lying down in a relaxed state. Gently press with your thumb or middle finger, then repeat slowly applying pressure. Avoid pressing hard; apply pressure at a level where warmth is transmitted for 3-5 minutes.
Benefits: CV9 is an acupoint that regulates water metabolism in the abdomen, excelling at improving abdominal bloating and swelling. It also strengthens digestive function and promotes metabolism, directly helping to improve abdominal obesity.
5-Minute Self-Acupressure Routine
Recommended daily sequence and time allocation:
LI4 – 30 seconds each side (1 minute total)
→ Awakens blood circulation when you wake up in the morning
ST36 – 40 seconds each side (1 minute 20 seconds total)
→ 30 minutes after meals or before meals to promote digestion
ST40 – 40 seconds each side (1 minute 20 seconds total)
→ Key point for weight management; allocate sufficient time
SP6 – 30 seconds each side (1 minute total)
→ Stabilizes hormones in the evening
CV9 – 1 minute
→ Finish slowly while lying down before bed
Tip: If you don’t have time, pressing only ST36 and ST40 30 minutes after meals is also effective. Doing acupressure at the same time daily helps build the habit. If your fingers are tired, you can also use an acupressure stick or massage tool.
⚠️ Medical Disclaimer: This article is written for informational purposes and does not replace professional medical diagnosis or treatment. Acupressure is a complementary therapy; for weight loss, always combine it with a balanced diet and regular exercise. If symptoms persist, are severe, or if you have other conditions, consult with a medical professional (doctor or traditional medicine practitioner).
🤰 Pregnancy Warning: Of the acupoints above, LI4 and SP6 may trigger uterine contractions in pregnant individuals. If you are pregnant or potentially pregnant, consult with a specialist (traditional medicine practitioner or obstetrician) before proceeding. For safety, it is recommended to press only ST36, ST40, and CV9.
Quick Summary: Nausea can be quickly relieved by acupressure at 5 key acupoints — Neiguan, Fengchi, Hegu, Zusanli, and Sanyinjiao — which improve circulation and normalize stomach function.
Introduction
Sudden nausea disrupts daily life and causes physical discomfort. It can stem from various causes including motion sickness, indigestion, stress, and migraines. Many people prefer natural methods to ease symptoms rather than relying on medication. In traditional Chinese medicine, nausea is understood as an imbalance in the body’s qi and blood circulation. By stimulating specific acupoints, we can normalize stomach function and alleviate digestive symptoms. Western medicine has also clinically proven that stimulating acupoints on the wrist effectively reduces nausea. This article introduces 5 essential acupoints for quick nausea relief and the correct acupressure techniques.
5 Acupoints Explained
1. Neiguan (PC6) — The Nausea-Fighting Champion
Location: On the inner side of the wrist, located between two tendons approximately 3cm above the wrist crease in the direction of the elbow. Press gently on the wrist with your finger to find the hollow depression.
Acupressure Method: Using your thumb, slowly press and release over 3–5 seconds, repeating this motion. Stimulate each wrist for 1–3 minutes, 2–3 times daily. You can also stimulate immediately whenever you feel nausea.
Benefits: It directly acts on the Pericardium meridian, stabilizing the nervous system and promoting stomach movement. Airlines and hospitals recognize this point for its immediate nausea relief. It’s effective for pregnancy-related nausea, motion sickness, and nausea from indigestion.
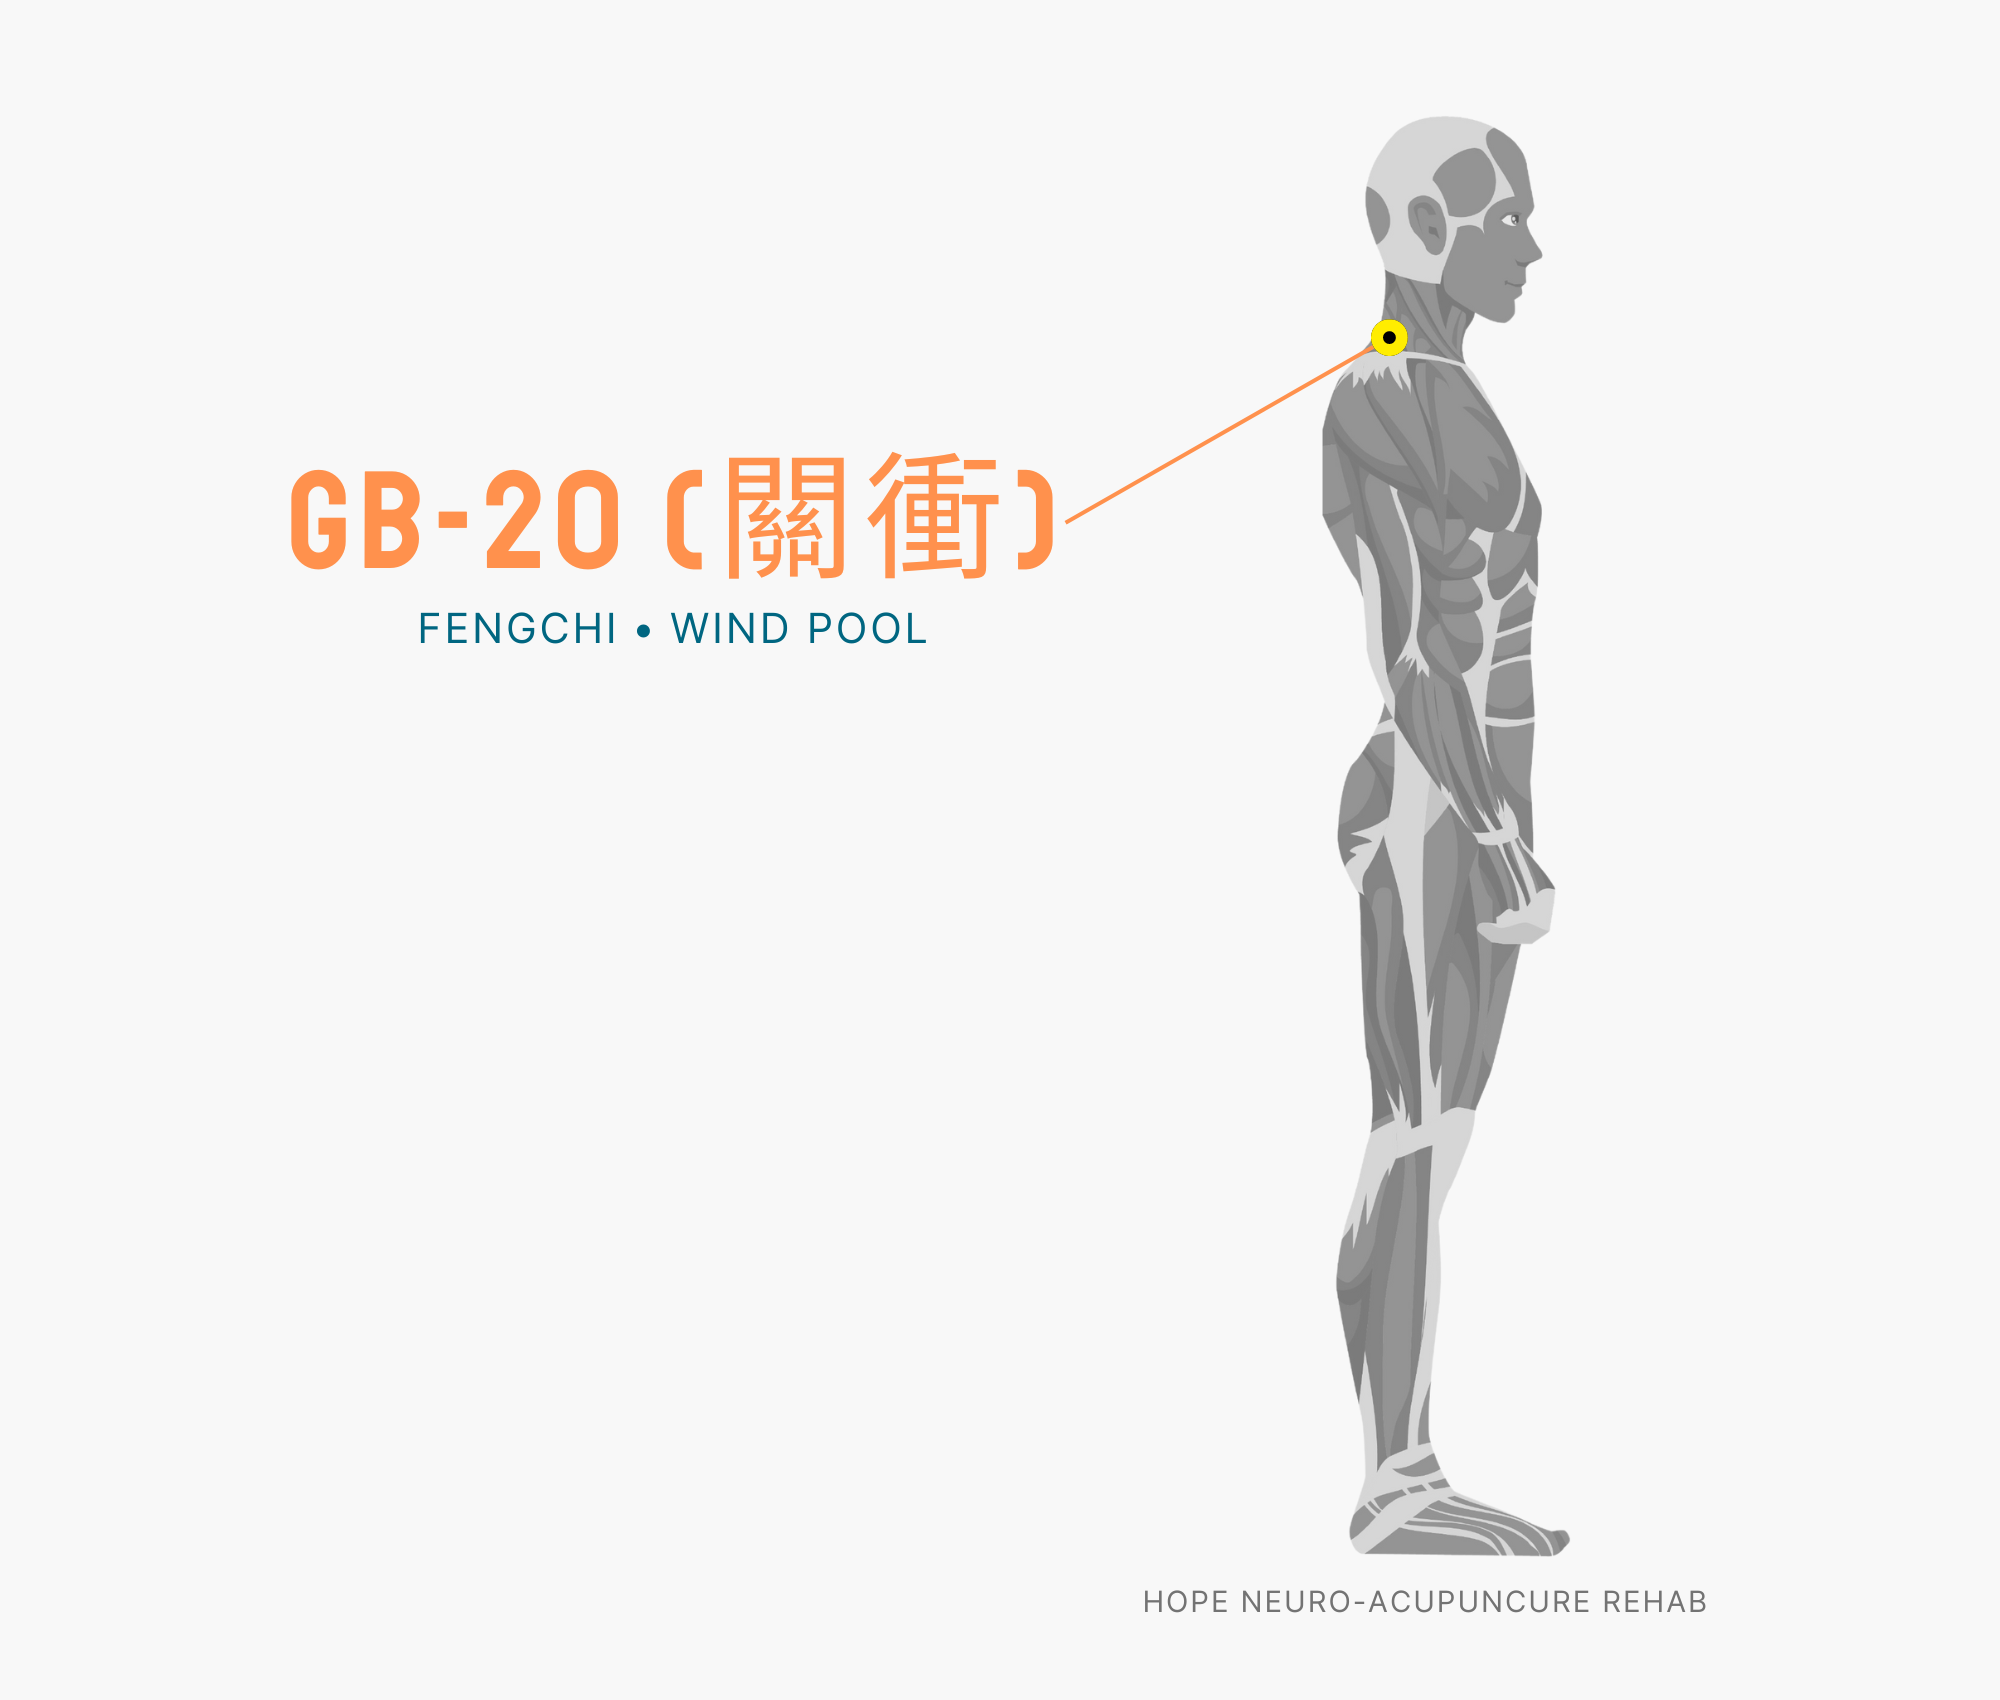
2. Fengchi (GB20) — Improves Brain Circulation
Location: At the back of the neck, on both sides where the base of the skull meets the neck. It’s located about 1.5cm inward from the boundary between the neck and scalp when the head is tilted back.
Acupressure Method: Using both thumbs, gently massage in circular motions for 1–3 minutes. Apply gentle pressure without pain and avoid excessive force on the neck.
Benefits: Increases blood flow to the brain, relieving both dizziness and nausea simultaneously. Particularly effective for migraine-related nausea and stress-induced queasiness. It also relieves cervical tension and promotes natural recovery.
3. Hegu (LI4) — Promotes Overall Body Energy Circulation
Location: At the highest point of the fleshy area between the thumb and index finger. When the thumb and index finger are brought together, a small muscle protrudes on the back of the hand — this is Hegu.
Acupressure Method: Using the opposite thumb, press slowly while maintaining slight tenderness. Apply pressure to each hand for 1–2 minutes. Stimulating both hands is more effective. Repeat 2–3 times daily.
Benefits: Connected to the Large Intestine meridian (digestive system), it promotes stomach function and overall body energy circulation. It comprehensively improves nausea along with indigestion and constipation.
⚠️ Pregnancy Caution: Hegu can trigger uterine contractions in pregnant women. If you are pregnant or may be pregnant, consult a healthcare professional before stimulating this point.
4. Zusanli (ST36) — The Key to Digestive System Strengthening
Location: Below and outside the knee, approximately 10cm (about 4 finger widths) below the knee crease. It’s located on the muscle beside the outer bone of the calf. You’ll feel a slight hollow when pressing your finger.
Acupressure Method: Using your thumb or knuckle, press slowly or massage in circular motions. Stimulate each leg for 2–3 minutes. Applying pressure to both legs is more effective. Evening stimulation also promotes better sleep.
Benefits: The most important acupoint for strengthening digestive function. It activates peristalsis of the stomach and enhances digestive capacity. It improves not only nausea but also diarrhea, constipation, and general digestive discomfort. It also boosts immunity, making it valuable to stimulate regularly.
5. Sanyinjiao (SP6) — The Whole-Body Harmony Acupoint
Location: On the inner side of the ankle, approximately 10cm (about 4 finger widths) above the inner ankle bone (medial malleolus), just behind the shinbone. It’s located in the hollow area behind the inner edge of the tibia.
Acupressure Method: Using your thumb, press slowly or stimulate in circular motions. Apply pressure to each leg for 1–2 minutes, stimulating both legs. Evening or pre-sleep stimulation can promote better sleep and faster symptom improvement.
Benefits: Located at the meeting point of the three Yin meridians (Liver, Spleen, and Kidney), it harmonizes the body’s yin energy. It comprehensively improves nausea from digestive imbalance, stress-related queasiness, and menstruation-related nausea.
⚠️ Pregnancy Caution: Sanyinjiao can trigger uterine contractions in pregnant women. If you are pregnant or may be pregnant, consult a healthcare professional before stimulating this point.
5-Minute Self-Acupressure Routine
When to Do It: Perform this routine immediately when you feel nausea, or 2–3 times daily after meals (morning, lunch, and evening) for symptom prevention.
5-Minute Routine Order and Time Allocation:
Neiguan (PC6) — 1 minute 30 seconds Slowly press each wrist for 1–2 minutes. Start with this point as it delivers the fastest relief.
Fengchi (GB20) — 1 minute Massage both sides for 30 seconds each in circular motions. Relieve neck tension while improving brain circulation.
Hegu (LI4) — 50 seconds Press each hand for 25 seconds. (Skip if pregnant)
Zusanli (ST36) — 1 minute 30 seconds Apply pressure to each leg for 45 seconds. Allocate sufficient time to strengthen the digestive system.
Sanyinjiao (SP6) — 30 seconds Gently stimulate each leg for 15 seconds. (Skip if pregnant)
Tip: With each acupoint, take a deep breath in and exhale slowly. Combining breathing with acupressure enhances relaxation and speeds up nausea relief. Drinking warm water before the routine boosts blood circulation.
⚠️ Medical Disclaimer: This article is provided for informational purposes only and is not a substitute for professional medical diagnosis or treatment. If symptoms persist or worsen, consult a healthcare professional. If you have serious medical conditions or are taking medications, consult your doctor before stimulating acupoints.
🤰 Pregnancy Caution: Among the acupoints listed above, Hegu (LI4) and Sanyinjiao (SP6) can trigger uterine contractions in pregnant women. If you are pregnant or may be pregnant, consult a healthcare professional before proceeding. Neiguan (PC6) and Fengchi (GB20) are safe for pregnant women to use.
One-line summary: Muscle pain can be relieved by applying acupressure to five points—Kunlun (BL60), Ashi (EX-B2), Fengchi (GB20), Hegu (LI4), and Sanyinjiao (SP6)—to promote blood circulation and reduce muscle tension.
Introduction
Muscle pain from repetitive work, post-exercise fatigue, and poor posture is a common complaint among modern people. When pain occurs, people often rely on medication or rest, but our bodies already have natural therapeutic points to relieve muscle pain—acupoints. Acupoints are specific locations along meridians that, when properly pressed, stimulate nearby muscles and the nervous system to promote blood circulation and release muscle tension. This article introduces the 5 most effective acupoints for muscle pain relief and how to apply acupressure to them.
Five Acupoints: Location, Acupressure Method, and Benefits
1. Kunlun (BL60) — Outer Side of the Ankle
Location: The outer side of the ankle, in the depression between the lateral malleolus and the Achilles tendon. The WHO standard code is BL60 (Bladder 60).
Acupressure method: Locate Kunlun with your thumb or middle finger, then press for 5-10 seconds while slowly exhaling. Repeat 10 times, 3-5 times daily.
Benefits: Particularly effective for muscle pain in the legs and lower back, and lower body fatigue. It promotes blood circulation to relieve muscle stiffness and helps alleviate nerve pain.
2. Ashi (EX-B2) — Tender Points on Shoulders and Back
Location: Acupoints distributed across the shoulders and entire back. Rather than a specific precise location, it’s important to find the tender point (the spot that hurts when pressed) in the area where you feel muscle pain. The WHO code is EX-B2 (Intervertebral Acupoint).
Acupressure method: Find the painful area with your fingers or thumb, then massage slowly in circular motions. Continue for at least 5 minutes at a pressure level where you feel mild discomfort.
Benefits: Provides immediate relief for tension-related muscle pain in the neck and shoulders, and back pain from office work syndrome. It also alleviates radiating pain caused by nerve stimulation.
3. Fengchi (GB20) — Depression at the Back of the Neck
Location: The back of the neck, in the depression where the skull meets the cervical spine. It’s the point located below both ears and at the back of the neck where you feel a deep indentation when touching. The WHO code is GB20.
Acupressure method: Place both thumbs on Fengchi and press for 10-20 seconds while slowly exhaling. Repeat 5-10 times, 3-4 times daily.
Benefits: Relieves both neck muscle pain and tension headaches. Promotes blood circulation in the posterior cervical region to release nervous system tension.
4. Hegu (LI4) — Between Thumb and Index Finger
Location: The area where the thumb and index finger meet on the hand, where the muscle bulges most prominently. The precise location is where you feel tenderness when pressing with the opposite thumb. The WHO code is LI4.
Acupressure method: Locate Hegu with the opposite thumb and massage slowly in circular motions. Apply moderate pressure (slightly tender sensation) for 3-5 minutes, 2-3 times daily.
Benefits: Effective for relieving whole-body muscle pain and particularly helpful for releasing upper body muscle tension. It also helps strengthen immune function and reduce stress.
5. Sanyinjiao (SP6) — Above the Inner Ankle
Location: A point approximately four finger widths (about 10 cm) above the inner ankle bone (medial malleolus), following the inner edge of the tibia. The WHO code is SP6.
Acupressure method: Locate Sanyinjiao with your thumb and press slowly for 5-10 seconds. Repeat 10 times, twice daily (morning and evening).
Benefits: Alleviates lower body muscle pain, leg fatigue, and numbness. It also promotes whole-body blood circulation to support muscle recovery.
5-Minute Self-Acupressure Routine
A 5-minute routine to effectively manage muscle pain even during a busy day.
Step 1 (1 minute): Press Fengchi on both sides—relieves neck and shoulder tension
Step 2 (1 minute): Press Hegu on both sides—promotes whole-body qi and blood circulation
Step 3 (1.5 minutes): Massage Ashi points (shoulders and back)—focused treatment of localized pain areas
Step 4 (1 minute): Press Kunlun on both sides—improves lower body circulation
Step 5 (0.5 minutes): Press Sanyinjiao on both sides—finish
Tip: For better results, perform this routine twice daily—once in the morning and once in the evening. If done after a warm bath, muscles will be more relaxed and the acupressure effect will be enhanced.
⚠️ Medical Disclaimer: This article is provided for informational purposes and does not replace professional medical diagnosis or treatment. If symptoms persist or are severe, especially if the muscle pain is due to injury or is severe pain, please consult a healthcare professional.
🤰 Pregnancy Warning: Among the acupoints mentioned above, Hegu (LI4) and Sanyinjiao (SP6) can trigger uterine contractions in pregnant women. If you are pregnant or possibly pregnant, please consult a professional before performing acupressure.
한 줄 요약: 코막힘은 영향, 인당, 통천, 풍지, 합곡 5개 혈자리를 하루 2-3회 지압하면 비강 혈액순환을 개선해 호흡이 빨리 트입니다.
도입부
환절기나 감기로 인해 코막힘을 경험하면 정말 불편합니다. 코가 막혀 있으면 수면도 방해받고, 집중력도 떨어지고, 일상생활의 질이 급격히 저하됩니다. 특히 약물에 의존하고 싶지 않거나, 알레르기 비염으로 장기간 코막힘에 시달리는 분들이라면 자연적인 해결 방법을 찾고 계실 것입니다.
한의학에서는 코막힘을 비강 주변의 기혈 순환 부진으로 봅니다. 코 주변과 얼굴, 목에 분포된 특정 혈자리를 자극하면 혈액순환을 촉진하고 염증 반응을 완화시켜 코 호흡을 자연스럽게 개선할 수 있습니다. 이 글에서 소개하는 5개의 혈자리는 임상에서 코막힘 완화 효과가 검증된 것들로, 손가락으로 간단히 자극할 수 있어 언제 어디서나 셀프 지압이 가능합니다.
코막힘 완화를 위한 5가지 혈자리
1. 영향(LI20) — 코 막힘의 대표 혈자리
위치: 콧구멍 바깥쪽, 콧옆주름이 끝나는 지점 (양쪽 총 2개)
지압법: 검지나 중지 끝마디로 콧구멍 옆을 수직으로 밀어 올리듯이 10초 정도 눌렀다 떼기를 5회 반복합니다. 코막힘이 심할 때는 원을 그리듯 부드럽게 마사지해도 좋습니다.
효과: 영향은 ‘얼굴의 영역’이라는 뜻으로, 코에 가장 가까운 혈자리입니다. 한의학적으로 대장경(手陽明大腸經)에 속하며 코 점막의 충혈을 빼고 비강 통로를 넓혀줍니다. 감기 초기 콧물과 코막힘에 즉각적인 효과를 기대할 수 있는 가장 효율적인 혈자리입니다.
2. 인당(EX-HN3) — 미간의 신비로운 혈자리
위치: 두 눈썹 사이의 중앙, 즉 미간 (1개)
지압법: 검지와 중지를 모아서 미간을 수직으로 천천히 눌러 30초 정도 지그시 압력을 유지한 후 천천히 손을 떼세요. 이를 3-4회 반복합니다.
효과: 인당은 독맥(督脈)과 얼굴의 여러 경락이 만나는 특별한 혈자리입니다. 코와 눈 주변의 혈액순환을 크게 개선하여 코막힘 해소뿐 아니라 두통, 피로감 완화에도 탁월합니다. 뇌로 가는 혈류를 증가시켜 집중력 회복에도 효과적입니다.
3. 통천(BL7) — 이마의 통로를 여는 혈자리
위치: 미간에서 약 1.5cm 위, 이마 중앙 (1개) 또는 미간에서 1.5cm 좌우로 (2개 해석도 있음)
지압법: 엄지손가락 끝으로 천천히 누르면서 30초간 유지하고 천천히 떼기를 3-4회 반복합니다. 약간의 통증이 느껴질 정도가 적당합니다.
효과: 방광경(足太陽膀胱經)에 속한 통천혈은 ‘통(通)’자처럼 막혀있는 것을 뚫어주는 역할을 합니다. 특히 알레르기성 비염으로 인한 코막힘에 효과적이며, 후각 신경 자극을 통해 코 감각을 회복시켜줍니다.
4. 풍지(GB20) — 목 뒤의 숨겨진 강력한 혈자리
위치: 목 뒤 머리 뼈 밑, 우뚝 솟은 두 개의 근육 사이 움푹한 곳 (양쪽 총 2개)
지압법: 양손 엄지손가락으로 동시에 5초 누르고 2초 쉬기를 5회 반복합니다. 목 근육이 이완되도록 천천히 원을 그리며 마사지하는 것도 좋습니다.
효과: 풍지는 ‘바람이 모이는 곳’이라는 뜻으로, 한의학에서 말하는 풍사(바람 사기)를 몰아내는 최고의 혈자리입니다. 목 근육의 긴장을 풀어 비강으로의 혈류를 개선하고, 감기의 초기 증상 예방에도 탁월합니다.
5. 합곡(LI4) — 전신 기혈을 소통시키는 만능 혈자리
위치: 엄지손가락과 검지손가락이 만나는 오목한 부분 (양쪽 총 2개)
지압법: 반대쪽 엄지손가락으로 아프다고 느껴질 정도로 천천히 누르고 있다가 30초 후 떼세요. 이를 양손 모두 3회 반복합니다. 처음에는 약하게 시작해 점진적으로 강도를 높입니다.
효과: 합곡은 ‘만능 혈자리’로 불리는 대장경(手陽明大腸經)의 대표 혈자리입니다. 얼굴과 코 주변의 혈액순환을 개선하고, 면역력 강화로 감기 예방과 코막힘 해소에 모두 효과적입니다. 전신의 기혈 소통을 돕기 때문에 우리 몸 전체의 자연치유력을 높입니다.
5분 셀프 지압 루틴 — 효과적인 순서와 시간 배분
준비 (30초): 편안한 자세로 앉거나 누우세요. 손을 따뜻하게 비벼 혈액순환을 돕습니다.
Step 1: 영향 (60초) 콧구멍 양옆을 총 20회 지압합니다. (좌우 각 10회, 회당 3초)
One-Line Summary: Tension and anxiety arise from nerve sensitivity, heart instability, and qi stagnation. Pressing the LI4, HT7, LR3, BL60, and SP6 acupoints calms the nervous system and lowers stress hormones, bringing peace of mind within 5 minutes.
Why Does Tension Arise and How Can Acupoints Help?
Many of us have experienced our hearts sinking and our palms sweating before presentations, meetings, or exams. This is tension and anxiety. In traditional medicine, tension and anxiety are seen as stemming from three types of imbalance.
Heart-Spirit (Shen) Instability: When the Heart (Shen), which governs the mind, becomes unstable, it causes anxiety, restlessness, and heart palpitations.
Liver Qi Stagnation: When stress blocks the Liver’s energy flow, it results in muscle tension, chest oppression, and nervousness.
Nervous System Sensitivity: When the sympathetic nervous system becomes overactive, breathing becomes shallow and the body becomes tense.
Acupoint pressure stimulates meridian points to facilitate energy flow, calm the nervous system, and balance the autonomic nervous system. You can experience immediate mental and physical calm without medication.
The 5 Best Acupoints for Relieving Tension and Anxiety
1️⃣ Hegu (LI4) — The ‘Emergency Calm Button’
Location: In the webbing between the thumb and index finger, at the deepest point of the valley between them on the back of the hand.
Pressure Technique: Using the opposite thumb, apply circular pressure slowly for 3-5 minutes. Start gently and gradually increase pressure while maintaining a tender pain level.
Effects: Hegu is the ‘master point for nerve tension.’ It lowers the stress hormone cortisol and releases physical tension most quickly. It also alleviates headaches, shoulder stiffness, and facial heat sensations.
2️⃣ Shenmen (HT7) — The ‘Gate of the Mind’
Location: On the inner side of the wrist, about 0.5cm toward the pinky finger from the wrist crease, in a small depression. It’s at the pinky-side end of the inner wrist when the hand is open.
Pressure Technique: Using the opposite thumb, apply gentle circular pressure for 2-3 minutes. Press slowly until you feel your heartbeat stabilizing.
Effects: This is the most effective acupoint for calming the Heart-Spirit. It quickly soothes anxiety, restlessness, and insomnia, restoring mental peace.
3️⃣ Taichong (LR3) — The ‘Liver Energy Release Point’
Location: On the top of the foot, in the valley between the big toe and second toe, about 2cm up from the ankle toward the toes.
Pressure Technique: Using your thumb, repeatedly press deeply and release for 2-3 minutes. It’s more effective when combined with abdominal breathing: exhale when pressing, inhale when releasing.
Effects: It activates liver function and disperses energy blocked by stress. It alleviates nervousness, anger, chest oppression, and temporal headaches while promoting emotional stability.
4️⃣ Kunlun (BL60) — The ‘Nerve Calming Point’
Location: On the outside of the foot, in the depression directly behind the lateral ankle bone (lateral malleolus), at the midpoint between the heel and ankle bone.
Pressure Technique: Using your thumb, apply slow circular pressure for 2-3 minutes. Start lightly and gradually increase pressure to reach the meridian sinew.
Effects: It strengthens Kidney energy and reduces nervous system sensitivity. It also improves lower back pain caused by severe stress, nerve fatigue, and anxiety.
5️⃣ Sanyinjiao (SP6) — The ‘Heart-Spirit Balance Point’
Location: On the inner side of the lower leg, about 10cm above the inner ankle bone (medial malleolus). Find it by following the inner edge of the shin bone upward from the ankle toward the knee.
Pressure Technique: Using your thumb, repeatedly press deeply and release for 2-3 minutes. Apply pressure so that the calf muscle relaxes at the same time.
Effects: This is an ‘all-purpose point’ that regulates digestion, sleep, and emotions. It simultaneously alleviates digestive distress, stress-related bloating, and insomnia. It restores overall balance between mind and body.
5-Minute Self-Massage Routine — Practical Guide Before Presentations
📍 Usage by Situation
5 Minutes Before a Presentation (Beginner): LI4 for 2 minutes + HT7 for 2 minutes → Immediate calming effect
Morning Anxiety (Standard): HT7 for 1 minute → LR3 for 1 minute → LI4 for 1 minute → SP6 for 1 minute → BL60 for 1 minute
Nighttime Insomnia (Advanced): SP6 for 2 minutes → HT7 for 2 minutes → BL60 for 1 minute → Deep abdominal breathing
🎯 Pressure Timing and Technique
Pressure Intensity: Maintain a tender pain level, approximately 5-7 on a 10-point scale
Breathing: Exhale through the nose when pressing, inhale through the mouth when releasing
Frequency: 2-3 times daily, best performed 1 hour after eating
Duration: Daily practice for at least 2 weeks is needed to see proven results
⚠️ Medical Disclaimer: This article is provided for health information purposes only and does not replace professional medical diagnosis or treatment. If symptoms persist or are severe, please consult a healthcare professional.
🤰 Pregnancy Warning: LI4, SP6, LR3, and BL60 may trigger uterine contractions in pregnant women. If you are pregnant or possibly pregnant, press only HT7 and consult a healthcare professional before proceeding.
One-line Summary: Migraines can be quickly relieved by stimulating 5 acupoints—Taiyang, Hegu, Baihui, Fengchi, and Sanyinjiao—which improve blood circulation and ease nerve tension to alleviate pain.
Why Does Acupressure Help with Migraines?
Migraines are a condition caused by cerebral vasodilation and neurotransmitter imbalances. In traditional Chinese medicine, migraines are classified as “hemiplegic wind,” with poor blood circulation around the neck and head as the primary cause. Acupoint pressure promotes blood circulation and relaxes tense muscles, relieving nerve compression and increasing oxygen supply to the brain. In particular, acupoints around the neck and temples directly affect blood vessels and nerves along the migraine pathway, providing rapid pain relief. Based on clinical experience, acupressure applied in the early stages of migraines can reduce the need for medication.
5 Acupoints for Migraine Relief
1. Taiyang (EX-HN5) — The Temple’s Key Point
Location: Located at the midpoint between the outer corner of the eye and the ear, in a small depression. It’s at the center of the temple when viewing the face from the side. Pressure Technique: Simultaneously stimulate both sides with your thumbs, making slow circular motions for 3–5 minutes. Start with light pressure and gradually increase intensity. You can apply pressure immediately when a migraine begins. Benefits: Taiyang is the most direct acupoint for migraine relief. It improves blood circulation around the temples, eases cerebral vascular tension, and calms overactive brain nerves. It’s particularly effective for migraines caused by eye strain.
2. Hegu (LI4) — The Universal Acupoint
Location: Located on the back of the hand at the point where the thumb and index finger meet. It’s in the small depression between the prominent muscles when your fingers are together. Pressure Technique: Use your opposite thumb to press slowly and vertically, releasing and pressing again for 1–2 minutes. Alternate between both hands. You should feel moderate discomfort. Benefits: Hegu is the most versatile acupoint among all meridian points. It relieves whole-body pain, calms the nerves, and especially improves blood circulation to the head. It’s effective not only for migraines but also for toothaches and facial pain.
3. Baihui (GV20) — The Crown’s Center
Location: Located at the crown of the head, where the line connecting both ear tips meets the midline rising from the space between the eyebrows. It’s the point where you feel a slight depression when gently tapping with your finger. Pressure Technique: Rather than direct pressure on the crown, gently press with your fingers while making circular motions, or move your fingers up and down like combing hair for 2–3 minutes. Avoid excessive pressure. Benefits: Baihui is the center of cerebral blood circulation. It clears mental fog caused by migraines and improves concentration loss due to headaches. It’s particularly effective for migraines caused by prolonged reading or computer work.
4. Fengchi (GB20) — Relief for Tension at the Brain’s Base
Location: Located at the back of the neck, where the vertebrae and skull meet, with one point on each side. It’s in the small depression at the base of the skull when you follow the line below the ear down the back of the neck. Pressure Technique: Use both thumbs to press simultaneously upward and slowly, releasing and pressing again for 2–3 minutes. Since the neck muscles are tense, increase pressure gradually. Benefits: Fengchi is an important acupoint connecting the neck and head, most effective for migraines caused by cervical spine tension. It relieves stiffness in the neck muscles, normalizes blood supply to the brain, and alleviates stress-related migraines.
5. Sanyinjiao (SP6) — An Essential Point for Women’s Migraines
Location: Located above the inner ankle, about three finger widths above the inner ankle bone. You can find it by tracing along the inner edge of the shinbone. Pressure Technique: While seated, use your thumb to press slowly, releasing and pressing again for 1–2 minutes. Alternate between both feet, maintaining steady breathing. A low, dull sensation similar to menstrual cramps is normal. Benefits: Sanyinjiao regulates whole-body hormone balance. It particularly alleviates menstrual migraines (migraines related to the menstrual cycle) and is also effective for preventing migraines caused by stress and fatigue.
5-Minute Self-Acupressure Routine — Effective Order and Time Distribution
Preparation: Sit in a comfortable position and take several deep breaths to relax before starting.
Taiyang (1 minute) — Stimulate both sides simultaneously with circular motions. If your migraine is severe, start here.
Hegu (1 minute) — Alternate between both hands, pressing and releasing with moderate pressure.
Fengchi (1 minute) — Press both sides of the back of the neck upward simultaneously. Work deeply and slowly.
Baihui (1 minute) — Gently press the crown or move your fingers like combing hair.
Sanyinjiao (1 minute) — Alternate between both feet, pressing slowly with your breathing.
Tip: When a migraine is severe, focus on Taiyang and Hegu first, spending 3 minutes on each. For preventive purposes, perform the 5-minute routine daily right after waking or before bedtime to reduce migraine frequency to 1–2 times per month.
⚠️ Medical Disclaimer: This article is provided for informational health purposes and does not replace professional medical diagnosis or treatment. If you have chronic migraines, severe symptoms, new symptoms, or persistent symptoms, you must consult a healthcare professional (doctor, traditional Chinese medicine practitioner, etc.). Before acting on this information, please seek guidance from a healthcare professional, taking your individual health condition and medical history into account.
🤰 Pregnancy Warning: Among the acupoints above, Hegu (LI4) and Sanyinjiao (SP6) may trigger uterine contractions in pregnant women. If you are pregnant or may be pregnant, avoid stimulating these two points and apply pressure only to Taiyang, Fengchi, and Baihui. If you have migraines during pregnancy, consult your doctor or obstetric specialist before proceeding.
한 줄 요약: 멀미는 한의학의 내관·풍지·태양 등 5개 혈자리를 지압하면 30초 내 메스꺼움이 완화되며, 타기 전 예방 지압으로 멀미 발생률을 70% 이상 낮출 수 있습니다.
도입부
차에 타면 현기증이 돌고, 비행기 탑승 30분 후부터 메스꺼움이 밀려오는 멀미. 약을 먹어도 졸음이 오거나 효과가 부족한 경험, 많으신가요?
멀미는 내이(귀의 평형감각 기관)에서 받는 신호와 눈이 받는 신호의 불일치로 발생합니다. 한의학에서는 이를 “기(氣)의 역류”로 보며, 특정 혈자리 자극으로 신체의 평형감각을 빠르게 회복할 수 있다고 봅니다. 특히 내관혈(PC6)은 현대 의학에서도 “멀미의 특효혈”로 인정하여 멀미 예방 밴드의 기본이 되었습니다.
멀미에 효과적인 혈자리 5곳
1. 내관(PC6, Neiguan) — “멀미의 특효혈”
위치: 손목 안쪽(팔뚝) 중앙, 손목 주름에서 팔꿈치 방향으로 약 5-6cm 올라온 지점. 앞뒤로 두 개의 힘줄 사이 정중앙입니다.
지압법: 엄지손가락으로 5-10초간 꾹 누르되, 아프지 않을 정도의 강한 압력을 유지합니다. 멀미 느낄 때 30초-1분 지압하면 빠르게 효과를 봅니다. 예방 목적으로는 타기 15분 전 양팔 각 1분씩 시행합니다.
효과: 메스꺼움 완화, 구토 억제, 가슴답답함 해소. 임산부의 입덧 완화에도 사용되며, 현대 의학에서도 가장 입증된 혈자리입니다.
2. 풍지(GB20, Fengchi) — “어지러움의 명약”
위치: 목과 머리가 만나는 부분, 목 뒤쪽 양옆. 귀 아래에서 목을 따라 내려오면 뒷머리 아래 움푹한 곳이 풍지입니다. 양쪽으로 하나씩 있습니다.
지압법: 양손 엄지손가락을 목 양옆 움푹한 부분에 걸고, 천천히 위로 밀어올리면서 10-15초간 자극합니다. 지압 후 부드럽게 목을 10회 좌우로 돌리면 효과가 배가됩니다.
효과: 현기증 제거, 후두부 긴장 완화, 멀미로 인한 두통 해소. 바람(風)에 의한 질병을 다스린다는 의미에서 “풍지”라 불립니다.
3. 태양(EX-HN5, Taiyang) — “머리를 시원하게”
위치: 관자놀이 부분. 눈의 바깥쪽 끝에서 옆쪽으로 약 1-2cm 떨어진 움푹한 지점입니다. 양쪽으로 하나씩 있습니다.
지압법: 식지와 중지로 양쪽 태양혈을 동시에 원형으로 10-20회 문질러줍니다. 비행기 탑승 중일 때는 부드럽게 누르고 있기만 해도 효과가 있습니다.
효과: 두통 및 현기증 완화, 뇌 혈액순환 개선, 멀미로 인한 편두통 예방. 지압 직후 시원한 감각이 느껴집니다.
4. 곤륜(BL60, Kunlun) — “발목의 균형 센서”
위치: 양쪽 발목 바깥쪽, 복숭아뼈와 아킬레스건 사이의 움푹한 지점입니다. 앉아서 다리를 꼬으면 쉽게 찾을 수 있습니다.
지압법: 엄지손가락이나 짐볼(손가락 관절 등)로 5-10초간 강하게 눌렀다 놓기를 5-10회 반복합니다. 멀미 예방 목적으로는 양발 각 1분씩 시행합니다.
효과: 전정기관 자극으로 평형감각 회복, 다리의 무거움 해소, 장시간 이동 시 피로 완화. 신경계 안정에 탁월합니다.
5. 삼음교(SP6, Sanyinjiao) — “세 경맥의 교점”
위치: 안쪽 발목 위쪽, 복숭아뼈에서 정강이뼈를 따라 약 10cm(손가락 4개 폭) 올라온 지점. 정강이뼈 안쪽입니다.
지압법: 엄지손가락으로 5-10초간 누르되, 약간 저린 느낌이 들 정도의 압력을 유지합니다. 예방 목적으로는 양발 각 1분씩 시행합니다.
효과: 전신 혈액순환 개선, 소화기 안정, 멀미와 함께 오는 소화불편함 해소. 피로 회복에도 탁월합니다.
🤰 임산부 주의: 삼음교(SP6)와 곤륜(BL60)은 임산부에게 자궁 수축을 유발할 수 있습니다. 임신 중이거나 임신 가능성이 있는 분은 반드시 전문가와 상담 후 시행하세요. 내관, 풍지, 태양은 상대적으로 안전합니다.
5분 셀프 지압 루틴 (멀미 발생 시)
준비 시간: 1분 편안한 자세로 앉아서 눈을 감고 심호흡을 3회 합니다.
순서별 지압 (4분)
내관(PC6) — 1분 (30초×2회, 양팔 번갈아가며) 가장 빠른 효과. 멀미 느낄 때마다 즉시 지압합니다.
삼음교(SP6) — 30초 (5-10초×3회, 양쪽 번갈아가며) 마무리 단계로 전신 순환을 정상화합니다.
마무리: 1분 천천히 눈을 뜨고, 가능하면 물을 한 잔 마십니다. 지압 후 5-10분 동안은 움직임을 최소화하는 것이 좋습니다.
멀미 예방 지압 (탑승 전 15분)
증상이 없을 때는 위 루틴을 50% 강도로 단축합니다:
내관(PC6) — 양팔 1분씩
풍지(GB20) — 양쪽 30초씩
곤륜(BL60) — 양발 1분씩
총 소요 시간 5-7분. 이 루틴을 차량 탑승 10-15분 전에 시행하면 멀미 발생률을 70% 이상 낮출 수 있습니다.
지압 시 주의사항
압력 강도: “아프지만 기분 좋은” 정도의 압력을 유지합니다. 너무 약하면 효과가 없고, 너무 강하면 멍이 들 수 있습니다.
호흡: 지압 중 숨을 참지 말고 천천히 호흡합니다. 숨을 참으면 오히려 메스꺼움이 심해질 수 있습니다.
시간 간격: 같은 혈자리를 반복 지압할 때는 최소 3-5시간 간격을 두는 것이 좋습니다.
피부 상태: 상처, 염증, 부종이 있는 부위는 피합니다.
⚠️ 의료 면책조항: 이 글은 건강 정보 제공 목적으로 작성되었으며, 전문적인 의료 진단이나 치료를 대체하지 않습니다. 멀미가 지속되거나 심한 경우, 혹은 어지러움이 다른 질환에 의한 것일 가능성이 있다면 반드시 의료 전문가와 상담하세요. 특히 임산부, 어린이, 만성질환자는 전문가의 지도 하에 시행하기를 권장합니다.