Author: Acupoint Guide Editorial Team

  • How to Relieve Facial Swelling Naturally with These 5 Pressure Points

    How to Relieve Facial Swelling Naturally with These 5 Pressure Points

    One-line Summary: Facial edema can be effectively reduced by pressing five acupoints—Hegu (LI4), Yingxiang (TE17), Taiyang (EX-HN5), Fengchi (BL12), and Sanyinjiao (SP6)—for 5 minutes daily, which promotes lymphatic circulation and reduces swelling.

    Introduction

    Many people experience facial puffiness when they wake up in the morning or as evening approaches. Facial edema goes beyond a cosmetic issue—it can be a signal that your body’s fluid metabolism is not functioning properly. In traditional Chinese medicine, facial edema is viewed as a result of weakened fluid metabolism function of the spleen. When you stimulate the appropriate acupoints, you can promote lymphatic circulation and enhance your body’s metabolic function, making it effective for relieving edema. The five acupoints we introduce today are the most commonly used acupoints in clinical practice for edema relief, and they can be conveniently stimulated at home with self-acupressure.

    Five Acupoints Explained

    1. Hegu (LI4) — The Representative Acupoint of the Large Intestine Meridian

    LI4 acupuncture point

    Location: In the highest point of the wrinkle between your thumb and index finger. You’ll feel slight pain when you press this point with your finger.
    Effects: It promotes facial blood circulation, boosts immunity, and is very effective for relieving edema. It can improve skin elasticity and reduce facial flushing.
    Acupressure Technique: Using the opposite thumb, press Hegu for 3 seconds and release for 3 seconds, repeating this 20 times. Apply pressure until you feel slight pain, but avoid excessive stimulation.

    2. Yingxiang (TE17) — Key Acupoint for Facial Edema Relief

    TE17 acupuncture point

    Location: About 1 cm above the upper edge of the ear, in the depression between the Taiyang acupoint and the top of the ear.
    Effects: It stimulates the nerves and blood vessels of the face, directly relieving edema. It is also effective for tinnitus and migraine relief.
    Acupressure Technique: Using the ring fingers of both hands, gently massage Yingxiang in circular motions 20 times. Since the area around the ear is sensitive, avoid strong pressure and maintain comfortable stimulation.

    3. Taiyang (EX-HN5) — Extra-meridian Acupoint That Directly Acts on Edema

    Location: About 1 cm below the midpoint between the glabella and the end of the ear, in the depression on the inside of the temple.
    Effects: It quickly relieves facial edema and improves eye fatigue caused by tiredness. It promotes blood circulation to the head and face.
    Acupressure Technique: Using the index and middle fingers of both hands together, gently massage Taiyang in circular motions. Each session should last 20-30 seconds, about 3 times a day.

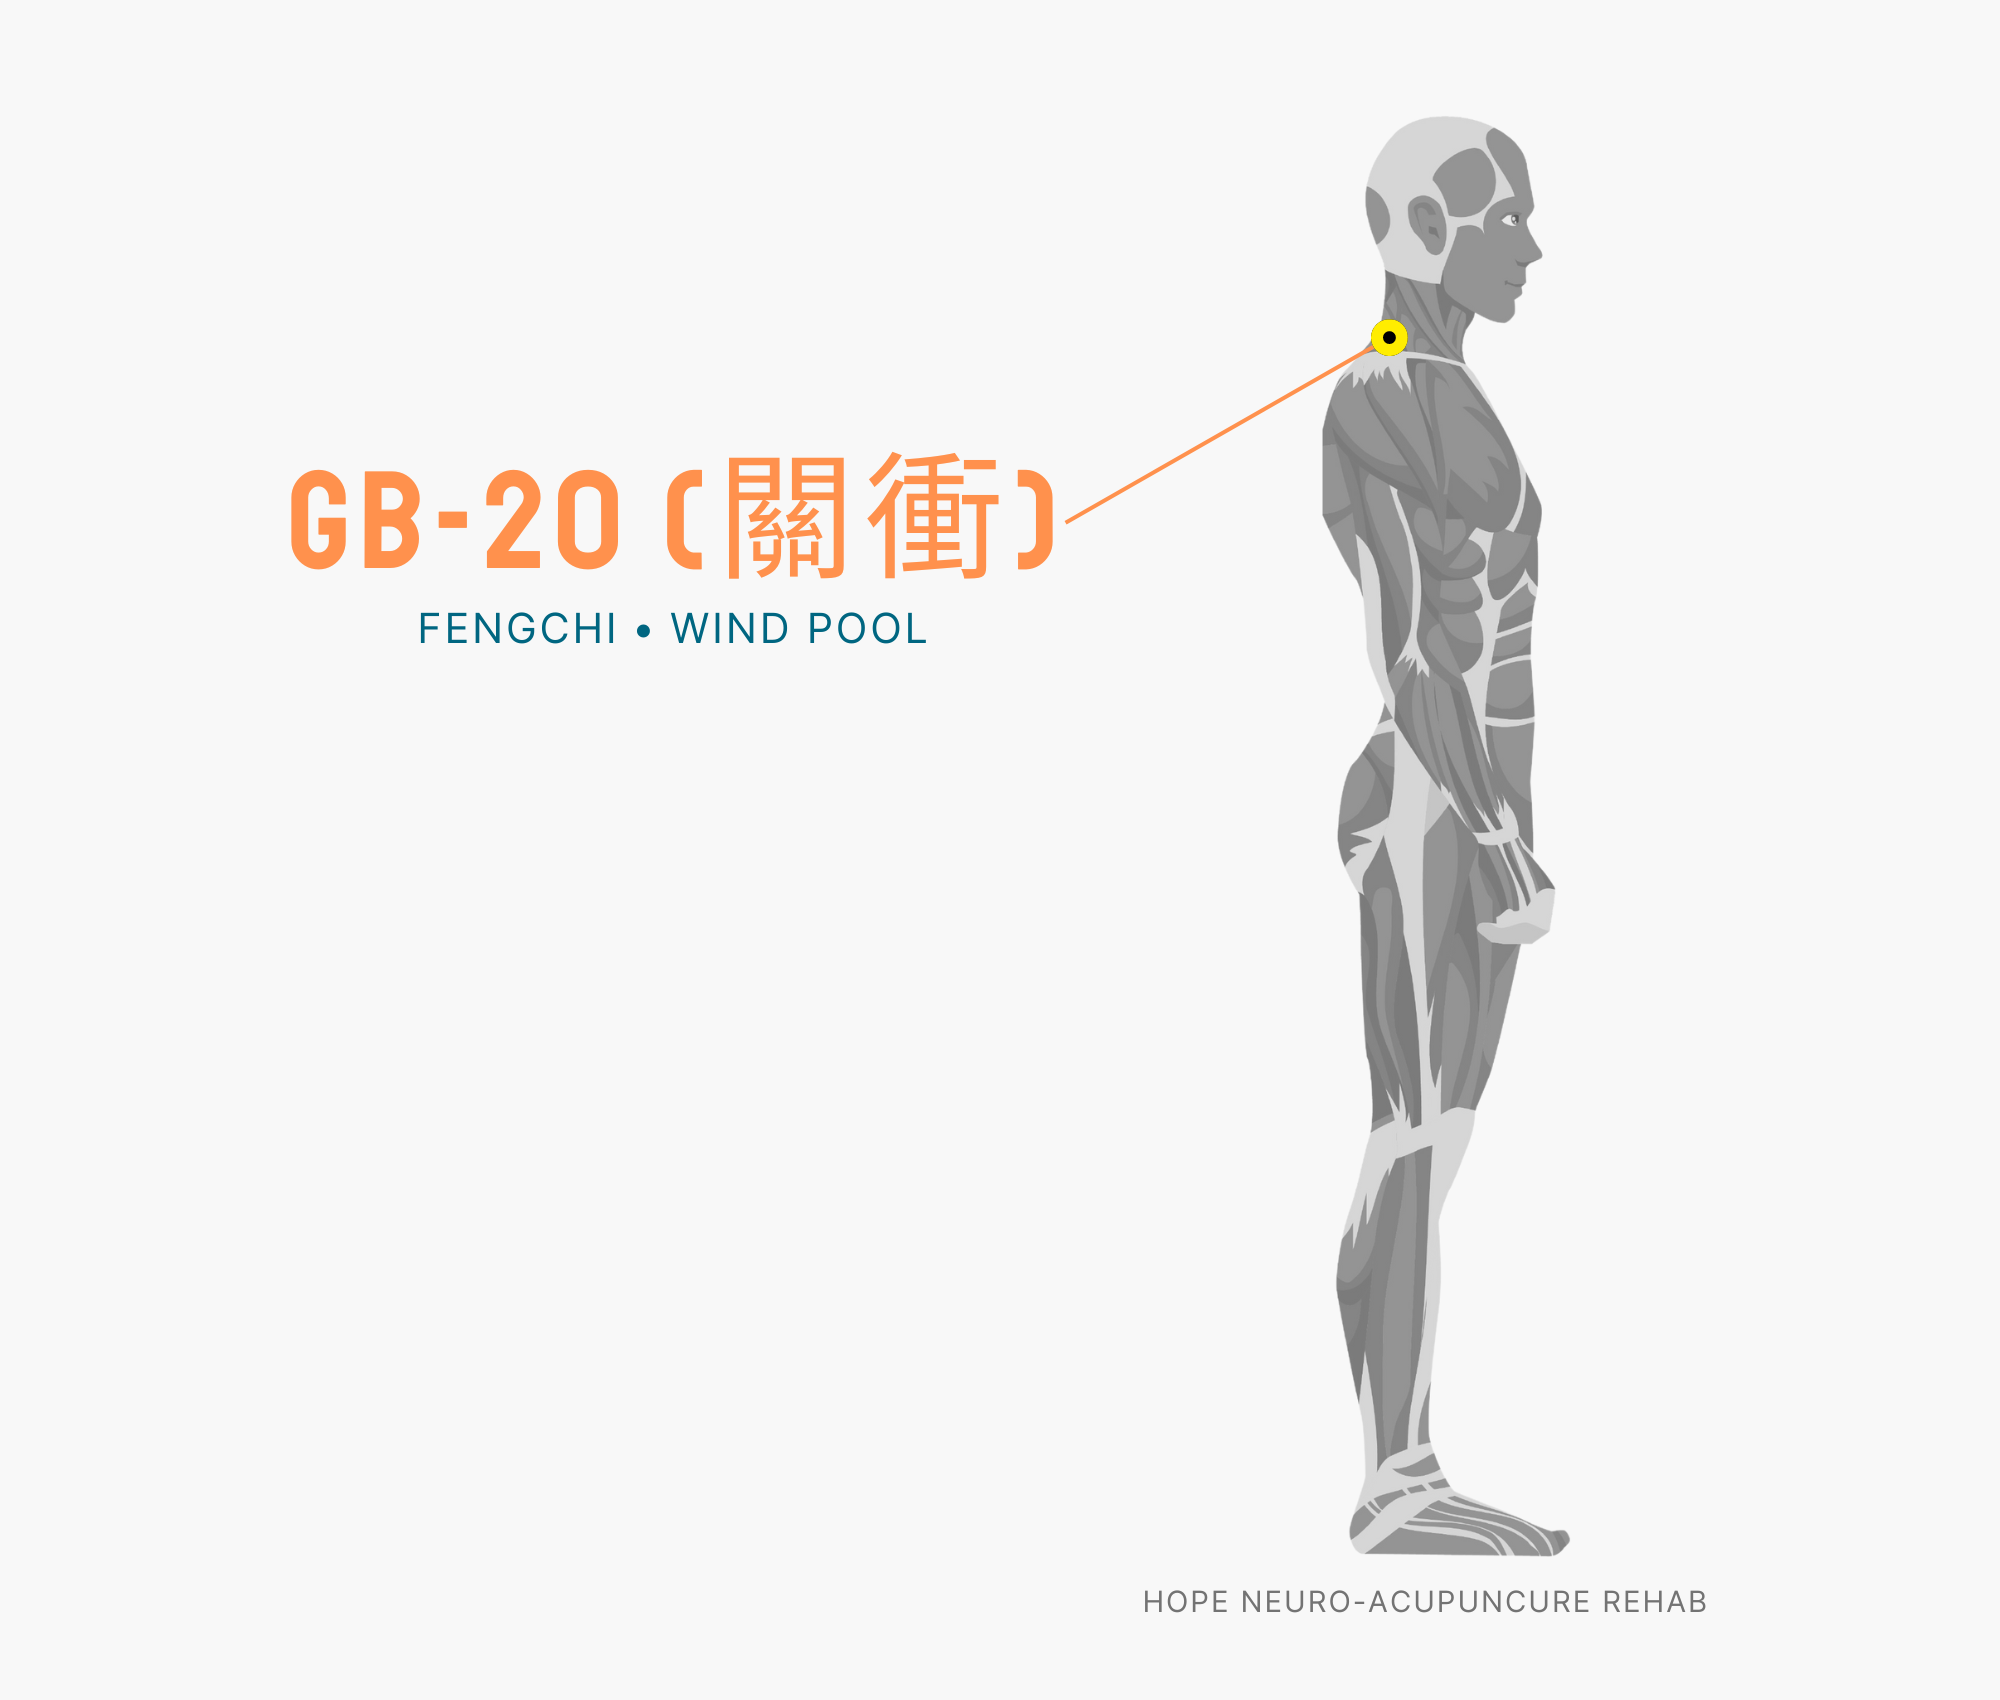
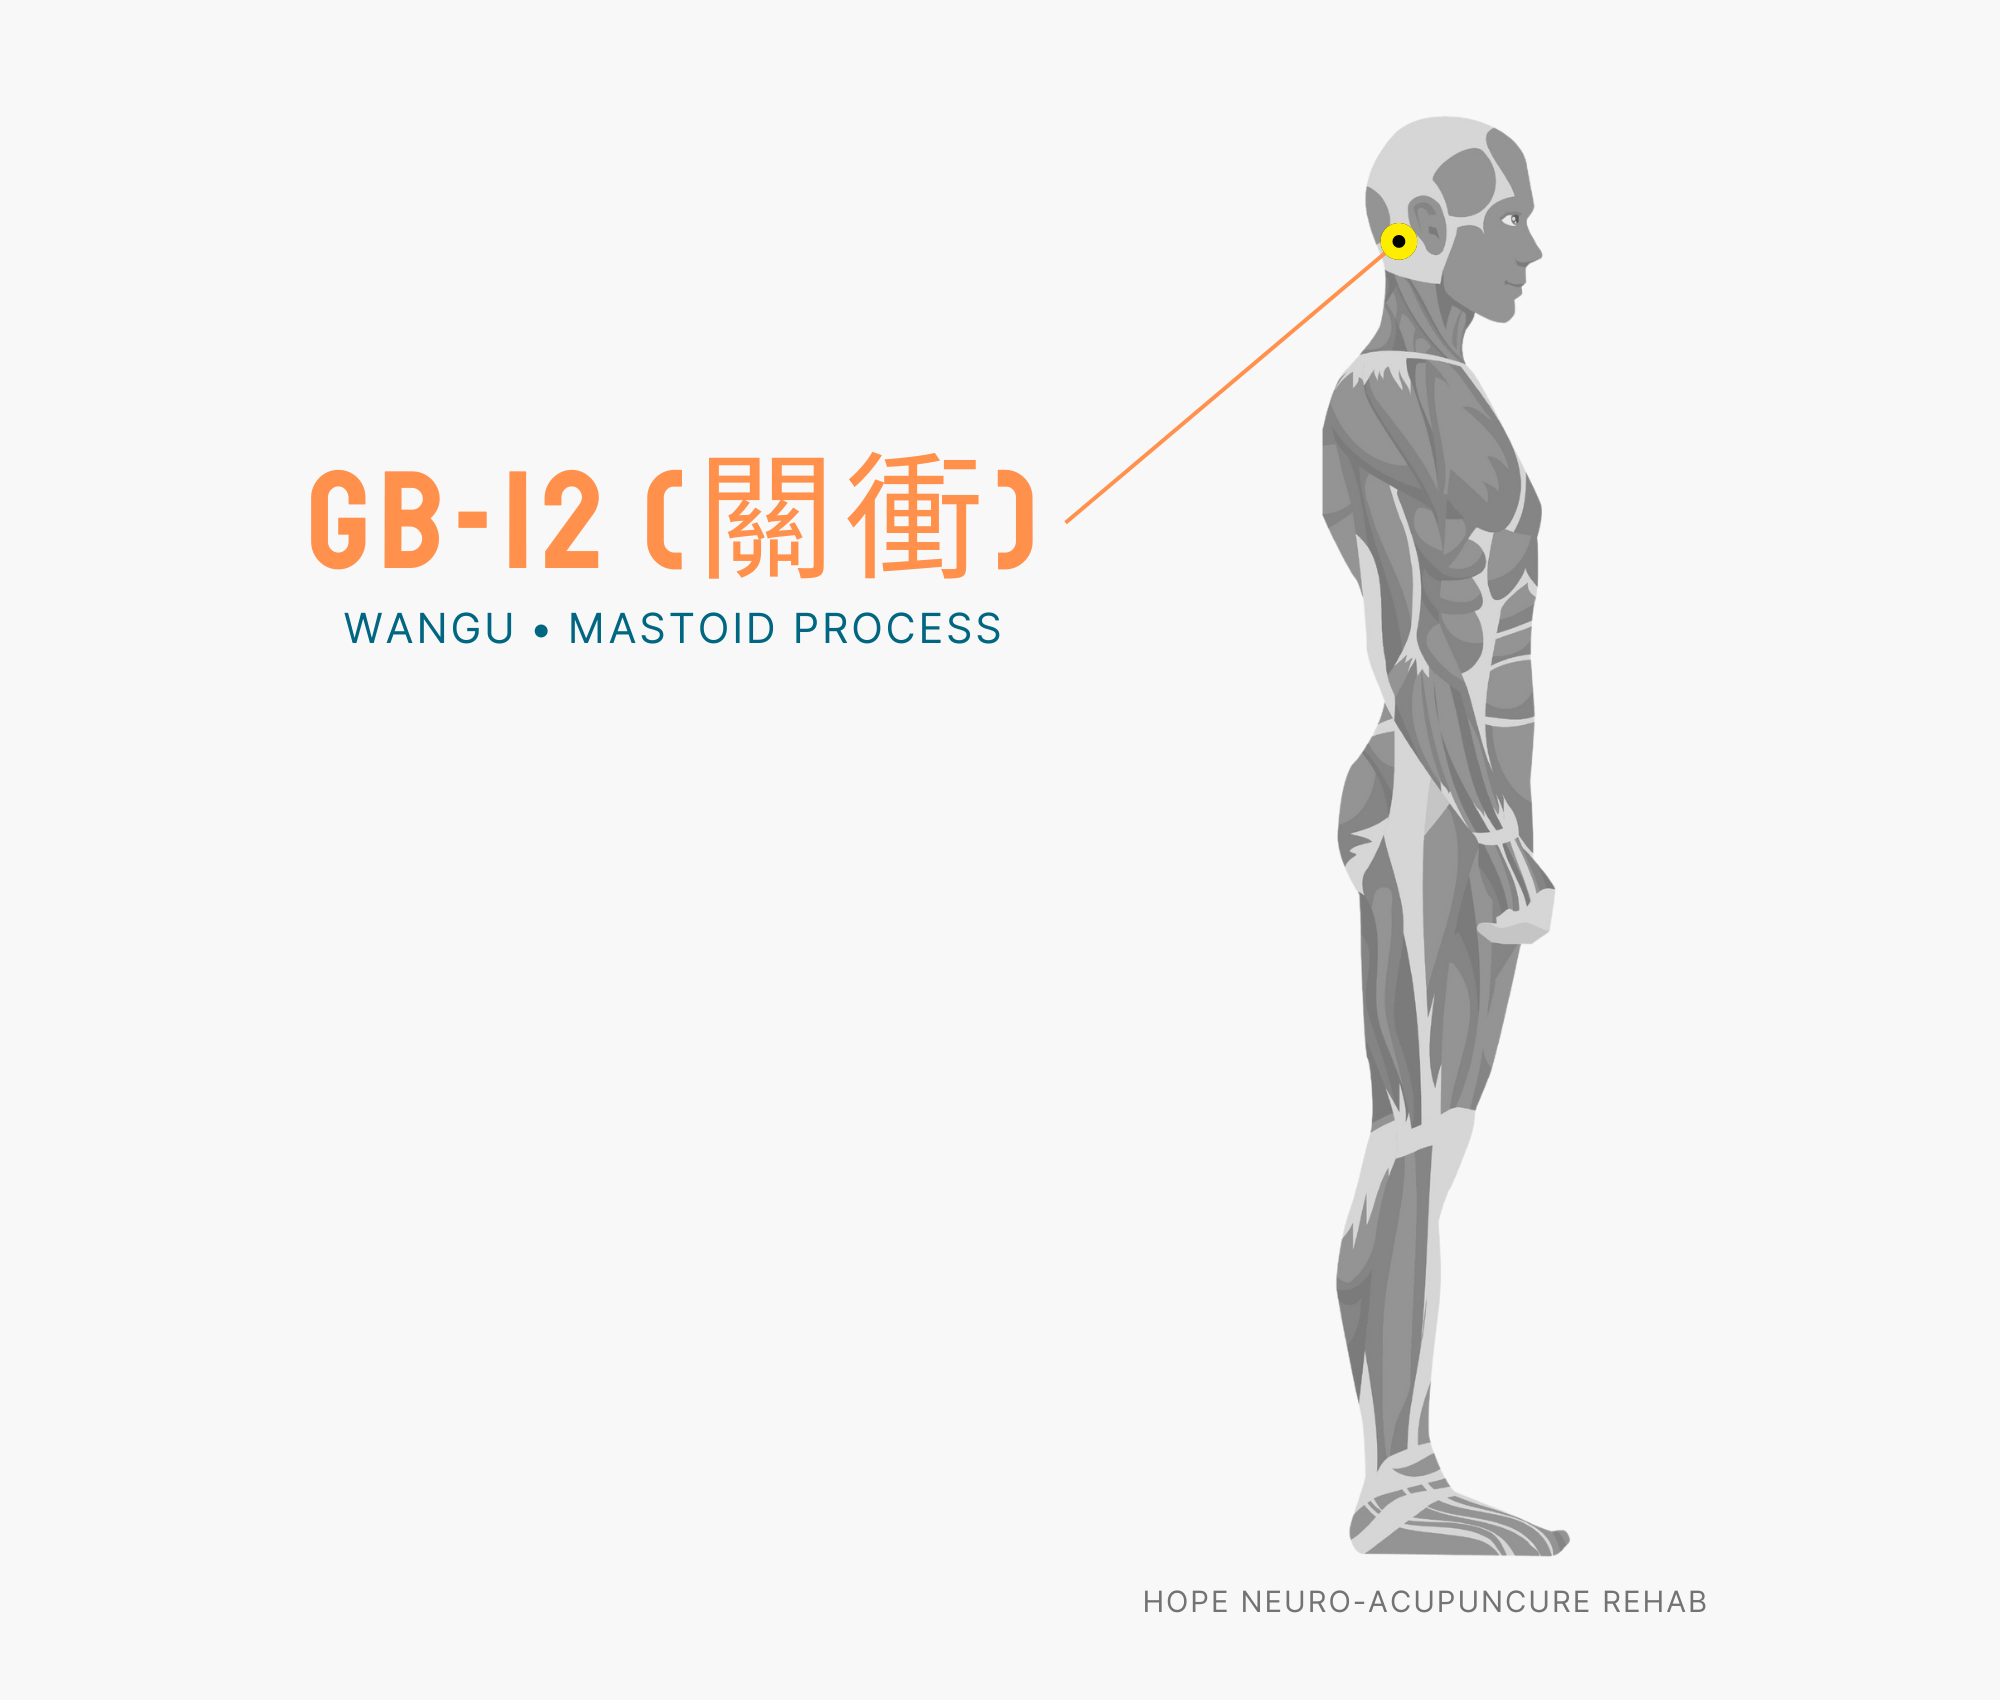
    4. Fengchi (BL12) — Relieves Edema Throughout the Entire Body

    BL12 acupuncture point

    Location: At the back of the neck, about 1 cm below where the hairline begins, in the depression about 1.5 cm lateral to both sides of the spine.
    Effects: As the first acupoint of the Bladder meridian, it improves fluid metabolism throughout the entire body. It is effective not only for facial edema but also for whole-body edema and cold prevention.
    Acupressure Technique: Using the thumbs of both hands, simultaneously press the Fengchi points on both sides of the back of the neck. Repeat the motion of pressing for 3 seconds and releasing for 3 seconds 15 times. Since this is in the neck area, avoid excessive stimulation.

    5. Sanyinjiao (SP6) — Important Acupoint for Fluid Metabolism

    SP6 acupuncture point

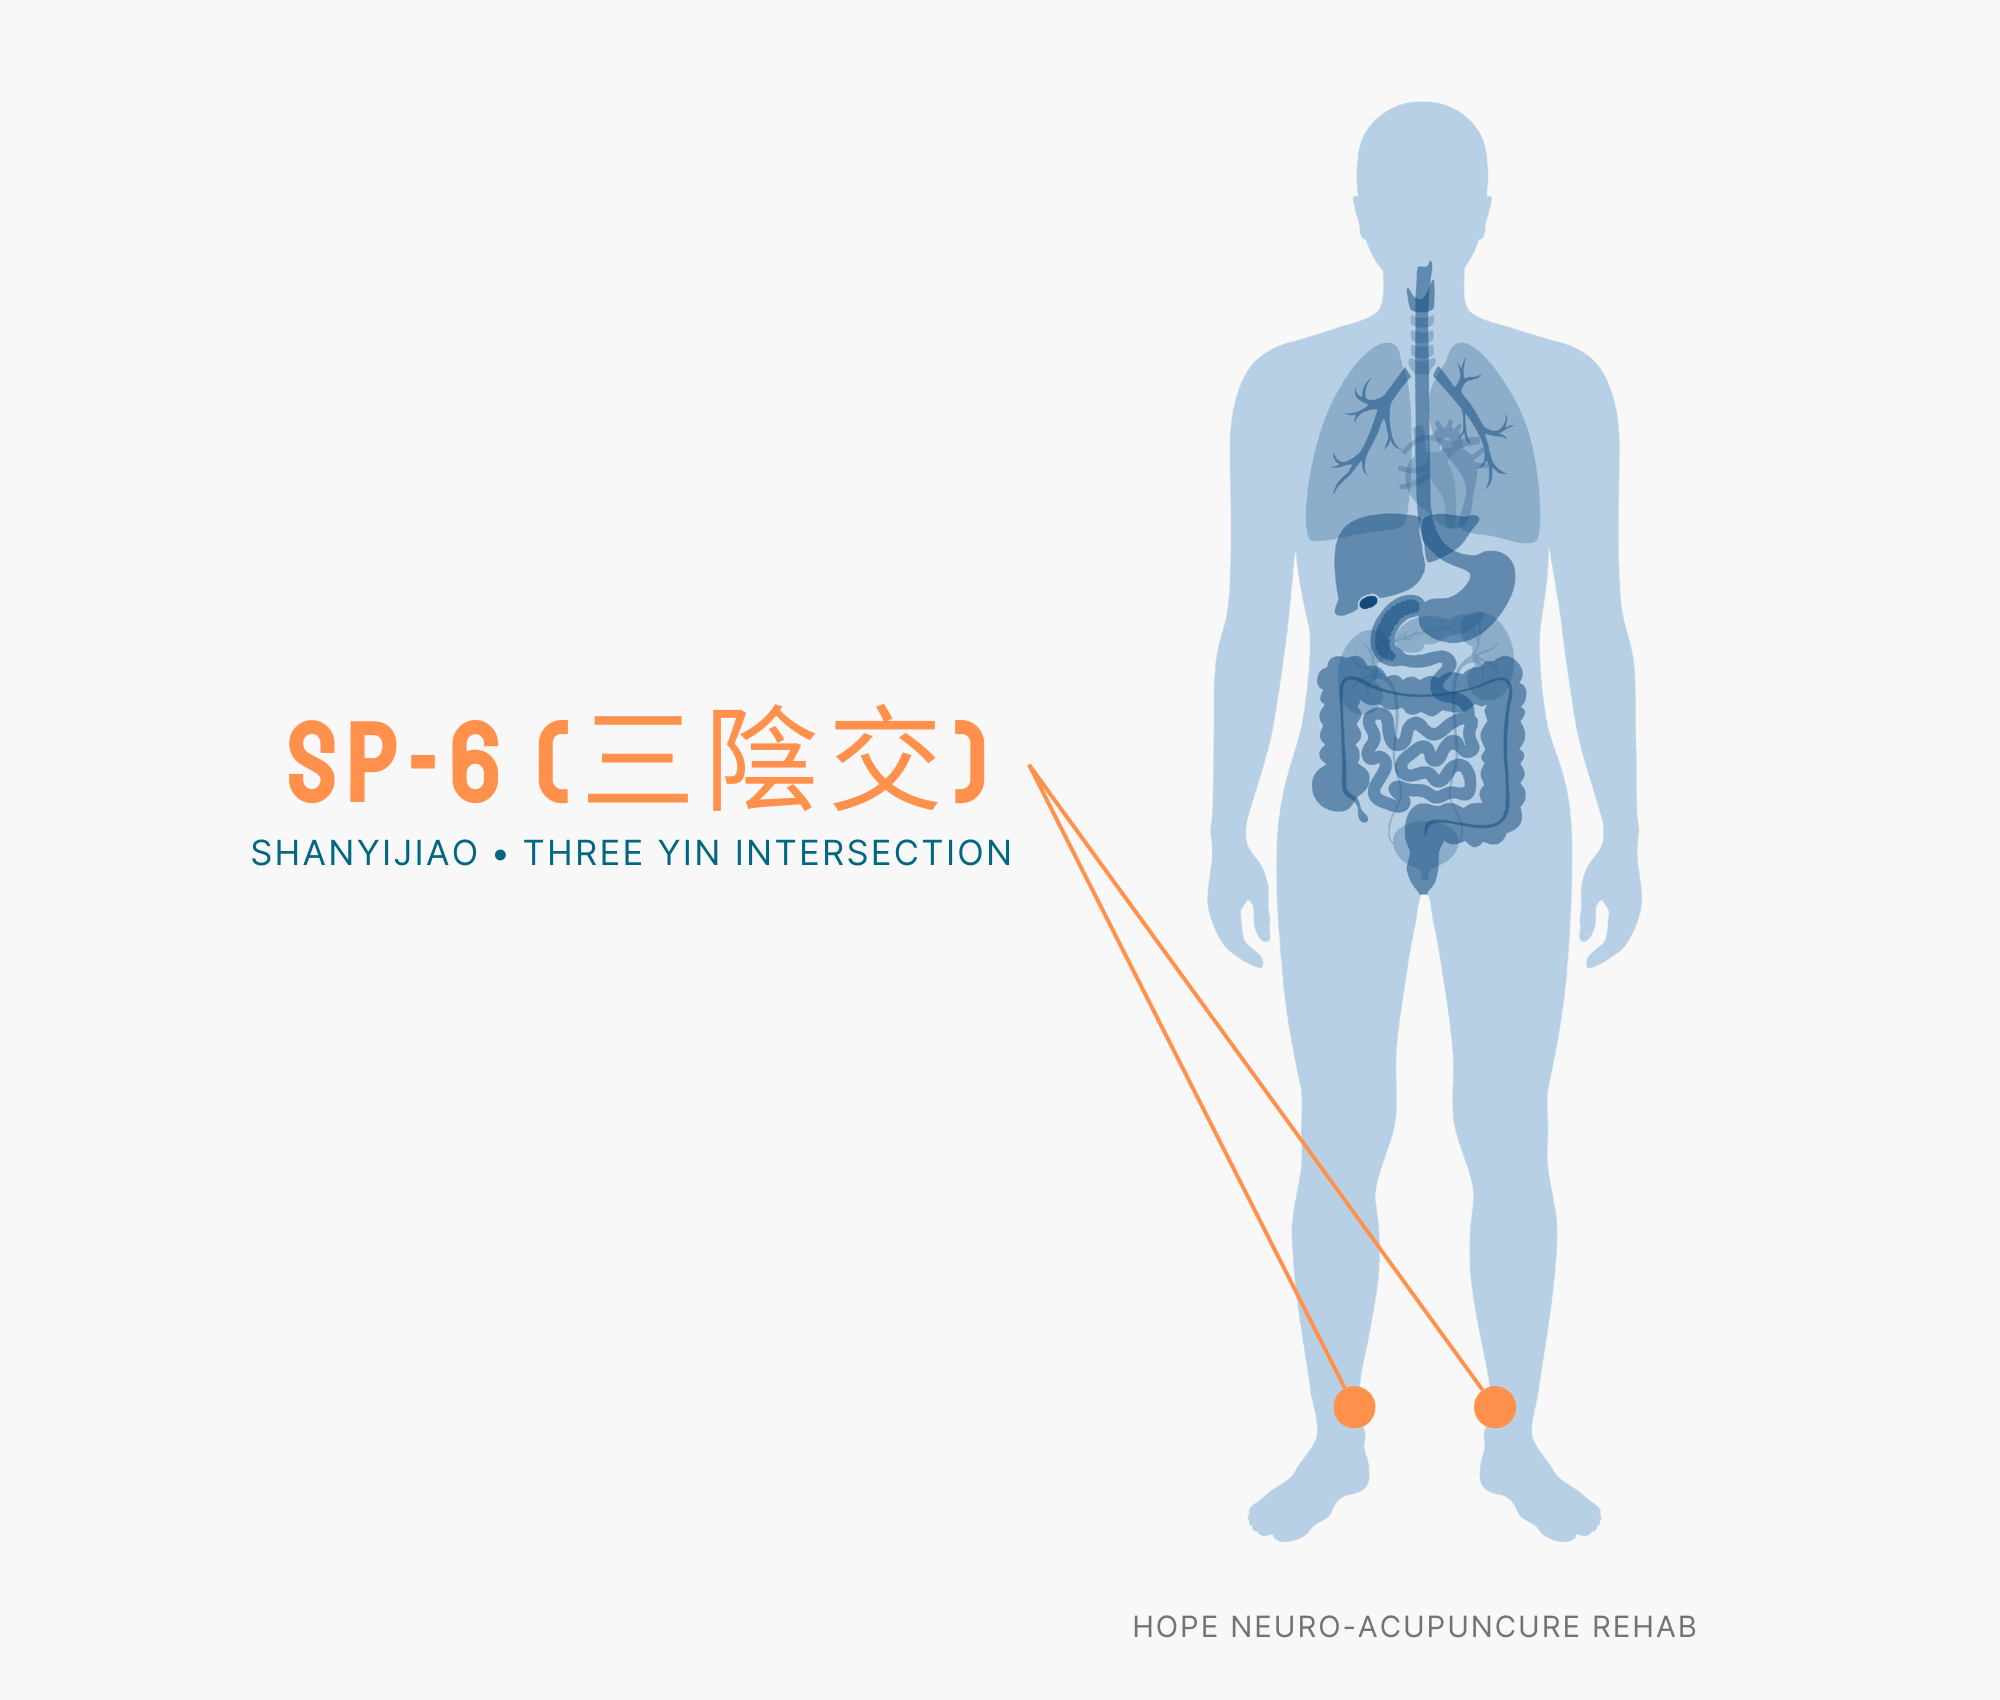
    Location: About 3 cm above the most prominent point of the inner ankle, in the depression directly behind the bone on the inside of the calf.
    Effects: It strengthens the spleen’s fluid metabolism function, addressing the root cause of edema. It also helps with menstrual irregularities and digestive issues.
    Acupressure Technique: Press Sanyinjiao on both feet simultaneously, using your thumbs to press firmly for 3 seconds and release for 3 seconds, repeating 20 times. The effect on reducing morning edema is especially noticeable when done in the evening.

    5-Minute Self-Acupressure Routine

    Recommended Time: Right after waking up in the morning or 1 hour before bedtime

    Step 1 (1 minute): Hegu Acupressure — Press Hegu on both hands alternately 20 times
    Step 2 (1 minute): Taiyang Massage — Massage Taiyang on both sides simultaneously in circular motions 20 times
    Step 3 (1 minute): Yingxiang Massage — Massage Yingxiang on both sides simultaneously in circular motions 20 times
    Step 4 (1 minute): Sanyinjiao Acupressure — Press Sanyinjiao on both feet simultaneously 20 times
    Step 5 (1 minute): Fengchi Acupressure — Press Fengchi on both sides simultaneously 15 times

    By following the above sequence, you can efficiently stimulate all the acupoints necessary for relieving facial edema within 5 minutes. If you consistently perform this routine for 2-3 weeks, you will notice a significant reduction in edema.

    ⚠️ Medical Disclaimer: This article is provided for informational purposes and does not replace professional medical diagnosis or treatment. If facial edema persists or is severe, there may be underlying conditions such as kidney disease, thyroid disease, or heart failure—consult a healthcare professional immediately. Particularly if sudden edema, difficulty breathing, or chest pain occurs, seek emergency care right away.
    🤰 Pregnancy Warning: Among the above acupoints, Hegu (LI4) and Sanyinjiao (SP6) may trigger uterine contractions in pregnant women. If you are pregnant or might be pregnant, consult with a healthcare professional (herbalist, obstetrician) before stimulating any acupoints to ensure safety.
  • 5 Acupressure Points for Golf Elbow — Quick Self-Massage Guide

    5 Acupressure Points for Golf Elbow — Quick Self-Massage Guide

    One-line summary: Golfer’s elbow pain on the inner elbow can be relieved through acupressure on the LI11, LI10, TE5, TE3, and LI4 acupoints to promote blood circulation and ease muscle stiffness.

    Introduction

    Have you ever experienced throbbing pain on the inside of your elbow when performing repetitive gripping motions in golf or daily life? This is golfer’s elbow (medial epicondylitis). It’s a condition where inflammation develops due to overuse of the inner arm muscles, and is especially common among workers in professions requiring frequent wrist flexion and athletes.

    In traditional Chinese medicine, this pain is viewed as an imbalance in meridians and poor circulation of qi and blood. Stimulating specific acupoints around the elbow helps promote local blood circulation, release muscle tension, and ease inflammatory responses. In this article, I’ll introduce in detail the 5 most effective acupoints for relieving golfer’s elbow and self-massage techniques.

    5 Acupoints Explained

    1. Quchi (Curved Pond) — LI11

    LI11 acupuncture point

    Location: At the outer end of the elbow crease when the elbow is bent at 90 degrees.

    Massage technique: Press slowly with your thumb, maintaining pressure for 3-5 seconds at a pressure level that produces a slight ache, then release. Repeat this sequence.

    Benefits: An important acupoint on the Large Intestine meridian that relieves arm muscle fatigue and reduces heat sensations. This is the acupoint that most directly alleviates the inflammation of golfer’s elbow.

    2. Shousanli (Arm Three Miles) — LI10

    LI10 acupuncture point

    Location: About 3 cun (approximately 9cm) below the elbow crease in the direction of the wrist, near the outer bone of the forearm when the elbow is extended.

    Massage technique: Press with your thumb for 3 seconds at a time and release. Repeat this 10-15 times. The technique is effective when a warm sensation spreads.

    Benefits: Releases forearm muscle stiffness and improves blood circulation. Promotes recovery from muscle fatigue caused by prolonged gripping motions.

    3. Waiguan (Outer Gate) — TE5

    TE5 acupuncture point

    Location: On the back of the forearm, approximately 2 cun (about 6cm) above the wrist crease in the direction of the elbow, in the hollow space between the two bones.

    Massage technique: Pinch and rub the area with your thumb and index finger from front and back for 2-3 minutes. The warmth should spread to your fingertips.

    Benefits: Opens the flow of qi and blood in the Triple Burner meridian, reducing forearm swelling and calming nerve pain. Improves wrist instability caused by golfer’s elbow.

    4. Zhongzhu (Middle Islet) — TE3

    TE3 acupuncture point

    Location: On the back of the hand, between the fourth and fifth metacarpal bones, approximately 1 cun (about 3cm) toward the wrist from the ends of the finger bones.

    Massage technique: Press deeply with your thumb for about 5 seconds, then slowly release the pressure. Repeat 10-15 times.

    Benefits: A distal acupoint on the Triple Burner meridian that promotes the flow of qi and blood throughout the entire arm. Simultaneously improves finger numbness and arm heaviness.

    5. Hegu (Union Valley) — LI4

    LI4 acupuncture point

    Location: On the back of the hand between the thumb and index finger, slightly toward the wrist from where the finger bones meet.

    Massage technique: Press slowly with the opposite hand’s thumb, adjusting the pressure until you feel a slight aching sensation. Maintain for 3-5 seconds, then release. Repeat 10-20 times.

    Benefits: The most excellent acupoint for pain relief throughout the body. Quickly calms elbow pain and releases muscle tension caused by stress.

    🤰 Caution for Pregnant Women: Hegu (LI4) may induce uterine contractions in pregnant women. Those who are pregnant or may be pregnant should consult with a healthcare professional before using this point.

    5-Minute Self-Massage Routine

    Recommended timing: After waking in the morning or in the evening after work, twice daily

    1. Quchi (LI11) — 1 minute: 10 repetitions of slow thumb pressure
    2. Shousanli (LI10) — 1 minute: 10-15 thumb presses until warmth spreads
    3. Waiguan (TE5) — 1 minute: Rub from front and back, maintaining warmth sensation
    4. Zhongzhu (TE3) — 1 minute: Deep pressure 10-15 times, holding for 5 seconds
    5. Hegu (LI4) — 1 minute: 20 repetitions with adjusted pressure (exclude pregnant women)

    Tip: It’s more effective when performed after washing your hands with warm water. Combining with adequate stretching (elbow extension/flexion) after the massage creates a synergistic effect.

    ⚠️ Medical Disclaimer: This article is provided for informational purposes only and does not substitute for professional medical diagnosis or treatment. If symptoms persist or are severe, please consult a healthcare professional.
  • Eye Strain Relief: 5 Pressure Points That Actually Work

    Eye Strain Relief: 5 Pressure Points That Actually Work

    한 줄 요약: 눈 피로는 청명·찬죽·사죽공·태양·합곡 5개 혈자리 지압으로 혈류 개선과 안근 이완을 통해 빠르게 회복할 수 있습니다.

    도입부

    스마트폰, 컴퓨터, 태블릿 화면을 하루 종일 들여다보다 보면 눈이 뻐근해지고, 초점이 안 맞고, 눈 뒤가 아픈 증상이 나타납니다. 이것이 바로 ‘눈 피로’입니다. 한의학에서는 눈이 간(肝)에 속하고, 눈 피로는 간의 혈(血)이 부족하거나 기(氣)의 순환이 막혔을 때 발생한다고 봅니다. 눈 주변과 팔, 다리에 분포한 특정 혈자리를 자극하면 혈액 순환을 촉진하고 안근의 긴장을 풀어 눈 피로를 신속하게 완화할 수 있습니다. 약물 없이 손가락만으로 5분이면 충분합니다.

    눈 피로 완화 혈자리 5곳

    1. 청명(BL1) — 가장 효과적인 눈 피로 혈자리

    BL1 acupuncture point

    위치: 눈 안쪽(코 옆)의 눈구석 위쪽 홈 부분. 코와 눈의 경계선에서 약간 위로 올라간 곳입니다.

    지압법: 양쪽 손의 검지나 엄지로 천천히 누르면서 위쪽으로 향하는 방향으로 온열감이 느껴질 때까지 3~5초 유지합니다. 한 세트에 10회, 하루 3회 반복하세요.

    효과: 청명은 눈 피로, 충혈, 눈 침침함, 근시, 안구 건조증의 특효혈입니다. 눈 주변 근육의 긴장을 직접 풀어주고 눈 주변 혈류를 촉진해 눈의 피로 회복을 가장 빠르게 이끕니다. 세 시간마다 한 번씩 눌러주면 장시간 작업 후 눈의 피로를 크게 줄일 수 있습니다.

    2. 찬죽(BL2) — 눈썹 안쪽의 피로 완화혈

    BL2 acupuncture point

    위치: 눈썹 안쪽 끝(코 위)의 홈 부분. 양쪽 눈썹의 가장 안쪽 모서리를 찾으면 됩니다.

    지압법: 양쪽 엄지손가락으로 위쪽 방향으로 살살 누르되, ‘시린 느낌(酸脹感)’이 들 정도로 약 5초씩 유지합니다. 한 번에 8~10회, 하루 3~4회 자극하세요.

    효과: 찬죽은 눈 피로, 안구 건조증, 눈썹 근처의 통증을 완화합니다. 특히 미간 부분의 긴장과 앞머리 두통과 함께 나타나는 눈 피로에 매우 효과적입니다. 스트레스로 인한 이마 주름 개선에도 도움됩니다.

    3. 사죽공(TE23) — 옆눈 피로 전문 혈자리

    TE23 acupuncture point

    위치: 눈 바깥쪽(관자놀이 방향)의 주름, 눈을 감았을 때 움푹 들어가는 곳입니다.

    지압법: 양쪽 손의 약지나 중지로 살짝 위로 향하게 누르면서 동그랗게 원을 그리듯 5초간 마사지합니다. 한 번에 10회 반복, 하루 2~3회 실시하세요.

    효과: 사죽공은 눈의 옆부분 피로와 뻐근함을 풀어주며, 편두통이나 관자놀이 통증을 동반한 눈 피로에 특히 좋습니다. 눈 주변 림프 순환을 촉진해 눈 부음(안검 부종)도 개선합니다.

    4. 태양(Ex-HN5) — 관자놀이의 다목적 혈자리

    위치: 관자놀이, 눈과 귀 사이의 중간쯤. 손가락으로 누르면 움푹 들어가는 부분입니다.

    지압법: 양쪽 손의 중지나 약지로 관자놀이에 부드럽게 접근한 후, 뒤쪽으로 향하면서 약한 힘으로 원을 그리듯 10초간 마사지합니다. 한 번에 15회, 하루 3회 반복하세요.

    효과: 태양은 눈 피로는 물론 편두통, 안구 통증, 눈과 관자놀이의 뻐근함을 동시에 완화합니다. 눈 주변의 혈류 개선과 신경 긴장 해소에 효과적이며, 현대인의 스트레스성 눈 피로에 특히 추천됩니다.

    5. 합곡(LI4) — 전신 통증과 눈 피로의 통합 혈자리

    LI4 acupuncture point

    위치: 엄지손가락과 검지손가락이 만나는 부분의 중앙, 손가락을 오므렸을 때 가장 높은 지점입니다.

    지압법: 반대쪽 손의 엄지손가락으로 아래쪽(손목 방향)으로 누르면서 천천히 꼭꼭 자극합니다. 한 번에 1분 이상, 하루 2~3회 지압하세요. 한쪽씩 실시해 양쪽 모두 자극하는 것이 좋습니다.

    효과: 합곡은 눈 피로, 안구 충혈, 얼굴의 모든 통증(두통, 치통, 안면통)을 다스리는 ‘만능 혈자리’입니다. 특히 눈 피로로 인한 두통이나 안구 통증이 있을 때 매우 효과적입니다. 손의 자율신경계를 자극해 눈과 뇌의 긴장을 동시에 완화합니다.

    5분 셀프 지압 루틴

    바쁜 아침이나 점심, 저녁에 5분이면 끝내는 눈 피로 완화 루틴입니다.

    1. 청명 (1분): 양쪽 청명을 번갈아가며 10회 × 1세트, 약 1분 소요
    2. 찬죽 (1분): 양쪽 찬죽을 부드럽게 8회 × 1세트, 약 1분 소요
    3. 사죽공 (1분): 양쪽 사죽공을 동그랗게 원을 그리며 10회 × 1세트, 약 1분 소요
    4. 태양 (1분): 양쪽 태양을 동시에 원을 그리며 15회, 약 1분 소요
    5. 합곡 (1분): 양쪽 합곡을 각각 30초씩 꼭꼭 누르기, 약 1분 소요

    팁: 이 루틴을 아침에 일어나자마자, 점심 후 1시간, 저녁 퇴근 후 1회씩 하루 3번 반복하면 눈 피로의 축적을 방지할 수 있습니다. 스스로 편한 시간에 부위 순서를 바꿔도 괜찮습니다.

    ⚠️ 의료 면책조항: 이 글은 건강 정보 제공 목적으로 작성되었으며, 전문적인 의료 진단이나 치료를 대체하지 않습니다. 눈 피로가 3주 이상 지속되거나, 시력 감소, 안구 통증, 이물감, 안압 상승 등 추가 증상이 있다면 반드시 안과 또는 한의원 전문가와 상담하세요. 특히 녹내장, 망막변성, 안구 건조증 등 기저 질환이 있는 경우 지압 전 의료 전문가의 승인을 받으세요.
    🤰 임산부 주의: 합곡(LI4)은 임신 중에는 자궁 수축을 유발할 수 있습니다. 임신 중이거나 임신 가능성이 있는 분은 합곡 지압을 피하시고, 청명·찬죽·사죽공·태양만 가볍게 자극하세요. 불안한 경우 반드시 산부인과 또는 한의원 전문가와 상담 후 시행하세요.
  • How to Relieve Frozen Shoulder Naturally with These 5 Pressure Points

    How to Relieve Frozen Shoulder Naturally with These 5 Pressure Points

    One-Line Summary: Pressing 5 acupoints—Jianjing (GB21), Quchi (LI11), Jianyu (LI15), Tianzong (SI10), and Pianli (LI6)—for 5 minutes daily to relieve frozen shoulder pain and stiffness can improve joint flexibility and reduce nighttime pain within 2-4 weeks.

    Introduction

    Frozen shoulder (adhesive capsulitis) is a shoulder condition commonly seen in people in their 40s-60s, causing severe pain and limited movement due to inflammation and adhesion of the joint capsule. Nighttime pain is particularly severe, disrupting sleep, and even daily activities (putting on clothes, combing hair, etc.) become difficult. While modern medicine may recommend steroid injections or surgery, the acupoint stimulation approach in traditional Chinese medicine is a non-invasive method that activates the body’s own healing abilities. Specific acupoints promote blood circulation around the shoulder, facilitate the elimination of inflammatory substances, and relieve muscle tension. Daily acupressure on the 5 acupoints introduced in this guide can accelerate pain relief and functional recovery as a complementary therapy to medical treatment.

    5 Major Acupoints Effective for Frozen Shoulder

    1. Jianjing (Shoulder Well, GB21) — The ‘Golden Acupoint’ for Shoulder Pain

    Location: From the center point above the clavicle below the neck, moving toward the end of the shoulder, at the highest point of the shoulder (slightly outward from the hollow space between the neck and shoulder)

    WHO Code: GB21

    Acupressure Method: Press vertically with your thumb, applying gentle pressure for the first 5 seconds, then firm pressure (intensity 7-8) for the next 5 seconds, and slowly release over 5 seconds. Repeat this 10 times. Gently rotating your neck after acupressure doubles the effect.

    Effects: GB21 is the most important acupoint for addressing overall shoulder pain and stiffness. Stimulating this point immediately improves local blood circulation and relieves tension in the trapezius muscle, which acts as a trigger point. It is particularly effective in the early stages of frozen shoulder, and you can notice reduced nighttime pain within 3-5 days of consistent stimulation.

    2. Quchi (Pool at the Bend, LI11) — The ‘Bridge Acupoint’ Connecting Arm and Shoulder

    LI11 acupuncture point

    Location: When your elbow is bent, the point at the end of the elbow crease (toward the fingers). When your arm is extended, it’s located approximately 1cm above the outer side of the elbow.

    WHO Code: LI11

    Acupressure Method: Using the thumb of the opposite hand, massage in circular motions for 30 seconds. Apply pressure at an intensity (5-6) where you feel mild discomfort. Alternate between both arms.

    Effects: LI11 is a key acupoint of the Large Intestine Meridian, activating qi and blood flow throughout the arm and upper shoulder. Stimulating this point promotes recovery of the shoulder joint’s range of motion and is excellent for relieving heaviness and numbness in the arm. It is particularly effective in improving arm dysfunction caused by frozen shoulder (lifting, extension).

    3. Jianyu (Shoulder Bone, LI15) — A ‘Pain Relief Point’ Deep in the Deltoid Muscle

    LI15 acupuncture point

    Location: On the front of the shoulder, at the upper outer arm. The hollow point beneath the deltoid muscle when the arm is lifted forward (outer side of the upper arm).

    WHO Code: LI15

    Acupressure Method: Using 3 fingers (index, middle, and ring finger) together, press vertically while performing circular massage for 20 seconds. The intensity should be around 6-7, where you feel pain but can tolerate it. Repeat 3 times on each arm.

    Effects: LI15 is an acupoint that directly accesses the deep muscles and tendons (rotator cuff) around the shoulder joint. It restores flexibility to the stiffened shoulder tissue caused by frozen shoulder and particularly effectively relieves pain when lifting the arm to the side. After 2-3 weeks of consistent stimulation, the range of abduction movement (lifting the arm sideways) noticeably improves.

    4. Tianzong (Heavenly Ancestor, SI10) — A ‘Deep Healing Point’ in the Posterior Rotator Cuff

    SI10 acupuncture point

    Location: On the back of the shoulder, slightly below the center of the scapula (shoulder blade). When crossing your arm across your chest, near the hollow center of the scapula.

    WHO Code: SI10

    Acupressure Method: Gather 3 fingers of the opposite hand and press vertically, holding for 10 seconds. The intensity should be around 7 (mildly painful). Slowly rotating the arm forward and backward while pressing is more effective. Repeat 3-5 times on each side.

    Effects: SI10 directly affects the rotator cuff muscles (infraspinatus and teres minor) and is excellent for resolving muscle adhesion and inflammation, which are the root causes of frozen shoulder. Continuous stimulation of this point is especially essential when shoulder extension (external rotation) is difficult. It is also highly effective for relieving nighttime pain.

    5. Pianli (LI6) — The ‘Upper-Lower Connecting Meridian Point’ of the Arm

    LI6 acupuncture point

    Location: On the inner side of the wrist (thumb side) upper forearm, approximately 10cm above the wrist toward the elbow when the arm is pronated, in the upper third of the forearm center.

    WHO Code: LI6 (or alternative acupoint LI5)

    Acupressure Method: Press vertically with your thumb and perform circular massage for 30 seconds. Use an intensity of 5-6 so that a warm sensation spreads throughout the arm. Repeat 2-3 times on each arm.

    Effects: LI6 is an important point on the meridian running from the shoulder down to the arm, promoting qi and blood circulation throughout the upper limb. Stimulating this acupoint relieves stiffness and numbness in the arm and improves blood circulation to the hand, preventing secondary symptoms caused by shoulder pain. It is particularly recommended for frozen shoulder patients experiencing arm numbness at night.

    5-Minute Self-Acupressure Routine

    Time Allocation and Order:

    1. Preparation (1 minute): Gently wash your shoulder and arm with warm water and relax your muscles by rotating your shoulder.
    2. Jianjing (GB21) – 1 minute: Focus on pressing both Jianjing points, 30 seconds each side. Gradually increase intensity, applying strong pressure for the last 10 seconds.
    3. Quchi (LI11) – 1 minute: Perform circular massage on both Quchi points, 30 seconds each side. Maintain consistent stimulation at an intensity where you feel discomfort.
    4. Jianyu (LI15) and Tianzong (SI10) – 1.5 minutes: Alternate stimulating Jianyu and Tianzong on both sides, 45 seconds each. Maintain intensity of 6-7, perceiving pain but at a tolerable level.
    5. Pianli (LI6) – 0.5 minutes: Finish with 30 seconds of circular massage on both Pianli points. Feel the warm sensation spreading to your arm.

    Recommended Time: After waking in the morning or before bed at night (1-2 times daily). It is more effective when performed at least 1 hour after meals.

    ⚠️ Medical Disclaimer: This article is written for informational purposes only and does not replace professional medical diagnosis or treatment. If symptoms persist or are severe, consult a healthcare professional. The appropriate intensity of acupressure may vary depending on the stage of frozen shoulder progression (freezing, stiffening, thawing phase), so it is recommended to perform acupressure under the guidance of a physician or acupuncturist.
  • Eye Twitching? Press These 5 Points for Natural Relief

    Eye Twitching? Press These 5 Points for Natural Relief

    One-line summary: Eye twitching is caused by meridian imbalance due to stress and fatigue, and symptoms can be relieved through acupressure on five acupoints—Taiyang, Fengchi, Xiaohai, Hegu, and Sanyinjiao.

    Introduction

    If you spend all day looking at screens while working, you’ve probably experienced one eye twitching repeatedly. This symptom is very common, but when it repeats, it causes inconvenience in daily life and acts as a source of stress. In traditional Chinese medicine, eye twitching is viewed as insufficient qi and blood in the spleen, insufficient blood in the liver, and insufficient yin fluids in the kidneys. From a modern medical perspective, causes include hyperexcitability of the facial nerve, stress, lack of sleep, and excessive caffeine intake. Fortunately, stimulating the meridians to promote smooth flow of qi and blood can have significant effects on symptom relief. Since it can be done with fingers alone without any special equipment, self-treatment is possible anytime, anywhere.

    Five Effective Acupoints for Eye Twitching

    1. Taiyang (EX-HN5) — The Most Direct Acupoint Around the Eyes

    Location: On the temple area, approximately 1cm away from the outer corner of the eye. You can find it by placing your finger at the end of the eye and pushing it outward.

    Acupressure method: Using the middle or ring finger of both hands, perform circular massage movements for 30 seconds. Adjust the intensity so it feels slightly warm. Repeat 5-10 times per session.

    Benefits: Promotes blood circulation in the meridians around the eyes and relieves tension in the facial nerve. In addition to eye twitching, it shows immediate effects on migraines and eye fatigue.

    2. Fengchi (GB20) — Promotes Blood Supply to the Brain and Eyes

    GB20 acupuncture point

    Location: Located at the base of the back of the neck, specifically in the hollow area about 2cm inside where the neck meets the hairline. It’s the hollow area you’ll find when following the back of the neck down from below the ear.

    Acupressure method: Using both thumbs, apply pressure in an upward pushing motion. Hold the pressure for 10-15 seconds and release, repeating this 5-10 times. You can also press deeply for about 3-5 seconds at a time.

    Benefits: Promotes blood circulation to the brain and eyes and relieves tension in the nervous system. Very effective for relieving eye twitching, neck stiffness, and headaches.

    3. Xiaohai (SI3) — Nerve Stabilization and Qi-Blood Circulation

    SI3 acupuncture point

    Location: On the side of the finger, specifically in the crease at the base of the little finger (mainly below the finger joint). It’s the point where the crease on the bottom of the little finger and the outer line meet when your hand is open.

    Acupressure method: Press with the opposite thumb for 3-5 seconds and repeat 10 times. It’s best to stimulate both hands. Don’t stimulate with the fingernail; press with the flesh beside the nail.

    Benefits: Directly plays a role in nerve stabilization by stimulating the Small Intestine meridian. Calms nerve hyperexcitability in the eyes and face and promotes qi-blood circulation.

    4. Hegu (LI4) — The Central Hub of Whole-Body Qi-Blood Communication

    LI4 acupuncture point

    Location: At the point where the thumb and index finger meet, slightly angled toward the index finger side. It’s the midpoint of the angle formed by the thumb and index finger bones when your hand is open.

    Acupressure method: Apply pressure with the opposite thumb, pressing downward for 5-10 seconds. Repeat 10-15 times and perform on both hands. Press slowly while taking deep breaths.

    Benefits: As an important acupoint of the Large Intestine meridian, it promotes smooth flow of whole-body qi and blood. Very effective for stress relief, enhanced immunity, and eye twitching relief.

    5. Sanyinjiao (SP6) — Fundamental Solution by Strengthening Spleen Function

    SP6 acupuncture point

    Location: About 10cm above the inner ankle (the width of four thumbs), specifically in the hollow area on the back of the tibia on the inner side of the calf.

    Acupressure method: In a seated position, apply pressure with your thumb in an upward pushing motion for 3-5 seconds. Repeat 10-15 times and stimulate both feet. A slightly painful intensity is appropriate.

    Benefits: Strengthens spleen qi and blood to address the root cause of eye twitching. Also effective for improving sleep, recovering from fatigue, and stabilizing the nervous system. In the long term, it plays a major role in preventing eye twitching recurrence.

    5-Minute Self-Acupressure Routine

    Morning routine (3 minutes):

    1. Taiyang (1 minute): Massage both temples in circular motions. Repeat about 10 times.
    2. Fengchi (1 minute): Apply acupressure to both sides of the back of the neck in an upward pushing motion, 10 times.
    3. Xiaohai (1 minute): Press below the little finger on both hands, 10 times each.

    Evening routine (5 minutes, recommended before bed):

    1. Hegu (2 minutes): Apply acupressure between the thumb and index finger of both hands, 15 times each.
    2. Sanyinjiao (2 minutes): Press deeply on the inner side of both feet, 15 times each.
    3. Taiyang (1 minute): Finish with circular massage of both temples.

    Tip for maximizing effects: Perform with warm hands and proceed while doing deep abdominal breathing. Applying acupressure immediately whenever you feel stressed or eye twitching begins is even more effective.

    🤰 Pregnancy precaution: Among the acupoints above, Hegu (LI4) and Sanyinjiao (SP6) can trigger uterine contractions in pregnant women. If you are pregnant or possibly pregnant, be sure to consult with a professional acupuncturist before proceeding. For pregnant women, stimulation of Taiyang, Fengchi, and Xiaohai only is safe.
    ⚠️ Medical disclaimer: This article is written for informational purposes and does not replace professional medical diagnosis or treatment. If eye twitching persists for more than 2 weeks, occurs in both eyes, or is accompanied by other neurological symptoms (dizziness, headaches), be sure to consult with a healthcare professional (doctor or acupuncturist). Early diagnosis is important as it may be a sign of a neurological disorder.
  • Swelling Relief: 5 Pressure Points That Actually Work

    Swelling Relief: 5 Pressure Points That Actually Work

    One-line summary: To relieve swelling, stimulate five acupoints daily—Sanyinjiao, Yinlingquan, Weizhong, Kunlun, and Taichong—which activate spleen function and promote blood circulation to improve puffiness within 3-5 days.

    Introduction

    Waking up with a puffy face in the morning and swollen legs by evening—most of us experience this at some point. Swelling is more than just a cosmetic concern; it causes discomfort and anxiety. Chronic swelling in particular signals that blood circulation is declining.

    Modern traditional Chinese medicine attributes the root cause of swelling to weakened water-metabolism function of the spleen. The spleen absorbs and eliminates water from the body, and when this function weakens, fluid accumulates in tissues, causing swelling. Fortunately, stimulating specific acupoints can activate spleen function and promote blood circulation. This article introduces the five most effective acupoints for swelling relief and their acupressure techniques.

    Five Acupoints Effective for Swelling Relief

    1. Sanyinjiao (SP6, 三陰交)

    SP6 acupuncture point

    Location: On the inner side of the ankle, approximately 10cm above the medial malleolus, following the inner edge of the tibia upward.

    Benefits: This is the “convergence point of three yin channels” where the spleen, liver, and kidney meridians meet—the key acupoint for systemic water metabolism. By strengthening spleen function, it directly relieves swelling and improves digestion and lower limb circulation.

    Acupressure technique: Using your thumb, apply slow, steady pressure for 5 seconds, then rest for 2 seconds, and repeat. Use enough pressure to feel mild discomfort but not excessive force. Treat each leg for 5 minutes for best results.

    2. Yinlingquan (SP9, 陰陵泉)

    Location: On the inner side of the knee, in the depression at the medial edge of the tibia below the knee. Feel for it in the hollow below the bone when you bend your knee.

    Benefits: As the “sea point” of the spleen meridian, it’s the key acupoint for water metabolism regulation. Beyond swelling, it addresses poor digestion, diarrhea, and gynecological issues, earning it the nickname “water’s acupoint.” It effectively reduces swelling in the legs, abdomen, and face.

    Acupressure technique: With your knee bent, press slowly with your thumb, hold for 5 seconds, then release and repeat. Apply to each leg for 3-5 minutes, and you may notice swelling noticeably decrease right after the massage.

    3. Weizhong (BL40, 委中)

    BL40 acupuncture point

    Location: At the center of the back of the knee, in the middle of the crease that forms when you bend your knee. It’s located where the hamstring muscles end.

    Benefits: As the “sea point” of the bladder meridian, it’s the central point for lower limb water metabolism and blood circulation. It’s especially effective for calf and ankle swelling, leg cramps and pain, and is ideal for people with sedentary jobs.

    Acupressure technique: With your knee slightly bent, press vertically using your thumb or middle finger at an intensity that produces mild pain. Hold for 5 seconds and release, repeating several times. Treat each leg for 3-5 minutes.

    4. Kunlun (BL60, 崑崙)

    BL60 acupuncture point

    Location: On the outer side of the ankle, in the hollow behind the lateral malleolus. Find the depression between bone and tendon on the back of the ankle.

    Benefits: A major acupoint on the bladder meridian, it’s highly effective for both systemic and lower limb swelling. It promotes blood circulation and strengthens kidney function to increase urination, so focus on this point when water elimination is needed.

    Acupressure technique: Position your foot comfortably and slowly press and release repeatedly with your thumb. Consistent, gentle pressure is more important than aggressive force. Treat each side for 3 minutes.

    5. Taichong (LR3, 太衝)

    Location: On the top of the foot, approximately 1.5cm above the point where the bones of the big toe and second toe meet. It’s in the depression you’ll feel on the top of your foot.

    Benefits: As the “spring point” of the liver meridian, it promotes qi circulation in the liver to improve systemic swelling. It’s especially effective for stress-related swelling, facial swelling, and swelling from hormonal changes, and can also improve sleep quality.

    Acupressure technique: Place your foot at a comfortable height and gradually press with your thumb while massaging in circular motions. Treat each side for 2-3 minutes for best results.

    5-Minute Self-Acupressure Routine

    Manage swelling daily with just 10 minutes of investment—morning and evening. Follow this sequence:

    1. Warm-up (1 minute): Sit comfortably with your feet elevated on a table or in a relaxed position. Repeat 3-5 deep breaths to relax your body.
    2. Sanyinjiao (2 minutes): 1 minute on each leg, pressing slowly.
    3. Yinlingquan (2 minutes): 1 minute on each leg.
    4. Weizhong (1 minute): 30 seconds on each leg.
    5. Kunlun (1 minute): 30 seconds on each leg.
    6. Taichong (1 minute): 30 seconds on each leg.
    7. Cool-down: Drink plenty of water after acupressure to increase urination and speed up results.

    Tip: On the go, focusing on just Sanyinjiao, Yinlingquan, and Taichong can still be effective. You’ll notice clear improvement after practicing consistently for at least 3 weeks.

    ⚠️ Medical Disclaimer: This article is for informational purposes only and does not replace professional medical diagnosis or treatment. If symptoms persist or are severe, consult a healthcare professional. Medical evaluation is essential, especially for deep vein thrombosis, lymphedema, or swelling caused by heart disease.
    🤰 Pregnancy Warning: The acupoints listed above—Sanyinjiao (SP6), Taichong (LR3), and Kunlun (BL60)—may trigger uterine contractions in pregnant women. If you are pregnant or possibly pregnant, consult a traditional Chinese medicine practitioner or healthcare professional before use. For pregnant women, stimulating only Yinlingquan (SP9) and Weizhong (BL40) is safer.
  • Elbow Pain Relief: 5 Pressure Points That Actually Work

    Elbow Pain Relief: 5 Pressure Points That Actually Work

    One-line Summary: To relieve elbow pain, press 5 acupoints—Quchi (LI11), Shousanli (LI10), Tianding (LI9), Wuhuishu (TE3), and Zhigou (TE8)—twice daily for 3 minutes each to expect improvement within 1-2 weeks.

    Introduction

    When you use a mouse for long periods or do work that puts strain on your arms, you develop a dull, heavy pain around the elbow. This condition, commonly called ‘tennis elbow’ or ‘golf elbow,’ is a frequent occupational condition in modern life.

    While elbow pain is mainly caused by inflammation from overexertion of muscles and tendons, traditional medicine interprets it also as a result of insufficient qi-blood circulation and meridian blockage. Stimulating acupoints restores qi-blood flow in the corresponding meridians, alleviates pain, and promotes self-healing of damaged tissue. Therefore, it is an effective method that can be easily performed in daily life without medication or surgery.

    5 Acupoints for Relieving Elbow Pain

    1. Quchi (LI11) — The Premier Acupoint for Elbow Pain

    LI11 acupuncture point

    WHO Code: LI11
    Location: At the end of the elbow crease on the outer side of the elbow when the arm is bent. It is the point on the thumb side of the crease.
    Acupressure Technique: Apply slow pressure with your thumb in a circular motion for 10-15 seconds. Repeat 3-5 times in one session.
    Benefits: As a junction point on the Large Intestine meridian, Quchi provides the most direct effect in relieving elbow pain. It is excellent for reducing inflammation, improving blood circulation, and alleviating nerve pain. It is particularly effective for outer elbow pain (tennis elbow).

    2. Shousanli (LI10) — The Acupoint for Relieving Arm Fatigue and Heaviness

    LI10 acupuncture point

    WHO Code: LI10
    Location: Located approximately 1 cun (about 1.5 cm) above the outer elbow crease when the arm is bent. It is on the outer side of the biceps tendon.
    Acupressure Technique: Repeatedly press down and release with your thumb. Apply pressure for 5 seconds per point, repeating 3-5 times.
    Benefits: It relieves muscle tension in the arm and eliminates fatigue. It is effective for overall pain relief from the forearm to the wrist, and is particularly good for removing accumulated fatigue from mouse use or repetitive work.

    3. Tianding (LI9) — The Acupoint for Opening Blocked Qi-Blood Above the Elbow

    LI9 acupuncture point

    WHO Code: LI9
    Location: Located on the outer side of the upper arm, approximately 3 cun (about 4.5 cm) above Quchi. It is on the lateral side of the humerus.
    Acupressure Technique: Slowly press with your thumb or index finger and hold for 10 seconds, repeating 3 times. Since the point is deep, apply moderately firm pressure.
    Benefits: It relieves pain in the upper arm and stiffness in muscles. It promotes qi-blood circulation, resolving tension and pain above the elbow, and smoothens arm movement.

    4. Wuhuishu (TE3) — The Acupoint for Quickly Calming Pain on the Side of the Arm

    TE3 acupuncture point

    WHO Code: TE3
    Location: Located on the outer side of the upper arm, approximately 2 cun (about 3 cm) above the elbow crease when the arm is bent. It is above the triceps.
    Acupressure Technique: Precisely stimulate with the tip of your thumb. Press for 5 seconds, then release for 2 seconds, repeating 5 times.
    Benefits: As a point on the Triple Burner meridian, it rapidly relieves nerve pain and muscle pain throughout the arm. It is particularly effective for tingling sensations or burning pain on the side of the arm.

    5. Zhigou (TE8) — The Acupoint for Resolving Pain at the Elbow-Forearm Boundary

    TE8 acupuncture point

    WHO Code: TE8
    Location: Located slightly above the boundary between the elbow and forearm, at the center of the back of the arm. It is near the radial nerve.
    Acupressure Technique: Slowly press with your thumb, applying pressure for 5 seconds without causing pain. Repeat 3-5 times. Since there is a nerve in this area, avoid excessive stimulation.
    Benefits: It relieves pain radiating from the elbow to the forearm. It is particularly useful for relieving forearm pain caused by golf elbow or repetitive strain injury (RSI).

    5-Minute Self-Acupressure Routine

    This routine is most effective when performed twice daily (morning and evening):

    1. Preparation (30 seconds): Sit in a comfortable position and rest your arms comfortably.
    2. Quchi (LI11) Acupressure (1 minute): Place your thumb on Quchi on the painful arm, and repeat circular pressing motions for 10-15 seconds, 3 times.
    3. Shousanli (LI10) Acupressure (1 minute): Move to Shousanli above Quchi and repeat in the same manner, 3 times.
    4. Tianding (LI9) Acupressure (1 minute): Stimulate Tianding on the upper arm, 3 times for 5 seconds each.
    5. Wuhuishu (TE3) & Zhigou (TE8) (1.5 minutes): Alternately stimulate Wuhuishu and Zhigou on the side of the arm, 30 seconds each.
    6. Cool-down (30 seconds): After acupressure, gently stretch your arm to promote blood circulation.

    Note: Avoid strenuous exercise immediately after acupressure and maintain rest for 1-2 hours. It is best to perform this routine at least 2 hours after eating.

    ⚠️ Medical Disclaimer: This article is written for informational purposes and does not replace professional medical diagnosis or treatment. If symptoms persist or are severe, or if you experience swelling, warmth, or severe pain in your elbow, consult a healthcare professional. You may have a serious condition such as fracture, ligament damage, or nerve compression.
  • Dry Eyes? Press These 5 Points for Natural Relief

    Dry Eyes? Press These 5 Points for Natural Relief

    One-line summary: Dry eye syndrome is relieved by acupressure on the acupoints around the eyes, which improves blood circulation. Stimulate 5 points—Jingming, Zanzhu, Taiyang, Tongziliao, and Sizhukongjing—for 5 minutes daily.

    Introduction

    Dry eye syndrome is a condition that anyone who spends long hours looking at screens experiences. Do you know that frustrating feeling when your eyes feel dry and gritty, become bloodshot, and are hard to keep open? This symptom threatens eye health beyond mere inconvenience, but can be effectively relieved through acupoint acupressure.

    In traditional Chinese medicine, acupoints distributed around the eyes regulate blood circulation to the eyes and help recover from eye fatigue. In particular, stimulating acupoints located around the eyes and face helps ease tension in the muscles around the eyes, promotes tear secretion, and improves blood circulation on the eye surface. Now let me introduce the 5 key acupoints for relieving dry eye syndrome.

    5 Acupoints for Dry Eye Syndrome

    1. Jingming (晴明, BL1) — The First Solution for Eye Health

    BL1 acupuncture point

    Location: The depressed point at the inner corner of the eye (at the boundary between the nose and eye).

    Acupressure technique: Using your index or middle finger on both sides, slowly apply pressure at a rate of about 1 press per second. Apply 10-15 presses with one hand, or about 30 total presses on both sides. Start with a pressure level that feels slightly tender and gradually increase the intensity.

    Benefits: Jingming is the most important acupoint related to the eyes and serves as a fundamental treatment point for nearly all eye conditions, including dry eyes, eye fatigue, bloodshot eyes, and vision decline. Because it most directly improves blood circulation around the eyes, it is the first acupoint used for all eye symptoms.

    2. Zanzhu (攢竹, BL2) — Fatigue Relief at the Inner Eyebrow

    BL2 acupuncture point

    Location: The inner end of both eyebrows, directly above the nose at the point where the eyebrow is closest to the nose.

    Acupressure technique: Using your thumbs on both sides, apply pressure by pushing inward and upward. Hold each press for about 3-5 seconds and repeat 10 times. Since you’re stimulating the eyebrow bone, distribute the pressure evenly along the bone.

    Benefits: Zanzhu is particularly effective for relieving eye fatigue. It helps alleviate heavy eyes, a pulling sensation in the forehead, and darkening vision that may accompany dry eye syndrome. When stimulated together with Jingming, the synergistic effect is maximized.

    3. Taiyang (太陽, EX-HN5) — The Mysterious Acupoint at the Temple

    Location: At the temple area about 1-1.5cm lateral to the outer corner of the eye, in the depressed point between the eye and ear.

    Acupressure technique: Using your middle or ring finger on both sides, gently massage in circular motions. Start with light pressure and gradually increase it, applying 10 circular motions in one direction and 10 in the opposite direction. Alternating between clockwise and counterclockwise motions is also beneficial.

    Benefits: Taiyang promotes blood circulation around the eyes and relieves headaches caused by eye fatigue. It is very effective at relieving migraines and tension around the eyes that may accompany dry eye syndrome.

    4. Tongziliao (瞳子髎, GB1) — The Supplementary Acupoint at the Outer Eye

    GB1 acupuncture point

    Location: About 0.5-1cm lateral to the outer corner of the eye, in the small depressed point above the cheekbone.

    Acupressure technique: Using your ring or middle finger on both sides, apply gentle pressure and hold for about 3-5 seconds. Repeat 10-15 times. Since the skin around the eyes is sensitive, start with very light pressure and adjust the intensity within a pain-free range.

    Benefits: Tongziliao improves blood circulation around the eyes and directly relieves dry eye symptoms. It is particularly effective when stimulated together with Jingming for dry, bloodshot eyes.

    5. Sizhukongjing (絲竹空, TE23) — The Recovery Acupoint at the Eyebrow End

    TE23 acupuncture point

    Location: At the outer end of both eyebrows, where the eyebrow ends. Look for the depressed point that resembles a small valley.

    Acupressure technique: Using your index or middle finger on both sides, apply gentle pressure and hold for about 3-5 seconds. Repeat 10-15 times. Stimulating with a gentle massage along the eyebrow bone is even more effective.

    Benefits: Sizhukongjing is specialized in promoting eye fatigue recovery and blood circulation around the eyes. It helps alleviate eye fatigue and eye twitching symptoms that may accompany dry eye syndrome.

    5-Minute Self-Acupressure Routine

    Recommended timing: It is most effective to practice this routine three times a day—morning, noon, and evening—for 5 minutes each time. You can feel immediate relief when you practice it, especially after using a computer for long periods or when your eyes feel tired.

    Order of practice and time allocation:

    1. Jingming (1 minute) — Allocate sufficient time as it is the most important acupoint. 30 seconds on each side.
    2. Zanzhu (1 minute) — The second most important acupoint. 30 seconds on each side.
    3. Taiyang (1 minute) — Stimulate gently in circular motions. 30 seconds on each side.
    4. Tongziliao (1 minute) — Apply light pressure. 30 seconds on each side.
    5. Sizhukongjing (1 minute) — Gently massage along the eyebrow. 30 seconds on each side.

    Precautions:

    • Be careful not to scratch with your fingernails, as the facial skin in this area is very sensitive.
    • For the first 1-2 weeks, start with light pressure and observe your skin’s reaction before increasing the intensity.
    • If your eyes become bloodshot or experience severe pain after acupressure, stop immediately.
    • You should practice consistently for at least 2-4 weeks to see results.
    ⚠️ Medical Disclaimer: This article is provided for informational purposes only and does not replace professional medical diagnosis or treatment. If symptoms persist or are severe, please consult a healthcare professional.
  • How to Relieve Ear Pain Naturally with These 5 Pressure Points

    How to Relieve Ear Pain Naturally with These 5 Pressure Points

    One-line summary: Ear pain can be effectively relieved and blood circulation improved by applying daily acupressure to 5 key acupoints—Auditory Gate (TE17), Chong Zhu (TE3), Wind Pool (GB20), Complete Bone (GB12), and Union Valley (LI4)—for 5 minutes each day.

    Introduction

    Sudden ear pain can significantly disrupt daily life. The ear is a highly sensitive nerve-rich area where pain can occur due to various causes including muscle tension, inflammation, and stress. In particular, modern people are increasingly experiencing ear pain due to “tech neck” from increased smartphone use and stress.

    In Eastern medicine, meridians (pathways) are believed to connect the ear and surrounding areas with various parts of the body. Appropriate stimulation of acupoints promotes blood circulation, relieves nerve tension, and activates the body’s natural healing ability. Since it can be practiced at home anytime with just a finger and without medication, many people are managing ear pain through acupoint acupressure.

    5 Acupoints Effective for Relieving Ear Pain

    1. Auditory Gate (TE17)

    TE17 acupuncture point

    WHO Code: TE17 (Triple Burner Meridian)

    Location: At the front of the ear, in the depression in front of the ear when the mouth is open. The exact location of Auditory Gate is the hollow area directly in front of the jaw joint.

    Massage technique: Using the index and middle fingers of both hands, apply pressure in circular motions for 5-10 seconds, repeating 10 times. Applying pressure while the mouth is slightly open allows for accurate stimulation of the point. Perform this 2-3 times daily.

    Benefits: Auditory Gate is the acupoint with the most direct effect on ear pain. It can alleviate ear infections, hearing loss, tinnitus, and even temporomandibular joint pain. It is particularly effective for pain in front of the ear or lingering symptoms of otitis media.

    2. Chong Zhu (TE3)

    TE3 acupuncture point

    WHO Code: TE3 (Triple Burner Meridian)

    Location: Between the ring finger and pinky finger on the hand, in the groove between the finger bones that forms when the fingers are bent. It is located on both hands.

    Pressure technique: Using the pad of your thumb, apply steady pressure for 5-10 seconds, then release. Repeat this 10 times on each hand, performing on both hands. You should feel slight tenderness.

    Benefits: Chong Zhu is a distal acupoint that alleviates not only ear pain but also migraines, facial neuralgia, and tinnitus. Since the hands can be stimulated anywhere, anytime, you can easily apply acupressure at work or while traveling.

    3. Wind Pool (GB20)

    GB20 acupuncture point

    WHO Code: GB20 (Gallbladder Meridian)

    Location: At the back of the neck, just above the hairline, in the hollow between the neck muscles and the spine. It is located on both sides at the back of the neck behind each ear.

    Massage technique: Using both thumbs, apply moderate pressure upward for 5-10 seconds. If the neck muscles are tight, massage in circular motions. Perform this 2 times daily, 1-2 minutes each morning and evening.

    Benefits: Wind Pool simultaneously alleviates ear and temporal pain as well as neck and shoulder stiffness. It is particularly effective for stress-induced tension pain and is excellent when both headache and ear pain are present.

    4. Complete Bone (GB12)

    GB12 acupuncture point

    WHO Code: GB12 (Gallbladder Meridian)

    Location: Directly in front of the protruding bone behind the ear (mastoid process), at the boundary between the muscle extending from behind the ear downward and the bone.

    Pressure technique: Overlap your index and middle fingers and press forward for 5-10 seconds. Repeat 10 times on each side, performing 2 times daily. Do not press too hard; moderate pressure is appropriate.

    Benefits: Complete Bone directly addresses pain behind the ear and temporal pain. It shows quick results for nerve pain behind the ear or swollen lymph nodes behind the ear, and also relieves tension in the neck and shoulders.

    5. Union Valley (LI4)

    LI4 acupuncture point

    WHO Code: LI4 (Large Intestine Meridian)

    Location: In the hollow between the thumb and index finger on the hand, in the center between the two fingers when the hand is extended. It is also called the “quiet blood area.”

    Pressure technique: Using the thumb of the opposite hand, apply pressure at a level of slight discomfort for 5-10 seconds. You can also massage in circular motions. Perform on both hands. Repeat approximately 10 times, 2-3 times daily.

    Benefits: Union Valley is often called the “sovereign of acupoints” due to its wide range of effects. It is effective for ear pain, facial neuralgia, migraines, and general pain relief, and also helps strengthen immunity and relieve stress. It is particularly a fundamental acupoint for managing whole-body pain.

    5-Minute Self-Acupressure Routine

    The following sequence is recommended to maximize effectiveness:

    1. Chong Zhu (TE3) pressure — 1 minute
      Apply pressure to Chong Zhu on both hands, 30 seconds each, for a total of 1 minute. Since the hands can be stimulated anywhere, it’s good to start this routine in the morning when you wake up.
    2. Union Valley (LI4) pressure — 1 minute
      Apply pressure to Union Valley on both hands, 30 seconds each, for a total of 1 minute. Since both Chong Zhu and Union Valley are located on the hands, it’s efficient to perform them together.
    3. Auditory Gate (TE17) pressure — 1 minute
      With the mouth slightly open, apply pressure to Auditory Gate on both sides, 30 seconds each, for a total of 1 minute. Accurate point stimulation is important, so find the exact location you feel and proceed slowly.
    4. Wind Pool (GB20) pressure — 1 minute
      Apply pressure to Wind Pool on both sides, 30 seconds each, for a total of 1 minute. If the neck muscles are tight, proceed with massage in circular motions.
    5. Complete Bone (GB12) pressure — 1 minute
      Apply pressure to Complete Bone on both sides, 30 seconds each, for a total of 1 minute. If pain behind the ear is severe, you may allocate more time to this step.

    Practice tips: This routine is most effective when performed 2 times daily—after waking in the morning and before sleep in the evening. Drinking warm water after acupressure helps promote blood circulation. On days with severe pain, you can increase the frequency to 3 times daily.

    ⚠️ Medical Disclaimer: This article is written for informational health purposes and does not replace professional medical diagnosis or treatment. If ear pain persists for more than 2 weeks, or if accompanied by other symptoms such as hearing loss, fever, or discharge, please consult an otolaryngologist or healthcare professional. Additionally, if you suspect ear trauma or perforation, please visit a medical facility immediately.
    🤰 Pregnancy Warning: Among the acupoints introduced in this post, Union Valley (LI4) can trigger uterine contractions in pregnant women. If you are pregnant or there is a possibility of pregnancy, perform only the other acupoints (Auditory Gate, Chong Zhu, Wind Pool, and Complete Bone) while excluding Union Valley, or consult with a professional before practicing.
  • The 5 Best Acupressure Points for Excessive Sweating (With Exact Locations)

    The 5 Best Acupressure Points for Excessive Sweating (With Exact Locations)

    One-Line Summary: Applying acupressure to 5 acupoints—SP6, LI4, LR3, BL60, and LU7—for 5 minutes daily can normalize your body’s temperature regulation function and reduce excessive sweating.

    Introduction

    Sweat dripping down even on cool days, excessive sweating so severe that it dampens your clothes and causes odor, making daily life uncomfortable—you’re not alone. Modern people suffer from excessive sweating due to stress, hormonal imbalance, and reduced thermoregulation function. In traditional Chinese medicine, excessive sweat secretion is viewed as a loss of “body fluids” and “qi deficiency.” By stimulating specific acupoints, you can normalize your body’s internal temperature regulation mechanism. Before turning to medication, try starting with simple acupoint acupressure. We’ll show you the exact locations and acupressure techniques for 5 WHO-recognized acupoints.

    The 5 Acupoints

    1. Sanyinjiao (SP6)

    SP6 acupuncture point

    Location: On the inner surface of the tibia (shin bone), approximately 4 finger widths (about 10 cm) above the inner ankle bone. To find the exact location, use the highest point of the prominent bone on the inner ankle as your reference point.

    Acupressure Technique: Using your thumb, press for 3-5 seconds and release for 1 second, repeating this cycle. Apply for about 1 minute on each side, totaling about 2 minutes. The ideal pressure intensity is “hurts good”—tender but pleasant.

    Benefits: Stimulates the spleen meridian to promote body fluid metabolism and reduce excessive water loss. Particularly effective for heat-related sweating caused by hormonal imbalance and helpful for menstrual-related sweating in women. Also contributes to strengthening immunity.

    2. Hegu (LI4)

    LI4 acupuncture point

    Location: In the webbing between the thumb and index finger. It’s located slightly elevated on the back of the hand. When you press it with another finger, you’ll feel a slightly tender spot—that’s the right location.

    Acupressure Technique: Using the tip of your thumb, gradually increase pressure and maintain at the peak for 10-15 seconds. Alternate between both hands and repeat 3-4 times. Apply for about 2 minutes per side, totaling about 4 minutes for both sides.

    Benefits: An important acupoint that regulates qi (vital energy) throughout the body, lowering nervous system excitability and suppressing excessive sweating caused by sympathetic nervous tension. Excellent for enhancing immunity and relieving stress, and also helps improve headaches and fatigue simultaneously.

    3. Taichong (LR3)

    Location: On the top of the foot, in the depression between the first and second metatarsal bones, slightly above the web between the big toe and second toe. It’s located in the hollow space between the bones, and pressure is applied toward the center of the foot.

    Acupressure Technique: Using your thumb, slowly press and release repeatedly. Press for 3-5 seconds, rest for 1 second, and repeat 8-10 times. Apply for about 3 minutes total on both feet.

    Benefits: Regulates the liver meridian to reduce sweating caused by stress and emotional instability. Normalizes hormone secretion and balances the autonomic nervous system to improve unstable temperature regulation. Also helps induce deep sleep, making it particularly effective for nighttime sweating.

    4. Kunlun (BL60)

    BL60 acupuncture point

    Location: In the depression between the lateral ankle bone (fibular malleolus) and the Achilles tendon. It’s located directly behind the most prominent bone on the outer side of the ankle.

    Acupressure Technique: Using the tip of your thumb, press vertically for 3-5 seconds and rest for 1 second, repeating this cycle. Apply pressure alternately to both Kunlun points for a total of about 3 minutes, being careful not to press too hard.

    Benefits: An important acupoint on the bladder meridian that expels internal heat and cools deeper body heat. Particularly effective at relieving nighttime sweating and also improves lower back pain and leg fatigue. Promotes whole-body blood circulation to normalize temperature regulation function.

    5. Lieque (LU7) or Yinlingquan (SP9)

    Location of Lieque: On the inner wrist, about 2.5 cm toward the forearm from the wrist crease, in the depression between two bones (the radius and ulna).

    Lieque Acupressure Technique: Using your thumb, slowly press and release, repeating 6-8 times. Apply for about 1 minute per side, totaling about 2 minutes for both sides.

    Location of Yinlingquan: On the inner side of the knee, in the depression found where the edge of the tibia meets the inner knee as you move upward from the inner knee.

    Yinlingquan Acupressure Technique: Using your thumb, press for 3-5 seconds and rest for 1 second, repeating this cycle for about 2 minutes total on both sides.

    Benefits: Lieque regulates the lung meridian to normalize respiratory function and control sweat secretion on the skin surface. Yinlingquan is particularly effective at removing damp-heat, making it especially beneficial for damp-heat-type excessive sweating. Both acupoints support digestive function and help reduce swelling.

    5-Minute Self-Acupressure Routine

    Total Time Required: About 5 minutes (5 minutes per session, 2 sessions daily recommended)

    Recommended Times: 5 minutes after waking in the morning, and 5 minutes about 1 hour before bedtime

    1. Preparation (30 seconds): Sit in a comfortable position and take 3 deep breaths. Warm your hands and feet.
    2. Sanyinjiao Acupressure (1 minute): Apply pressure to both sides for 30 seconds each. Maintain a moderate pressure intensity.
    3. Hegu Acupressure (1 minute): Apply pressure to Hegu on both hands alternately. Maintain deep, slow breathing.
    4. Taichong Acupressure (1 minute): Gently apply pressure to both feet for 30 seconds each. Move your toes to enhance the effect.
    5. Kunlun Acupressure (1 minute): Apply pressure to both feet for 30 seconds each. Maintaining consistent pressure is important.
    6. Lieque or Yinlingquan (1 minute): Apply pressure to both sides for 30 seconds each. Finish by gently tapping the area.

    Tips to Maximize Effects: Drinking a cup of warm barley tea or water after acupressure helps boost metabolism. Avoid exposure to cold air, and refrain from soaking your hands and feet in cold water for 1 hour after acupressure.

    ⚠️ Medical Disclaimer: This article is provided for informational purposes only and does not replace professional medical diagnosis or treatment. If symptoms persist or are severe, please consult a healthcare professional. Excessive sweating may be a sign of underlying conditions such as diabetes, thyroid disease, or infection, so please seek medical evaluation if necessary.
    🤰 Pregnancy Warning: Among the above acupoints, Hegu (LI4), Sanyinjiao (SP6), Taichong (LR3), and Kunlun (BL60) may induce uterine contractions in pregnant women. If you are pregnant or may be pregnant, please consult with a healthcare professional before practicing. During pregnancy, it is recommended to apply only light pressure to Yinlingquan (SP9) and Lieque (LU7).