Author: Acupoint Guide Editorial Team

  • Where Is Zhongfu (LU1)? Location, Benefits, and Technique

    Where Is Zhongfu (LU1)? Location, Benefits, and Technique

    Summary: Zhongfu (LU1) is the first acupoint on the Lung meridian that supports lung function and alleviates respiratory disorders and chest pain.

    What is Zhongfu?

    Zhongfu (LU1) is an acupoint on the Lung Meridian of Hand-Greater Yin, which is the starting point of the Lung meridian. ‘Zhong’ means central and ‘Fu’ means region. It is an important acupoint that strengthens lung function and promotes respiratory health. In traditional Chinese medicine, it is frequently used to treat lung-related conditions such as cough, asthma, and chest pain.

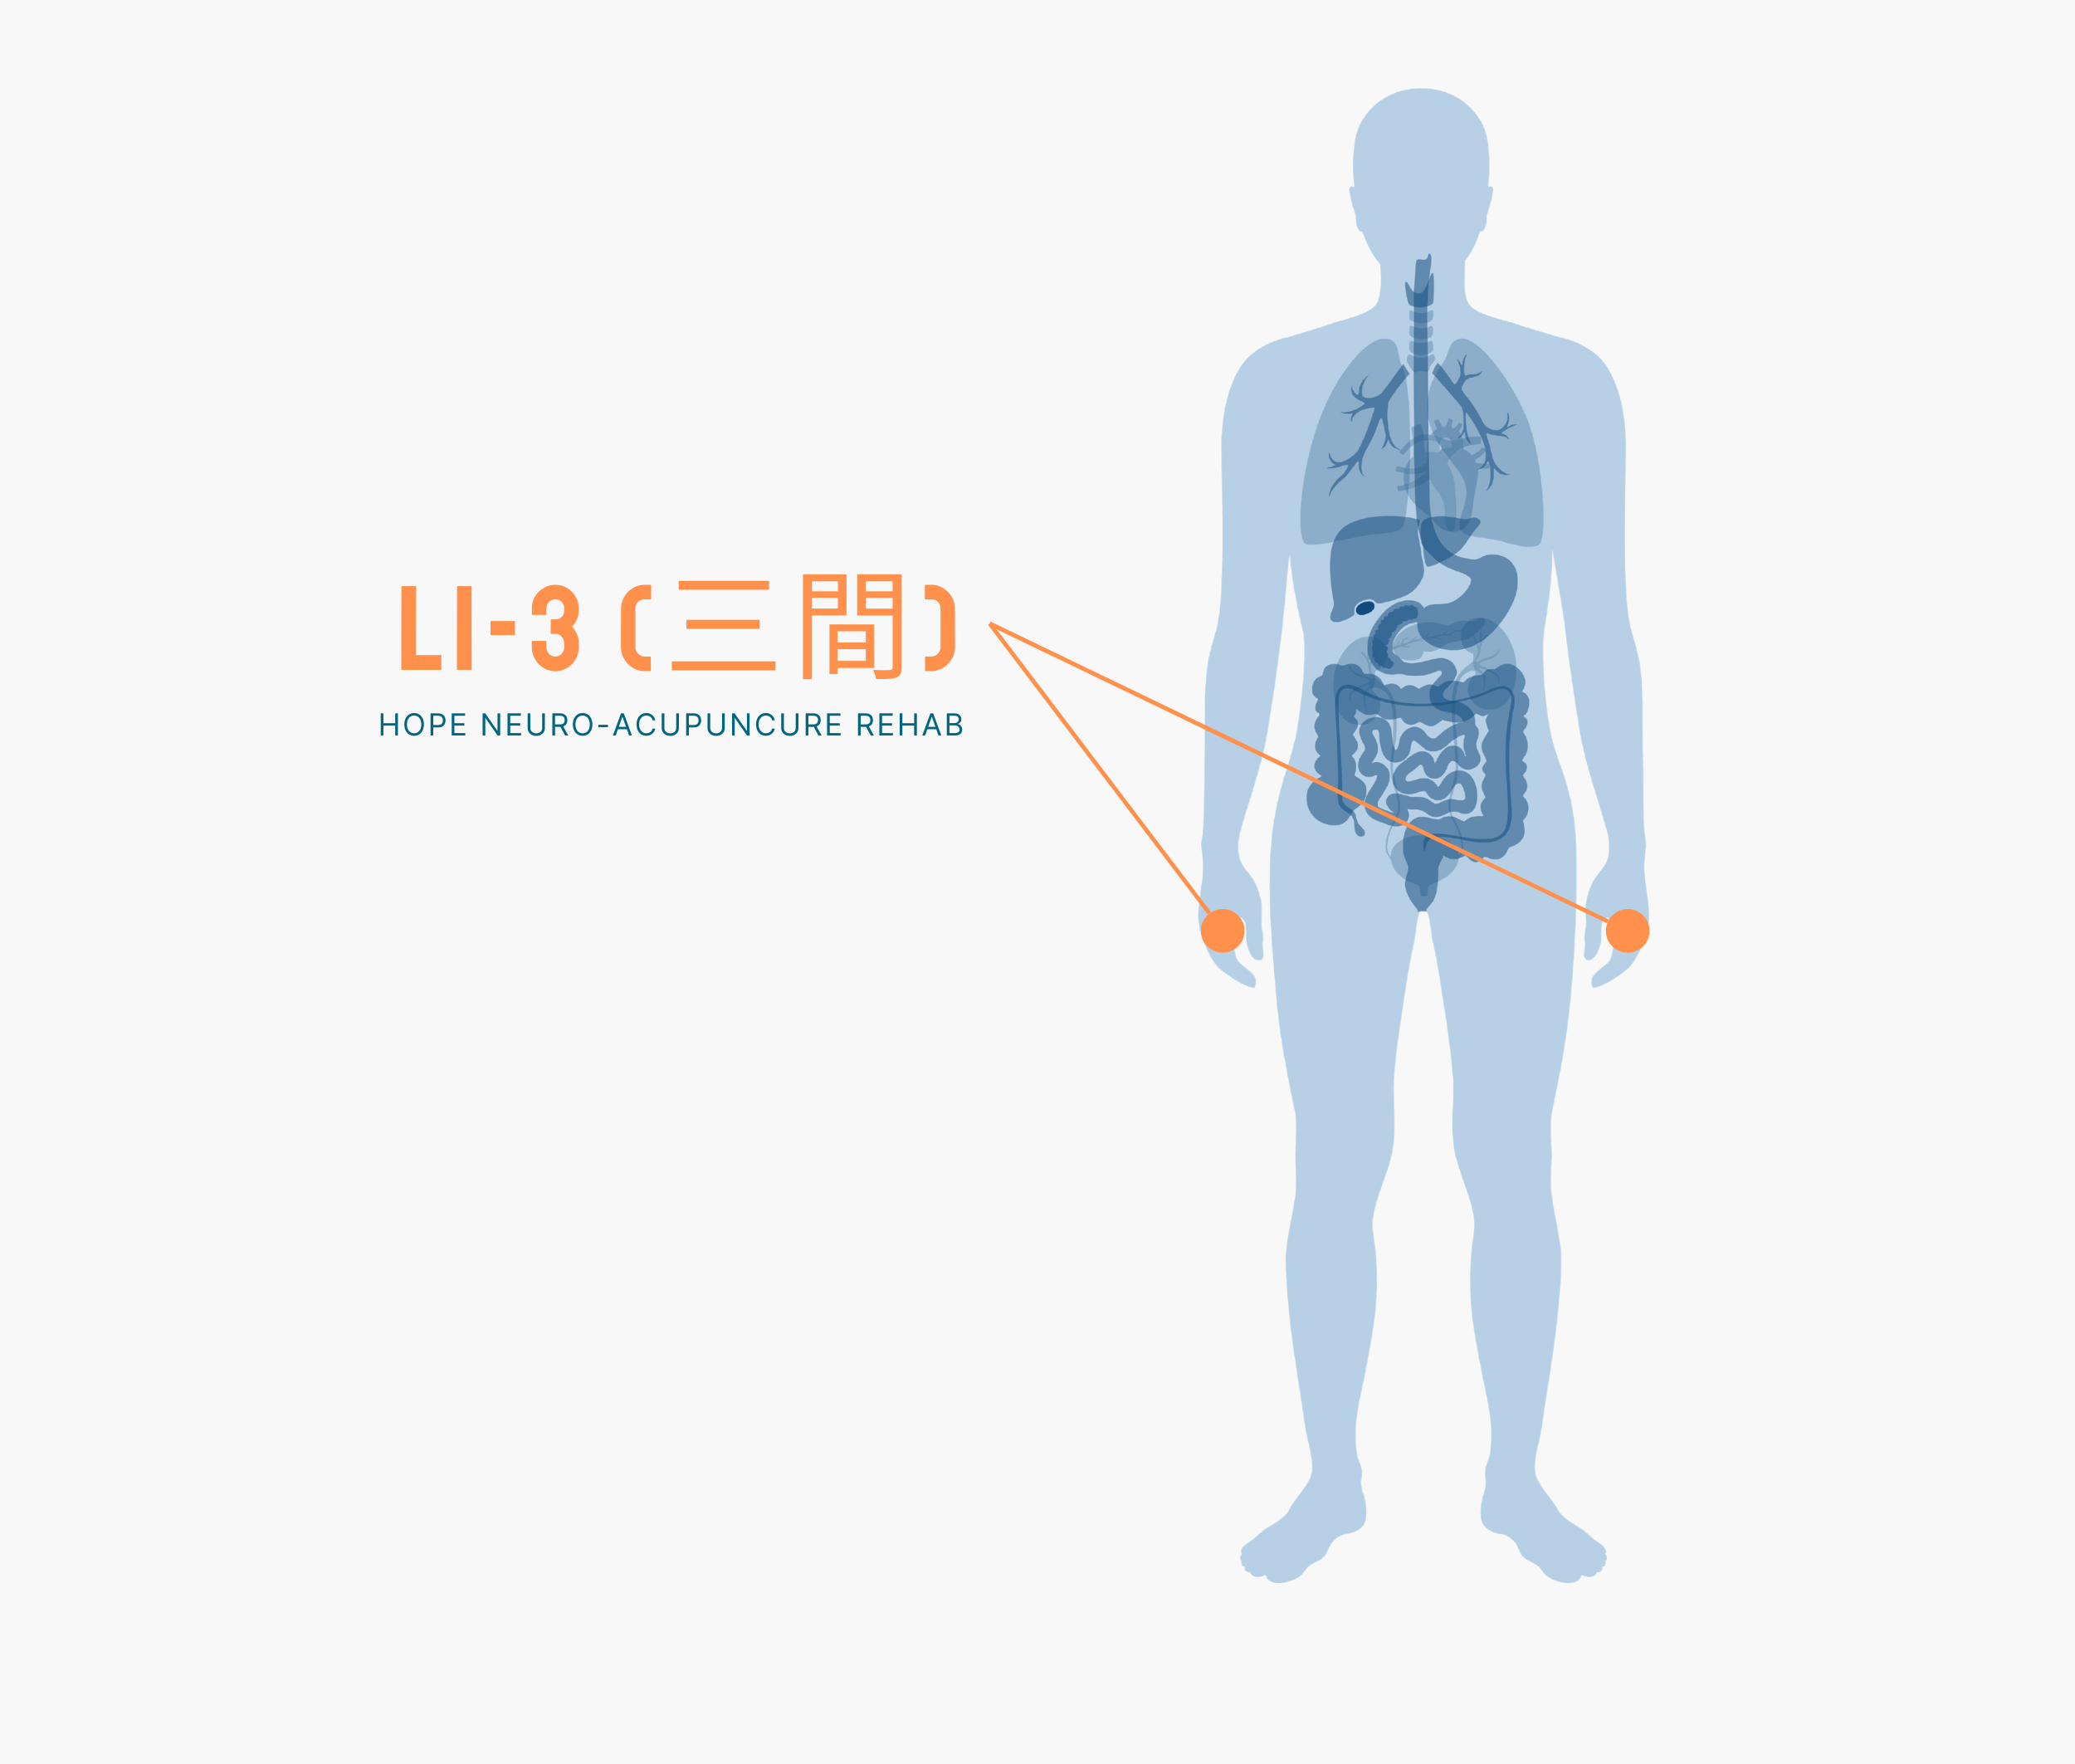
    How to Locate the Exact Position

    Step 1: Find the area below the clavicle.
    Step 2: Move down approximately 1 cun (about 1.3 cm) below the clavicle.
    Step 3: Find a location approximately 6 cun (about 18 cm) lateral to the midline at the center of the neck.
    Step 4: Zhongfu is the point where you feel slight tenderness when pressing the hollow area between the pectoralis major and pectoralis minor muscles.

    Acupressure Technique

    Position: Sit or stand comfortably.
    Fingers: Use your thumb or middle finger.
    Pressure: Press slowly and deeply, applying enough pressure to feel slight tenderness without pain.
    Duration: Apply for 1-2 minutes per session, repeating 2-3 times daily.
    Breathing: The effect is enhanced when performing acupressure while taking deep breaths.

    Primary Benefits

    • Relieves cough: Improves dry cough or cough with phlegm.
    • Alleviates asthma symptoms: Relieves shortness of breath and asthmatic episodes.
    • Relieves chest pain: Improves chest pain related to the lungs and heart.
    • Alleviates shoulder pain: Releases tension in the shoulder and neck muscles.
    • Improves breathing: Enhances lung function to promote deep and easy breathing.

    When is the Best Time to Apply Acupressure?

    Optimal time: Best in the morning after waking up or in the evening before bedtime.
    Situational use: It’s effective to apply acupressure immediately when coughing, experiencing shortness of breath, feeling chest tightness, or when shoulders feel tight.
    Prevention: Applying acupressure in advance during seasons when respiratory health is vulnerable (seasonal transitions and winter) helps prevent illness.

    Precautions

    Contraindications: Professional consultation is necessary if you are pregnant or have serious cardiopulmonary disease.
    Pressure control: Avoid excessive stimulation and maintain gentle pressure that produces slight tenderness.
    Hygiene: Wash your hands thoroughly before applying acupressure.
    Medical consultation: If symptoms persist, consult a traditional Chinese medicine practitioner or physician.

    🤰 Pregnant Women Warning: Certain acupoints such as Sanyinjiao (SP6), Hegu (LI4), and Taichong (LR3) may trigger uterine contractions in pregnant women. If you are pregnant or may be pregnant, consult with a traditional Chinese medicine practitioner or healthcare professional before using acupressure.
    ⚠️ Medical Disclaimer: This article is provided for informational purposes and does not replace professional medical diagnosis or treatment. If symptoms persist or are severe, please consult a healthcare professional.
  • 5 Acupressure Points for Wrist Pain — Quick Self-Massage Guide

    5 Acupressure Points for Wrist Pain — Quick Self-Massage Guide

    한 줄 요약: 손목 통증은 태연, 내관, 대릉, 합곡, 외관 혈자리의 정기적인 자극으로 경맥 순환을 개선하여 완화할 수 있습니다. 셀프 지압은 비용 효율적인 통증 관리 방법입니다.

    도입부

    마우스 클릭, 스마트폰 터치, 요리와 빨래—현대인의 손목은 쉴 틈 없이 움직입니다. “손목이 자주 저린다”, “손목을 굽히면 통증이 온다”, “손목이 뻣뻣하고 아프다”는 증상은 직장인과 학생들 사이에서 흔한 불편입니다.

    손목 통증의 원인은 다양합니다. 반복적인 움직임으로 인한 근육 피로, 손목터널증후군(CTS), 염좌, 또는 경추의 문제가 손목까지 영향을 미칠 수 있습니다. 한의학에서는 이러한 손목 통증을 경맥의 불균형으로 보고, 특정 혈자리의 자극을 통해 기혈 순환을 개선하는 것을 중요하게 여깁니다.

    이 글에서 소개하는 5가지 혈자리는 손목 통증 완화에 특히 효과적으로 알려져 있습니다. 사무실에서, 집에서, 이동 중에도 쉽게 자극할 수 있어 직장인의 필수 셀프 케어 도구가 될 것입니다.

    손목 통증 완화를 위한 혈자리 5곳

    1. 태연(TE5, 外關) — 손목 통증의 대표 혈자리

    TE5 acupuncture point

    위치: 삼초경(三焦經)에 속하는 혈자리로, 손등 쪽 손목 주름에서 팔 방향으로 약 2-3cm 떨어진 요골(엄지뼈)과 척골(새끼손가락뼈) 사이의 공간입니다. 정확하게는 손목을 펴면 손등 위에 두 개의 뼈 사이 골짜기에서 팔 쪽으로 약 2-3cm 올라간 지점입니다.

    효과: 태연은 손목 통증, 팔꿈치 통증, 상완신경통에 효과적입니다. 특히 손목을 구부리거나 펼 때 생기는 통증 완화에 탁월하며, 한의학에서는 “외감병”(외부 사기로 인한 질병)을 치료하는 데도 사용됩니다.

    지압 방법: 엄지손가락 끝으로 태연 부위에 수직으로 압력을 가합니다. 아프면서도 시원한 통증이 느껴질 정도의 강도로 3-5초간 누르고 놓기를 반복합니다. 양손을 번갈아가며 각 3분씩 시행하세요.

    2. 내관(PC6, 內關) — 손목 통증과 스트레스 완화

    PC6 acupuncture point

    위치: 심포경(心包經)에 속하며, 손목의 안쪽(손가락 방향)에 위치합니다. 손목의 안쪽 주름에서 팔 방향으로 약 2-3cm 올라가되, 두 개의 힘줄(장 노근과 손가락 굽힘 힘줄) 사이의 중앙입니다. 간단히는 손목 안쪽 주름에서 손가락 두 개 너비만큼 팔 쪽으로 올라간 지점입니다.

    효과: 내관은 손목 통증뿐만 아니라 손가락 저림, 팔 통증, 그리고 불안감이나 스트레스로 인한 가슴 두근거림까지 완화합니다. 현대인의 스트레스성 손목 통증에 매우 적합한 혈자리입니다.

    지압 방법: 엄지손가락으로 직접 누르거나, 반대편 손의 손가락 관절로 문지르듯 자극합니다. 강도는 중간 정도로, 약 1분에 60-80회 정도의 속도로 문지르면 좋습니다. 좌우 각 2분씩 시행하세요.

    3. 대릉(PC7, 大陵) — 손목 통증과 수면 개선

    PC7 acupuncture point

    위치: 심포경에 속하며, 손목의 손가락 쪽 주름 중앙에 위치합니다. 손목을 조금 펴면 손목 안쪽에 두 개의 힘줄이 있는데, 바로 그 사이의 중앙이 대릉입니다. 손가락을 손목 쪽으로 구부리면 손목 주름이 생기는데, 그 주름의 중앙입니다.

    효과: 대릉은 손목 통증, 팔 저림, 그리고 불면증과 불안감 개선에 효과적입니다. 손목 통증으로 인한 수면 방해가 있을 때 특히 유용하며, 정신을 안정시키는 효과도 있습니다.

    지압 방법: 엄지손가락으로 수직으로 눌러줍니다. 통증이 약간 있을 정도의 강도로 3-5초간 누르고 놓기를 반복합니다. 특히 자기 전 1-2분씩 자극하면 수면 개선까지 도움이 됩니다.

    4. 합곡(LI4, 合谷) — 전신 통증 완화의 특효혈

    LI4 acupuncture point

    위치: 대장경(大腸經)에 속하며, 엄지손가락과 검지손가락 사이의 뼈 갈라진 곳(제1-2중수골간)입니다. 손을 펼쳤을 때 엄지와 검지 사이 손등 부위에서 손가락을 모으면 볼록하게 솟아오르는 근육(제1배측골간근) 위 지점입니다.

    효과: 합곡은 “전신 통증의 특효혈”로 불리며, 손목 통증은 물론 두통, 목 통증, 팔꿈치 통증 등 전신의 다양한 통증을 완화합니다. 감기, 발열, 스트레스 완화에도 널리 사용됩니다.

    지압 방법: 반대편 손의 엄지손가락으로 다소 강한 압력으로 눌러줍니다. 5-10초간 누르고 놓기를 3-5회 반복합니다. 누를 때 “아프면서 시원한” 느낌이 들어야 효과적입니다. 양손 각 2-3분씩 시행하세요.

    5. 외관(TE5, 外關) — 팔뚝과 손목 외측 통증

    TE5 acupuncture point

    위치: 삼초경에 속하며, 손등 쪽 손목 주름에서 팔 방향으로 약 2-3cm 떨어진 위치입니다. 태연과 같은 영역이지만 더 정확하게는 요골(엄지뼈) 쪽에 더 가까운 지점입니다. 손목을 살짝 펴면 손등 위 두 뼈의 사이에서 팔 방향으로 올라간 곳입니다.

    효과: 외관은 팔뚝 외측의 통증, 손목 외측 통증, 그리고 목 경직된 느낌을 완화합니다. 마우스질로 인한 손목 외측 통증이 특히 있을 때 효과적입니다.

    지압 방법: 엄지손가락으로 직각으로 눌러줍니다. 중간 강도의 압력으로 3-5초간 누르고 놓기를 반복합니다. 양손 각 2-3분씩, 하루 2-3회 시행하세요.

    5분 셀프 지압 루틴 — 직장에서도 할 수 있는 간편 프로그램

    준비 (30초): 편한 자세로 앉아 양손을 책상 위에 올려놓습니다. 심호흡을 3-4회 천천히 한 후 시작합니다.

    1번 혈자리 태연 (1분): 왼손 태연부터 시작합니다. 엄지손가락으로 30초간 누르기를 반복한 후, 오른손도 같은 방식으로 30초간 시행합니다.

    2번 혈자리 내관 (1분): 왼손 내관을 30초간 문지르듯이 자극한 후, 오른손도 30초 시행합니다.

    3번 혈자리 대릉 (1분): 왼손 대릉을 30초간 누르기를 반복한 후, 오른손도 30초 시행합니다.

    4번 혈자리 합곡 (1분): 왼손 합곡을 30초 강하게 누르기를 반복한 후, 오른손도 30초 시행합니다.

    5번 혈자리 외관 (1분): 왼손 외관을 30초간 누르기를 반복한 후, 오른손도 30초 시행합니다.

    마무리 (1분): 양손을 가볍게 흔들어주고, 손목을 천천히 시계 방향과 반시계 방향으로 회전시킵니다. 찬물에 손목을 3-5초 담갔다가 따뜻한 수건으로 감싸면 더욱 효과적입니다.

    추천 시간대: 아침 기상 직후, 점심 식사 후 1시간 뒤, 저녁 퇴근 후—하루 3회가 이상적입니다. 증상이 심할 때는 하루 4-5회까지 가능하지만, 과도한 자극은 피하세요.

    손목 통증 혈자리 지압의 추가 팁

    온열 효과 활용: 지압 전에 손목을 따뜻한 물에 1-2분 담그거나 온찜질을 하면 혈액 순환이 개선되어 지압 효과가 더욱 증대됩니다.

    올바른 강도: 혈자리 지압은 “아프지만 시원한” 정도의 강도가 가장 효과적입니다. 과도한 자극은 피하고, 통증이 심해지면 즉시 중단하세요.

    일관성 유지: 혈자리 지압은 한두 번의 자극으로는 효과가 미미합니다. 최소 2-3주 이상 꾸준히 시행해야 개선 효과를 느낄 수 있습니다.

    다른 치료와의 병행: 손목 스트레칭, 물리치료, 생활 습관 개선과 함께 혈자리 지압을 병행하면 더욱 효과적입니다.

    ⚠️ 의료 면책조항: 이 글은 건강 정보 제공 목적으로 작성되었으며, 전문적인 의료 진단이나 치료를 대체하지 않습니다. 손목 통증이 2주 이상 지속되거나, 심한 통증, 부종, 무감각, 또는 근력 약화가 동반된다면 반드시 의료 전문가(의사, 정형외과 전문의, 한의사 등)와 상담하세요. 특히 손목터널증후군, 류마티스 관절염 등 기저 질환이 있거나 의심되는 경우에는 더욱 그렇습니다.
    🤰 임산부 주의: 위에서 소개한 혈자리 중 합곡(LI4)은 임산부에게 자궁 수축을 유발할 수 있으므로 시행을 피해야 합니다. 태연, 내관, 대릉, 외관은 상대적으로 안전하지만, 임신 중이거나 임신 가능성이 있는 분은 반드시 한의사나 의료 전문가와 상담 후 시행하세요.
  • 5 Acupressure Points for Back Pain — Quick Self-Massage Guide

    5 Acupressure Points for Back Pain — Quick Self-Massage Guide

    한 줄 요약: 등 통증은 견정, 풍지, 천주 혈자리에 규칙적인 지압을 통해 근육 긴장 완화와 혈액순환 개선으로 셀프 관리 가능합니다.

    등 통증, 왜 생기고 어떻게 해결할까?

    현대인의 만성질환이 된 등 통증. 장시간 앉아있는 업무, 스마트폰 사용, 잘못된 자세로 인해 경추와 흉추 주변 근육이 경직되면서 통증이 발생합니다. 목과 어깨, 등 전체가 경직되고 무거운 느낌이 드는데, 이는 혈액순환이 제대로 되지 않아 근육에 산소가 부족하기 때문입니다.

    한의학에서는 이러한 등 통증을 혈자리 자극을 통해 근본적으로 접근합니다. 특정 혈자리를 지압하면 근육 긴장이 풀어지고, 경혈을 따라 혈액과 기(氣)의 순환이 원활해져 통증이 완화됩니다. 약물 없이 손가락만으로도 즉각적인 완화 효과를 느낄 수 있어, 현대인의 셀프 관리에 적합한 방법입니다.

    등 통증 완화 혈자리 5곳 — 정확한 위치와 지압법

    1. 견정(肩井, GB21) — 어깨와 등상부 근육의 즉각적 이완

    WHO 코드: GB21 (쓸개경 21번)
    위치: 목 뒤쪽 한가운데에서 어깨 끝 방향으로 뻗은 선의 중점. 목을 앞으로 숙였을 때 가장 높이 솟아오르는 어깨 근육 위의 가장 높은 지점입니다.
    지압법: 엄지손가락으로 3초간 누르고 2초 쉬는 방식으로 1분간 반복합니다. 양쪽 견정을 번갈아가며 지압하면 어깨와 등 전체의 근육 긴장이 빠르게 풀어집니다.
    효과: 어깨 경결(굳은 근육)을 푸는 데 가장 효과적이며, 목 결림, 편두통, 스트레스로 인한 상체 긴장 완화에 탁월합니다. 지압 직후 따뜻한 느낌과 함께 통증이 현저히 감소합니다.

    2. 풍지(風池, GB20) — 경추와 뇌 혈류 개선

    GB20 acupuncture point

    WHO 코드: GB20 (쓸개경 20번)
    위치: 목 뒤쪽, 목뼈(경추 7번)와 어깨뼈 사이 움푹 패인 곳. 손가락으로 목 뒤를 따라 올라가다가 머리카락 경계선 바로 아래 오목한 부분입니다.
    지압법: 양손 엄지손가락으로 동시에 부드럽게 누르되, 상향으로 밀어 올리는 느낌으로 3초간 지압 후 2초 휴식을 1분간 반복합니다. 목의 경직된 근육이 풀어질 때까지 반복합니다.
    효과: 경추 주변의 혈액순환을 개선하여 뒷목 통증, 경추성 두통, 목 결림을 빠르게 완화합니다. 뇌로 가는 혈류가 증가하면서 답답한 느낌도 함께 해소됩니다.

    3. 천주(天柱, BL10) — 경추 하부와 등상부 연결 부위

    BL10 acupuncture point

    WHO 코드: BL10 (방광경 10번)
    위치: 목 뒤쪽 중앙, 흉쇄유돌근(목 옆 근육)의 바깥쪽 경계에 위치. 목을 약간 숙였을 때 목과 어깨가 만나는 지점 바로 아래입니다.
    지압법: 엄지와 검지로 집듯이 쥐면서 3초간 압박 후 2초 이완하는 방식으로 양쪽을 번갈아 1-2분간 시술합니다. 통증이 약간 느껴질 정도의 강도가 효과적입니다.
    효과: 경추 하부에서 등상부까지 연결되는 근육군의 긴장을 완화하며, 목과 등의 통증이 동시에 있을 때 특히 효과적입니다. 혈액순환 개선으로 피로감도 빠르게 해소됩니다.

    4. 곡지(曲池, LI11) — 광범위한 상체 통증 완화

    LI11 acupuncture point

    WHO 코드: LI11 (대장경 11번)
    위치: 팔꿈치 앞쪽 주름의 끝 부분. 팔을 구부렸을 때 팔꿈치 안쪽 가장 바깥 지점입니다.
    지압법: 엄지손가락으로 수직 방향으로 3-5초 강하게 누른 후 떼는 방식을 1분간 반복합니다. 양쪽 팔을 번갈아가며 지압하면 상체 전체의 효과가 증대됩니다.
    효과: 대장경을 따라 상체 전반의 신경 부위를 자극하므로, 등 통증뿐 아니라 팔 저림, 팔꿈치 통증, 광범위한 상체 긴장을 완화합니다. 신경성 통증에 특히 효과적입니다.

    5. 폐수(肺兪, BL13) — 등 중앙 근육군의 깊은 이완

    BL13 acupuncture point

    WHO 코드: BL13 (방광경 13번)
    위치: 등 중앙, 흉추 3번 극돌기(척추뼈 튀어나온 부분)에서 옆으로 약 2cm 떨어진 방광경 위. 정확한 위치는 척추뼈 양쪽으로 약 한 손가락 너비 떨어진 지점입니다.
    지압법: 테니스공을 등에 받치고 벽에 기대어 깊게 누르거나, 반듯이 누워 엄지손가락으로 수직 방향으로 3-5초간 강하게 누른 후 떼기를 1분간 반복합니다.
    효과: 등 중앙 근육군의 깊은 경결을 풀어주는 데 가장 효과적이며, 숨 쉬기가 편해지고 흉부 불편감도 함께 해소됩니다. 호흡 개선으로 전신 이완이 더욱 깊어집니다.

    5분 셀프 지압 루틴 — 효과적인 순서와 시간 배분

    준비: 편안한 자세로 앉거나 누워서, 따뜻한 물로 목욕 후 근육이 이완된 상태에서 시작하면 더 좋습니다.

    1. 견정 지압 (1분)
      양쪽 견정에 엄지손가락을 올리고, “3초 누르고 2초 쉬기”를 반복합니다. 어깨의 무거움이 풀어지는 것을 느낄 수 있을 것입니다.
    2. 풍지 지압 (1분)
      양손 엄지손가락으로 동시에 부드럽게 누르되, 상향으로 밀어 올리는 느낌으로 시술합니다. 뒷목의 경직이 완화되면서 머리가 맑아지는 느낌을 받습니다.
    3. 천주 지압 (1분)
      양쪽을 번갈아가며 엄지와 검지로 집듯이 3초간 압박 후 2초 이완하는 방식으로 진행합니다.
    4. 곡지 지압 (1분)
      양쪽 팔을 번갈아가며 엄지손가락으로 수직 방향으로 강하게 누르고 떼기를 반복합니다.
    5. 폐수 지압 (1분)
      등 중앙의 양쪽 폐수 지점을 반듯이 누워 엄지손가락으로 수직 누르기를 반복하거나, 테니스공을 받치고 벽에 기대어 자극합니다.

    완료 후: 지압 직후 가벼운 목 스트레칭을 5-10초씩 4방향으로 진행하면, 효과가 더욱 확실해집니다.

    ⚠️ 의료 면책조항: 이 글은 건강 정보 제공 목적으로 작성되었으며, 전문적인 의료 진단이나 치료를 대체하지 않습니다. 등 통증이 3일 이상 지속되거나, 팔 저림, 다리 저림, 대소변 이상, 고열 등의 증상이 동반된 경우 반드시 의료 전문가(의사, 한의사)와 상담하세요. 골절, 추간판 탈출증, 척수 압박 등의 심각한 질환이 있을 수 있습니다.
  • Low Immunity Relief: 5 Pressure Points That Actually Work

    Low Immunity Relief: 5 Pressure Points That Actually Work

    한 줄 요약: 족삼리, 기해, 풍지, 삼음교, 합곡 5가지 혈자리를 매일 3분씩 자극하면 면역력을 높이고 감기 예방 효과를 볼 수 있습니다.

    도입부

    날씨가 조금만 바뀌어도 감기에 걸리고, 한 번 아프면 오래 낫지 않으며, 항상 피로하고 기운이 없는 상태—이것이 면역력 저하의 전형적인 증상입니다. 현대인들은 스트레스, 불규칙한 생활, 수면 부족 등으로 인해 면역력이 점점 약해지고 있습니다.

    한의학에서는 이러한 면역력 저하를 ‘기(氣)의 부족’ 상태로 봅니다. 다행히 우리 몸에는 면역력을 높이는 특별한 혈자리들이 있습니다. 이 혈자리들을 자극하면 신체의 자연치유력을 깨워 면역력을 강화할 수 있습니다. 약물 없이 손가락만으로 할 수 있는 지압 요법으로 당신의 면역력을 되살려보세요.

    면역력 강화의 핵심, 5가지 혈자리

    1. 족삼리(ST36) — 면역력의 최고봉

    ST36 acupuncture point

    위치: 무릎 아래 10cm, 정강이뼈 바깥쪽. 무릎 아래 움푹한 곳(양릉천)에서 손가락 약 4개 폭 아래 방향입니다.

    지압법: 엄지손가락으로 천천히 원을 그리며 눌러줍니다. 숨을 내쉬면서 3초간 눌렀다가 1초에 걸쳐 풀어줍니다. 양쪽 다리 각각 3분씩, 하루 2회.

    효과: ‘다리의 보약’이라 불리는 족삼리는 소화, 혈액 순환, 면역력을 동시에 강화합니다. 감기 예방, 피로 회복, 전신 기력 증진에 가장 효과적입니다. 고대 의사들은 족삼리를 자극하는 것만으로도 건강을 유지할 수 있다고 믿었습니다.

    2. 기해(CV6) — 원기 강화의 중심

    위치: 배꼽에서 아래로 약 1.5cm(손가락 1개 폭) 내려온 지점. 정확히는 임맥 위의 기(氣) 저장소입니다.

    지압법: 따뜻한 손가락으로 배를 편하게 하여 엄지손가락 관절 부분으로 부드럽게 눌러줍니다. 시계 방향으로 원을 그리며 1분씩, 아침 저녁 2회 자극합니다.

    효과: 기해는 우리 몸의 원기(元氣)가 모이는 곳입니다. 자극하면 전신의 에너지가 활발해지고, 소화 기능이 개선되며, 피로가 빠르게 회복됩니다. 면역 시스템 전체를 활성화하는 최고의 혈자리입니다.

    3. 풍지(GB20) — 감기 예방의 방패

    GB20 acupuncture point

    위치: 목 뒤 거대한 근육(승모근)이 만나는 부위, 두 개골의 움푹한 곳. 목을 앞으로 숙였을 때 가장 튀어나온 척추뼈 아래 양쪽 약 2cm 옆입니다.

    지압법: 양손 엄지손가락으로 부드럽게 누르면서 천천히 원을 그립니다. 양쪽 동시에 자극하거나 한쪽씩 1분씩, 하루 2회. 과하게 누르면 두통이 생길 수 있으므로 주의합니다.

    효과: 풍지는 ‘외부의 나쁜 기운(風邪)을 막는 문’이라는 뜻입니다. 목 주변 혈액 순환을 개선하고, 호흡기를 강화하며, 감기 바이러스 침입을 방어합니다. 계절 변화기에 꾸준히 자극하면 감기 예방 효과가 탁월합니다.

    4. 삼음교(SP6) — 체내 순환의 교차로

    SP6 acupuncture point

    위치: 안쪽 발목 위로 약 10cm(손가락 4개 폭) 올라온 정강이뼈 안쪽 모서리. 정강이뼈 뒤의 움푹한 곳입니다.

    지압법: 엄지손가락으로 천천히 눌러주되, 3초 눌렀다 1초 쉬는 방식으로 3분씩 양쪽 다리를 자극합니다. 저녁 시간(오후 5-7시)에 자극하면 효과가 더 좋습니다.

    효과: 비장, 간, 신장 경락이 만나는 삼음교는 혈액 순환, 신진대사, 호르몬 조절을 담당합니다. 면역력 저하로 인한 소화 불량, 피부 트러블, 피로 개선에 매우 효과적입니다.

    5. 합곡(LI4) — 통증과 피로의 특효약

    LI4 acupuncture point

    위치: 엄지손가락과 검지손가락 사이의 웹 부분(손등)에서 뼈가 만나는 지점. 검지손가락 뼈를 따라 엄지손가락 방향으로 올라가다 보면 가장 높은 지점입니다.

    지압법: 반대쪽 엄지손가락으로 천천히 눌러주되, 지압할 때 약간의 통증이 느껴져야 효과적입니다(‘시원한 통증’). 양손 동시에 각 3분씩, 하루 2-3회.

    효과: 합곡은 대장경을 통해 전신에 영향을 미칩니다. 면역력 강화, 감기 증상 완화, 두통과 피로 제거에 가장 효과적입니다. 어디서나 쉽게 자극할 수 있어 스트레스 해소에도 좋습니다.

    5분 셀프 지압 루틴 — 매일 아침 시작하기

    바쁜 아침 시간에도 할 수 있는 5분 루틴입니다. 일관성 있게 지속하는 것이 가장 중요합니다.

    1. 기해(CV6) – 1분 : 손을 따뜻하게 비벼 배를 시계 방향으로 문질러줍니다. 원기를 깨우는 시작 단계입니다.
    2. 합곡(LI4) – 1분 : 양손 동시에 자극합니다. 뇌를 맑게 하고 집중력을 높입니다.
    3. 족삼리(ST36) – 2분 : 앉거나 누운 상태에서 양쪽 다리를 각 1분씩. 가장 중요한 혈자리이므로 시간을 넉넉히 할당합니다.
    4. 풍지(GB20) – 0.5분 : 양손 엄지손가락으로 부드럽게. 과하면 두통이 생기므로 짧게 자극합니다.
    5. 삼음교(SP6) – 0.5분 : 앉은 상태에서 양발목을 빠르게 자극합니다.

    시간대: 아침 기상 후 30분 이내가 가장 좋습니다. 저녁(오후 5-7시)에 추가로 한 번 더 하면 면역력 증진 효과가 배가 됩니다.

    혈자리 지압 효과를 높이는 생활 습관

    • 충분한 수면: 하루 7-8시간. 밤 11시 전에 자는 것이 면역력 회복에 도움됩니다.
    • 따뜻한 물: 자극 후 따뜻한 물을 마시면 혈액 순환이 더 활발해집니다.
    • 면역 음식: 버섯, 홍삼, 마, 검은콩 등 면역력을 높이는 식재료를 자주 섭취합니다.
    • 가벼운 운동: 걷기, 요가, 스트레칭 등 부드러운 운동이 면역력을 높입니다.
    • 스트레스 관리: 명상, 호흡법, 마음챙김으로 스트레스를 줄입니다.
    ⚠️ 의료 면책조항: 이 글은 건강 정보 제공 목적으로 작성되었으며, 전문적인 의료 진단이나 치료를 대체하지 않습니다. 증상이 지속되거나 심한 경우 반드시 의료 전문가와 상담하세요.
    🤰 임산부 주의: 위 혈자리 중 삼음교(SP6), 합곡(LI4)는 임산부에게 자궁 수축을 유발할 수 있습니다. 임신 중이거나 임신 가능성이 있는 분은 반드시 전문가와 상담 후 시행하세요.
  • The 5 Best Acupressure Points for Nausea (With Exact Locations)

    The 5 Best Acupressure Points for Nausea (With Exact Locations)

    One-line summary: Vomiting can be relieved by acupoint pressing of acupoints such as Neiguan, Hegu, and Zusanli to regulate gastrointestinal function and alleviate nausea.

    Introduction

    Sudden vomiting, dizziness, and nausea from digestive discomfort are uncomfortable symptoms that interfere with daily life. Especially when it’s difficult to take medicine or quick relief is needed, wouldn’t it be great to have a method you can do without moving from your seat?

    Traditional Chinese medicine views vomiting as an imbalance in the digestive system and believes that stimulating specific acupoints can calm the gastric nerves and normalize gastric peristalsis. Scientific research has also published results showing that stimulation of specific acupoints (particularly the Neiguan acupoint) alleviates chemotherapy-induced nausea. In this article, we’ll introduce the 5 most effective acupoints for relieving vomiting and self-massage techniques.

    5 Acupoints for Relieving Vomiting

    1. Neiguan (PC6, Neiguan) — The Strongest Barrier Against Nausea

    PC6 acupuncture point

    Location: On the inner wrist, located between the two tendons at the center of the forearm, about two finger-widths above the wrist crease. (About 5cm up from the inner wrist crease in the direction of the elbow)

    Benefits: Neiguan is the most well-researched acupoint for improving nausea and digestive discomfort. It directly regulates gastric nerves to suppress the gag reflex and is also effective for dizziness and nausea. It is widely used to relieve morning sickness during pregnancy.

    Technique: Using your thumb, apply pressure at a level where you feel slight discomfort and press for 3-5 seconds, then slowly release. Repeat this process for 1-2 minutes on each hand, doing both hands. Even when there is no discomfort, you can apply pressure every 5 minutes for prevention.

    2. Hegu (LI4, Hegu) — Normalizing Overall Digestive Function

    LI4 acupuncture point

    Location: Between the thumb and index finger, at the highest point of the hand (bone intersection). It’s the indented area between the thumb and index finger when your hand is open.

    Benefits: An important acupoint of the Large Intestine meridian, it regulates overall digestive function. It improves not only vomiting but also various digestive symptoms such as constipation and diarrhea, and also has pain-relieving effects. It’s a multipurpose acupoint that enhances overall bodily function.

    Technique: Apply pressure using the thumb of the opposite hand. Press for 10-15 seconds at a level where you feel slight discomfort, and repeat with 2-3 second rest periods. It’s effective to practice for 2 minutes on each hand.

    ⚠️ Caution: Pregnant women should consult with a traditional Chinese medicine doctor before practicing this, as there is a risk of uterine contractions.

    3. Zusanli (ST36, Zusanli) — Fundamentally Strengthening Digestive Power

    ST36 acupuncture point

    Location: About 4 cun (approximately 10cm) below the knee, on the outer side of the shinbone. It’s located about 10cm down from the outer indented area of the knee toward the ankle.

    Benefits: The most important acupoint for the gastrointestinal system, it fundamentally strengthens digestive function. It improves chronic vomiting, poor digestion, and fatigue, and regular acupressure increases digestive system resilience. It also has excellent preventative effects for vomiting.

    Technique: Sit comfortably and extend one leg. Apply pressure with your thumb or finger joint for 30 seconds to 1 minute at a level where you feel slight discomfort. Practice on each leg for 2-3 minutes. Heat therapy (moxibustion) is also effective.

    4. Zhongwan (CV12, Zhongwan) — Regulating the Gastric Center

    Location: Above the navel, located about 4 cun (10cm) above the xiphoid process (the border between the chest and abdomen). More precisely, it’s at the midpoint between the navel and the xiphoid process.

    Benefits: A central gastric acupoint on the Conception Vessel meridian, it directly regulates stomach function. It quickly alleviates poor digestion, abdominal bloating, and vomiting, and normalizes gastric acid secretion. It’s particularly effective for vomiting from food poisoning or overeating.

    Technique: Lie down comfortably and relax your abdomen. Gather three fingers and gently massage the Zhongwan area in circular motions. Massage slowly 50-100 times in a clockwise direction, or directly apply pressure with your thumb for 30 seconds to 1 minute.

    5. Taichong (LR3, Taichong) — Relieving Stress-Related Vomiting

    Location: On the top of the foot, in the indented area between the big toe and the second toe. It’s about 2 cun (5cm) up from between the toe bases on the top of the foot.

    Benefits: An important acupoint on the Liver meridian, it effectively alleviates vomiting caused by stress and tension. It improves digestive function along with emotional stability and also helps with nausea from headaches or fatigue. It’s particularly recommended for nervous digestive discomfort.

    Technique: Sit and place one foot on your knee. Using your thumb, press for 10-15 seconds at a level where you feel slight discomfort, and repeat with rest periods. By practicing on each foot for 2-3 minutes, you can feel emotional stability along with vomiting relief effects.

    ⚠️ Caution: Pregnant women should consult with a traditional Chinese medicine doctor before practicing this, as there is a risk of uterine contractions.

    5-Minute Self-Massage Routine

    Emergency vomiting situation — Order to relieve in 5 minutes:

    1. Neiguan (1 minute) — 30 seconds on each hand, highest priority for suppressing nausea
    2. Hegu (1 minute) — 30 seconds on each hand, overall digestive regulation
    3. Zhongwan (1.5 minutes) — Circular massage 50-100 times with three fingers, direct stimulation of the gastric center
    4. Zusanli (1.5 minutes) — 45 seconds on each leg, fundamental strengthening of digestive power

    Daily prevention routine — 5 minutes every morning:

    By proceeding in the order of Neiguan 1 minute → Hegu 1 minute → Zhongwan 1.5 minutes → Zusanli 1.5 minutes, you can prevent vomiting recurrence in advance. It’s especially recommended to practice daily for those with weak digestion or frequent dizziness.

    ⚠️ Medical Disclaimer: This article is written for informational purposes and does not substitute for professional medical diagnosis or treatment. If vomiting persists or is severe, is accompanied by abdominal pain, or includes blood, please consult with a healthcare professional (doctor or traditional Chinese medicine doctor). Especially children, elderly individuals, and those with chronic conditions should practice under professional guidance.
    🤰 Pregnancy Caution: Among the acupoints above, Hegu (LI4) and Taichong (LR3) can cause uterine contractions in pregnant women. If you are pregnant or could be pregnant, avoid these two acupoints and practice only Neiguan, Zusanli, and Zhongwan, or consult with a traditional Chinese medicine doctor before practicing. If the goal is to relieve morning sickness, Neiguan acupressure alone is sufficiently effective.
  • The 5 Best Acupressure Points for Toothache (With Exact Locations)

    The 5 Best Acupressure Points for Toothache (With Exact Locations)

    한 줄 요약: 합곡, 임읍, 하관, 영향, 삼간 5가지 혈자리를 정확히 자극하면 치통의 급성 통증을 5~15분 내에 완화할 수 있습니다.

    도입부

    갑자기 찾아오는 치통만큼 괴로운 통증은 드뭅니다. 밤 중에 갑자기 통증이 시작되거나, 치과 예약을 기다리는 동안 통증으로 고통받는 분들이 많으실 텐데요. 현대 의학과 한의학은 오랫동안 얼굴 통증 완화에 혈자리 자극을 권장해왔습니다. 특히 얼굴 주변의 혈자리들은 신경이 많이 분포되어 있어 지압만으로도 빠른 완화 효과를 기대할 수 있습니다. 이 글에서는 치통 완화에 가장 효과적인 5가지 혈자리와 정확한 지압법을 소개합니다.

    치통에 효과적인 혈자리 5곳

    1. 합곡(LI4) — 통증 완화의 시작점

    LI4 acupuncture point

    위치: 엄지손가락과 검지손가락이 만나는 지점, 손가락 사이 근육의 가장 높은 부분입니다. 손등을 위로 향하게 했을 때 엄지와 검지 사이 물갈퀴 부분에 위치합니다.

    지압법: 반대쪽 엄지손가락으로 합곡 혈자리에 꾹 누르고 10초간 유지한 후 천천히 놓습니다. 이를 10회 반복하고, 같은 방식으로 양손 모두 시행합니다. 지압 강도는 약간의 통증이 느껴질 정도가 적당합니다.

    효과: 대장경의 주요 혈자리로, 얼굴 전체의 통증 완화에 뛰어난 효과가 있습니다. 특히 이빨 통증, 턱 통증, 두통 완화에 널리 사용됩니다. 치통뿐만 아니라 편두통, 안면 신경통 완화에도 효과적입니다.

    2. 임읍(ST6) — 턱 통증 전문 혈자리

    ST6 acupuncture point

    위치: 아래턱 끝 모서리에서 귀 방향으로 약 1cm 위에 있는 지점입니다. 입을 다물었을 때 깨물근(저작근)이 튀어나오는 부위 바로 위에 위치합니다.

    지압법: 검지 또는 중지로 임읍 부위를 찾은 후, 귀 방향으로 약간 기울여 지압합니다. 10초간 꾹 누르고, 원을 그리듯 10회 정도 마사지한 후 천천히 떼어냅니다. 양쪽 턱 모두 시행하세요.

    효과: 위경의 혈자리로, 턱 관절 통증과 아래니 주변 치통에 특히 효과적입니다. 이 혈자리를 자극하면 턱 주변 근육의 긴장이 풀려 통증이 빠르게 완화됩니다.

    3. 하관(ST7) — 아래 이빨 통증의 특효약

    ST7 acupuncture point

    위치: 광대뼈 아래 오목한 부분에 위치하며, 귀 아래에서 아래턱 방향으로 약 1cm 정도 내려온 지점입니다. 입을 약간 벌렸을 때 관절이 움직이는 부분 바로 앞에 있습니다.

    지압법: 검지 또는 중지로 하관을 찾고, 수직으로 진행 방향(아래 방향)으로 약간의 압력을 유지하며 10초간 지압합니다. 원을 그리듯 10-15회 원형 마사지를 한 후 띄어냅니다. 양쪽 모두 반복하세요.

    효과: 위경의 주요 혈자리로, 아래 앞니의 치통과 턱 통증에 특히 탁월한 효과를 보입니다. 임읍과 함께 자극하면 더욱 효과적입니다.

    4. 영향(LI20) — 코와 입 주변 통증 완화

    LI20 acupuncture point

    위치: 콧구멍 옆 주름이 깊어지는 부분, 코의 양쪽 끝에서 약간 아래 방향에 위치합니다. 입 모서리에서 수직으로 위로 올라간 지점과 만나는 곳입니다.

    지압법: 양쪽 검지로 영향 혈자리를 동시에 찾고, 콧구멍을 향해 약간 안쪽으로 기울여 10초간 지압합니다. 원을 그리듯 10-15회 마사지한 후 천천히 떼어냅니다. 통증이 심하지 않은 가벼운 강도로 시행하세요.

    효과: 대장경의 혈자리로, 위 앞니와 코 주변의 치통 완화에 효과적입니다. 특히 상악 비대로 인한 치통이나 부비동염 연관 치통에 좋습니다.

    5. 삼간(LI3) — 손 위의 응급 혈자리

    LI3 acupuncture point

    위치: 손의 검지와 중지 뼈 사이, 손등의 주름이 있는 부분에 위치합니다. 주먹을 쥐었을 때 검지 손가락이 닿는 부분 바로 아래입니다.

    지압법: 반대쪽 엄지손가락으로 삼간 혈자리를 찾고, 수직으로 10-15초간 꾹 누릅니다. 이를 5-10회 반복하고, 손가락 위아래로 움직이며 마사지합니다. 양손 모두 시행하세요.

    효과: 대장경의 혈자리로, 합곡과 함께 사용하면 치통 완화 효과가 배가됩니다. 언제 어디서나 쉽게 자극할 수 있어 응급 상황에서 매우 유용합니다.

    5분 셀프 지압 루틴

    치통이 갑자기 발생했을 때 순서대로 다음 루틴을 따르세요:

    1. 합곡 지압 (1분) — 양손 각 30초, 강도 중상
    2. 임읍 지압 (1분) — 양쪽 턱 각 30초, 턱 관절을 의식하며 시행
    3. 하관 지압 (1분) — 양쪽 각 30초, 아래 방향으로의 압력 유지
    4. 영향 지압 (1분) — 양쪽 동시에 30초, 가벼운 강도
    5. 삼간 지압 (1분) — 양손 각 30초, 마무리 단계

    팁: 위 루틴을 1회 시행한 후 15분 정도 기다렸다가 필요시 반복합니다. 하루에 최대 3-4회까지 반복해도 됩니다.

    ⚠️ 의료 면책조항: 이 글은 건강 정보 제공 목적으로 작성되었으며, 전문적인 의료 진단이나 치료를 대체하지 않습니다. 증상이 지속되거나 심한 경우 반드시 의료 전문가와 상담하세요.
    🤰 임산부 주의: 위 혈자리 중 합곡(LI4)과 하관(ST7)은 임산부에게 자궁 수축을 유발할 수 있습니다. 임신 중이거나 임신 가능성이 있는 분은 반드시 전문가와 상담 후 시행하세요. 임산부는 영향(LI20)과 임읍(ST6) 지압만 시행하는 것을 권장합니다.
  • Jaw Pain? Press These 5 Points for Natural Relief

    Jaw Pain? Press These 5 Points for Natural Relief

    “`html

    One-line summary: By applying acupressure to the Lower Jaw (ST7), Jaw Muscle (ST6), Temple (EX-HN5), Wind Pool (GB20), and Three Intervals (LI3) acupoints 2-3 times daily, you can relieve jaw muscle tension and alleviate temporomandibular joint pain.

    Introduction

    Does your jaw make a clicking sound when you chew, or do you feel pain when opening your mouth? Modern people frequently experience temporomandibular joint pain due to stress, poor posture, and teeth grinding. These symptoms can progress beyond simple discomfort and develop into chronic pain. Acupressure on meridian points in traditional medicine effectively relieves temporomandibular joint pain by relaxing tense muscles around the jaw joint and improving blood circulation. Here are 5 acupoints you can easily stimulate at home without medication.

    5 Acupoints for Temporomandibular Joint Pain Relief

    1. Lower Jaw (ST7, Xiaguan) — Key acupoint above the temporomandibular joint

    ST7 acupuncture point

    Location: The hollow depression below the cheekbone, on the upper part of the jawbone. This is the easiest acupoint to locate when your mouth is closed.
    WHO Code: ST7 (Stomach Meridian of Foot-Yangming)
    Acupressure technique: Repeatedly press slowly upward with your thumb for 3-5 seconds, then release. Be careful not to press too hard, as this can increase pain.
    Effects: Relieves tension around the temporomandibular joint and directly reduces pain with jaw movement. It is also related to facial neuralgia and headaches, making it effective for comprehensive pain relief in the facial area.

    2. Jaw Muscle (ST6, Jiache) — Relaxation point for lower jaw muscles

    ST6 acupuncture point

    Location: The edge of the lower jaw, at the muscle that bulges when clenching the teeth. It is approximately 2cm above the tip of the lower jaw.
    WHO Code: ST6 (Stomach Meridian of Foot-Yangming)
    Acupressure technique: Press simultaneously upward and inward using your index and middle fingers. Massage 3-5 times daily, 30 seconds per session for best results.
    Effects: Directly relieves excessive tension in the masticatory muscles, making it particularly effective for temporomandibular joint pain caused by teeth grinding or jaw clenching.

    3. Temple (EX-HN5, Taiyang) — Universal acupoint at the temple

    Location: Both temples, in the hollow depression approximately 1.5cm laterally from the end of the eyebrow.
    WHO Code: EX-HN5 (Extra-meridian acupoint)
    Acupressure technique: Simultaneously massage both sides with your thumbs in circular motions. Repeat 10 times clockwise and 10 times counterclockwise. Perform this in the morning upon waking and again in the evening for best results.
    Effects: Effective for headache and facial tension relief, while relaxing the temporal muscles connected to the temporomandibular joint. Particularly helpful for temporomandibular joint pain caused by stress.

    4. Wind Pool (GB20, Fengchi) — Connection point between the cervical spine and jaw

    GB20 acupuncture point

    Location: The back of the head, in the bilateral hollow depressions at the base of the neck. These are the two indented areas that become palpable when you bend your head forward.
    WHO Code: GB20 (Gallbladder Meridian of Foot-Shaoyang)
    Acupressure technique: Slowly press downward with your thumbs on both sides for 1-2 minutes. Maintain pressure until you feel the neck muscles relax.
    Effects: Relieves neck and shoulder tension, reducing stress transmitted to the temporomandibular joint. Effective for temporomandibular joint pain caused by cervical spondylosis or forward head posture.

    5. Three Intervals (LI3, Sangjian) — Remote treatment point on the hand

    LI3 acupuncture point

    Location: The webbing between the thumb and index finger on the hand, at the midpoint where the bones meet.
    WHO Code: LI3 (Large Intestine Meridian of Hand-Yangming)
    Acupressure technique: Press or massage in circular motions using the thumb of the opposite hand for 1-2 minutes. Treat both hands.
    Effects: Stimulates the Large Intestine meridian, which regulates digestive and facial-related nerves, alleviating systemic tension associated with temporomandibular joint pain. As a remote treatment point, you can stimulate it anytime, anywhere.

    5-Minute Self-Acupressure Routine

    Perform the following sequence daily, either morning or evening:

    1. Preparation (30 seconds): Sit comfortably and take 3 deep breaths
    2. Wind Pool (GB20) — 1 minute: Slow pressing with thumbs × 3 times
    3. Temple (EX-HN5) — 1 minute: Circular massage with both thumbs × 2 sets
    4. Lower Jaw (ST7) — 1 minute: Press upward with thumb and release × 5 times
    5. Jaw Muscle (ST6) — 1 minute: Massage upward with index and middle fingers × 30 seconds
    6. Three Intervals (LI3) — 1 minute: Press firmly with both thumbs × 30 seconds each
    7. Closing (30 seconds): Gently move your jaw 10 times, then take deep breaths

    ⏰ Total duration: Approximately 5-6 minutes
    💡 Tip: Warm compress therapy or applying a warm towel to the face before acupressure enhances the muscle-relaxing effects.

    🤰 Pregnancy Caution: The acupoints mentioned in this article (Lower Jaw, Jaw Muscle, Temple, Wind Pool) are generally safe; however, if you are pregnant or possibly pregnant, avoid strong stimulation and consult with a traditional medicine practitioner or obstetric specialist before proceeding.
    ⚠️ Medical Disclaimer: This article is provided for informational purposes and does not replace professional medical diagnosis or treatment. If temporomandibular joint pain persists for more than 3 weeks, you have difficulty opening your mouth, or your jaw frequently dislocates, please consult a dentist or orthopedic specialist. In particular, if pain develops after trauma, seek immediate medical attention.

    “`

  • The 5 Best Acupressure Points for Text Neck Pain (With Exact Locations)

    The 5 Best Acupressure Points for Text Neck Pain (With Exact Locations)

    “`html

    One-line summary: Stimulating five acupoints—GB20, BL10, GB21, LI4, and LR3—for 5 minutes daily can effectively relieve neck and shoulder pain caused by text neck.

    What is Text Neck Pain?

    With the increased use of smartphones and computers, the number of people suffering from text neck has significantly increased. Text neck is a condition where the neck is bent forward more than in a normal posture, placing continuous tension on the neck and shoulder muscles. This causes stiffness in the muscles around the cervical spine and nerve compression, resulting in various symptoms such as neck pain, shoulder tightness, headaches, and tingling in the arms. Traditional Chinese medicine believes that such neck pain can be alleviated through acupoint stimulation. Acupressure stimulates meridians to promote the circulation of qi and blood, relieve muscle tension, and is effective for pain relief and prevention.

    5 Effective Acupoints for Text Neck Pain

    1. GB20 (Fengchi) — The ‘Pain-Blocking Acupoint’ at the Back of the Neck

    GB20 acupuncture point

    Location: At the back of the neck, in the hollow area below the skull (on both sides of the boundary between the neck and head) | WHO Code: GB20

    Technique: Fix both thumbs on the GB20 acupoint and apply pressure upward for 2-3 seconds, then release. Repeat 10-15 times. It’s easier to locate the acupoint if you bend your neck slightly forward.

    Benefits: GB20 is an important meridian connecting the neck and head. Stimulating it promotes blood circulation around the neck and relieves muscle tension, simultaneously improving back-of-neck pain, headaches, and eye fatigue caused by text neck. It’s beneficial to stimulate this point frequently when your neck feels stiff in the afternoon.

    2. BL10 (Tianzhu) — The ‘Troublemaker Acupoint’ for Neck Pain

    BL10 acupuncture point

    Location: At the back of the neck, slightly below GB20, approximately 1.3 cm to the side of the center line at the back of the neck | WHO Code: BL10

    Technique: Place both thumbs on BL10 and slowly massage in circular motions 10-15 times. Alternatively, pressing with the thumbs for 2-3 seconds is also effective. Use a natural pressure level that creates a sensation of soreness.

    Benefits: BL10 directly alleviates stiffness in muscles around the cervical spine. It rapidly improves back-of-neck pain, stiff neck, and cervicogenic headaches, providing immediate relief for tension pain in the shoulders and neck caused by text neck.

    3. GB21 (Jianjing) — The ‘Emergency Acupoint’ for Shoulder-Neck Tension

    Location: At the midpoint where the neck and shoulder meet, at the highest point of the shoulder | WHO Code: GB21

    Technique: Pinch GB21 with the thumb and fingers of the opposite hand and apply pressure for 3-5 seconds. Repeat 10-15 times. Alternatively, pressing downward with the thumb is also effective.

    Benefits: The shoulder-neck boundary is the most tense area caused by text neck. Stimulating GB21 relieves widespread tension from the neck to the shoulders, improves blood circulation, and simultaneously resolves shoulder tightness, neck pain, and tingling sensations in the arms.

    4. LI4 (Hegu) — The ‘Universal Acupoint’ for Whole-Body Pain

    LI4 acupuncture point

    Location: In the center of the webbing between the thumb and index finger on the dorsum of the hand, in the hollow area | WHO Code: LI4

    Technique: Press LI4 firmly with the opposite thumb for 2-3 seconds, then release. Repeat 10-15 times. Pressure that creates slight discomfort is most effective. Stimulate both hands.

    Benefits: LI4 is the ‘king of pain relief’ that stimulates the nervous and immune systems. It comprehensively alleviates pain in the neck, shoulders, and arms, and also relieves muscle tension caused by stress. It also improves headaches and fatigue accompanying text neck pain.

    5. LR3 (Taichong) — The ‘Stress-Relief Acupoint’ for Whole-Body Relaxation

    Location: On the dorsum of the foot, in the center of the webbing between the big toe and second toe | WHO Code: LR3

    Technique: Apply pressure to LR3 with your thumb or a blunt object for 2-3 seconds, then release. Repeat 10-15 times. It’s important to stimulate both feet with equal pressure.

    Benefits: LR3 promotes relaxation throughout the entire body through the liver meridian. It alleviates muscle stiffness caused by stress and improves blood circulation, fundamentally resolving tension in the neck and shoulders. It’s particularly effective for text neck pain worsened by stress.

    5-Minute Self-Massage Routine

    Choose according to your situation:

    Quick Relief Mode (3 minutes):

    1. GB20 × 10 times (30 seconds)
    2. BL10 × 10 times (30 seconds)
    3. GB21 × 10 times (30 seconds)
    4. LI4 × 10 times (both hands, 1 minute)

    Complete Care Mode (5 minutes):

    1. GB20 × 15 times (1 minute)
    2. BL10 × 15 times (1 minute)
    3. GB21 × 15 times (1 minute)
    4. LI4 × 10 times (both hands, 1 minute)
    5. LR3 × 10 times (both feet, 1 minute)

    Recommended timing: After waking in the morning, around 3 PM after lunch, and after work in the evening, for a total of 1-2 times daily. With consistent daily practice, you can notice significant improvement within 1-2 weeks.

    ⚠️ Medical Disclaimer: This article is provided for informational purposes only and does not substitute for professional medical diagnosis or treatment. If symptoms persist or are severe, please consult with a healthcare professional.
    🤰 Pregnancy Warning: Of the acupoints mentioned above, LI4 and LR3 may trigger uterine contractions in pregnant women. If you are pregnant or may be pregnant, please consult with a healthcare professional before proceeding, and selectively use only GB20, BL10, and GB21.

    “`

  • Tinnitus Relief: 5 Pressure Points That Actually Work

    Tinnitus Relief: 5 Pressure Points That Actually Work

    한 줄 요약: 귀에서 울리는 이명은 청궁·중저·풍지·백회·곤륜 5개 혈자리의 규칙적인 지압으로 기혈 순환을 촉진하고 신경을 안정시켜 증상을 완화할 수 있습니다.

    도입부: 이명 증상과 혈자리 치료의 원리

    귀에서 들리지 않아야 할 음이 자꾸만 울려서 일상이 불편한가요? 그것이 바로 이명(tinnitus)입니다. 외부 소리가 없는데도 귀에서 윙윙거리거나 쌩쌩거리는 증상으로, 스트레스와 불안감을 동반하기도 합니다.

    현대 의학에서는 이명의 명확한 원인을 파악하기 어려운 경우가 많지만, 한의학은 다른 접근을 합니다. 이명을 기혈 순환 부족, 신경 과민, 수면 부족으로 인한 신경 피로로 보며, 특정 혈자리 자극으로 이를 개선할 수 있다고 여깁니다. 특히 귀 주변과 뇌로 가는 경맥(경락)을 자극하면 청각 신경을 진정시키고 혈액 순환을 개선할 수 있습니다.

    이명 완화에 최고의 혈자리 5곳

    1. 청궁(聽宮) – SI19 / Tinghui

    SI19 acupuncture point

    위치: 귀 앞쪽, 입을 다물었을 때 움푹 들어가는 부분 (귀 구슬 앞 아래).

    찾는 방법: 양손 검지를 입 앞쪽에 댄 후 입을 벌렸을 때 함몰되는 지점이 청궁입니다. 입을 다물면 다시 튀어나옵니다.

    지압법: 엄지손가락 끝으로 부드럽게 원형으로 30초 지압하세요. 하루 2-3회, 양쪽 모두 시행합니다.

    효과: 청궁은 귀 질환의 특효혈입니다. 이명, 난청, 귀 먹먹함을 직접 완화하는 혈자리로, 중국 고전 경혈서에서도 강조하는 요혈입니다.

    2. 중저(翳風) – TE17 / Yifeng

    TE17 acupuncture point

    위치: 귀 아래쪽, 귓불 뒤 움푹한 부분 (귀 뒤쪽 뼈와 턱 사이의 공간).

    찾는 방법: 귓불을 손가락으로 누르고 뒤로 넘기면, 귀 뒤쪽에 깊은 홈이 생깁니다. 그 위치가 중저입니다.

    지압법: 엄지손가락으로 약간의 압력을 주되, 통증이 생기지 않는 범위 내에서 원을 그리듯 30초간 지압합니다.

    효과: 중저는 삼초경(귀와 얼굴로 가는 경맥)의 요혈로, 귀의 피로를 풀고 청각 신경을 안정시킵니다. 이명과 귀 통증, 안면신경마비에도 효과적입니다.

    3. 풍지(風池) – GB20 / Fengchi

    GB20 acupuncture point

    위치: 목 뒤쪽, 머리뼈 밑 부분 (목 양옆 근육의 움푹한 지점).

    찾는 방법: 목을 뒤로 젖혔을 때 생기는 두 근육 사이의 홈, 정확히 두개골 밑 움직이는 뼈 부분이 풍지입니다.

    지압법: 양손 엄지손가락으로 목 안쪽을 향해 약간 위로 향한 방향으로 압력을 줍니다. 한 지점에 30초, 하루 3회 시행합니다.

    효과: 뇌로 가는 혈액 순환을 촉진하고 신경 긴장을 풀어줍니다. 이명과 함께 나타나는 두통, 어지러움, 목 경직을 동시에 완화할 수 있습니다.

    4. 백회(百會) – GV20 / Baihui

    위치: 머리 정상부, 정중선 상에서 양쪽 귀 꼭짓점을 잇는 선이 정중선과 만나는 점.

    찾는 방법: 양쪽 귀의 최고점을 가상의 선으로 이으면, 그 선이 머리 중앙 정중선과 만나는 곳이 백회입니다. 손가락으로 누르면 살짝 움푹한 느낌입니다.

    지압법: 엄지손가락 또는 중지로 수직으로 부드럽게 누르고, 작은 원을 그리듯 20-30초 마사지합니다. 과도한 자극은 피하세요.

    효과: 뇌 신경을 안정시키고 정신을 맑게 합니다. 이명, 불면증, 불안감을 함께 개선하며, 두뇌 피로 회복에도 탁월합니다.

    5. 곤륜(崑崙) – BL60 / Kunlun

    BL60 acupuncture point

    위치: 발목 바깥쪽, 바깥쪽 복숭아뼈 뒤쪽 움푹한 부분.

    찾는 방법: 발의 바깥쪽 복숭아뼈(외측 발목뼈)와 아킬레스힘줄 사이의 홈이 곤륜입니다.

    지압법: 엄지손가락으로 발목을 향해 수직으로 눌렀다 떼기를 1분간 반복합니다. 통증을 느낄 정도로 자극합니다. 하루 1-2회.

    효과: 신경 긴장을 완화하고 전신의 기혈 순환을 개선합니다. 특히 귀의 신경 피로를 풀어주고, 수면 부족으로 인한 이명 악화를 방지합니다.

    5분 셀프 지압 루틴: 최적의 순서와 시간 배분

    매일 아침 일어난 후 또는 저녁 잠들기 전에 다음 순서로 진행하세요:

    1. 청궁 (1분) — 양쪽 30초씩, 부드럽게 원형 지압
    2. 중저 (1분) — 양쪽 30초씩, 약간의 압력으로 지압
    3. 풍지 (1분) — 양쪽 30초씩, 뇌 쪽으로 향해 지압
    4. 백회 (1분) — 정중선 중심으로 30초 지압
    5. 곤륜 (1분) — 양쪽 30초씩, 통증 정도로 자극

    팁: 1주에 5-6일 꾸준히 시행하고, 증상이 심한 날은 하루 2회(아침, 저녁) 시행하세요. 최소 3개월 이상 지속해야 효과를 체감할 수 있습니다.

    ⚠️ 의료 면책조항: 이 글은 건강 정보 제공 목적으로 작성되었으며, 전문적인 의료 진단이나 치료를 대체하지 않습니다. 이명이 갑자기 발생하거나 심한 경우, 청력 저하를 동반한 경우, 또는 지속되는 경우 반드시 이비인후과 또는 한의원에서 전문가와 상담하세요. 특히 뇌종양이나 혈관 질환으로 인한 이명의 가능성을 배제하기 위해 정확한 진단이 필수입니다.
    🤰 임산부 주의: 위 혈자리 중 곤륜(BL60)과 풍지(GB20)는 임산부에게 자궁 수축을 유발할 수 있습니다. 임신 중이거나 임신 가능성이 있는 분은 이 두 혈자리를 피하고, 청궁·중저·백회만 시행하거나 반드시 전문가와 상담 후 진행하세요.
  • The 5 Best Acupressure Points for Tension Headaches (With Exact Locations)

    The 5 Best Acupressure Points for Tension Headaches (With Exact Locations)

    One-line summary: Tension headaches are primarily caused by poor blood circulation due to stiffness in the neck and scalp muscles, and stimulating five acupoints—GB20, LI4, Taiyang, GV20, and BL10—can provide immediate relief.

    Introduction: Resolve Tension Headaches with Acupoints

    Tension headaches are a chronic problem for modern people. Do you experience that bothersome pain that arrives in the afternoon, that urge to press your neck and head? Tension headaches occur when the muscles in the neck, shoulders, and scalp become excessively contracted due to stress and poor posture. As blood circulation within the muscles decreases and metabolic waste accumulates, the pain worsens.

    Traditional Chinese medicine views tension headaches as resulting from insufficient qi and blood circulation in the neck and head, and promotes muscle relaxation and blood circulation by stimulating specific acupoints. I’ll now introduce the secret to achieving immediate pain relief by investing just 5 minutes with a single finger, without medication.

    Acupoint 1: Fengchi (GB20)

    Location: On both sides of the back of the neck where the neck and head meet. It’s the indented area just above the hairline.

    Acupressure technique: Using both thumbs, press slightly upward while rubbing in circular motions 10-15 times. You can also repeat the pressing motion for 3-5 seconds, 10 times.

    Benefits: GB20 is known as the acupoint that “relieves neck tension” and directly alleviates muscle stiffness in the neck. It’s the most powerful acupoint for simultaneously relieving occipital and temporal headaches, neck stiffness, and back-of-neck tension.

    Acupoint 2: Hegu (LI4)

    Location: In the webbing between the thumb and index finger, at the indented area slightly below the end of the thumb bone, toward the index finger.

    Acupressure technique: Using your opposite thumb, apply firm pressure for 30 seconds to 1 minute, then release. Repeat 5 times. Rubbing in circular motions slowly is also effective.

    Benefits: Known as the “universal remedy for all pain” in Oriental medicine, LI4 regulates nerve signal transmission to broadly relieve upper body pain including headaches, facial pain, and toothaches. It’s particularly effective for tension headaches caused by stress.

    Acupoint 3: Taiyang (Extra Point)

    Location: At the temple. It’s the indented area roughly midway between the eye and ear when pressed.

    Acupressure technique: Using your index and middle fingers together, rub slowly in circular motions 15-20 times. Maintain slight pressure while making small circular motions. You can also do 10 circles in one direction and 10 in the opposite direction.

    Benefits: This is a specialized acupoint for temporal (temple area) headaches. It’s especially effective when tension headaches occur on one side of the head, and it also helps with eye fatigue and vision improvement.

    Acupoint 4: Baihui (GV20)

    Location: At the crown of the head. It’s the intersection point where a line connecting the highest points of both ears meets a line through the center of the face. When pressed with a finger, it’s a slightly indented area.

    Acupressure technique: Overlap your middle fingers to stimulate the GV20 point. Repeat pressing for 3-5 seconds 10 times, while simultaneously rubbing in small circles. Be careful not to press too hard.

    Benefits: This acupoint, whose name means “resolves a hundred problems,” clears overall mental energy. It relieves headaches at the crown and throughout the head, while simultaneously alleviating fatigue and lethargy. It’s particularly beneficial for stress-related headaches.

    Acupoint 5: Tianzhu (BL10)

    Location: At the center of the back of the neck, slightly below GB20. It’s on the upper part of the muscles on both sides where the neck and shoulders meet.

    Acupressure technique: Using both thumbs, press firmly downward and hold for 5 seconds. Repeat 8-10 times. It’s even more effective if you simultaneously gently stretch by tilting your head backward.

    Benefits: BL10 is an acupoint that relieves severely stiffened muscles at the back of the neck. It simultaneously relieves occipital headaches, neck stiffness, and shoulder tension, while improving blood circulation to the brain to treat the root cause of headaches.

    5-Minute Self-Acupressure Routine—Quick and Effective Method

    Here’s a routine you can complete in 5 minutes when tension headaches appear during a busy day:

    • 1 minute (Preparation): Sit in a comfortable position and take 3 deep breaths, exhaling slowly. Slowly rotate your neck and shoulders left and right 2-3 times.
    • 1 minute (GB20): Stimulate GB20 with both thumbs. Apply firm pressure and massage in circles 10-15 times.
    • 1 minute (Taiyang + LI4): With one hand, rub your temple (Taiyang) in circles, while with the other hand, press LI4 firmly. After 30 seconds, switch hands.
    • 1 minute (GV20 + BL10): While gently pressing the crown of your head (GV20) with your middle fingers, strongly stimulate the back of your neck (BL10) with your thumbs. Repeat 10 times.
    • 1 minute (Finishing): Again, slowly rotate your neck left and right, and breathe deeply to release tension.

    Tip: By doing the routine once in the morning as prevention and twice in the afternoon when symptoms appear, you can stay free from headache worries all day.

    ⚠️ Medical Disclaimer: This article is written for educational and informational purposes and does not replace professional medical diagnosis or treatment. If symptoms persist or are severe, please consult a healthcare professional.
    🤰 Pregnancy Warning: Among the acupoints above, LI4, BL10, and GB20 may trigger uterine contractions in pregnant women. If you are pregnant or may be pregnant, be sure to consult with a professional before performing these techniques.