Author: Acu Master

  • 5 Acupoints for High Blood Pressure — Complete Self-Acupressure Guide

    5 Acupoints for High Blood Pressure — Complete Self-Acupressure Guide

    One-line summary: Pressing 5 acupoints—Taichong, Sanyinjiao, Kunlun, Hegu, and Fengchi—three times daily helps balance your autonomic nervous system and reduce high blood pressure. Use alongside medication.

    Can acupressure really help with high blood pressure?

    One in three Koreans suffers from high blood pressure. While medication is important, you can ease the stress and autonomic nervous system imbalance that cause blood pressure spikes with simple acupoint massage you can do at home every day.

    In traditional Chinese medicine, we believe that ‘qi’ and blood flow through the meridians (經絡) in our body. High blood pressure is understood as a condition caused by excessive ‘yang qi’ in the liver or insufficient ‘yin’ in the kidneys. Proper stimulation of acupoints helps correct this imbalance and stabilize blood pressure.

    5 acupoints excellent for high blood pressure relief

    1. Taichong (LR3) — The ‘master key’ to cooling liver heat

    Location: On the top of the foot between the big toe and second toe, slightly above where the bones meet (on the center line of the instep)

    Massage technique: Using your thumb, press slowly for 3 seconds, then release for 3 seconds. Work both feet for 2-3 minutes each, applying pressure firm enough to feel slight discomfort.

    Benefits: Reduces excessive ‘yang qi’ in the liver to suppress blood pressure spikes. Excellent for relieving stress-related blood pressure rises, headaches, and irritability.

    2. Sanyinjiao (SP6) — The blood pressure control point where three meridians meet

    SP6 acupuncture point

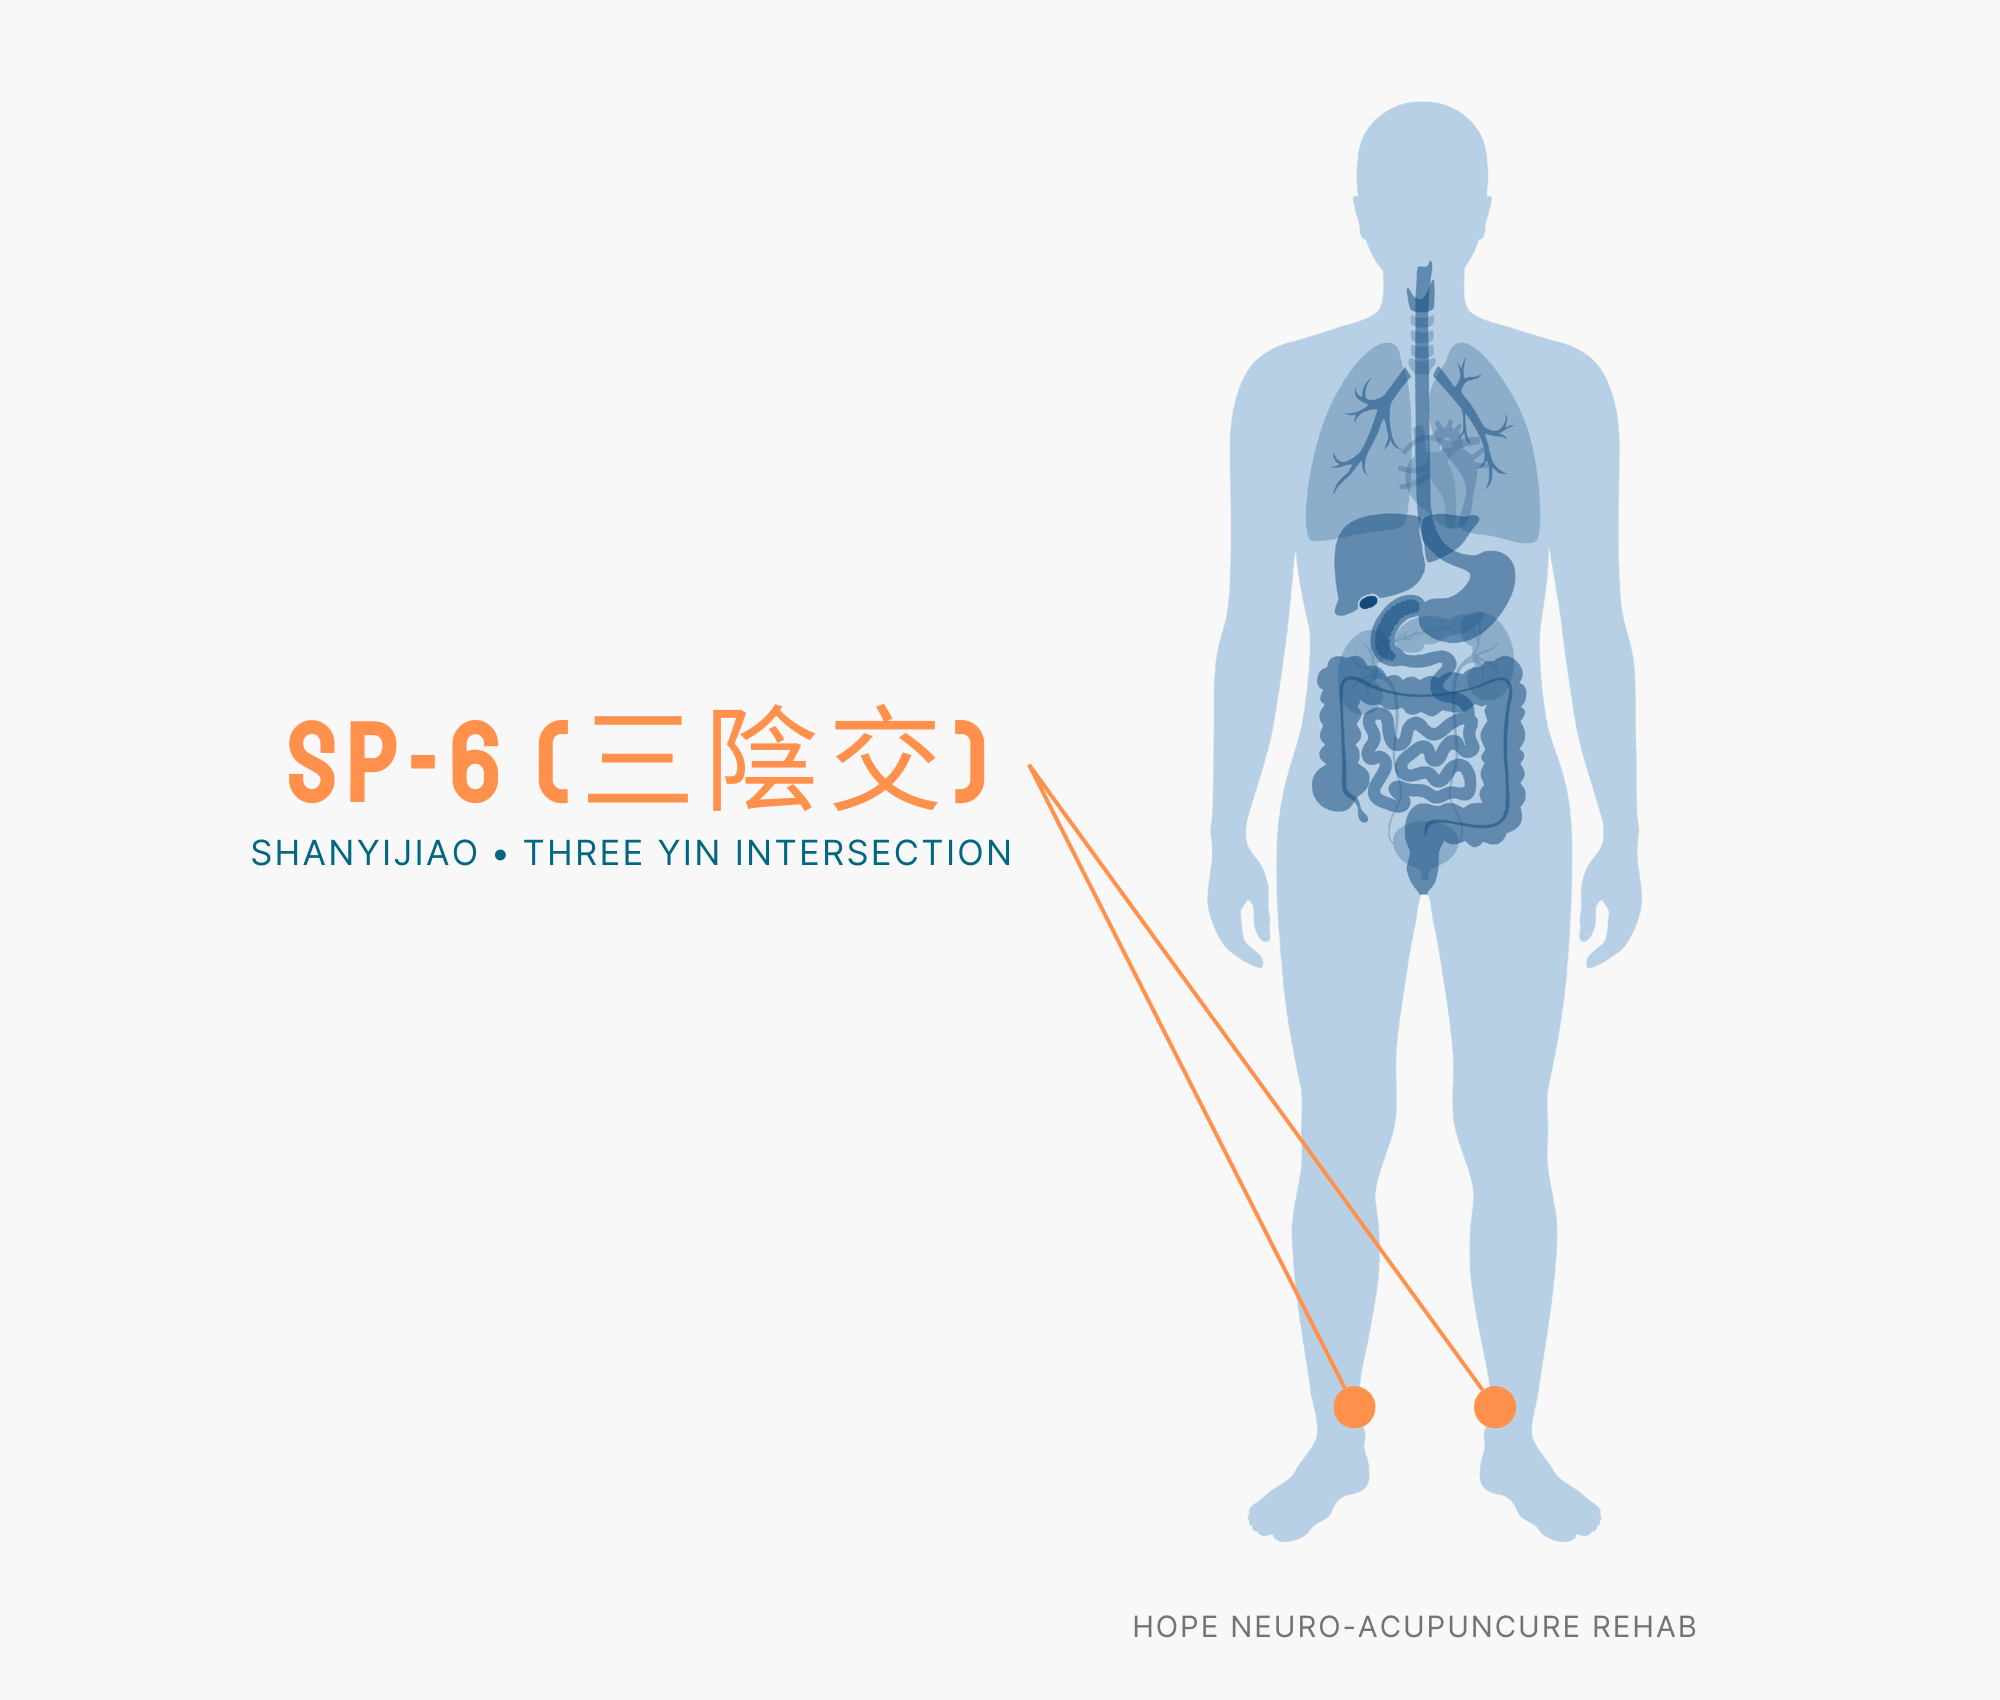
    Location: On the inner leg, four finger-widths above the inner ankle bone (medial malleolus), along the inner edge of the shinbone (tibia)

    Massage technique: Press vertically deep with your thumb. Work each side for 1-2 minutes, using gentle circular motions rather than hard jabbing.

    Benefits: Where the liver, kidney, and spleen meridians meet, this point regulates hormone secretion and supplements insufficient kidney ‘yin’ to help stabilize blood pressure.

    3. Kunlun (BL60) — Improves blood circulation comprehensively

    BL60 acupuncture point

    Location: In the hollow space between the outer ankle bone (lateral malleolus) and the Achilles tendon

    Massage technique: Slowly press with your thumb for 10-15 seconds, repeating 5-10 times in one session. Work each foot for 2 minutes.

    Benefits: A major point on the bladder meridian that promotes whole-body circulation and strengthens kidney function. Effective for improving high blood pressure accompanied by dizziness and fatigue.

    4. Hegu (LI4) — The universal pain-relief and calming acupoint

    LI4 acupuncture point

    Location: In the hollow between the thumb and index finger (where a crease forms when you bring your fingers together)

    Massage technique: Using your opposite thumb, press for 3 seconds and release for 3 seconds. Work each hand for 1-2 minutes, applying pressure firm enough to feel slight discomfort.

    Benefits: Clears heat from the large intestine meridian and promotes qi and blood circulation throughout the body. Indirectly suppresses blood pressure spikes by relieving stress, reducing headaches, and improving sleep.

    5. Fengchi (GB20) — Normalizes brain blood flow by relieving neck tension

    GB20 acupuncture point

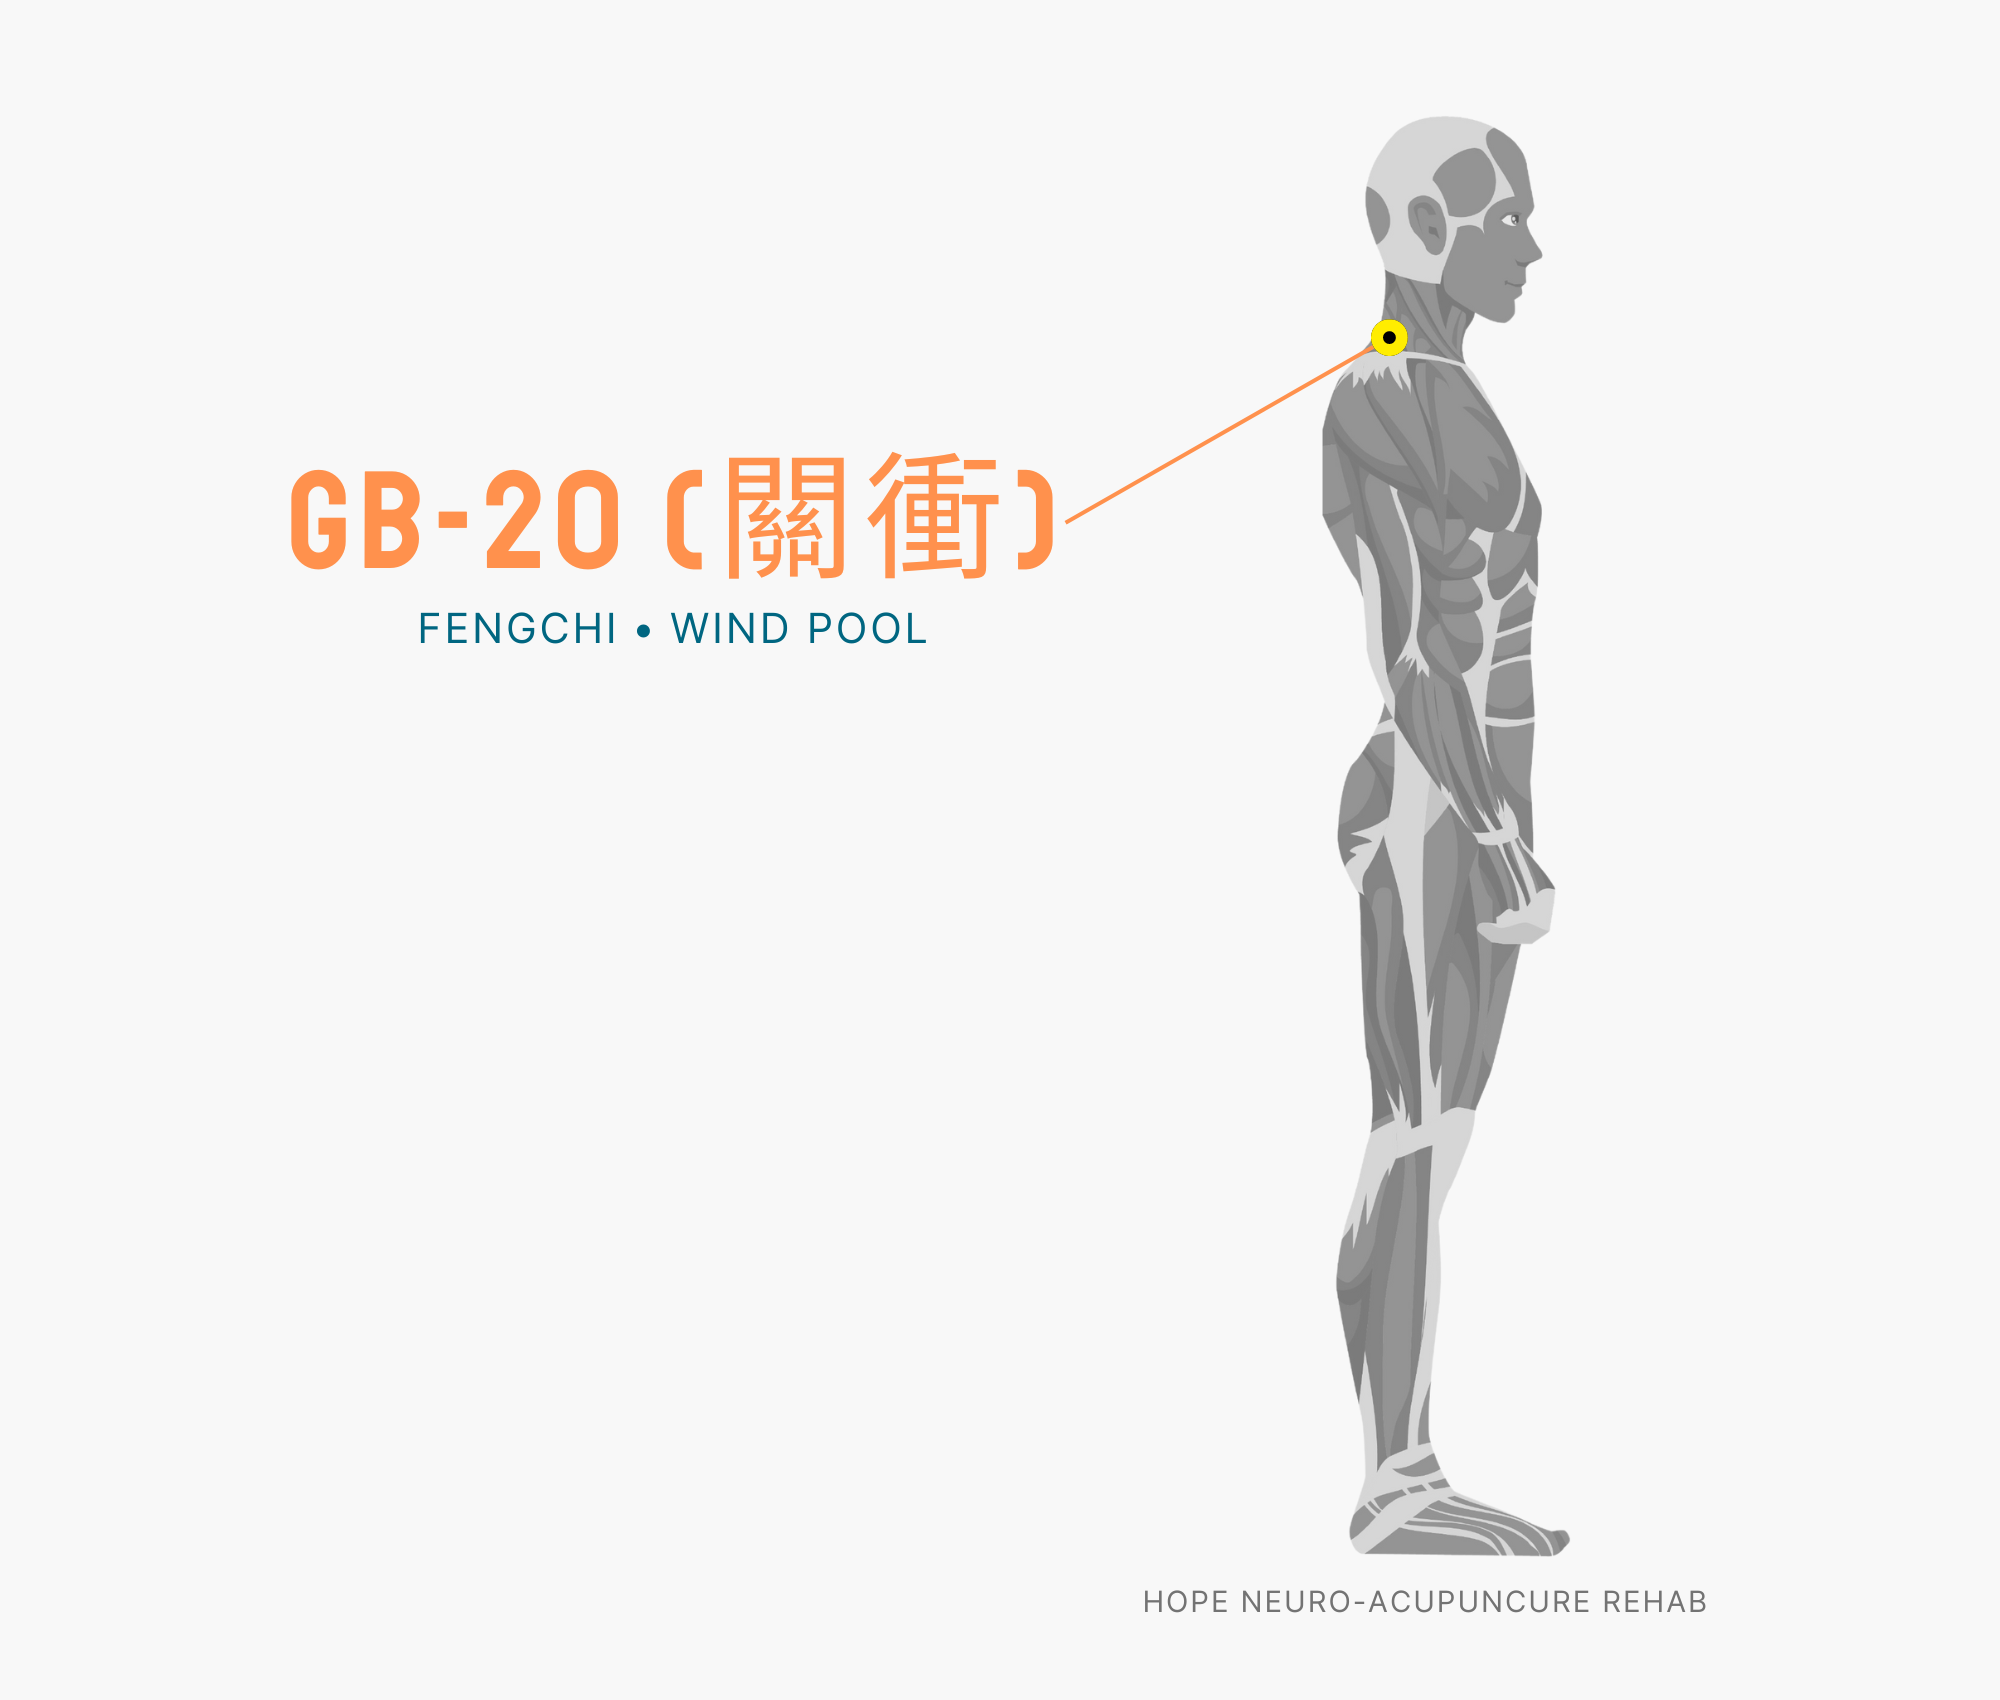
    Location: At the base of the skull below the neck, at the hairline. In the hollow space between the two trapezius muscles (the muscles connecting the neck and shoulders)

    Massage technique: Place both thumbs in the hollow and press slowly. Repeat 3-5 times for 20-30 seconds each. Work both sides for 2 minutes total.

    Benefits: Relieves tension in the neck and shoulders to improve blood flow to the brain, and eases stress-related headaches and back-of-head tension. Particularly effective when neck tension is a major cause of your blood pressure rise.

    5-minute self-massage routine

    Best times: 7 AM, 12 PM, and 7 PM (30 minutes to 1 hour after meals) | Total time: 5-7 minutes

    Step Acupoint Time
    1 Taichong (LR3) – Both feet 2 minutes
    2 Sanyinjiao (SP6) – Both sides 1.5 minutes
    3 Kunlun (BL60) – Both feet 1 minute
    4 Hegu (LI4) – Both hands 1 minute
    5 Fengchi (GB20) – Both sides 1 minute

    Tip: If you have long nails, you can use a knuckle, a coin, or an acupressure tool instead. Sit in a comfortable position and combine diaphragmatic breathing (inhale for 4 seconds, exhale for 4 seconds) with your massage to double the stress-relief benefits.

    ⚠️ Medical Disclaimer: This article is provided for informational purposes and does not replace professional medical diagnosis or treatment. Acupoint massage is a complementary method to be used alongside blood pressure medication. If symptoms persist or worsen, or if your blood pressure is 160/100 mmHg or higher, please visit a hospital and consult with a medical professional. Those with a family history of stroke or heart attack, or those taking medication for other conditions, should consult a doctor before beginning.
    🤰 Pregnancy Warning: The above acupoints—Hegu (LI4), Sanyinjiao (SP6), Taichong (LR3), and Kunlun (BL60)—may trigger uterine contractions. If you are pregnant or could be pregnant, consult a professional before proceeding. Fengchi (GB20) is relatively safe, but should be avoided during the first 3 months of pregnancy.
  • 5 Acupoints Good for Cough — Complete Self-Acupressure Guide

    5 Acupoints Good for Cough — Complete Self-Acupressure Guide

    One-Minute Summary: Applying acupressure to Feishu, Tianduo, Zhongfu, Lieque, and Taiyuan—five acupoints—twice daily for five minutes each improves respiratory function and helps relieve cough.

    Introduction

    When a sudden cough comes on, daily life becomes inconvenient, and if nighttime coughing disrupts your sleep, it’s truly frustrating. In particular, lingering cough from an unresolved cold or respiratory discomfort from seasonal changes are symptoms many people experience.

    In traditional Chinese medicine, cough is understood as a result of reduced lung function and insufficient respiratory circulation. Our bodies have specific acupoints that promote lung function and strengthen the respiratory system. By consistently stimulating these acupoints, you can activate the secretion of lung fluids and relieve airway tension, naturally improving cough symptoms. Since you can simply stimulate them with your fingers without taking medication, you can practice this anytime and anywhere.

    5 Effective Acupoints for Cough Relief

    1. Feishu (BL13) — The Center of Lung Function

    BL13 acupuncture point

    Location: Upper back, approximately 2cm lateral to the third thoracic vertebra. If it’s difficult to locate precisely, it is at the level of the inner edge of the shoulder blade, approximately one index finger width away from both sides of the spine.

    Acupressure Method: While lying down or in a comfortable position, slowly press and release with your thumb 10-15 times. Continue until you feel a refreshing sensation rather than pain.

    Benefits: As the most important acupoint of the lung meridian, it strengthens lung function and is effective for respiratory conditions in general. It is particularly useful for relieving chronic cough, asthma, and cough caused by bronchitis.

    2. Tianduo (BL11) — Respiratory Strengthening

    BL11 acupuncture point

    Location: Upper back, near the boundary between the neck and shoulder, approximately 2cm lateral to the first thoracic vertebra. You can find it by placing your finger behind the neck and moving it down along both sides of the spine.

    Acupressure Method: Gently press with both thumbs simultaneously about 10 times. If it’s difficult to do alone, you can also use a mini massage stick.

    Benefits: It calms upper respiratory inflammation and strengthens overall respiratory function. It quickly relieves lingering cough from cold aftereffects or throat itchiness.

    3. Zhongfu (REN17) — The Center of Lung and Chest

    Location: The center of the chest, at the height where your finger touches when your arm hangs down from the centerline between both breasts. More precisely, it is at the apex between the ribs at the center of the breastbone.

    Acupressure Method: Standing upright, gently press the center of the chest with your thumb or middle finger 10-15 times. Be careful not to press too hard.

    Benefits: It directly stimulates lung function to make breathing deeper and easier. It improves oppressive cough, chest tightness, and shortness of breath.

    4. Lieque (LU7) — The Special Point of the Lung Meridian

    LU7 acupuncture point

    Location: Approximately 1.5cm from the inner wrist crease in the direction of the thumb. When you bend your wrist, two tendons become visible, and it is in the hollow space between them.

    Acupressure Method: Extend one arm and press slowly with the opposite thumb for about 1 minute or stimulate it in a circular motion. Alternate between both sides.

    Benefits: As a key acupoint that regulates the entire lung meridian, it broadly improves not only cough but also sneezing, nasal symptoms, and skin conditions. It shows rapid effects especially for acute cough.

    5. Taiyuan (LU11) — The Final Acupoint for Clearing Lung Heat

    Location: The outer edge of the thumb nail, at the point where the nail meets the finger skin. More precisely, it is at the edge of the thumb tip toward the index finger.

    Acupressure Method: Stimulate the Taiyuan area with the thumb and index finger of the opposite hand by gently pinching. Repeat 10-15 times, but do not press too hard.

    Benefits: It drains heat from the lungs and removes toxins from the body. It is particularly effective for cough accompanied by throat soreness and cough with a burning sensation.

    5-Minute Self-Acupressure Routine

    Time Allocation and Order:

    1. Feishu (BL13) — 1 minute (30 seconds each side)
    2. Tianduo (BL11) — 1 minute (30 seconds each side)
    3. Lieque (LU7) — 1 minute (30 seconds each side)
    4. Zhongfu (REN17) — 1 minute (1 minute at the center point)
    5. Taiyuan (LU11) — 1 minute (30 seconds each side)

    Recommended Time: After waking in the morning or before bed at night. It is more effective if done twice a day.

    Additional Tips: If you wash your hands with warm water to warm your fingers before starting, blood circulation becomes more active and the effectiveness increases.

    ⚠️ Medical Disclaimer: This article is written for informational purposes and does not replace professional medical diagnosis or treatment. If symptoms are severe, such as cough persisting for more than 2 weeks, spitting up blood-tinged sputum, or high fever, please consult a healthcare professional (hospital or traditional medicine clinic).
    🤰 Pregnancy Warning: The acupoints presented in this article are generally safe, but their effects may vary depending on individual constitution and pregnancy stage. If you are pregnant or might be pregnant, please consult with a healthcare professional (doctor or traditional medicine practitioner) before practicing.
  • 5 Best Acupoints for Gum Pain — Complete Self-Acupressure Guide

    5 Best Acupoints for Gum Pain — Complete Self-Acupressure Guide

    One-Line Summary: In traditional medicine, gum pain is viewed as heat in the Stomach meridian and insufficient qi and blood circulation in the Large Intestine meridian. Applying acupressure to the Hegu, Yingxiang, Xiaguan, Jiache, and Neiting points 2-3 times a day helps reduce inflammation and improve pain.

    Introduction

    When your gums are swollen or painful, eating becomes difficult and your daily focus suffers. When brushing your teeth, pain prevents you from cleaning properly, and in severe cases, you may lose sleep. While dental treatment is important, many people look for ways to relieve symptoms in the meantime.

    In traditional Chinese medicine, gum pain is understood as heat in the Stomach meridian and insufficient qi and blood circulation in the Large Intestine meridian. By stimulating acupoints distributed along these meridians, you can reduce local inflammation and enhance the body’s natural healing ability. Here are 5 acupoints you can practice at home using just your fingers, without any special tools.

    5 Effective Acupoints for Gum Pain

    1. Hegu (LI4) — A Natural Remedy for Pain

    LI4 acupuncture point

    Location: In the center of the hollow area where the thumb and index finger meet on the back of your hand, approximately at the middle of the bone below the index finger.

    Acupressure Method: Press with the thumb of the opposite hand for 5-10 seconds, then release. Gradually increase pressure to a level that doesn’t cause pain. Circular rubbing motions are also effective.

    Effects: As a primary acupoint on the Large Intestine meridian, it relieves pain throughout the face and head. Beyond gum pain, it’s widely used for headaches, facial pain, and tooth pain. According to meridian theory, it promotes the circulation of qi in the facial region, reducing inflammation.

    2. Yingxiang (LI20) — Local Inflammation Relief

    LI20 acupuncture point

    Location: On the outer side of the nostrils, at the end of the crease beside the nose, on both sides where a vertical line from the center of the upper lip intersects.

    Acupressure Method: Stimulate by tapping upward with your index or middle finger. You can also place one finger on the point and vibrate it up and down.

    Effects: As a point where meridians converge around the nose and mouth, it promotes local blood circulation. It’s particularly effective for reducing gum swelling and facial swelling, and also improves rhinitis symptoms.

    3. Xiaguan (ST7) — Relief from Jaw-Related Pain

    ST7 acupuncture point

    Location: Below the cheekbone, in the hollow area just above the jaw joint. It’s easier to locate when your mouth is open.

    Acupressure Method: Using your middle and index fingers together, stimulate by gently pushing upward. Massage gently in circular motions for 1-2 minutes.

    Effects: As a primary acupoint on the Stomach meridian, it stimulates the muscles and blood vessels around the jaw joint. It can simultaneously relieve pain from masticatory muscle tension, jaw clicking, and gum pain.

    4. Jiache (ST6) — Relaxation of the Masticatory Muscles

    ST6 acupuncture point

    Location: About two finger widths above the lower jaw edge, directly over the muscle that moves when chewing (the masseter muscle).

    Acupressure Method: With your mouth slightly open, massage in circular motions using your index and middle fingers, pressing inward. Start gently and gradually increase pressure.

    Effects: It releases tension in the masticatory muscles and improves local blood circulation. Beyond pain from gum disease, it relieves gum pain caused by teeth grinding and jaw muscle fatigue.

    5. Neiting (ST44) — Clearing Stomach Heat

    ST44 acupuncture point

    Location: On the top of the foot, in the webbing between the second and third toes. The hollow area becomes visible when you spread the toes.

    Acupressure Method: Press vertically with your thumb, applying light pressure for the first 5 seconds, then medium pressure for the next 10 seconds. Repeat 2-3 times a day.

    Effects: It alleviates inflammatory gum diseases viewed as “Stomach heat” in traditional medicine. It’s effective for improving mouth ulcers, gum swelling, and bad breath caused by digestive heat rising to the mouth.

    5-Minute Self-Acupressure Routine

    Recommended Order and Time Allocation:

    1. Hegu — 1 minute (30 seconds each hand)
    2. Yingxiang — 1 minute (30 seconds on each side)
    3. Xiaguan — 1 minute (30 seconds on each side)
    4. Jiache — 1 minute (30 seconds on each side)
    5. Neiting — 1 minute (30 seconds on each foot)

    Implementation Tips:

    • Practice twice a day: after brushing in the morning and after brushing in the evening.
    • The appropriate sensation is a sore and heavy feeling (de qi sensation) at each acupoint.
    • If you’re short on time, focusing on Hegu and Neiting alone is also effective.
    • It’s more effective to use warm fingers, so in winter, rub your hands together to warm them before starting.
    ⚠️ Medical Disclaimer: This article is written for informational purposes and does not replace professional medical diagnosis or treatment. If symptoms persist or are severe, please consult with a healthcare professional. Acupoint acupressure is a complementary health management method, and if gum disease (periodontitis, periodontal abscess, etc.) is suspected, professional dental examination is essential.
    🤰 Pregnancy Warning: Among the acupoints above, Hegu (LI4) and Neiting (ST44) can trigger uterine contractions in pregnant women. If you are pregnant or might be pregnant, consult with a healthcare professional before practice. Safe acupoints include Yingxiang (LI20), Xiaguan (ST7), and Jiache (ST6).
  • 5 Acupoints for Hair Loss — Your Complete Self-Acupressure Guide

    5 Acupoints for Hair Loss — Your Complete Self-Acupressure Guide

    One-Line Summary: Hair loss occurs due to insufficient blood circulation and decreased scalp metabolism. Regular acupressure on five acupoints—Baihui, Fengchi, Hegu, Zusanli, and Sanyinjiao—can improve hair health.

    Hair Loss and Acupoint Acupressure

    Losing 100-200 strands of hair daily is normal, but excessive hair loss is a signal from your body. Modern hair loss results from multiple factors working together: stress, lack of sleep, excessive dieting, and hormonal changes.

    In traditional Chinese medicine, hair loss is viewed as a result of “insufficient blood circulation” and “decreased scalp metabolism.” When blood flow to the scalp decreases, hair follicles don’t receive enough nutrients and oxygen, causing hair to become thin and fall out. Acupoint acupressure works by stimulating meridian points to promote blood circulation and normalize the flow of qi (vital energy) and blood to the scalp. With consistent self-massage, you can not only prevent hair loss but also promote the growth of new hair.

    Five Effective Acupoints for Hair Loss Improvement

    1. Baihui (GV20) – The Acupoint That Gathers Qi at the Crown of the Head

    Location: Located at the very center of the crown of the head, at the intersection point where the midline running from the nose meets the horizontal line connecting the two ears.

    Effects: Baihui is so important it’s called “the place where all yang qi gathers.” It directly improves scalp blood circulation and strengthens the energy flowing to the head, fundamentally improving hair loss. It also relieves symptoms of heaviness and dizziness in the head.

    Acupressure Method: Find the Baihui acupoint using your middle fingers from both hands, then press vertically with a pressure that feels “pleasant but slightly tender.” Press for 5 seconds, rest for 3 seconds, and repeat 10 times.

    2. Fengchi (GB20) – The Gateway for Brain Blood Circulation

    GB20 acupuncture point

    Location: Located at the boundary where the back of the head meets the neck muscles, in the hollow area where the neck meets the head on both sides. It’s positioned approximately 2.5cm to the left and right of the center line at the back of the neck.

    Effects: Fengchi controls the passageway for blood flowing to the brain. Stimulating this acupoint increases blood flow to the scalp and releases tension in the neck and shoulder muscles, promoting blood circulation. Besides hair loss, it’s also effective for migraines, neck stiffness, and brain fatigue.

    Acupressure Method: Place your thumbs at the back of your neck and locate the Fengchi acupoint. Tilt your head back slightly and apply circular pressure with both thumbs simultaneously. Maintain this for about 1 minute, and you’ll feel a warm sensation spreading to your head.

    3. Hegu (LI4) – A Key Acupoint That Facilitates Qi Flow Throughout the Body

    LI4 acupuncture point

    Location: Located at the point where the thumb and index finger meet, in the hollow area on the back of the hand below the index finger bone.

    Effects: Hegu is a representative acupoint that regulates qi and blood flow throughout the entire body. Stimulating this point activates metabolism throughout your body and ensures smooth supply of qi and blood to the scalp. It’s particularly effective for stress-related hair loss and helps strengthen immunity.

    Acupressure Method: Place your thumb from the opposite hand on Hegu and press with a “pleasant but slightly tender” pressure while making small circular motions. Apply acupressure for about 1 minute per hand, repeating 3-5 times daily.

    4. Zusanli (ST36) – The Acupoint That Strengthens Immunity and Digestive Function

    ST36 acupuncture point

    Location: Located 4cm below the knee, specifically about four finger widths down from the outer lower part of the kneecap.

    Effects: Zusanli is called the “longevity acupoint” and strengthens digestive function while boosting overall body immunity. In traditional Chinese medicine, it’s said that “the luster of hair is related to the stomach.” By stimulating Zusanli to improve digestive function, nutrient absorption increases, making hair thicker and healthier.

    Acupressure Method: Sit down, bend your knee, and locate the point 4cm below the kneecap. Using your thumb, make circular motions while pressing for 5 seconds and resting for 3 seconds. Repeat for about 1 minute on each leg, 1-2 times daily.

    5. Sanyinjiao (SP6) – Effective for Hair Loss Caused by Female Hormonal Imbalance

    SP6 acupuncture point

    Location: Located four finger widths above the inner ankle bone on the inside of the ankle, on the inner edge of the tibia (shinbone).

    Effects: Sanyinjiao is the intersection point of the spleen, kidney, and liver meridians and is particularly effective for improving hair loss caused by hormonal imbalance in women. If you’re experiencing hair loss due to menopause or irregular menstruation, this is an essential acupoint. It also strengthens kidney function to help maintain healthy hair color.

    Acupressure Method: Place your thumb from the opposite leg on Sanyinjiao and press for 10 seconds while gradually increasing the pressure intensity. Repeat 10 times on each leg, and it’s most effective when done in the evening.

    5-Minute Self-Massage Complete Routine

    Follow this routine twice daily—morning and evening. Consistent practice is key to improving hair loss.

    Step Acupoint Duration Method
    Step 1 Baihui (GV20) 1 minute Vertical acupressure with middle fingers from both hands
    Step 2 Fengchi (GB20) 1 minute Circular acupressure with thumbs from both hands
    Step 3 Hegu (LI4) 1 minute Circular acupressure with thumb from opposite hand (30 seconds each side)
    Step 4 Zusanli (ST36) 1 minute Thumb pressing acupressure (30 seconds each leg)
    Step 5 Sanyinjiao (SP6) 1 minute Thumb pressing acupressure (30 seconds each leg)

    Acupressure Tips:

    • Maintain pressure that feels “pleasant but slightly tender.” Too light pressure won’t be effective, and too strong pressure can damage the skin.
    • In the morning, use slightly firmer pressure to awaken qi; in the evening, use gentler pressure for relaxation.
    • Drinking warm water after acupressure further promotes blood circulation.
    • You need to practice consistently for at least 3 months to see improvement in hair loss.
    ⚠️ Medical Disclaimer: This article is provided for informational purposes only and does not substitute for professional medical diagnosis or treatment. If symptoms persist or worsen, please consult a healthcare professional.
    🤰 Pregnancy Warning: Among the acupoints above, Hegu (LI4) and Sanyinjiao (SP6) can trigger uterine contractions in pregnant women. If you are pregnant or may be pregnant, please consult a specialist before performing acupressure.
  • 5 Best Acupoints for Hangovers — Complete Self-Acupressure Guide

    5 Best Acupoints for Hangovers — Complete Self-Acupressure Guide

    Quick Summary: Pressing the LI4, SP6, ST36, LR3, and BL60 acupoints in sequence can quickly relieve hangover-related headaches, nausea, and fatigue.

    Introduction

    We’ve all experienced waking up the morning after drinking with a ruined start to the day. Headaches, nausea, overall fatigue… the suffering of a hangover is truly difficult to endure. These symptoms occur during the liver’s detoxification process, and Traditional Eastern medicine believes that stimulating specific acupoints can accelerate this process and alleviate symptoms. Before heading to the pharmacy or hospital, try overcoming your hangover with self-acupressure using acupoints on your hands and feet. You only need a single finger—no complicated tools required.

    5 Effective Acupoints for Hangover Relief

    1. LI4 — Promoting Alcohol Breakdown and Relieving Nausea

    LI4 acupuncture point

    Location: The point where the bones of the thumb and index finger meet on the back of the hand (center of the webbing between the fingers).
    How to locate it: Open your hand and look between your thumb and index finger—you’ll find a natural depression.
    Acupressure technique: Using your opposite thumb, press in circular motions for 10 seconds, repeat 3 times. Apply to both hands.
    Benefits: LI4 has excellent pain-relieving effects and quickly alleviates nausea and headaches caused by alcohol. It also improves digestive function, reducing the liver’s detoxification burden.

    2. SP6 — Improving Digestion and Recovering from Fatigue

    SP6 acupuncture point

    Location: Four finger widths above the inner ankle bone (toward the calf).
    How to locate it: From the inner ankle bone, place four fingers upward (approximately 10cm). It’s near the inner side of the bone.
    Acupressure technique: Using your thumb, slowly press for 10 seconds, release, and repeat 5 times. Stimulate both sides.
    Benefits: It activates digestive and liver function, promoting alcohol metabolism. It quickly relieves fatigue and lethargy caused by hangovers.

    3. ST36 — Restoring Energy and Boosting Immunity

    ST36 acupuncture point

    Location: Below the knee on the outer side, in the depression on the outer side of the tibia (anterior shin bone).
    How to locate it: From below the outside of the knee, move down four finger widths (approximately 10cm). It’s where your finger naturally sinks in.
    Acupressure technique: Using your thumb, press firmly for 10 seconds at a pressure level that causes mild discomfort, repeat 3-5 times.
    Benefits: It’s a powerful acupoint that raises your whole-body energy (qi). It rapidly recovers from severe hangover fatigue and boosts immunity to improve your condition the next day.

    4. LR3 — Improving Liver Function and Relieving Stress

    Location: On the top of the foot, above where the first and second toes meet.
    How to locate it: Trace upward between the big toe and second toe on the top of the foot—you’ll feel a natural depression.
    Acupressure technique: Using your thumb, press for 10 seconds and stimulate in circular motions slowly. Repeat 3-5 times on both feet.
    Benefits: It’s an acupoint that directly promotes the liver’s detoxification function. It alleviates liver stress from alcohol and relieves mental stress simultaneously, accelerating hangover recovery.

    5. BL60 — Promoting Blood Circulation and Relieving Overall Body Pain

    BL60 acupuncture point

    Location: In the depression midway between the outer ankle bone and the heel.
    How to locate it: Between the outer ankle bone and the heel, you’ll find a hollow depression.
    Acupressure technique: Using your thumb, press with slightly firm pressure for 10 seconds. Repeat 3-5 times on each foot.
    Benefits: It promotes whole-body blood circulation, accelerating toxin elimination from alcohol. It relieves headaches and overall body pain while activating metabolism.

    5-Minute Self-Acupressure Routine

    Recommended order and time allocation:

    1. LI4 (1 minute) — 30 seconds per hand, starting your quick recovery
    2. SP6 (1 minute) — 30 seconds per foot, activating digestive function
    3. ST36 (1 minute) — 30 seconds per foot, restoring energy
    4. LR3 (1 minute) — 30 seconds per foot, improving liver function
    5. BL60 (1 minute) — 30 seconds per foot, promoting blood circulation

    Application tips: It’s most effective to apply 3 times a day: right after waking in the morning, around lunchtime, and in the evening. It’s important to maintain a pressure level that is ‘slightly tender but pleasantly so’ at each acupoint. Avoid excessive stimulation and practice this along with adequate hydration.

    ⚠️ Medical Disclaimer: This article is written for informational purposes and does not replace professional medical diagnosis or treatment. If symptoms persist or are severe, be sure to consult with a healthcare professional.
    🤰 Pregnancy Warning: The acupoints LI4, SP6, LR3, and BL60 above may trigger uterine contractions in pregnant women. If you are pregnant or may be pregnant, be sure to consult with a professional before practicing this.
  • 5 Acupoints for Cold Limbs — Complete Self-Acupressure Guide

    5 Acupoints for Cold Limbs — Complete Self-Acupressure Guide

    One-line summary: Cold hands and feet syndrome occurs due to insufficient peripheral blood circulation, and can be improved by stimulating acupressure points at five locations – Sanyinjiao, Taichong, Hegu, Guanyuan, and Zusanli – to promote qi and blood circulation.

    Introduction

    Many people experience cold and tingling symptoms in their hands and feet not just in winter, but year-round. This is known as cold hands and feet syndrome. For those who feel discomfort with cold fingertips and toes no matter how much clothing they wear, Traditional Chinese Medicine recommends acupressure at points that improve qi and blood circulation. Cold hands and feet syndrome fundamentally occurs due to insufficient peripheral blood circulation and reduced qi (氣) circulation. Acupressure is effective in stimulating acupoints to promote qi and blood flow and normalize body temperature. This article explains in detail five acupoints that directly help improve cold hands and feet syndrome and their acupressure techniques.

    The Five Acupoints in Detail

    1. Sanyinjiao (SP6, Sanyinjiao)

    SP6 acupuncture point

    Location: On the inner side of the lower leg, approximately 10cm (four finger widths) above the inner ankle bone, at the inner edge of the tibia
    WHO Code: SP6
    Acupressure Technique: Use your thumb to repeatedly press and release slowly. Apply pressure for 30 seconds until you feel a mild soreness, then rest for 10 seconds and repeat. Perform on both legs.
    Benefits: Sanyinjiao is where the spleen, liver, and kidney meridians meet, making it the most effective point for promoting qi and blood circulation. It excels not only at treating cold hands and feet but also at promoting fatigue recovery and enhancing immunity. Regular acupressure can improve chronic cold symptoms.

    2. Taichong (LR3, Taichong)

    Location: Between the bones of the big toe and second toe on the top of the foot, approximately 3cm above the ankle
    WHO Code: LR3
    Acupressure Technique: Press firmly using the fingertip of your thumb. The most effective pressure is when you feel a mild soreness (痛快感). Apply pressure 10 times for 1 minute on each side, and perform on both feet.
    Benefits: Taichong promotes the flow of liver qi (肝氣), directly improving blood circulation. It effectively treats not only cold sensations in the hands and feet but also poor blood circulation caused by stress. It is one of the acupoints where cold hands and feet syndrome patients feel the quickest improvement.

    3. Hegu (LI4, Hegu)

    LI4 acupuncture point

    Location: Between the bones of the thumb and index finger, at the highest point of the muscle visible on the back of the hand
    WHO Code: LI4
    Acupressure Technique: Use the thumb of your other hand to slowly press in circular motions. Apply pressure for 30 seconds until you feel a mild soreness, then rest for 10 seconds and repeat. Perform on both hands.
    Benefits: Hegu is an important acupoint of the large intestine meridian, known as “the cure-all point.” It promotes qi and blood circulation throughout the body, and excels particularly at improving blood circulation in the upper body and hands. It simultaneously alleviates not only cold hands and feet but also various other symptoms such as headaches and facial flushing.

    4. Guanyuan (CV4, Guanyuan)

    Location: Approximately 10cm below the navel, on the midline of the body
    WHO Code: CV4
    Acupressure Technique: In a lying position, gently massage in circular motions using 3-4 fingers. Do not press hard; massage for 2-3 minutes until you feel warmth.
    Benefits: Guanyuan is an important acupoint called the “lower dantian,” which tonifies kidney yang and strengthens foundational energy throughout the body. Chronic cold hands and feet syndrome often occurs due to kidney yang deficiency, and stimulating Guanyuan fundamentally improves this condition.

    5. Zusanli (ST36, Zusanli)

    ST36 acupuncture point

    Location: Approximately 10cm (four finger widths) below the outer side of the knee, on the front of the shin
    WHO Code: ST36
    Acupressure Technique: Use your thumb to repeatedly press and release slowly. Apply pressure for 30 seconds until you feel a mild soreness, then rest for 10 seconds and repeat 3-4 times. Perform on both legs.
    Benefits: Zusanli is a well-known acupoint for enhancing immunity and improving overall circulation. It promotes stomach function to improve digestion and absorption, thereby promoting qi and blood production. Regular stimulation simultaneously improves chronic cold symptoms and fatigue.

    5-Minute Self-Acupressure Routine

    Optimal time allocation for best results:

    1. Preparation (30 seconds): Wash your hands and feet with warm water and take a comfortable position (sitting or lying down).
    2. Hegu (LI4) acupressure (50 seconds): 25 seconds on each hand, pressing gently in circular motions
    3. Sanyinjiao (SP6) acupressure (60 seconds): 30 seconds on each leg, pressing and releasing slowly
    4. Taichong (LR3) acupressure (60 seconds): 30 seconds on each foot, applying pressure until you feel slight soreness
    5. Zusanli (ST36) acupressure (60 seconds): 30 seconds on each leg, until you feel soreness
    6. Guanyuan (CV4) massage (50 seconds): In a lying position, massage gently in circular motions
    7. Cool down (20 seconds): Drink warm water or put on warm clothing to maintain body temperature.

    Recommended timing: Perform this routine 1-2 times daily, either in the morning after waking or in the evening before bed. You will notice significant improvement if you consistently perform this routine for at least 3 weeks.

    ⚠️ Medical Disclaimer: This article is provided for informational purposes only and does not replace professional medical diagnosis or treatment. Cold hands and feet syndrome can result from various underlying conditions including thyroid disease, circulatory disorders, and Raynaud’s syndrome. If symptoms persist or are severe, or if ulcers or color changes appear on your hands or feet, please consult a healthcare professional (physician or Traditional Chinese Medicine practitioner).
    🤰 Pregnancy Warning: Among the above acupoints, Sanyinjiao (SP6), Taichong (LR3), and Hegu (LI4) may trigger uterine contractions in pregnant women. If you are pregnant or may be pregnant, please consult a healthcare professional before practicing acupressure. For pregnant women, it is safe to focus acupressure on Guanyuan (CV4) and Zusanli (ST36) only.
  • 5 Acupoints Good for Frozen Shoulder — Complete Self-Acupressure Guide

    5 Acupoints Good for Frozen Shoulder — Complete Self-Acupressure Guide

    One-Line Summary: Pressing 5 acupoints—Jianjing (GB21), Quchi (LI11), Jianyu (LI15), Tianzong (SI10), and Pianli (LI6)—for 5 minutes daily to relieve frozen shoulder pain and stiffness can improve joint flexibility and reduce nighttime pain within 2-4 weeks.

    Introduction

    Frozen shoulder (adhesive capsulitis) is a shoulder condition commonly seen in people in their 40s-60s, causing severe pain and limited movement due to inflammation and adhesion of the joint capsule. Nighttime pain is particularly severe, disrupting sleep, and even daily activities (putting on clothes, combing hair, etc.) become difficult. While modern medicine may recommend steroid injections or surgery, the acupoint stimulation approach in traditional Chinese medicine is a non-invasive method that activates the body’s own healing abilities. Specific acupoints promote blood circulation around the shoulder, facilitate the elimination of inflammatory substances, and relieve muscle tension. Daily acupressure on the 5 acupoints introduced in this guide can accelerate pain relief and functional recovery as a complementary therapy to medical treatment.

    5 Major Acupoints Effective for Frozen Shoulder

    1. Jianjing (Shoulder Well, GB21) — The ‘Golden Acupoint’ for Shoulder Pain

    Location: From the center point above the clavicle below the neck, moving toward the end of the shoulder, at the highest point of the shoulder (slightly outward from the hollow space between the neck and shoulder)

    WHO Code: GB21

    Acupressure Method: Press vertically with your thumb, applying gentle pressure for the first 5 seconds, then firm pressure (intensity 7-8) for the next 5 seconds, and slowly release over 5 seconds. Repeat this 10 times. Gently rotating your neck after acupressure doubles the effect.

    Effects: GB21 is the most important acupoint for addressing overall shoulder pain and stiffness. Stimulating this point immediately improves local blood circulation and relieves tension in the trapezius muscle, which acts as a trigger point. It is particularly effective in the early stages of frozen shoulder, and you can notice reduced nighttime pain within 3-5 days of consistent stimulation.

    2. Quchi (Pool at the Bend, LI11) — The ‘Bridge Acupoint’ Connecting Arm and Shoulder

    LI11 acupuncture point

    Location: When your elbow is bent, the point at the end of the elbow crease (toward the fingers). When your arm is extended, it’s located approximately 1cm above the outer side of the elbow.

    WHO Code: LI11

    Acupressure Method: Using the thumb of the opposite hand, massage in circular motions for 30 seconds. Apply pressure at an intensity (5-6) where you feel mild discomfort. Alternate between both arms.

    Effects: LI11 is a key acupoint of the Large Intestine Meridian, activating qi and blood flow throughout the arm and upper shoulder. Stimulating this point promotes recovery of the shoulder joint’s range of motion and is excellent for relieving heaviness and numbness in the arm. It is particularly effective in improving arm dysfunction caused by frozen shoulder (lifting, extension).

    3. Jianyu (Shoulder Bone, LI15) — A ‘Pain Relief Point’ Deep in the Deltoid Muscle

    LI15 acupuncture point

    Location: On the front of the shoulder, at the upper outer arm. The hollow point beneath the deltoid muscle when the arm is lifted forward (outer side of the upper arm).

    WHO Code: LI15

    Acupressure Method: Using 3 fingers (index, middle, and ring finger) together, press vertically while performing circular massage for 20 seconds. The intensity should be around 6-7, where you feel pain but can tolerate it. Repeat 3 times on each arm.

    Effects: LI15 is an acupoint that directly accesses the deep muscles and tendons (rotator cuff) around the shoulder joint. It restores flexibility to the stiffened shoulder tissue caused by frozen shoulder and particularly effectively relieves pain when lifting the arm to the side. After 2-3 weeks of consistent stimulation, the range of abduction movement (lifting the arm sideways) noticeably improves.

    4. Tianzong (Heavenly Ancestor, SI10) — A ‘Deep Healing Point’ in the Posterior Rotator Cuff

    SI10 acupuncture point

    Location: On the back of the shoulder, slightly below the center of the scapula (shoulder blade). When crossing your arm across your chest, near the hollow center of the scapula.

    WHO Code: SI10

    Acupressure Method: Gather 3 fingers of the opposite hand and press vertically, holding for 10 seconds. The intensity should be around 7 (mildly painful). Slowly rotating the arm forward and backward while pressing is more effective. Repeat 3-5 times on each side.

    Effects: SI10 directly affects the rotator cuff muscles (infraspinatus and teres minor) and is excellent for resolving muscle adhesion and inflammation, which are the root causes of frozen shoulder. Continuous stimulation of this point is especially essential when shoulder extension (external rotation) is difficult. It is also highly effective for relieving nighttime pain.

    5. Pianli (LI6) — The ‘Upper-Lower Connecting Meridian Point’ of the Arm

    LI6 acupuncture point

    Location: On the inner side of the wrist (thumb side) upper forearm, approximately 10cm above the wrist toward the elbow when the arm is pronated, in the upper third of the forearm center.

    WHO Code: LI6 (or alternative acupoint LI5)

    Acupressure Method: Press vertically with your thumb and perform circular massage for 30 seconds. Use an intensity of 5-6 so that a warm sensation spreads throughout the arm. Repeat 2-3 times on each arm.

    Effects: LI6 is an important point on the meridian running from the shoulder down to the arm, promoting qi and blood circulation throughout the upper limb. Stimulating this acupoint relieves stiffness and numbness in the arm and improves blood circulation to the hand, preventing secondary symptoms caused by shoulder pain. It is particularly recommended for frozen shoulder patients experiencing arm numbness at night.

    5-Minute Self-Acupressure Routine

    Time Allocation and Order:

    1. Preparation (1 minute): Gently wash your shoulder and arm with warm water and relax your muscles by rotating your shoulder.
    2. Jianjing (GB21) – 1 minute: Focus on pressing both Jianjing points, 30 seconds each side. Gradually increase intensity, applying strong pressure for the last 10 seconds.
    3. Quchi (LI11) – 1 minute: Perform circular massage on both Quchi points, 30 seconds each side. Maintain consistent stimulation at an intensity where you feel discomfort.
    4. Jianyu (LI15) and Tianzong (SI10) – 1.5 minutes: Alternate stimulating Jianyu and Tianzong on both sides, 45 seconds each. Maintain intensity of 6-7, perceiving pain but at a tolerable level.
    5. Pianli (LI6) – 0.5 minutes: Finish with 30 seconds of circular massage on both Pianli points. Feel the warm sensation spreading to your arm.

    Recommended Time: After waking in the morning or before bed at night (1-2 times daily). It is more effective when performed at least 1 hour after meals.

    ⚠️ Medical Disclaimer: This article is written for informational purposes only and does not replace professional medical diagnosis or treatment. If symptoms persist or are severe, consult a healthcare professional. The appropriate intensity of acupressure may vary depending on the stage of frozen shoulder progression (freezing, stiffening, thawing phase), so it is recommended to perform acupressure under the guidance of a physician or acupuncturist.
  • 5 Acupoints for Golf Elbow — Complete Self-Acupressure Guide

    5 Acupoints for Golf Elbow — Complete Self-Acupressure Guide

    One-line summary: Golfer’s elbow pain on the inner elbow can be relieved through acupressure on the LI11, LI10, TE5, TE3, and LI4 acupoints to promote blood circulation and ease muscle stiffness.

    Introduction

    Have you ever experienced throbbing pain on the inside of your elbow when performing repetitive gripping motions in golf or daily life? This is golfer’s elbow (medial epicondylitis). It’s a condition where inflammation develops due to overuse of the inner arm muscles, and is especially common among workers in professions requiring frequent wrist flexion and athletes.

    In traditional Chinese medicine, this pain is viewed as an imbalance in meridians and poor circulation of qi and blood. Stimulating specific acupoints around the elbow helps promote local blood circulation, release muscle tension, and ease inflammatory responses. In this article, I’ll introduce in detail the 5 most effective acupoints for relieving golfer’s elbow and self-massage techniques.

    5 Acupoints Explained

    1. Quchi (Curved Pond) — LI11

    LI11 acupuncture point

    Location: At the outer end of the elbow crease when the elbow is bent at 90 degrees.

    Massage technique: Press slowly with your thumb, maintaining pressure for 3-5 seconds at a pressure level that produces a slight ache, then release. Repeat this sequence.

    Benefits: An important acupoint on the Large Intestine meridian that relieves arm muscle fatigue and reduces heat sensations. This is the acupoint that most directly alleviates the inflammation of golfer’s elbow.

    2. Shousanli (Arm Three Miles) — LI10

    LI10 acupuncture point

    Location: About 3 cun (approximately 9cm) below the elbow crease in the direction of the wrist, near the outer bone of the forearm when the elbow is extended.

    Massage technique: Press with your thumb for 3 seconds at a time and release. Repeat this 10-15 times. The technique is effective when a warm sensation spreads.

    Benefits: Releases forearm muscle stiffness and improves blood circulation. Promotes recovery from muscle fatigue caused by prolonged gripping motions.

    3. Waiguan (Outer Gate) — TE5

    TE5 acupuncture point

    Location: On the back of the forearm, approximately 2 cun (about 6cm) above the wrist crease in the direction of the elbow, in the hollow space between the two bones.

    Massage technique: Pinch and rub the area with your thumb and index finger from front and back for 2-3 minutes. The warmth should spread to your fingertips.

    Benefits: Opens the flow of qi and blood in the Triple Burner meridian, reducing forearm swelling and calming nerve pain. Improves wrist instability caused by golfer’s elbow.

    4. Zhongzhu (Middle Islet) — TE3

    TE3 acupuncture point

    Location: On the back of the hand, between the fourth and fifth metacarpal bones, approximately 1 cun (about 3cm) toward the wrist from the ends of the finger bones.

    Massage technique: Press deeply with your thumb for about 5 seconds, then slowly release the pressure. Repeat 10-15 times.

    Benefits: A distal acupoint on the Triple Burner meridian that promotes the flow of qi and blood throughout the entire arm. Simultaneously improves finger numbness and arm heaviness.

    5. Hegu (Union Valley) — LI4

    LI4 acupuncture point

    Location: On the back of the hand between the thumb and index finger, slightly toward the wrist from where the finger bones meet.

    Massage technique: Press slowly with the opposite hand’s thumb, adjusting the pressure until you feel a slight aching sensation. Maintain for 3-5 seconds, then release. Repeat 10-20 times.

    Benefits: The most excellent acupoint for pain relief throughout the body. Quickly calms elbow pain and releases muscle tension caused by stress.

    🤰 Caution for Pregnant Women: Hegu (LI4) may induce uterine contractions in pregnant women. Those who are pregnant or may be pregnant should consult with a healthcare professional before using this point.

    5-Minute Self-Massage Routine

    Recommended timing: After waking in the morning or in the evening after work, twice daily

    1. Quchi (LI11) — 1 minute: 10 repetitions of slow thumb pressure
    2. Shousanli (LI10) — 1 minute: 10-15 thumb presses until warmth spreads
    3. Waiguan (TE5) — 1 minute: Rub from front and back, maintaining warmth sensation
    4. Zhongzhu (TE3) — 1 minute: Deep pressure 10-15 times, holding for 5 seconds
    5. Hegu (LI4) — 1 minute: 20 repetitions with adjusted pressure (exclude pregnant women)

    Tip: It’s more effective when performed after washing your hands with warm water. Combining with adequate stretching (elbow extension/flexion) after the massage creates a synergistic effect.

    ⚠️ Medical Disclaimer: This article is provided for informational purposes only and does not substitute for professional medical diagnosis or treatment. If symptoms persist or are severe, please consult a healthcare professional.
  • 5 Acupoints for Eye Strain — Complete Self Acupressure Guide

    5 Acupoints for Eye Strain — Complete Self Acupressure Guide

    One-Line Summary: Eye strain can be rapidly relieved through acupressure on five key points—Jingming, Zanzhu, Sizhukong, Taiyang, and Hegu—by improving blood circulation and relaxing the eye muscles.

    Introduction

    Staring at smartphone, computer, and tablet screens all day long leaves your eyes feeling tired and sore, with difficulty focusing and pain behind the eyes. This is “eye strain.” In traditional Chinese medicine, the eyes are connected to the liver, and eye strain occurs when the liver’s blood (blood) is insufficient or when the flow of qi (vital energy) becomes blocked. By stimulating specific acupressure points distributed around the eyes, arms, and legs, you can improve blood circulation and relieve eye muscle tension to quickly ease eye strain. Just five minutes using only your fingers is enough, without any medication.

    Five Acupressure Points to Relieve Eye Strain

    1. Jingming (BL1) — The Most Effective Acupressure Point for Eye Strain

    Location: The inner corner of the eye (beside the nose), in the groove above the inner eye corner. It’s located slightly above the line where the nose and eye meet.

    Massage Technique: Using the index finger or thumb of both hands, gently press upward and hold for 3 to 5 seconds until you feel a warming sensation. Repeat 10 times per set, three times daily.

    Effects: Jingming is a miracle acupressure point for eye strain, bloodshot eyes, tired eyes, myopia, and dry eyes. It directly relieves tension in the muscles around the eyes and promotes blood circulation around the eye area, providing the fastest recovery from eye strain. Pressing it every three hours can significantly reduce eye fatigue after long work sessions.

    2. Zanzhu (BL2) — Eye Strain Relief Point Inside the Eyebrow

    Location: The groove at the inner end of the eyebrow (above the nose). You can find it at the inner corner of each eyebrow.

    Massage Technique: Using both thumbs, gently press upward with a tender feeling (soreness-distension sensation) and hold for about 5 seconds. Stimulate 8 to 10 times per session, three to four times daily.

    Effects: Zanzhu relieves eye strain, dry eyes, and pain near the eyebrows. It’s especially effective for eye strain accompanied by tension in the area between the eyebrows and frontal headaches. It also helps improve wrinkles on the forehead caused by stress.

    3. Sizhukong (TE23) — Specialized Acupressure Point for Outer Eye Strain

    Location: The wrinkle area at the outer corner of the eye (toward the temple), in the indented area that appears when you close your eyes.

    Massage Technique: Using the ring finger or middle finger of both hands, press slightly upward and massage in a circular motion for 5 seconds. Repeat 10 times per session, two to three times daily.

    Effects: Sizhukong relieves fatigue and soreness on the outer side of the eyes and is especially beneficial for eye strain accompanied by migraines or temple pain. It promotes lymphatic circulation around the eyes and improves eye puffiness (eyelid edema).

    4. Taiyang (Ex-HN5) — Multi-Purpose Acupressure Point at the Temple

    Location: The temple area, roughly halfway between the eye and ear. It’s the area that becomes indented when you press with your finger.

    Massage Technique: Gently approach the temples with the middle or ring finger of both hands, then massage in a circular motion toward the back with light pressure for 10 seconds. Repeat 15 times per session, three times daily.

    Effects: Taiyang relieves not only eye strain but also migraines, eye pain, and soreness around the eyes and temples. It effectively improves blood circulation around the eyes and relieves nervous tension, and is especially recommended for stress-related eye strain in modern life.

    5. Hegu (LI4) — Comprehensive Acupressure Point for Overall Pain and Eye Strain

    Location: The center of the point where the thumb and index finger meet, at the highest point when the fingers are closed together.

    Massage Technique: Using the thumb of the opposite hand, press downward (toward the wrist) and slowly stimulate with firm pressure. Massage for more than 1 minute per session, two to three times daily. It’s good to stimulate both sides one at a time.

    Effects: Hegu is a universal acupressure point that addresses eye strain, bloodshot eyes, and all facial pain (headaches, toothaches, facial pain). It’s particularly effective when eye strain is accompanied by headaches or eye pain. It stimulates the autonomic nervous system in the hands, simultaneously relieving tension in the eyes and brain.

    5-Minute Self-Massage Routine

    A quick eye strain relief routine that takes just 5 minutes during your busy morning, lunch, or evening.

    1. Jingming (1 minute): Alternate pressing both Jingming points 10 times × 1 set, approximately 1 minute
    2. Zanzhu (1 minute): Gently stimulate both Zanzhu points 8 times × 1 set, approximately 1 minute
    3. Sizhukong (1 minute): Massage both Sizhukong points in circular motions 10 times × 1 set, approximately 1 minute
    4. Taiyang (1 minute): Massage both Taiyang points simultaneously in circular motions 15 times, approximately 1 minute
    5. Hegu (1 minute): Press both Hegu points firmly for 30 seconds each, approximately 1 minute

    Tip: If you repeat this routine three times a day—right after waking in the morning, one hour after lunch, and once after work in the evening—you can prevent the buildup of eye strain. Feel free to change the order of the points if it’s more comfortable for you.

    ⚠️ Medical Disclaimer: This article is provided for informational purposes and does not replace professional medical diagnosis or treatment. If eye strain persists for more than three weeks, or if you experience decreased vision, eye pain, foreign body sensation, or elevated intraocular pressure, you must consult with an ophthalmologist or traditional medicine specialist. Especially if you have underlying conditions such as glaucoma, retinal degeneration, or dry eye disease, please obtain medical professional approval before performing acupressure.
    🤰 Pregnancy Warning: Hegu (LI4) can trigger uterine contractions during pregnancy. If you are pregnant or may be pregnant, avoid pressing Hegu and stimulate only Jingming, Zanzhu, Sizhukong, and Taiyang gently. If you are uncertain, be sure to consult with an obstetrician or traditional medicine specialist before proceeding.
  • 5 Acupoints for Eye Twitching — Complete Self-Acupressure Guide

    5 Acupoints for Eye Twitching — Complete Self-Acupressure Guide

    One-line summary: Eye twitching is caused by meridian imbalance due to stress and fatigue, and symptoms can be relieved through acupressure on five acupoints—Taiyang, Fengchi, Xiaohai, Hegu, and Sanyinjiao.

    Introduction

    If you spend all day looking at screens while working, you’ve probably experienced one eye twitching repeatedly. This symptom is very common, but when it repeats, it causes inconvenience in daily life and acts as a source of stress. In traditional Chinese medicine, eye twitching is viewed as insufficient qi and blood in the spleen, insufficient blood in the liver, and insufficient yin fluids in the kidneys. From a modern medical perspective, causes include hyperexcitability of the facial nerve, stress, lack of sleep, and excessive caffeine intake. Fortunately, stimulating the meridians to promote smooth flow of qi and blood can have significant effects on symptom relief. Since it can be done with fingers alone without any special equipment, self-treatment is possible anytime, anywhere.

    Five Effective Acupoints for Eye Twitching

    1. Taiyang (EX-HN5) — The Most Direct Acupoint Around the Eyes

    Location: On the temple area, approximately 1cm away from the outer corner of the eye. You can find it by placing your finger at the end of the eye and pushing it outward.

    Acupressure method: Using the middle or ring finger of both hands, perform circular massage movements for 30 seconds. Adjust the intensity so it feels slightly warm. Repeat 5-10 times per session.

    Benefits: Promotes blood circulation in the meridians around the eyes and relieves tension in the facial nerve. In addition to eye twitching, it shows immediate effects on migraines and eye fatigue.

    2. Fengchi (GB20) — Promotes Blood Supply to the Brain and Eyes

    GB20 acupuncture point

    Location: Located at the base of the back of the neck, specifically in the hollow area about 2cm inside where the neck meets the hairline. It’s the hollow area you’ll find when following the back of the neck down from below the ear.

    Acupressure method: Using both thumbs, apply pressure in an upward pushing motion. Hold the pressure for 10-15 seconds and release, repeating this 5-10 times. You can also press deeply for about 3-5 seconds at a time.

    Benefits: Promotes blood circulation to the brain and eyes and relieves tension in the nervous system. Very effective for relieving eye twitching, neck stiffness, and headaches.

    3. Xiaohai (SI3) — Nerve Stabilization and Qi-Blood Circulation

    SI3 acupuncture point

    Location: On the side of the finger, specifically in the crease at the base of the little finger (mainly below the finger joint). It’s the point where the crease on the bottom of the little finger and the outer line meet when your hand is open.

    Acupressure method: Press with the opposite thumb for 3-5 seconds and repeat 10 times. It’s best to stimulate both hands. Don’t stimulate with the fingernail; press with the flesh beside the nail.

    Benefits: Directly plays a role in nerve stabilization by stimulating the Small Intestine meridian. Calms nerve hyperexcitability in the eyes and face and promotes qi-blood circulation.

    4. Hegu (LI4) — The Central Hub of Whole-Body Qi-Blood Communication

    LI4 acupuncture point

    Location: At the point where the thumb and index finger meet, slightly angled toward the index finger side. It’s the midpoint of the angle formed by the thumb and index finger bones when your hand is open.

    Acupressure method: Apply pressure with the opposite thumb, pressing downward for 5-10 seconds. Repeat 10-15 times and perform on both hands. Press slowly while taking deep breaths.

    Benefits: As an important acupoint of the Large Intestine meridian, it promotes smooth flow of whole-body qi and blood. Very effective for stress relief, enhanced immunity, and eye twitching relief.

    5. Sanyinjiao (SP6) — Fundamental Solution by Strengthening Spleen Function

    SP6 acupuncture point

    Location: About 10cm above the inner ankle (the width of four thumbs), specifically in the hollow area on the back of the tibia on the inner side of the calf.

    Acupressure method: In a seated position, apply pressure with your thumb in an upward pushing motion for 3-5 seconds. Repeat 10-15 times and stimulate both feet. A slightly painful intensity is appropriate.

    Benefits: Strengthens spleen qi and blood to address the root cause of eye twitching. Also effective for improving sleep, recovering from fatigue, and stabilizing the nervous system. In the long term, it plays a major role in preventing eye twitching recurrence.

    5-Minute Self-Acupressure Routine

    Morning routine (3 minutes):

    1. Taiyang (1 minute): Massage both temples in circular motions. Repeat about 10 times.
    2. Fengchi (1 minute): Apply acupressure to both sides of the back of the neck in an upward pushing motion, 10 times.
    3. Xiaohai (1 minute): Press below the little finger on both hands, 10 times each.

    Evening routine (5 minutes, recommended before bed):

    1. Hegu (2 minutes): Apply acupressure between the thumb and index finger of both hands, 15 times each.
    2. Sanyinjiao (2 minutes): Press deeply on the inner side of both feet, 15 times each.
    3. Taiyang (1 minute): Finish with circular massage of both temples.

    Tip for maximizing effects: Perform with warm hands and proceed while doing deep abdominal breathing. Applying acupressure immediately whenever you feel stressed or eye twitching begins is even more effective.

    🤰 Pregnancy precaution: Among the acupoints above, Hegu (LI4) and Sanyinjiao (SP6) can trigger uterine contractions in pregnant women. If you are pregnant or possibly pregnant, be sure to consult with a professional acupuncturist before proceeding. For pregnant women, stimulation of Taiyang, Fengchi, and Xiaohai only is safe.
    ⚠️ Medical disclaimer: This article is written for informational purposes and does not replace professional medical diagnosis or treatment. If eye twitching persists for more than 2 weeks, occurs in both eyes, or is accompanied by other neurological symptoms (dizziness, headaches), be sure to consult with a healthcare professional (doctor or acupuncturist). Early diagnosis is important as it may be a sign of a neurological disorder.