Author: Acu Master

  • 5 Acupoints for Text Neck Pain — Complete Self-Acupressure Guide

    5 Acupoints for Text Neck Pain — Complete Self-Acupressure Guide

    “`html

    One-line summary: Stimulating five acupoints—GB20, BL10, GB21, LI4, and LR3—for 5 minutes daily can effectively relieve neck and shoulder pain caused by text neck.

    What is Text Neck Pain?

    With the increased use of smartphones and computers, the number of people suffering from text neck has significantly increased. Text neck is a condition where the neck is bent forward more than in a normal posture, placing continuous tension on the neck and shoulder muscles. This causes stiffness in the muscles around the cervical spine and nerve compression, resulting in various symptoms such as neck pain, shoulder tightness, headaches, and tingling in the arms. Traditional Chinese medicine believes that such neck pain can be alleviated through acupoint stimulation. Acupressure stimulates meridians to promote the circulation of qi and blood, relieve muscle tension, and is effective for pain relief and prevention.

    5 Effective Acupoints for Text Neck Pain

    1. GB20 (Fengchi) — The ‘Pain-Blocking Acupoint’ at the Back of the Neck

    GB20 acupuncture point

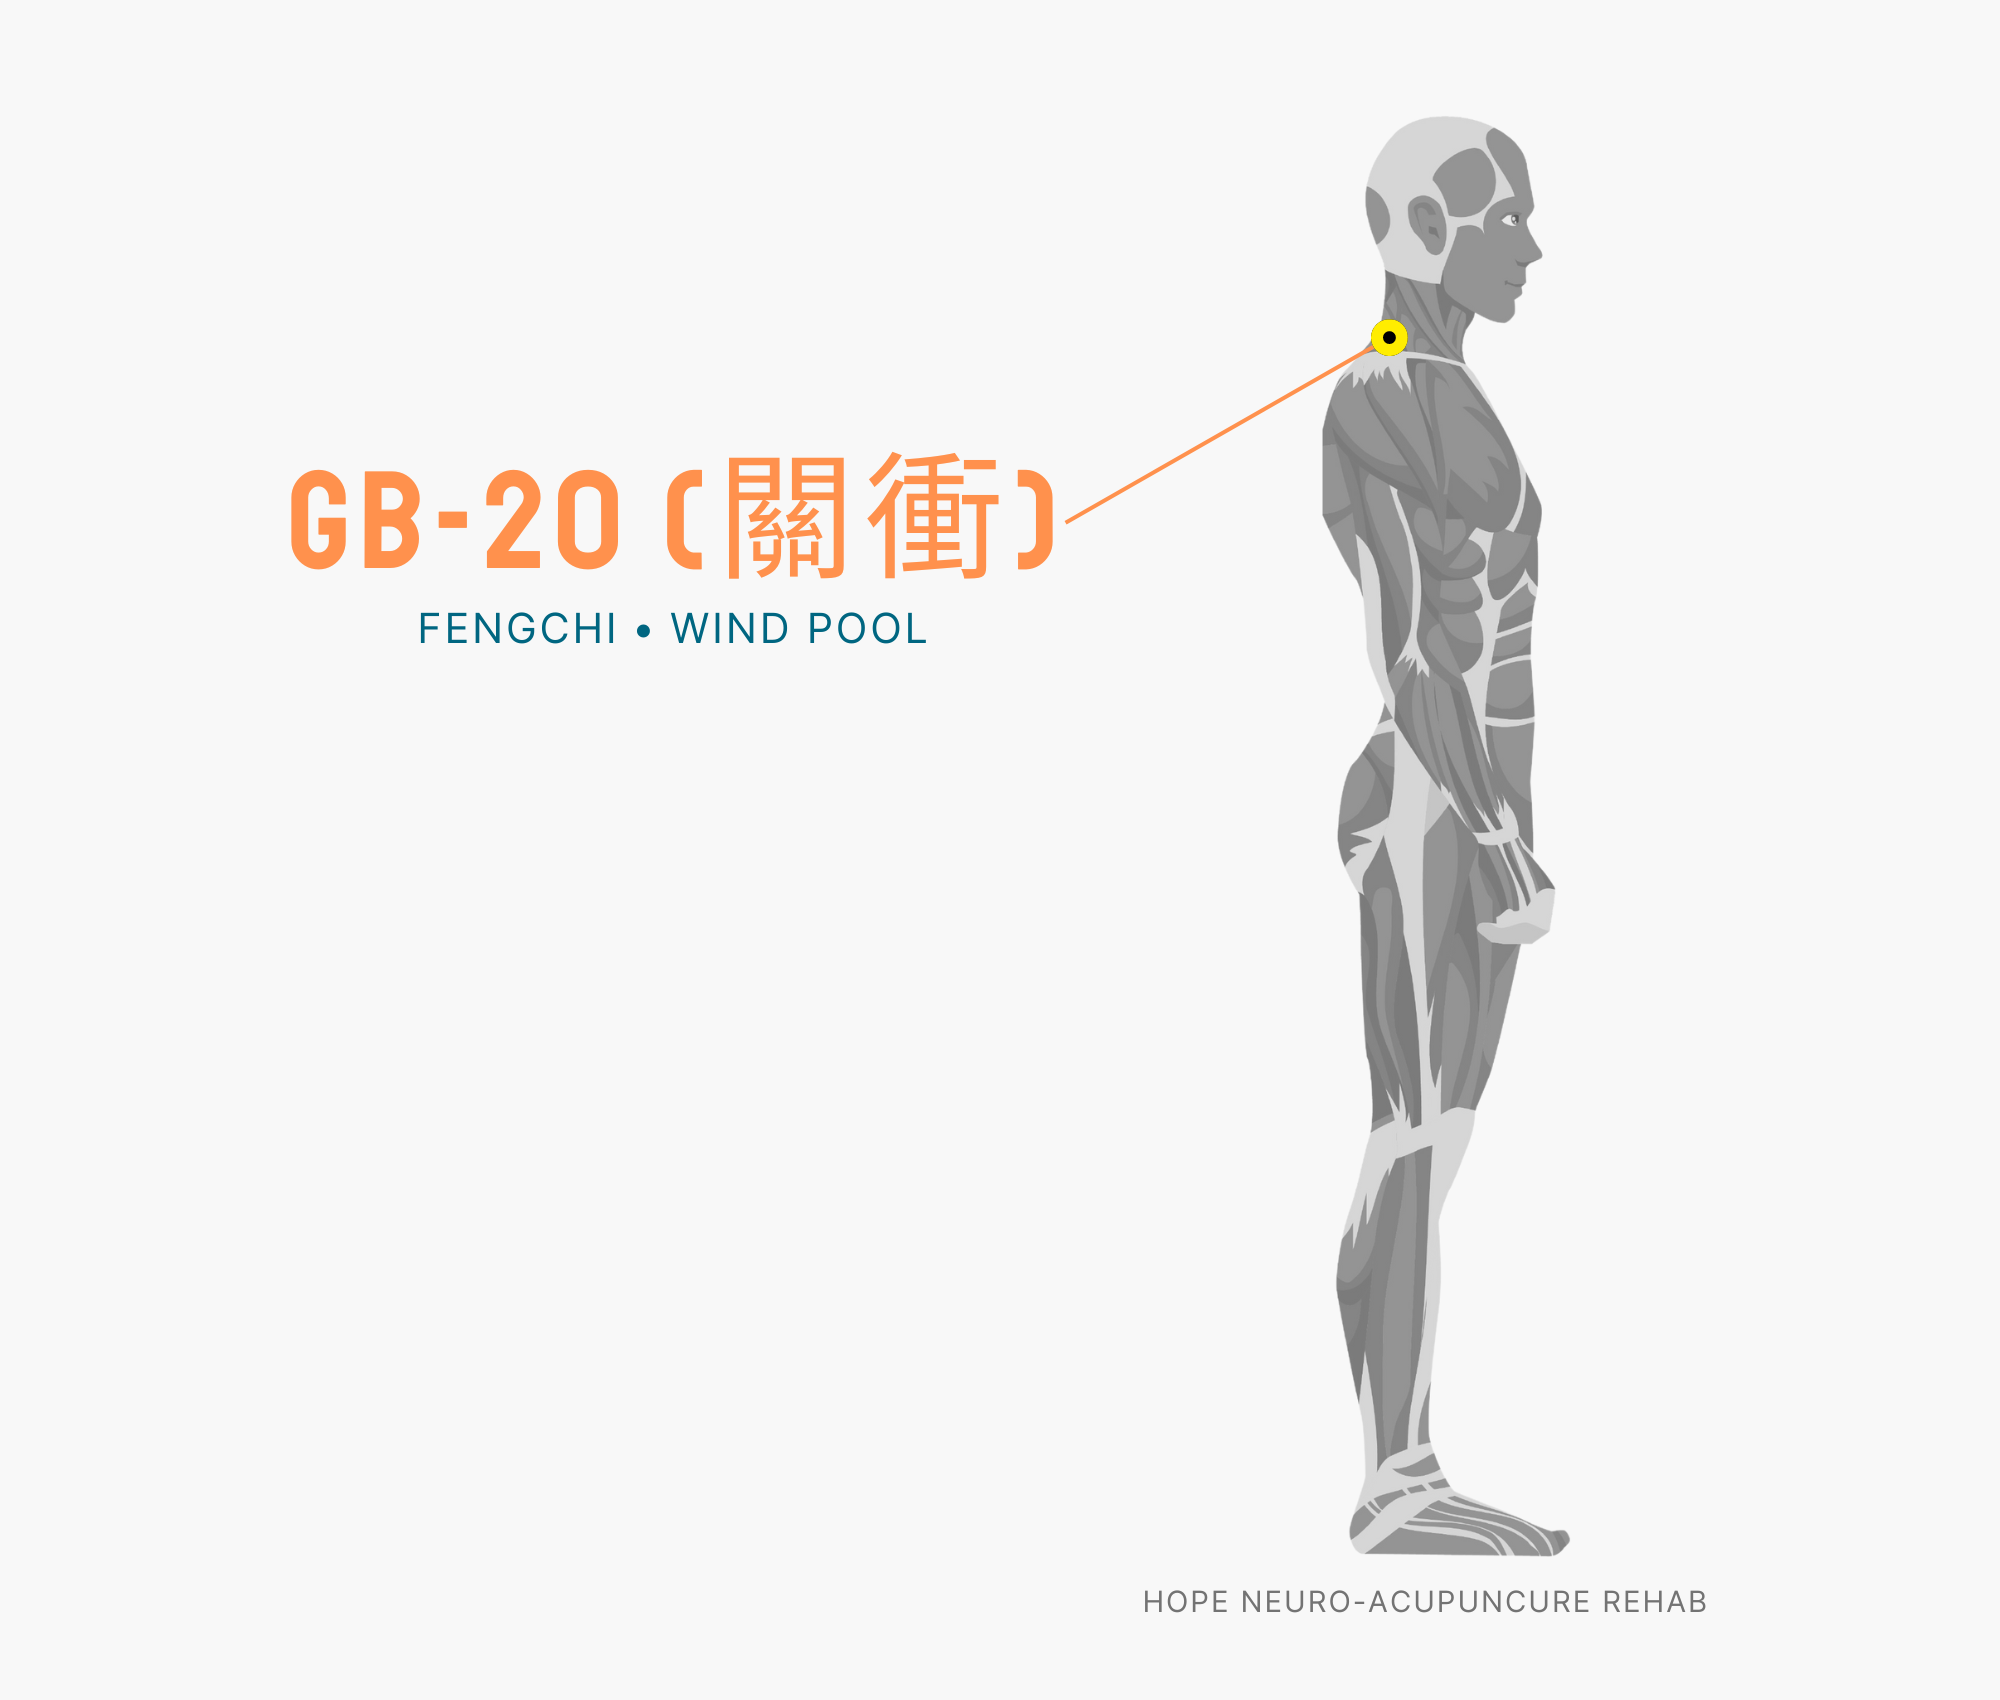
    Location: At the back of the neck, in the hollow area below the skull (on both sides of the boundary between the neck and head) | WHO Code: GB20

    Technique: Fix both thumbs on the GB20 acupoint and apply pressure upward for 2-3 seconds, then release. Repeat 10-15 times. It’s easier to locate the acupoint if you bend your neck slightly forward.

    Benefits: GB20 is an important meridian connecting the neck and head. Stimulating it promotes blood circulation around the neck and relieves muscle tension, simultaneously improving back-of-neck pain, headaches, and eye fatigue caused by text neck. It’s beneficial to stimulate this point frequently when your neck feels stiff in the afternoon.

    2. BL10 (Tianzhu) — The ‘Troublemaker Acupoint’ for Neck Pain

    BL10 acupuncture point

    Location: At the back of the neck, slightly below GB20, approximately 1.3 cm to the side of the center line at the back of the neck | WHO Code: BL10

    Technique: Place both thumbs on BL10 and slowly massage in circular motions 10-15 times. Alternatively, pressing with the thumbs for 2-3 seconds is also effective. Use a natural pressure level that creates a sensation of soreness.

    Benefits: BL10 directly alleviates stiffness in muscles around the cervical spine. It rapidly improves back-of-neck pain, stiff neck, and cervicogenic headaches, providing immediate relief for tension pain in the shoulders and neck caused by text neck.

    3. GB21 (Jianjing) — The ‘Emergency Acupoint’ for Shoulder-Neck Tension

    Location: At the midpoint where the neck and shoulder meet, at the highest point of the shoulder | WHO Code: GB21

    Technique: Pinch GB21 with the thumb and fingers of the opposite hand and apply pressure for 3-5 seconds. Repeat 10-15 times. Alternatively, pressing downward with the thumb is also effective.

    Benefits: The shoulder-neck boundary is the most tense area caused by text neck. Stimulating GB21 relieves widespread tension from the neck to the shoulders, improves blood circulation, and simultaneously resolves shoulder tightness, neck pain, and tingling sensations in the arms.

    4. LI4 (Hegu) — The ‘Universal Acupoint’ for Whole-Body Pain

    LI4 acupuncture point

    Location: In the center of the webbing between the thumb and index finger on the dorsum of the hand, in the hollow area | WHO Code: LI4

    Technique: Press LI4 firmly with the opposite thumb for 2-3 seconds, then release. Repeat 10-15 times. Pressure that creates slight discomfort is most effective. Stimulate both hands.

    Benefits: LI4 is the ‘king of pain relief’ that stimulates the nervous and immune systems. It comprehensively alleviates pain in the neck, shoulders, and arms, and also relieves muscle tension caused by stress. It also improves headaches and fatigue accompanying text neck pain.

    5. LR3 (Taichong) — The ‘Stress-Relief Acupoint’ for Whole-Body Relaxation

    Location: On the dorsum of the foot, in the center of the webbing between the big toe and second toe | WHO Code: LR3

    Technique: Apply pressure to LR3 with your thumb or a blunt object for 2-3 seconds, then release. Repeat 10-15 times. It’s important to stimulate both feet with equal pressure.

    Benefits: LR3 promotes relaxation throughout the entire body through the liver meridian. It alleviates muscle stiffness caused by stress and improves blood circulation, fundamentally resolving tension in the neck and shoulders. It’s particularly effective for text neck pain worsened by stress.

    5-Minute Self-Massage Routine

    Choose according to your situation:

    Quick Relief Mode (3 minutes):

    1. GB20 × 10 times (30 seconds)
    2. BL10 × 10 times (30 seconds)
    3. GB21 × 10 times (30 seconds)
    4. LI4 × 10 times (both hands, 1 minute)

    Complete Care Mode (5 minutes):

    1. GB20 × 15 times (1 minute)
    2. BL10 × 15 times (1 minute)
    3. GB21 × 15 times (1 minute)
    4. LI4 × 10 times (both hands, 1 minute)
    5. LR3 × 10 times (both feet, 1 minute)

    Recommended timing: After waking in the morning, around 3 PM after lunch, and after work in the evening, for a total of 1-2 times daily. With consistent daily practice, you can notice significant improvement within 1-2 weeks.

    ⚠️ Medical Disclaimer: This article is provided for informational purposes only and does not substitute for professional medical diagnosis or treatment. If symptoms persist or are severe, please consult with a healthcare professional.
    🤰 Pregnancy Warning: Of the acupoints mentioned above, LI4 and LR3 may trigger uterine contractions in pregnant women. If you are pregnant or may be pregnant, please consult with a healthcare professional before proceeding, and selectively use only GB20, BL10, and GB21.

    “`

  • 5 Best Acupoints for Wrist Pain — Complete Self-Acupressure Guide

    5 Best Acupoints for Wrist Pain — Complete Self-Acupressure Guide

    One-line Summary: Wrist pain can be relieved by regularly stimulating the TE5, PC6, PC7, LI4, and TE5 acupoints to improve qi and blood circulation through the meridians. Self-acupressure is a cost-effective pain management method.

    Introduction

    Mouse clicks, smartphone touches, cooking, laundry—modern people’s wrists move constantly without rest. Symptoms such as “frequent tingling in the wrist,” “pain when bending the wrist,” and “stiffness and soreness in the wrist” are common discomforts among office workers and students.

    The causes of wrist pain are varied. Muscle fatigue from repetitive movements, carpal tunnel syndrome (CTS), sprains, or cervical spine issues can affect the wrist. In traditional Chinese medicine, wrist pain is viewed as an imbalance in meridian function, and improving qi and blood circulation through stimulation of specific acupoints is considered important.

    The five acupoints introduced in this article are particularly known to be effective for relieving wrist pain. Because they can be easily stimulated at the office, at home, or while traveling, they will become an essential self-care tool for office workers.

    5 Acupoints for Relieving Wrist Pain

    1. TE5, Waigguan (外關) — The Primary Acupoint for Wrist Pain

    TE5 acupuncture point

    Location: This acupoint belongs to the Triple Burner meridian. It is located on the back of the wrist, approximately 2-3cm above the wrist crease toward the forearm, in the space between the radius (thumb bone) and ulna (pinky bone). More precisely, when you extend your wrist, it is located approximately 2-3cm above the midpoint between the two bones on the back of your hand.

    Benefits: TE5 is effective for wrist pain, elbow pain, and brachial neuralgia. It is particularly excellent for alleviating pain that occurs when bending or extending the wrist, and in traditional Chinese medicine, it is also used to treat “external pathogenic diseases” (diseases caused by external pathogens).

    Technique: Apply vertical pressure to the TE5 area with the tip of your thumb. Press and release repeatedly for 3-5 seconds at an intensity where you feel soreness that is also refreshing. Perform this on both hands alternately, each for 3 minutes.

    2. PC6, Neiguan (內關) — Wrist Pain and Stress Relief

    PC6 acupuncture point

    Location: This acupoint belongs to the Pericardium meridian and is located on the inner side of the wrist (toward the fingers). From the inner wrist crease, go up toward the forearm approximately 2-3cm, positioning it at the center between the two tendons (palmaris longus and flexor carpi radialis). Simply, it is located one to two finger-widths above the inner wrist crease toward the forearm.

    Benefits: PC6 relieves not only wrist pain but also finger numbness, arm pain, and chest palpitations caused by anxiety and stress. It is a very suitable acupoint for stress-related wrist pain in modern people.

    Technique: Press directly with your thumb or massage by rubbing with the knuckle of your opposite hand’s finger. Use medium intensity, rubbing at a pace of approximately 60-80 strokes per minute. Perform this on both sides for 2 minutes each.

    3. PC7, Daling (大陵) — Wrist Pain and Sleep Improvement

    PC7 acupuncture point

    Location: This acupoint belongs to the Pericardium meridian and is located at the center of the wrist crease on the palm side. When you slightly extend your wrist, you will see two tendons on the inner side of the wrist, and Daling is located directly between them. When you bend your fingers toward the wrist, a crease appears, and Daling is at the center of that crease.

    Benefits: PC7 is effective for wrist pain, arm numbness, and improving insomnia and anxiety. It is particularly useful when wrist pain interferes with sleep, and it also has a calming effect on the mind.

    Technique: Press vertically with your thumb. Press and release repeatedly for 3-5 seconds at an intensity with slight discomfort. Particularly if you stimulate this for 1-2 minutes before bed, it can also help improve sleep.

    4. LI4, Hegu (合谷) — A Master Acupoint for Whole-Body Pain Relief

    LI4 acupuncture point

    Location: This acupoint belongs to the Large Intestine meridian and is located in the bony space between the thumb and index finger (between the 1st and 2nd metacarpal bones). When you open your hand, it is located on the back of the hand between the thumb and index finger, at the point above the muscle (first dorsal interosseous muscle) that rises when you bring your fingers together.

    Benefits: LI4 is called the “master acupoint for whole-body pain relief” and alleviates not only wrist pain but also headaches, neck pain, elbow pain, and various other pain throughout the body. It is also widely used for colds, fever, and stress relief.

    Technique: Press with the thumb of your opposite hand using moderate to strong pressure. Repeat pressing and releasing for 5-10 seconds, doing this 3-5 times. When pressing, you should feel an “achy but refreshing” sensation for the technique to be effective. Perform this on both hands for 2-3 minutes each.

    5. TE5, Waigguan (外關) — Forearm and Lateral Wrist Pain

    TE5 acupuncture point

    Location: This acupoint belongs to the Triple Burner meridian and is located approximately 2-3cm above the wrist crease on the back of the wrist toward the forearm. It is in the same area as TE5 but more precisely positioned closer to the radius (thumb bone). When you slightly extend your wrist, it is located above the space between the two bones on the back of the wrist, going up toward the forearm.

    Benefits: TE5 alleviates lateral forearm pain, lateral wrist pain, and stiffness in the neck. It is particularly effective when experiencing lateral wrist pain from mouse use.

    Technique: Press with your thumb at a right angle. Repeat pressing and releasing for 3-5 seconds using medium pressure. Perform this on both hands for 2-3 minutes each, 2-3 times a day.

    5-Minute Self-Acupressure Routine — A Simple Program You Can Do at the Office

    Preparation (30 seconds): Sit in a comfortable position and rest both hands on the desk. Take 3-4 slow, deep breaths before starting.

    Acupoint 1: TE5 (1 minute): Start with the left hand TE5. Repeat pressing for 30 seconds with your thumb, then perform the same technique on the right hand for 30 seconds.

    Acupoint 2: PC6 (1 minute): Stimulate the left hand PC6 by rubbing for 30 seconds, then perform the same on the right hand for 30 seconds.

    Acupoint 3: PC7 (1 minute): Repeat pressing the left hand PC7 for 30 seconds, then perform the same on the right hand for 30 seconds.

    Acupoint 4: LI4 (1 minute): Repeat pressing the left hand LI4 strongly for 30 seconds, then perform the same on the right hand for 30 seconds.

    Acupoint 5: TE5 (1 minute): Repeat pressing the left hand TE5 for 30 seconds, then perform the same on the right hand for 30 seconds.

    Cool-down (1 minute): Gently shake both hands and slowly rotate your wrists clockwise and counterclockwise. For even better results, immerse your wrists in cold water for 3-5 seconds and then wrap them with a warm towel.

    Recommended Times: Right after waking in the morning, 1 hour after lunch, and after leaving work in the evening—three times a day is ideal. When symptoms are severe, you can do this 4-5 times a day, but avoid excessive stimulation.

    Additional Tips for Wrist Pain Acupoint Acupressure

    Use Heat Therapy: Soaking your wrist in warm water for 1-2 minutes or applying a warm compress before acupressure can improve blood circulation and enhance the acupressure effects.

    Correct Intensity: Acupoint acupressure is most effective at an intensity that is “achy but refreshing.” Avoid excessive stimulation, and stop immediately if pain worsens.

    Maintain Consistency: Acupoint acupressure shows minimal effects from just one or two sessions. You need to perform it consistently for at least 2-3 weeks to feel improvement.

    Combine with Other Treatments: Acupoint acupressure is even more effective when combined with wrist stretching, physical therapy, and lifestyle improvements.

    ⚠️ Medical Disclaimer: This article is written for informational health purposes and does not replace professional medical diagnosis or treatment. If wrist pain persists for more than 2 weeks, or if severe pain, swelling, numbness, or weakness is present, please consult a medical professional (doctor, orthopedic specialist, or acupuncturist). This is especially important if you have or suspect an underlying condition such as carpal tunnel syndrome or rheumatoid arthritis.
    🤰 Pregnancy Warning: Among the acupoints introduced above, LI4 should be avoided during pregnancy as it can trigger uterine contractions. TE5, PC6, PC7, and TE5 are relatively safer; however, if you are pregnant or may be pregnant, please consult with an acupuncturist or medical professional before performing these techniques.
  • 5 Acupoints for Sleep Apnea — Complete Self-Acupressure Guide

    5 Acupoints for Sleep Apnea — Complete Self-Acupressure Guide

    “`html

    One-line summary: Sleep apnea is a condition caused by interrupted breathing at night that leads to reduced sleep quality and daytime drowsiness, and acupressure on acupoints can improve respiratory function and sleep quality.

    Introduction

    Are you struggling with symptoms where your breathing keeps stopping and starting throughout the night? Sleep apnea is not simply snoring. It is a condition where the airway becomes partially or completely blocked during sleep, causing breathing to stop repeatedly, which can lead to oxygen deprivation in the brain, fragmented sleep, and chronic fatigue. Beyond CPAP machines and surgery, acupressure on acupoints from traditional medicine can help relieve symptoms through improved respiratory function, relaxation of neck muscles, and mental and physical calm. In this article, we introduce the precise locations of 5 acupoints effective for sleep apnea relief and self-acupressure methods.

    5 Acupoints Explained

    1️⃣ Anmian (An-mien, EX-HN22) — Sleep Relief Acupoint

    Location: Behind the ear, about 1.5 cm below the hollow area beneath the mastoid process (the bone behind the ear). There are 2 acupoints symmetrically located behind each ear.

    Pressing Method: Repeat slowly pressing and releasing with your thumb or middle finger for 3-5 seconds. Perform 2 times daily, 30 minutes before bedtime for best results.

    Effect: It promotes the secretion of sleep-inducing neurotransmitters and calms excessive brain activity to induce deep sleep. It is excellent for relieving conscious symptoms caused by sleep apnea and daytime drowsiness.

    2️⃣ Fengchi (Feng-chih, GB20) — Neck Tension Relief Acupoint

    GB20 acupuncture point

    Location: At the back of the neck where the neck and shoulder meet. Located about 2 cm lateral to the spine, roughly below the hollow area beneath the ear.

    Pressing Method: Press simultaneously on both sides with your thumbs while making circular massage motions. Maintain for about 1 minute and perform 2 times daily.

    Effect: It relieves tension in the muscles around the neck and throat area to alleviate airway constriction. It improves blood circulation around the cervical spine to strengthen respiratory function and reduce snoring and apnea episodes.

    3️⃣ Shenmen (Shen-men, HT7) — Key to Mental and Physical Calm

    HT7 acupuncture point

    Location: On the inner wrist, about 0.5 cm toward the pinky finger from the wrist crease. It is at the end of the flexor aspect of the inner wrist.

    Pressing Method: Slowly press with the thumb of your opposite hand for 3-5 seconds. Perform on both hands, 1-2 times daily.

    Effect: It calms the heart and nervous system to reduce anxiety and nighttime awakenings caused by sleep apnea. It improves sleep quality and increases the proportion of REM sleep (deep sleep).

    4️⃣ Tiantu (Tian-tu, CV22) — Direct Respiratory System Strengthening

    Location: At the front of the neck, in the hollow above the collarbone (upper center of the neck). It is located about 0.5 cm above the hollow where both collarbones meet.

    Pressing Method: Repeatedly press and release gently for 1-2 seconds vertically with your ring finger or middle finger. Press gently as pressing too hard may cause discomfort, and it is recommended to perform about 1 time daily.

    Effect: It directly stimulates the respiratory system and bronchi to reduce airway resistance. It alleviates upper airway constriction, the root cause of sleep apnea, and improves breathing depth and stability.

    5️⃣ Zusanli (Zu-san-li, ST36) — Overall Immune System Enhancement

    ST36 acupuncture point

    Location: Below the knee, on the outer side of the calf. About 4 finger widths (approximately 10 cm) below the hollow area under the knee. It is located on the central outer aspect of the tibia.

    Pressing Method: Press with your thumb for 3-5 seconds while making circular massage motions. Perform on both legs, maintaining for about 5 minutes once daily.

    Effect: It activates immune function to alleviate physical stress caused by sleep apnea. It helps improve digestive function, restore vitality, and reduce nighttime awakenings to enhance overall sleep quality.

    5-Minute Self-Acupressure Routine

    Recommended time: 30 minutes before bedtime or when waking up in the morning

    Sequence:

    1. Shenmen (HT7) — 1 minute: 30 seconds for each hand. First calm your mind and body.
    2. Anmian (EX-HN22) — 1 minute: 30 seconds for each side. Activate sleep pathways.
    3. Fengchi (GB20) — 1.5 minutes: 1 minute on both sides simultaneously, plus additional 30 seconds on each side individually. Release neck tension.
    4. Tiantu (CV22) — 0.5 minutes: Gentle 30-second pressing. Directly strengthen respiratory function.
    5. Zusanli (ST36) — 1 minute: 30 seconds for each leg. Complete the routine with overall immune system stimulation.

    Tip: A dull ache during acupressure is normal and indicates that the acupoint is being stimulated. With consistent practice 1-2 times daily, you can experience symptom improvement within 2-3 weeks.

    ⚠️ Medical Disclaimer: This article is written for informational purposes only and does not substitute for professional medical diagnosis or treatment. Sleep apnea can lead to serious complications (such as high blood pressure and cerebrovascular disease), so if symptoms persist or are severe, please consult a sleep medicine specialist or otolaryngology professional.

    “`

  • 5 Acupoints Good for Sore Throat — Complete Self-Acupressure Guide

    5 Acupoints Good for Sore Throat — Complete Self-Acupressure Guide

    “`html

    One-Minute Summary: Sore throat can be relieved by acupressing 5 acupoints: Hegu (LI4), Chize (LU5), Fengchi (GB20), Kunlun (BL60), and Tianfu (LU3). Press each point for 1-2 minutes, 2-3 times daily for best results.

    Why Does Acupressure Help With Sore Throat?

    Throat pain is a very common symptom in daily life. Sore throats from colds, dry throat, or vocal strain can be relieved with simple stimulation before taking medication. In traditional Chinese medicine, sore throat is viewed as ‘weakened lung function’ and ‘insufficient qi and blood circulation.’ Stimulating specific acupoints strengthens lung function and promotes qi and blood circulation around the throat, rapidly reducing inflammation. Plus, you only need your fingers, making it the best value-for-money self-care method you can do anywhere, anytime.

    5 Acupoints for Relieving Sore Throat

    1. Hegu (LI4) — The Key to Immunity and Inflammation Relief

    LI4 acupuncture point

    Location: The point where the thumb and index finger meet, at the most prominent part of the muscle

    Pressure Technique: Using the opposite thumb, apply vertical pressure to a point that feels slightly tender but good, hold for 5 seconds, then slowly release. Repeat for 1-2 minutes on each hand.

    Effects: As the representative acupoint of the Large Intestine meridian, it boosts overall immunity and rapidly reduces inflammation. Beyond sore throat, it’s excellent for headaches, general pain, and stress relief. In traditional Chinese medicine, it’s a ‘key point’ (yao xue) prescribed even for chronic diseases.

    2. Chize (LU5) — Lung Function Enhancement Specialist

    LU5 acupuncture point

    Location: On the inner side of the elbow, at the center of the elbow crease on the outer side (toward the thumb) when the elbow is bent

    Pressure Technique: Using the opposite thumb, gently press the inner elbow crease. When coughing or severe sore throat occurs, you can apply slightly stronger pressure.

    Effects: As a key acupoint of the Lung meridian, it directly strengthens lung function and rapidly relieves cough, pharyngitis, and sore throat. Regular stimulation of Chize also improves respiratory immunity and helps prevent colds.

    3. Fengchi (GB20) — The Nerve Center for Neck Stiffness and Inflammation

    GB20 acupuncture point

    Location: At the back of the neck, in the hollow where the base of the skull meets the neck (one on each side)

    Pressure Technique: Using the middle and ring fingers of both hands, simultaneously press the sides at the back of the neck and gently massage in circular motions. Repeat for about 1 minute.

    Effects: As the representative acupoint of the Gallbladder meridian, it relieves muscle tension around the neck and improves blood circulation. It effectively relieves neck stiffness from sore throat, headaches, and even laryngitis—a ‘multi-functional’ acupoint.

    4. Kunlun (BL60) — Auxiliary Center for Whole-Body Immunity

    BL60 acupuncture point

    Location: On the outer side of the ankle, in the hollow between the ankle bone and the heel

    Pressure Technique: Use the thumb to apply vertical pressure to the outer ankle, hold for 5 seconds, then slowly release. Perform on each foot for 1-2 minutes.

    Effects: As an important acupoint of the Bladder meridian, it boosts whole-body immunity and is excellent for pain relief. Particularly effective when sore throat is accompanied by general fatigue, and regular stimulation helps prevent recurrent colds.

    5. Tianfu (LU3) — The Strongest Airway Inflammation Soother

    LU3 acupuncture point

    Location: On the inner side of the arm, descending from the armpit toward the elbow, at the center crease of the inner arm (slightly toward the upper part)

    Pressure Technique: Using the opposite thumb, gently press the inner arm and hold for 5 seconds. When experiencing cough or phlegm, you can apply slightly stronger pressure.

    Effects: An acupoint on the Lung meridian pathway, it directly soothes throat inflammation and relieves cough and sore throat. When stimulated together with Chize, it creates a synergistic effect, with particularly rapid results especially in early stages of throat colds.

    5-Minute Self-Acupressure Routine

    Sequence and Time Distribution (5 minutes total):

    1. Hegu (LI4) — 1 minute (30 seconds per hand)
    2. Chize (LU5) — 1 minute (30 seconds per arm)
    3. Tianfu (LU3) — 1 minute (30 seconds per arm)
    4. Fengchi (GB20) — 1 minute (30 seconds per side)
    5. Kunlun (BL60) — 1 minute (30 seconds per foot)

    Best Time: Recommended twice daily—after waking in the morning and before bed at night. During acute sore throat, you can add an additional session during lunch time.

    Tip: Performing this after drinking warm water promotes better blood circulation and increases effectiveness. After acupressure, avoid exposure to cold air for at least 30 minutes.

    ⚠️ Medical Disclaimer: This article is provided for informational health purposes and does not replace professional medical diagnosis or treatment. If sore throat persists for more than 3 weeks or is accompanied by serious symptoms such as high fever, severe pain, or difficulty swallowing, you must consult a healthcare professional (ENT specialist or licensed acupuncturist). Patients with immune disorders or those undergoing cancer treatment must consult a specialist before acupressure.
    🤰 Pregnancy Warning: Some of the above acupoints (particularly Hegu LI4 and Kunlun BL60) may trigger uterine contractions. If you are pregnant or possibly pregnant, you must consult an acupuncturist or obstetrician before performing this routine. It is important to select and press only safe acupoints during pregnancy.

    “`

  • 5 Acupoints for Skin Itching — A Complete Self-Acupressure Guide

    5 Acupoints for Skin Itching — A Complete Self-Acupressure Guide

    One-line Summary: Skin itching can be naturally relieved by applying acupressure to 5 acupoints—Quchi (LI11), Xuehai (BL55), Sanyinjiao (SP6), Hegu (LI4), and Fengshi (GB31)—for 5 minutes daily, which improves blood circulation and immune function.

    Introduction

    Have you ever stayed up at night due to sudden skin itching or found it difficult to concentrate on daily tasks? Skin itching is not just a simple symptom—it’s a signal from your body. In traditional Chinese medicine, skin itching is diagnosed as “heat from dampness” or “qi and blood deficiency.” When the body’s qi and blood become stagnant or heat accumulates due to stress, dry environments, or poor eating habits, skin itching appears. By consistently stimulating specific acupoints, you can promote blood circulation and strengthen immune function to relieve itching. This article introduces the 5 most effective acupoints for improving skin itching and how to perform self-acupressure.

    5 Acupoints Good for Skin Itching

    1. Quchi (LI11) — The Acupoint That Clears Heat and Boosts Immunity

    LI11 acupuncture point

    Location: Located at the end of the inner crease of the arm when the elbow is bent. Using the thumb of the opposite hand, follow the centerline on the inner side of the arm and find the point where it touches the inner elbow crease.

    Technique: Using your thumb, press slowly and deeply for 3 seconds, then slowly release over 3 seconds. Repeat this 10 times.

    Effects: Quchi is an acupoint on the “Large Intestine Meridian” that clears heat from the body and reduces inflammation. It is particularly effective for improving skin conditions such as skin itching, eczema, and hives, and also helps prevent colds by strengthening immunity.

    2. Xuehai (BL55) — The Acupoint That Promotes Blood Circulation

    BL55 acupuncture point

    Location: Located on the center of the back of the calf, about 3-4 cm below the knee. It is slightly to the inner side of the center of the calf muscle (gastrocnemius).

    Technique: Press vertically using your thumb or a knuckle joint. Apply pressure strong enough to feel slight discomfort for 10 seconds, then release. Repeat 10 times on each leg.

    Effects: As its name suggests, Xuehai is an acupoint related to “blood.” It activates blood circulation to supply nutrients and oxygen to the skin and promotes toxin elimination. It is effective not only for skin itching but also for improving skin tone and recovering from fatigue.

    3. Sanyinjiao (SP6) — Boosts Immunity and Improves Skin Tone

    SP6 acupuncture point

    Location: Located about 4 cm (4 finger widths) above the highest bone on the inner ankle (medial malleolus). Follow the inner edge of the tibia bone upward.

    Technique: Using your thumb, press deeply while breathing slowly, then release. Repeat 15 times on each ankle, twice daily.

    Effects: Sanyinjiao is where three meridians meet—the Spleen Meridian, Liver Meridian, and Kidney Meridian—which is why it is named “three yin.” It strengthens immunity, balances hormones, and improves skin tone and texture. By activating qi and blood circulation throughout the body, it addresses the root cause of skin itching.

    4. Hegu (LI4) — The Versatile Acupoint That Regulates Whole-Body Function

    LI4 acupuncture point

    Location: Located in the deep space between the thumb and index finger, at the point where the finger bones meet. You can find this sensitive area by slowly pressing with the opposite thumb.

    Technique: Using the opposite thumb, press vertically and deeply. You may feel slight discomfort. Press for 5 seconds and release for 3 seconds, repeat 10 times.

    Effects: Hegu is called the “universal acupoint” because it affects the whole body. In addition to skin health, it is effective for stress relief, immune enhancement, and promoting metabolism. It is particularly helpful for relieving stress-related symptoms that occur together with skin itching.

    5. Fengshi (GB31) — The Specialized Acupoint for Relieving Skin Itching and Eczema

    GB31 acupuncture point

    Location: Located on the outer side of the leg, about 10-12 cm above the knee (in the center of the thigh). It is at the point where your fingertips touch when your arms hang naturally at your sides.

    Technique: Overlap the middle and index fingers of both hands and press vertically. Gradually increase the pressure and press for 10 seconds, then release. Repeat 10 times on each leg.

    Effects: Fengshi is a specialized acupoint for “skin itching caused by dampness.” It shows quick results especially for itching caused by eczema, hives, and allergic dermatitis, and improves skin condition while preventing recurrence.

    5-Minute Self-Acupressure Routine

    Recommended Time: It is most effective to perform this routine twice daily—morning and evening—for 5 minutes each.

    Acupressure Order and Time Allocation:

    • [1 minute] Both Quchi (LI11) — 30 seconds × 2 rounds
    • [1 minute] Both Hegu (LI4) — 30 seconds × 2 rounds
    • [1 minute] Both Sanyinjiao (SP6) — 30 seconds × 2 rounds
    • [1 minute] Both Xuehai (BL55) — 30 seconds × 2 rounds
    • [1 minute] Both Fengshi (GB31) — 30 seconds × 2 rounds

    Precautions: After acupressure, drink warm water and avoid exposure to cold air for at least 30 minutes. When starting out, begin with light pressure and observe how your body responds before increasing intensity. If you have wounds on your skin or severe inflammation, consult a healthcare professional before performing acupressure.

    ⚠️ Medical Disclaimer: This article is provided for informational purposes and does not replace professional medical diagnosis or treatment. If skin itching persists or worsens for more than 2 weeks, consult a dermatologist or a traditional Chinese medicine practitioner. If infection symptoms (suppuration, swelling, high fever, etc.) are present, seek immediate medical attention.
    🤰 Pregnancy Caution: Among the acupoints above, Sanyinjiao (SP6) and Hegu (LI4) may trigger uterine contractions in pregnant women. If you are pregnant or possibly pregnant, consult a traditional Chinese medicine practitioner before performing acupressure. Instead, using only Quchi (LI11) and Xuehai (BL55) is safer.
  • 5 Acupoints for Runny Nose — Complete Self-Acupressure Guide

    5 Acupoints for Runny Nose — Complete Self-Acupressure Guide

    One-Line Summary: Runny nose can be improved within 2-3 days by applying acupressure to 5 points—Yingxiang (LI20), Hegu (LI4), Yintang (GV27), Fengchi (GB20), and Tongzhu (BL7)—three times daily for 5 minutes each. This method is effective for both early-stage cold and allergic rhinitis.

    Introduction

    Runny nose is a common symptom that everyone experiences due to colds, allergies, rhinitis, and other conditions. Continuously flowing nasal discharge makes daily life inconvenient, irritates the skin around the nose turning it red, and disturbs sleep. More people are seeking ways to enhance their body’s natural healing power rather than relying solely on medication.

    Acupoint acupressure in traditional medicine is an effective natural therapy that regulates the body’s qi (energy) flow and enhances immunity. In particular, stimulating specific acupoints located around the nose, face, arms, and back of the neck promotes blood circulation in the nose, alleviates inflammation, and reduces nasal discharge. The advantage is that it can be performed with just one finger in just 5 minutes without worrying about side effects from medication.

    5 Effective Acupoints for Relieving Runny Nose

    1. Yingxiang (LI20, Yingxiang) — Premier Acupoint for Runny Nose Symptoms

    LI20 acupuncture point

    Location: On the side of the nostril, at the point where the nasolabial fold meets the base of the nostril

    Acupressure Method: Position the index fingers of both hands on either side of the nose, then slowly stimulate by making small circular motions up and down for 3-5 seconds each, repeating 20-30 times. Each session should last about 1-2 minutes. Apply moderate pressure to avoid pain in the nasal bone.

    Benefits: Yingxiang stimulates the trigeminal nerve responsible for local nasal sensation, directly controlling mucus production. It is highly effective for early-stage cold runny nose, allergic rhinitis, and sinusitis-related nasal discharge. This is the acupoint that provides the fastest results.

    2. Hegu (LI4, Hegu) — Representative Acupoint for Enhancing Immunity

    LI4 acupuncture point

    Location: In the depression between the thumb and index finger, between the first and second metacarpal bones

    Acupressure Method: Place the opposite thumb on Hegu and press firmly at a 45-degree angle toward the bone for about 3-5 seconds. Repeat this 20-30 times, alternating between both hands. A slight soreness or fullness sensation is normal.

    Benefits: Hegu is an acupoint on the Large Intestine meridian that regulates the entire immune system. It can simultaneously alleviate runny nose, general cold symptoms, headaches, fever, and nasal congestion. Regular stimulation also provides cold prevention benefits.

    3. Yintang (GV27 or EX-HN3, Yintang) — Key Acupoint for Nasal and Head Symptoms

    Location: In the center between the two eyebrows, commonly called the glabella

    Acupressure Method: Overlap the thumbs of both hands on Yintang and apply pressure by moving slightly up and down or in circular motions. Each session should last 1-2 minutes, performed 3 times daily. Since this is in the center of the face, avoid pressing too hard.

    Benefits: Yintang is close to the pituitary gland, the immune regulation center of the brain. When stimulated, it rapidly decreases nasal mucus secretion. It also alleviates forehead pain, eye fatigue, and heaviness in the head that accompany runny nose.

    4. Fengchi (GB20, Fengchi) — Cold-Relief Acupoint at the Back of the Neck

    GB20 acupuncture point

    Location: At the back of the neck, in the two depressions below the occipital bone at the boundary between the neck and head

    Acupressure Method: Place both thumbs on either side of the back of the neck, then press firmly upward for 5 seconds each. Repeat 20-30 times for about 1-2 minutes per session. It is helpful to lower your head slightly during the procedure to prevent neck stiffness.

    Benefits: Fengchi is an acupoint on the Gallbladder meridian that blocks external pathogens (Wind Evil) from invading the body. It simultaneously improves early-stage cold sore throat, runny nose, nasal congestion, and laryngitis. It is particularly effective at eliminating the ‘wind’ symptoms of a cold.

    5. Tongzhu (BL7, Tongzhu) — Acupoint Responsible for Nasal Ventilation

    BL7 acupuncture point

    Location: On the outer side of the bridge of the nose, approximately 1 cm above the inner end of the eyebrow, next to the first and second cervical vertebrae

    Acupressure Method: Place the index fingers of both hands above the inner ends of the eyebrows, then press at a 45-degree angle toward the bridge of the nose for 3-5 seconds before releasing. Alternate between both sides, repeating 20-30 times for about 1-2 minutes per session.

    Benefits: Tongzhu is on the Bladder meridian and promotes blood circulation in the nose to regulate nasal discharge. It is particularly effective at alleviating nasal congestion and stuffiness, early-stage sinusitis symptoms, and allergic rhinitis.

    5-Minute Self-Massage Acupressure Routine

    ※ Optimal results are achieved by performing this routine three times daily (morning, lunch, and evening).

    Step Acupoint Time Required
    Step 1 Yingxiang (LI20) 1 minute
    Step 2 Hegu (LI4) – Both Hands 1 minute
    Step 3 Yintang (GV27) 1 minute
    Step 4 Fengchi (GB20) 1 minute
    Step 5 Tongzhu (BL7) 1 minute
    Total Time Required 5 minutes

    Implementation Tips:

    • Sit in a comfortable position and proceed slowly while breathing calmly, as rushing through the procedure reduces its effectiveness.
    • Warming your fingers before acupressure makes it more effective.
    • For severe symptoms, additional stimulation at 2-hour intervals is possible, with one additional treatment before bed particularly recommended.
    • Avoid exposure to cold air for 20-30 minutes after acupressure.
    ⚠️ Medical Disclaimer: This article is written for informational health purposes and does not replace professional medical diagnosis or treatment. If runny nose persists for more than two weeks or is accompanied by severe symptoms such as high fever, yellow nasal discharge, or foul odor, you must consult a medical professional such as an otolaryngologist or traditional medicine practitioner. In particular, acupressure should be avoided if there are wounds around the nose or eyes or if fracture is suspected.
    🤰 Pregnancy Warning: Hegu (LI4) can trigger uterine contractions in pregnant women. If you are pregnant or possibly pregnant, perform only the 4 acupoints excluding Hegu—Yingxiang (LI20), Yintang (GV27), Fengchi (GB20), and Tongzhu (BL7)—or consult a professional before proceeding.
  • 5 Best Acupoints for Sciatic Nerve Pain — Complete Self Acupressure Guide

    5 Best Acupoints for Sciatic Nerve Pain — Complete Self Acupressure Guide

    “`html

    One-line summary: To relieve leg pain and numbness caused by sciatica, it is effective to apply acupressure to the Weizhong (BL40), Kunlun (BL60), Fengshi (GB31), Chengfu (BL36), and Yanglingquan (GB34) acupoints for 5-10 minutes daily.

    Introduction

    Sciatica — pain that originates in the lower back, travels through the buttocks, and down the back of the leg. This painful condition, which suddenly occurs when sitting for long periods or lifting heavy objects, significantly interferes with daily activities. Often it becomes worse at night or causes numbness in the legs that prevents sleep.

    Traditional Chinese Medicine has designated several acupoints effective for relieving sciatica based on thousands of years of experience and theory. Stimulating these acupoints is known to relax muscle tension around the sciatic nerve, improve blood circulation and qi flow, and reduce pain. While professional treatment is best, in emergency situations or when time is limited, you can self-apply acupressure to these acupoints for rapid pain relief.

    5 Acupoints for Sciatica Relief

    1. Weizhong (委中, BL40) — A Powerful Acupoint Behind the Knee

    BL40 acupuncture point

    Location: In the center crease behind the knee, in the hollow area between the muscles on both sides of the leg. It is easy to locate when the knee is slightly bent.

    Acupressure Technique: Using your thumb, press slowly while maintaining a pressure that is tender but bearable. Press for 5 seconds and rest for 5 seconds, repeating 10 times. Apply to both legs.

    Effects: Weizhong is known as a specific acupoint for sciatica. Stimulating this point improves blood circulation throughout the leg and relieves nerve compression, providing immediate pain relief. It is also effective for fatigue recovery and reducing leg swelling.

    2. Kunlun (崑崙, BL60) — Pain-Relief Acupoint of the Ankle

    BL60 acupuncture point

    Location: On the outer side of the ankle, in the hollow area between the lateral malleolus and the Achilles tendon. You can feel the depression inside the bone when you press with your finger.

    Acupressure Technique: Press gently but firmly with your thumb or middle finger. It is effective to massage each ankle in circular motions for about 3-5 minutes.

    Effects: Kunlun is an acupoint that promotes blood circulation in the ankle and lower leg. It is particularly effective at relieving numbness in the foot and leg caused by sciatica, and also helps improve cold feet.

    3. Fengshi (風市, GB31) — Pain-Relief Acupoint on the Outer Leg

    GB31 acupuncture point

    Location: At the midpoint of the outer thigh, where your middle finger touches when standing with your arms at your sides. It is located at the center of the lateral surface of the femur.

    Acupressure Technique: Overlap your thumbs and press firmly. Repeat pressing for 10 seconds and resting for 5 seconds, applying to each leg for a total of 3-5 minutes. Initial soreness is normal and indicates effectiveness.

    Effects: Fengshi excels at relieving pain, numbness, and muscle cramps on the outer leg. It is especially effective for leg numbness or tightness on the lateral side caused by sciatica, and improves leg fatigue for those standing for long periods.

    4. Chengfu (承扶, BL36) — Specific Acupoint for Buttock Nerve Pain

    BL36 acupuncture point

    Location: Below the buttocks, at the midpoint of the line between the buttocks and leg. It is at the exact center of the crease you feel when sweeping your hand down across the buttocks.

    Acupressure Technique: While seated, press slowly with your thumb. Apply firm pressure but adjust to avoid severe pain. It is beneficial to massage continuously for about 5-10 minutes at a time.

    Effects: Chengfu is the acupoint closest to the origin of the sciatic nerve and directly relieves nerve compression in the buttocks. It relaxes muscle tension, a root cause of sciatica, and quickly soothes nerve irritation.

    5. Yanglingquan (陽陵泉, GB34) — Supportive Acupoint for Nerve Function Recovery

    GB34 acupuncture point

    Location: On the outside of the lower leg, in a hollow area in front of the fibula, about 3-4 cm below the knee.

    Acupressure Technique: Press gently with your thumb while making slow circular motions. Apply to each leg for 3-5 minutes. Start with light pressure and gradually increase intensity.

    Effects: Yanglingquan improves nervous system function and alleviates muscle cramps. It relieves leg weakness and numbness symptoms, and serves as a supporting acupoint that enhances the effects of other acupoint treatments.

    5-Minute Self-Acupressure Routine

    This is a 5-minute routine for quick results when time is limited.

    1. Weizhong (1 minute): Apply firm acupressure alternately to both sides behind the knees. You can expect rapid pain relief.
    2. Chengfu (1 minute): Slowly massage both sides below the buttocks. It works directly on nerve trigger points.
    3. Fengshi (1 minute): Apply focused pressure to both outer thighs. It relieves surface leg pain.
    4. Kunlun (1 minute): Massage both ankles in sequence. It improves circulation in the lower leg.
    5. Yanglingquan (1 minute): Gently apply acupressure to both calves. It normalizes nerve function.

    Tip: If it is difficult to locate the exact acupoints, you can still see results by applying acupressure to the entire 2-3 cm area around the location. Focus on the area where pain is most strongly felt.

    ⚠️ Medical Disclaimer: This article is written for informational purposes and does not replace professional medical diagnosis or treatment. If symptoms persist or are severe, be sure to consult a healthcare professional. If severe pain, discomfort, or worsening of symptoms occurs during acupressure, stop immediately and seek professional care.

    “`

  • 5 Acupoints for Tinnitus — Complete Self-Acupressure Guide

    5 Acupoints for Tinnitus — Complete Self-Acupressure Guide

    “`html

    One-line summary: Tinnitus (ringing in the ears) can be alleviated by stimulating 5 acupoints—Tinghui, Yifeng, Fengchi, Baihui, and Kunlun—through regular acupressure, which promotes qi and blood circulation and stabilizes the nerves.

    Introduction: Understanding Tinnitus Symptoms and the Principles of Acupoint Treatment

    Are you bothered by unwanted sounds constantly ringing in your ears, disrupting your daily life? That’s tinnitus. It’s characterized by hearing ringing, buzzing, or hissing sounds in your ears even when there’s no external sound, and it can be accompanied by stress and anxiety.

    While modern medicine often finds it difficult to identify a clear cause of tinnitus, Traditional Chinese Medicine takes a different approach. It views tinnitus as resulting from insufficient qi and blood circulation, nervous sensitivity, and nerve fatigue caused by sleep deprivation, and believes it can be improved through stimulation of specific acupoints. In particular, stimulating the meridians (acupuncture channels) around the ear and those leading to the brain can calm the auditory nerve and improve blood circulation.

    The 5 Best Acupoints for Tinnitus Relief

    1. Tinghui (聽宮) – SI19 / Tinghui

    SI19 acupuncture point

    Location: In front of the ear, at the depression that appears when the mouth is closed (below the front of the earlobe).

    How to find it: Place your index fingers in front of your mouth, and when you open your mouth, the depressed point is Tinghui. It returns to prominence when you close your mouth.

    Acupressure technique: Using the tip of your thumb, apply gentle circular pressure for 30 seconds. Perform on both sides, 2-3 times per day.

    Benefits: Tinghui is a specific acupoint for ear disorders. It’s an essential point that directly alleviates tinnitus, hearing loss, and ear fullness, and is emphasized in classical Chinese acupoint texts.

    2. Yifeng (翳風) – TE17 / Yifeng

    TE17 acupuncture point

    Location: Below the ear, at the depression behind the earlobe (in the space between the mastoid bone and the jaw).

    How to find it: Press the earlobe with your finger and fold it backward; a deep groove will appear behind the ear. That’s where Yifeng is located.

    Acupressure technique: Apply gentle pressure with your thumb, using circular motions for 30 seconds, keeping the pressure within a range that doesn’t cause pain.

    Benefits: Yifeng is an essential point on the Triple Burner meridian (the channel that goes to the ear and face), relieving ear fatigue and stabilizing the auditory nerve. It’s effective for tinnitus, ear pain, and facial nerve paralysis.

    3. Fengchi (風池) – GB20 / Fengchi

    GB20 acupuncture point

    Location: At the back of the neck, below the base of the skull (at the depression between the neck muscles on both sides).

    How to find it: Tilt your head back to find the groove between two muscles; specifically, it’s at the movable bone beneath the skull.

    Acupressure technique: Using both thumbs, apply pressure toward the inside of the neck at a slight upward angle. Apply pressure for 30 seconds at each point, 3 times per day.

    Benefits: It promotes blood circulation to the brain and relieves nerve tension. It can simultaneously alleviate headaches, dizziness, and neck stiffness that often accompany tinnitus.

    4. Baihui (百會) – GV20 / Baihui

    Location: At the top of the head, at the point where the line connecting the highest points of both ears intersects with the midline.

    How to find it: Imagine a line connecting the highest points of both ears; where this line intersects the midline of the head is Baihui. When you press it with your finger, it feels slightly depressed.

    Acupressure technique: Using your thumb or middle finger, apply gentle pressure vertically, massaging in small circles for 20-30 seconds. Avoid excessive stimulation.

    Benefits: It calms brain nerves and clarifies the mind. It improves tinnitus, insomnia, and anxiety together, and is excellent for recovering from mental fatigue.

    5. Kunlun (崑崙) – BL60 / Kunlun

    BL60 acupuncture point

    Location: On the outer ankle, at the depression behind the outer ankle bone.

    How to find it: Kunlun is located in the groove between the outer ankle bone (lateral malleolus) and the Achilles tendon.

    Acupressure technique: Using your thumb, repeatedly press vertically toward the ankle and release for 1 minute. Apply enough stimulation to feel mild tenderness. Perform 1-2 times per day.

    Benefits: It relieves nerve tension and improves qi and blood circulation throughout the body. In particular, it relieves nerve fatigue in the ear and prevents tinnitus from worsening due to sleep deprivation.

    5-Minute Self-Acupressure Routine: Optimal Sequence and Time Distribution

    Perform the following sequence every morning after waking up or every evening before sleep:

    1. Tinghui (1 minute) — 30 seconds on each side, gentle circular pressure
    2. Yifeng (1 minute) — 30 seconds on each side, light to moderate pressure
    3. Fengchi (1 minute) — 30 seconds on each side, pressing toward the brain
    4. Baihui (1 minute) — 30 seconds centered on the midline
    5. Kunlun (1 minute) — 30 seconds on each side, stimulate to mild tenderness

    Tip: Perform this routine consistently 5-6 days per week, and do it twice daily (morning and evening) on days when symptoms are severe. You should continue for at least 3 months to notice the effects.

    ⚠️ Medical Disclaimer: This article is provided for informational purposes only and does not replace professional medical diagnosis or treatment. If tinnitus develops suddenly, is severe, is accompanied by hearing loss, or persists, please consult a specialist at an ENT clinic or Traditional Chinese Medicine clinic. A proper diagnosis is especially important to rule out the possibility of tinnitus caused by a brain tumor or vascular disease.
    🤰 Pregnancy Warning: Among the acupoints above, Kunlun (BL60) and Fengchi (GB20) may trigger uterine contractions in pregnant women. If you are pregnant or may be pregnant, avoid these two acupoints and perform only Tinghui, Yifeng, and Baihui, or consult a specialist before proceeding.

    “`

  • 5 Acupoints for Skin Aging — Complete Self-Acupressure Guide

    5 Acupoints for Skin Aging — Complete Self-Acupressure Guide

    One-Sentence Summary: If you’re concerned about declining skin elasticity and increased wrinkles, try stimulating these 5 acupoints daily to improve blood circulation: LI4, SP6, ST36, LR3, and LI20.

    Introduction

    Don’t you sometimes sigh while looking at your face in the mirror, thinking “It wasn’t like this yesterday”? Skin aging is a natural process everyone wants to avoid, but it progresses faster than expected due to hormonal changes, stress, sleep deprivation, and environmental pollution. Wrinkles, sagging skin, and dull complexion can shake your confidence beyond being merely cosmetic concerns.

    In traditional Chinese medicine, the root causes of skin aging are seen as “Qi and blood deficiency” and “reduced blood circulation.” When blood flow to the face decreases, skin cells don’t receive adequate oxygen and nutrients, causing loss of elasticity, and impaired waste elimination accelerates aging. Fortunately, by consistently stimulating specific acupoints, you can dilate capillaries, improve facial blood flow, enhance your body’s natural healing capacity, and promote skin regeneration. You can see significant results from just a 5-minute self-massage routine, and the best part is you can do it anytime, anywhere, without any extra cost or special tools.

    5 Acupoints Effective for Skin Aging

    1. LI4 — The Starting Point for Immunity Enhancement and Skin Regeneration

    LI4 acupuncture point

    Location: The center of the webbing between your thumb and index finger (thumb-index webspace) where the bones meet
    WHO Code: LI4
    Technique: Use the thumb of the opposite hand to apply pressure the size of a coin in circular motions for 1 minute. Start with light pressure and gradually increase the intensity. Work on both hands, and pressing for 5 minutes before bed is also beneficial.
    Effects: Connected to the Large Intestine meridian, LI4 is known as the “universal acupoint” and excels at boosting immunity, reducing inflammation, and improving facial complexion. It accelerates metabolism, speeds up skin cell regeneration, and helps detoxify the body by improving constipation. With regular stimulation, you can achieve even skin tone and restore natural luster.

    2. SP6 — Hormone Balance and Skin Hydration

    SP6 acupuncture point

    Location: On the inner side of the leg, about 3 finger widths (approximately 10cm) above the inner ankle bone (medial malleolus)
    WHO Code: SP6
    Technique: Slowly press with your thumb while breathing deeply to promote blood circulation. Work on each leg for 1-2 minutes once a day. Stimulating this point in the evening also helps induce better sleep.
    Effects: SP6 is where the Liver, Spleen, and Kidney meridians meet, playing a crucial role in hormone regulation. For women, it normalizes estrogen secretion, alleviates dry skin, and increases skin’s moisture retention. Improved blood circulation reduces facial puffiness and restores skin elasticity.

    3. ST36 — Whole-Body Immunity Boost and Skin Vitality

    ST36 acupuncture point

    Location: On the outer side below the knee, about 3 finger widths (approximately 10cm) below the depression below the kneecap
    WHO Code: ST36
    Technique: Slowly press vertically with your thumb until you feel a slight warming sensation. Work on each leg for 1-2 minutes, 1-2 times daily. The effect is even greater when combined with moxibustion (heat therapy).
    Effects: Called the “leg’s tonic herb,” ST36 strengthens Qi and blood throughout the body. It improves digestion and nutrient absorption, and activates immune cells to effectively improve inflammatory skin conditions like acne and dermatitis. It promotes metabolism to help eliminate skin waste and slows the skin aging process with consistent stimulation.

    4. LR3 — Stress Relief and Skin Elasticity Recovery

    Location: On the top of the foot, in the valley between the first and second toe bones, about 2cm above the ankle
    WHO Code: LR3
    Technique: Slowly press with your thumb for about 1 minute. Avoid painful pressure; maintain a “firm yet comfortable” intensity. Work on both feet, and it’s best to stimulate this point daily, especially in the evening on stressful days.
    Effects: LR3 opens the Liver’s Qi and blood flow, making it an excellent point for stress relief. It improves dull and lifeless complexion caused by chronic stress and promotes detoxification by activating liver function. It relieves blood vessel constriction to increase facial blood flow, and with consistent stimulation, restores skin elasticity and radiance.

    5. LI20 — Maximized Skin Benefits Through Direct Facial Stimulation

    LI20 acupuncture point

    Location: Above the nasolabial fold (smile lines) beside the nose, about 1cm below the nostril
    WHO Code: LI20
    Technique: Gently massage in circular motions with your index or middle finger. Since facial blood vessels are delicate, avoid strong pressure and use light touch for about 1 minute. Apply a thin layer of essence after skincare and then stimulate this point to improve product absorption.
    Effects: LI20, the endpoint of the Large Intestine meridian, is the key point for improving facial complexion. It dilates capillaries around the nose and cheeks to directly improve facial blood flow and promotes even skin tone. It’s particularly effective for reducing nasolabial folds and brings vibrant, youthful expression back to facial skin with consistent stimulation.

    5-Minute Self-Massage Routine

    Morning Routine (Before work, about 5 minutes):

    1. LI4 (Both hands) — 1 minute: Extend your hands with the webspace facing upward, slowly massage in circles with the opposite thumb
    2. LI20 (Both sides) — 1 minute: Gently massage beside the nose in circles with your index finger to awaken facial complexion
    3. ST36 (Both legs) — 1.5 minutes: Sit in a chair, extend your legs, and slowly press vertically with your thumb
    4. LR3 (Both feet) — 1.5 minutes: Extend your feet and press firmly with your thumb

    Evening Routine (Before bed, about 5 minutes):

    1. SP6 (Both legs) — 1 minute: Lie in bed, bend your legs comfortably, and slowly press vertically with your thumb
    2. LR3 (Both feet) — 1 minute: Extend your feet and stimulate while stretching toward your legs
    3. LI4 (Both hands) — 1 minute: Bring your hands together at your chest and massage in circles with the opposite thumb
    4. ST36 (Both legs) — 1 minute: Extend your legs while lying down and slowly press to promote better sleep

    Key Tips: Combining deep belly breathing with acupressure increases relaxation response and doubles the effectiveness. Repeating the routine at the same time daily synchronizes with your body’s natural rhythm and hormone cycle for faster results.

    ⚠️ Medical Disclaimer: This article is provided for informational purposes only and does not replace professional medical diagnosis or treatment. If symptoms persist or are severe, consult a healthcare professional.
    🤰 Pregnancy Warning: Among the acupoints mentioned above, LI4, SP6, and LR3 may trigger uterine contractions in pregnant women. If you are pregnant or may be pregnant, consult a healthcare professional before practicing these techniques.
  • 5 Best Acupoints for Rhinitis — Complete Self-Acupressure Guide

    5 Best Acupoints for Rhinitis — Complete Self-Acupressure Guide

    “`html

    One-line summary: Rhinitis can be relieved within 1-2 weeks by pressing five acupoints—Yingxiang, Hegu, Taiyang, Yintang, and Tongqian—2-3 times daily to reduce nasal congestion and sneezing.

    Introduction

    Rhinitis that gets worse in spring is truly frustrating—nasal congestion makes concentration difficult, and nighttime snoring can be bothersome. Even with medication, there’s no fundamental solution, and repeated sneezing and nasal discharge make daily life inconvenient. In traditional Chinese medicine, rhinitis is viewed as “lung qi deficiency” and “pathogenic wind invasion.” By stimulating specific acupoints, you can strengthen lung function and improve blood circulation around the nose. Scientific research also shows that acupoint pressure helps regulate immune response and reduce nasal inflammation. Now, manage your rhinitis symptoms directly with just your fingertips, without relying on medication.

    Five Effective Acupoints for Relieving Rhinitis

    1. Yingxiang (LI20) — Instant Relief for Nasal Congestion

    LI20 acupuncture point

    Location: Just outside the nostril, where the wrinkles on the side of the ala of the nose converge

    WHO Code: LI20 (Large Intestine 20)

    Pressure technique: Using your index or middle finger, gently press both sides of the ala of the nose simultaneously, directing the pressure slightly upward. Press for 1-2 minutes per session, maintaining comfortable breathing. Practice this 3 times daily when you feel nasal congestion.

    Benefits: Known as the “nasal acupoint,” Yingxiang most quickly relieves nasal congestion, runny nose, and loss of smell caused by rhinitis. You’ll feel immediate results within 5-10 minutes after pressure, with your nasal passages opening up.

    2. Hegu (LI4) — Boost Immunity & Reduce Inflammation

    LI4 acupuncture point

    Location: Between the thumb and index finger, at the highest point of the muscle on the back of the hand

    WHO Code: LI4 (Large Intestine 4)

    Pressure technique: Press vertically with the opposite thumb or massage in circular motions. Apply continuous pressure for about 1-2 minutes until you feel a slight warmth. Stimulate both hands for equal duration.

    Benefits: Known as a “universal acupoint,” Hegu strengthens lung function and boosts overall immunity. By addressing the root cause of rhinitis—lung qi deficiency—it reduces nasal allergic reactions long-term. It also relieves headaches and facial pain simultaneously.

    3. Taiyang (EX-HN5) — Rhinitis-Related Headaches & Temple Pain

    Location: The temple, approximately 1.5 cm inward from the outer edge of the eye toward the ear

    WHO Code: EX-HN5 (Extra Head 5, Extra point)

    Pressure technique: Using both middle fingers, gently massage both temples simultaneously in circular motions. Repeat 3 times for 30 seconds to 1 minute each. Gentle massage is more effective than firm pressure. Pressing too hard may worsen headaches.

    Benefits: When nasal congestion blocks the nose, pressure builds at the temples causing headaches. Stimulating Taiyang releases this tension. It also improves migraines and eye fatigue while promoting blood circulation to the brain.

    4. Yintang (EX-HN3) — Relieve Nasal Congestion & Stress Together

    Location: The glabella, the indented area in the center of the skin and muscle between the two eyebrows

    WHO Code: EX-HN3 (Extra Head 3, Extra point)

    Pressure technique: Using your thumb or middle finger, slowly press the glabella vertically for about 1-2 minutes. Start with moderate pressure, then gradually deepen it within a comfortable range. It’s important to maintain deep breathing.

    Benefits: Yintang promotes blood circulation to the brain and activates the parasympathetic nervous system. It relieves not only nasal congestion but also stress-related headaches, insomnia, and poor concentration while releasing overall forehead tension.

    5. Tongqian (BL7) — Restore Lung Function & Prevent Recurrence

    BL7 acupuncture point

    Location: On the crown of the head, approximately 1.5 cm in front of Baihui (GV20). You can locate it by following the center line of the head downward from your hair parting.

    WHO Code: BL7 (Bladder 7)

    Pressure technique: Tongqian can be difficult to locate, so first find Baihui (the center of the crown between the two ears), then press the point about 1-1.5 cm in front. Massage in circular motions with your middle finger for about 1 minute or apply gentle pressure.

    Benefits: Tongqian is an important acupoint connected to the Lung meridian that directly strengthens lung function. It’s most effective for improving the lung constitution—the root cause of rhinitis—and consistent stimulation prevents rhinitis recurrence. It also helps improve asthma and cough symptoms.

    5-Minute Self-Acupoint Massage Routine — Practice Once Daily in the Morning

    Recommended time: After waking in the morning or 1 hour before bedtime

    1. Yingxiang (LI20) — 1 minute
      Gently press both sides of the ala of the nose simultaneously until you feel nasal fullness.
    2. Yintang (EX-HN3) — 1 minute
      Slowly press the glabella vertically, then gently lift. Repeat 3 times.
    3. Hegu (LI4) — 1 minute
      Press both Hegu points simultaneously for about 1 minute until warmth is felt.
    4. Taiyang (EX-HN5) — 1 minute
      Gently massage both temples in circular motions. 30 seconds × 2 rounds.
    5. Tongqian (BL7) — 1 minute
      Gently massage the area below the center of the crown in circular motions.

    Important notes: The complete routine takes 5-6 minutes. Drinking warm water after massage enhances results. Practice daily for the first 1-2 weeks, then reduce to 3-4 times per week once symptoms improve.

    ⚠️ Medical Disclaimer: This article is provided for health information purposes and does not replace professional medical diagnosis or treatment. If symptoms persist or are severe, please consult a healthcare professional. Bacterial rhinitis, sinusitis, and allergic rhinitis require comprehensive treatment.
    🤰 Pregnancy Warning: Among the acupoints above, Hegu (LI4) may trigger uterine contractions in pregnant women. If you are pregnant or may be pregnant, avoid stimulating Hegu and practice only Yingxiang, Yintang, Taiyang, and Tongqian. If you have concerns, consult a healthcare professional before practicing.

    “`