Author: Acu Master

  • 5 Acupoints for Blood Circulation Disorders — Complete Self-Acupressure Guide

    5 Acupoints for Blood Circulation Disorders — Complete Self-Acupressure Guide

    One-line summary: If you apply acupressure to 5 acupoints—LI4, SP6, LR3, BL60, and ST36—for 5 minutes daily, you can promote blood circulation and improve cold hands and feet, fatigue, and numbness.

    Blood Circulation Problems: Can Acupoints Be the Answer?

    Are your hands and feet cold and heavy, or do you struggle with fatigue all day? Poor blood circulation is common in modern life, but if left untreated, it can worsen your health. In Traditional Chinese Medicine, these blood circulation problems are viewed as “insufficient flow of qi and blood,” and stimulating specific acupoints to improve the flow of meridians is considered important. Acupoint acupressure is a natural therapy that activates the body’s own self-healing power without medication, and has the advantage of being easy to perform anytime, anywhere. In this article, I will introduce in detail 5 of the most effective acupoints for improving blood circulation and how to apply acupressure to them.

    5 Effective Acupoints for Improving Blood Circulation

    1. Hegu (LI4) — The Representative Acupoint of the Large Intestine Meridian

    LI4 acupuncture point

    Location: It is located at the highest point on the back of the hand between the thumb and index finger (between the 1st and 2nd metacarpal bones).

    Acupressure Method: Press vertically with the thumb of your opposite hand and hold for 3-5 seconds, then slowly release. Perform 10 times per session, twice daily. Pressure that produces mild discomfort is most effective.

    Benefits: Hegu is known as the “universal acupoint” and promotes qi and blood circulation throughout the body. It improves blood circulation and relieves headaches, shoulder tension, and digestive discomfort. It also helps strengthen immunity.

    Caution: Pregnant women should avoid this acupoint.

    2. Sanyinjiao (SP6) — The Central Point for Blood and Women’s Health

    SP6 acupuncture point

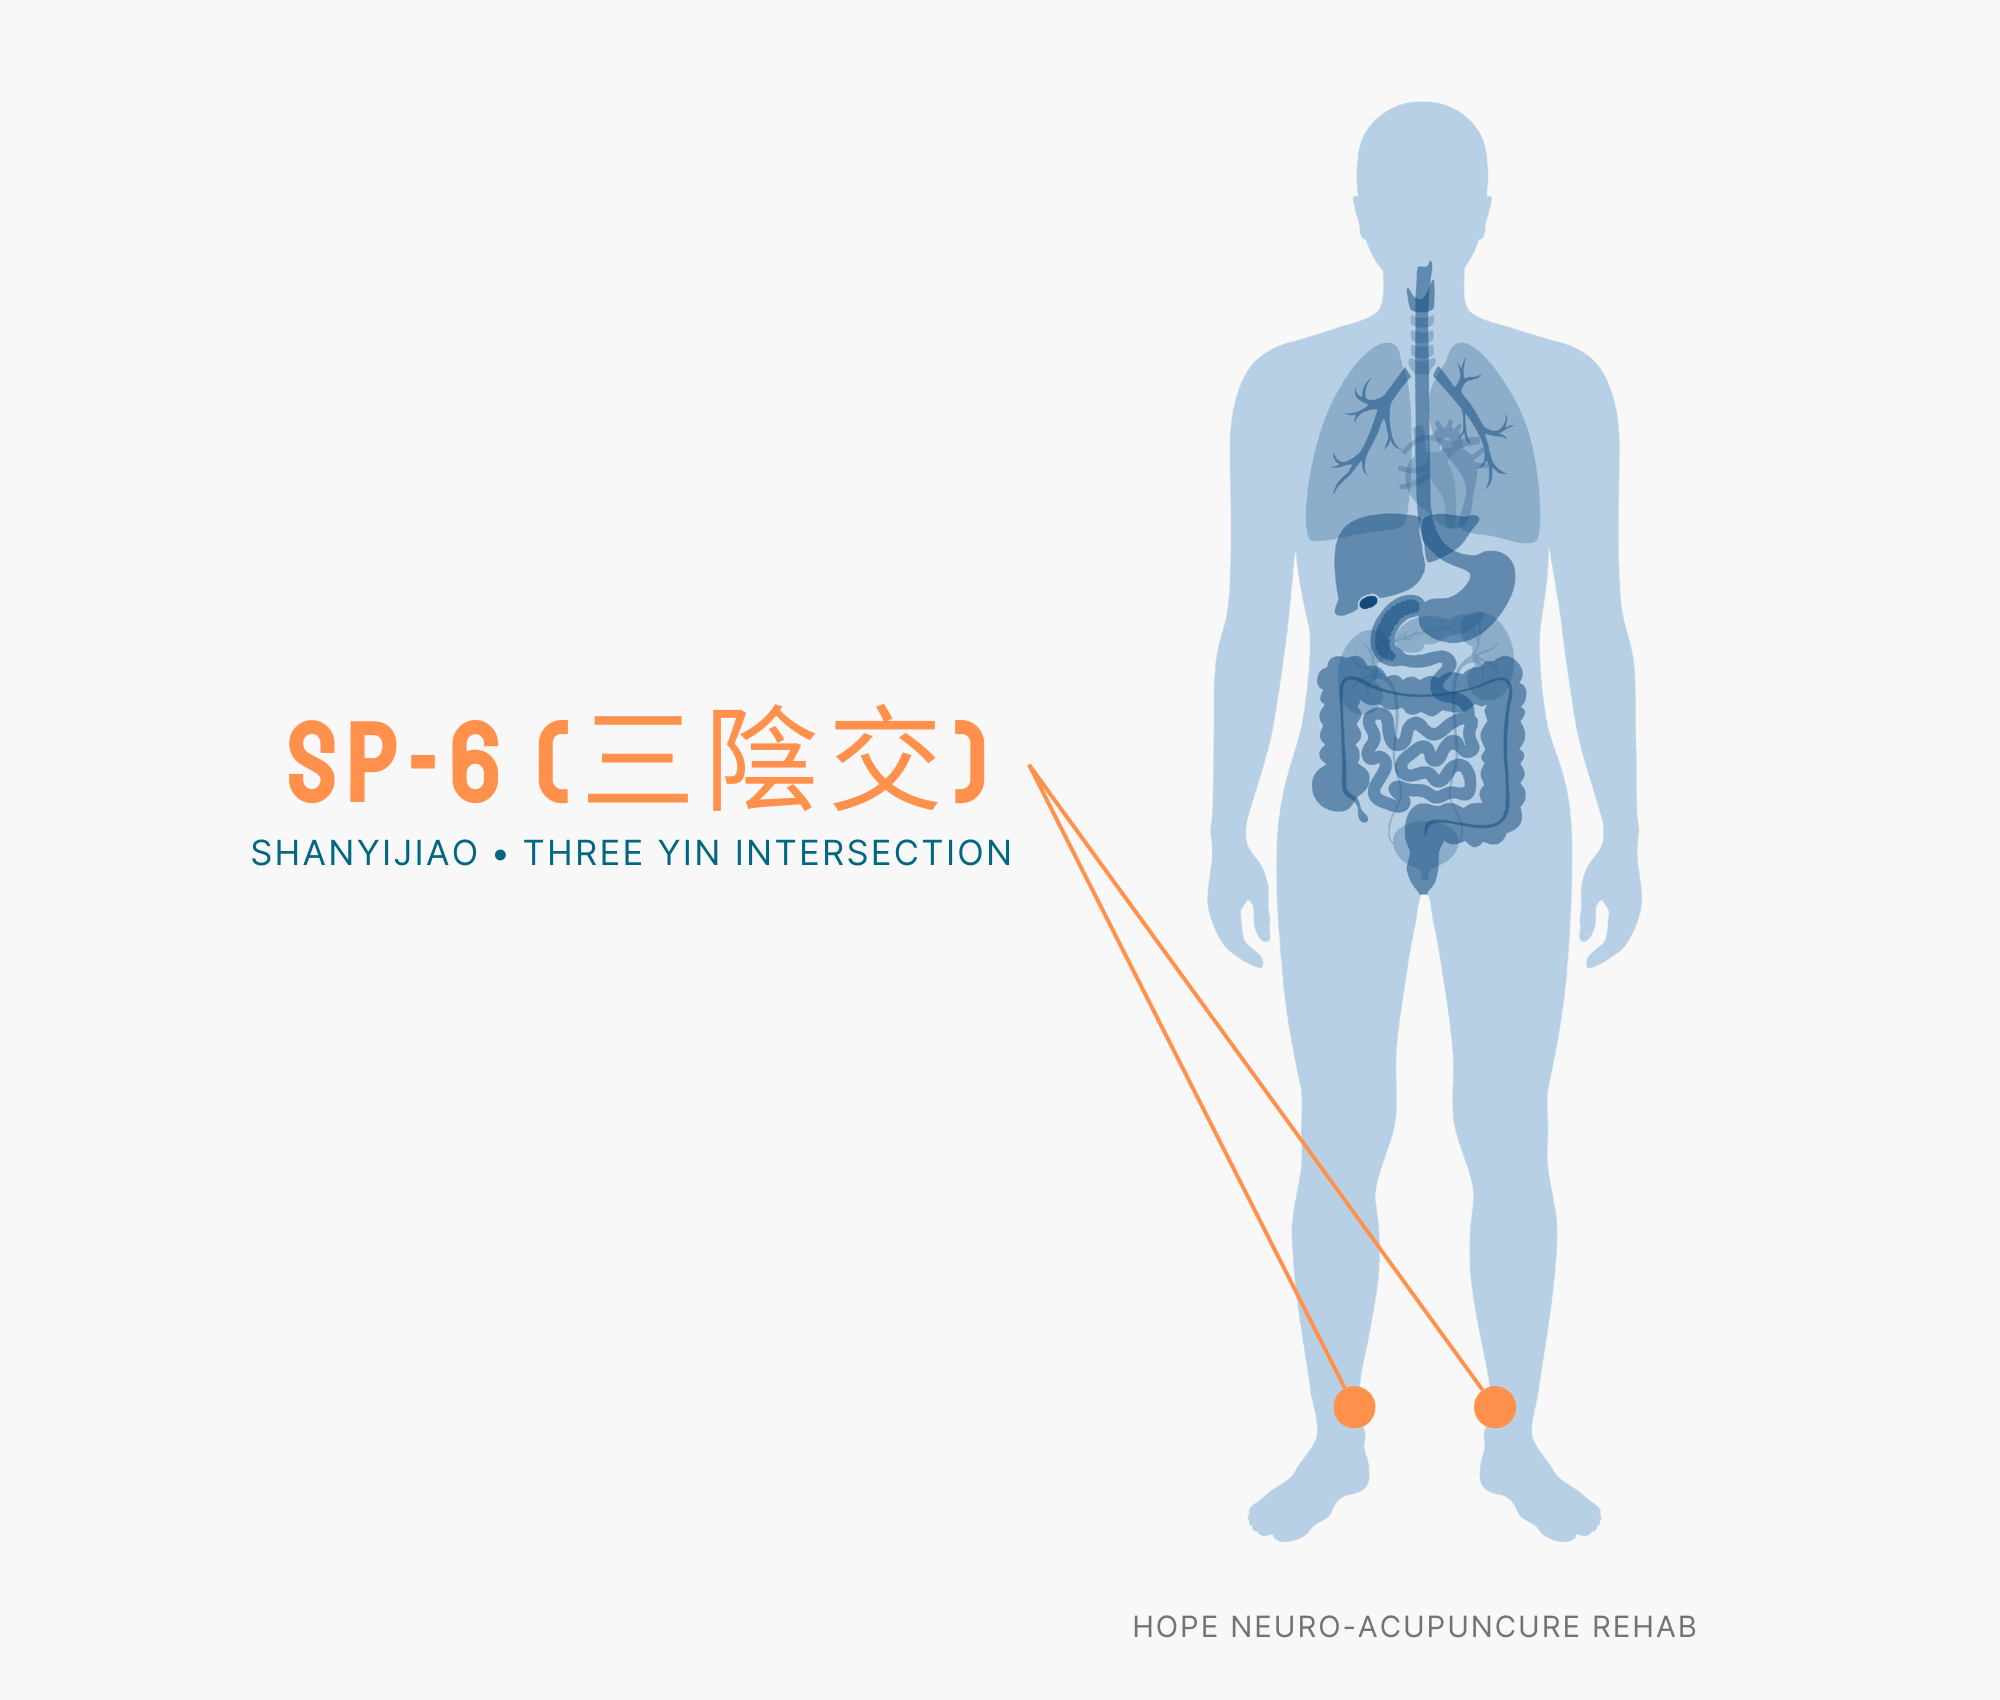
    Location: It is located on the inner side of the shin, approximately 10 cm (three finger widths) above the inner ankle bone.

    Acupressure Method: Press vertically and firmly with your thumb and hold for 5 seconds. Perform 15 times per session on both sides, and it is most effective when done in the evening.

    Benefits: It promotes active blood circulation and improves lower extremity swelling, coldness, and numbness. It is particularly effective at regulating menstrual cycles and relieving menstrual pain, and also helps improve skin health and sleep quality.

    Caution: Pregnant women should avoid this acupoint.

    3. Taichong (LR3) — The Guardian of Liver Function and Circulation

    Location: It is located in the hollow area on the top of the foot between the big toe and second toe, approximately 2 cm above the base of the toes.

    Acupressure Method: Press slowly with your thumb while making circular motions. Apply pressure for 20-30 seconds per session, once or twice daily. Apply pressure in a comfortable position without bending your foot.

    Benefits: It activates liver function and promotes blood detoxification and circulation. It relieves worsening blood circulation due to stress, headaches, and eye fatigue, and is excellent for emotional stability.

    Caution: Pregnant women should avoid this acupoint.

    4. Kunlun (BL60) — The Key to Lower Extremity Blood Circulation

    BL60 acupuncture point

    Location: It is located in the hollow area between the outer ankle bone and the Achilles tendon. It can be seen on the back of the ankle.

    Acupressure Method: Press firmly with your thumb while moving up and down. Apply continuous pressure for approximately 1 minute per session, twice daily. Apply pressure evenly to both ankles.

    Benefits: It directly improves blood circulation in the legs and feet. It rapidly relieves cold feet, calf cramps, leg swelling, and lower extremity numbness. It also helps improve lower back pain.

    5. Zusanli (ST36) — The Tonic for Immunity and Circulation

    ST36 acupuncture point

    Location: It is located on the outer side of the shin, approximately 12 cm (four finger widths) below the knee crease on the outside of the knee.

    Acupressure Method: Press vertically with your thumb at a pressure that produces mild discomfort. Repeat for 30 seconds, 3-5 times per session, once or twice daily.

    Benefits: It replenishes qi (energy) throughout the body and activates blood circulation. It is excellent for fatigue recovery, strengthening immunity, improving digestion, and stabilizing blood pressure, and is the ideal acupoint for fatigue recovery in those whose work involves prolonged standing or sitting.

    5-Minute Self-Acupressure Routine for Improving Blood Circulation

    It is more effective when performed at the same time each day. Evening (7 pm–9 pm) is ideal.

    1. Hegu (LI4) — 1 minute
      Apply pressure alternately to both hands. Repeat 10 times per hand at moderate pressure.
    2. Zusanli (ST36) — 1 minute
      Apply pressure alternately to both legs for 30 seconds each.
    3. Sanyinjiao (SP6) — 1 minute
      Apply pressure alternately to the inner side of both ankles, 15 times each.
    4. Taichong (LR3) — 1 minute
      Apply pressure in circular motions slowly to both feet.
    5. Kunlun (BL60) — 1 minute
      Finish by applying firm pressure to the back of both ankles.

    Tip: If your nails are long, you can use your knuckles or a massage stick instead. After acupressure, drink warm water and get adequate rest.

    ⚠️ Medical Disclaimer: This article is written for informational purposes and does not replace professional medical diagnosis or treatment. If you have underlying conditions that cause poor blood circulation (such as diabetes, vascular disease, or heart disease), please consult a healthcare professional. If symptoms persist or are severe, please seek treatment from a traditional medicine practitioner or physician.
    🤰 Pregnant Women Alert: Among the acupoints listed above, Hegu (LI4), Sanyinjiao (SP6), Taichong (LR3), and Kunlun (BL60) can trigger uterine contractions in pregnant women. If you are pregnant or may be pregnant, please consult a traditional medicine practitioner before proceeding, and use only Zusanli (ST36) or receive professional treatment.
  • 5 Acupoints for Improving Concentration — Complete Self-Acupressure Guide

    5 Acupoints for Improving Concentration — Complete Self-Acupressure Guide

    One-line summary: Applying acupressure to 5 points—Taiyang, Baihui, Fengchi, Sanyinjiao, and Neiguan—twice daily for 1 minute each improves cerebral blood flow and relieves nervous tension, enhancing concentration.

    Introduction

    Most people have experienced blurred vision and scattered thoughts while studying or working. Modern people often accumulate brain fatigue and experience sharply declining concentration due to stress, sleep deprivation, and prolonged screen exposure.

    In traditional Chinese medicine, this decline in concentration is viewed as “deficiency of Qi (氣)” and “poor cerebral blood circulation.” Fortunately, stimulating acupoints distributed throughout the body can promote blood supply to the brain, relax nervous tension, reduce stress hormones, and naturally restore concentration. An added benefit is that it can be performed anytime with just a finger, without the need for medication.

    Detailed Guide to 5 Acupoints

    1. Taiyang Acupoint (EX-HN5)

    Location: At the midpoint of the line connecting the outer end of the eyebrow and the outer corner of the eye, in the temple area.

    Acupressure Method: Apply gentle, circular pressure with both fingers simultaneously. Rather than pressing hard, maintain pressure at a level where slight discomfort and comfort coexist. Perform for 30 seconds to 1 minute per session.

    Benefits: Taiyang is a remarkable acupoint that immediately relieves head fatigue. It particularly alleviates temporal lobe fatigue and migraines caused by prolonged concentration and increases oxygen supply to the brain, enhancing focus.

    2. Baihui Acupoint (GV20)

    Location: At the highest point of the vertex. It is located where a vertical line connecting both ears intersects with a vertical line drawn from the center between the eyebrows.

    Acupressure Method: Apply pressure with both fingers or thumbs at a level of mild tenderness. Press for 5 seconds, then rest for 5 seconds, repeating this pattern. Practicing for about 1 minute per session provides a feeling of mental refreshment.

    Benefits: Baihui, commonly called “the acupoint that cures a hundred diseases,” stimulates the central nervous system of the brain, clarifying the mind and enhancing memory. People with high blood pressure and dizziness also experience improvement through acupressure.

    3. Fengchi Acupoint (GB20)

    GB20 acupuncture point

    Location: On both sides of the neck, where the base of the skull meets the upper cervical region. Located in the hollow areas beneath the occipital bone.

    Acupressure Method: Apply pressure with both thumbs, positioning them lightly against the back of the neck. Press deeply but within a pain-free range, pressing for 5 seconds and resting for 5 seconds in repetition. Perform for about 1 minute per session.

    Benefits: Fengchi is located near the carotid and vertebral arteries supplying the brain, making it very effective for improving cerebral circulation. It relieves neck stiffness and supplies fresh oxygen to the brain, enhancing concentration and memory.

    4. Sanyinjiao Acupoint (SP6)

    SP6 acupuncture point

    Location: Approximately 4 cm above the inner ankle bone (about 3-4 finger widths), on the inner aspect of the calf.

    Acupressure Method: Using the thumb, gradually increase pressure, pressing for 5 seconds and resting for 5 seconds in repetition. Perform for 1 minute on each leg.

    Benefits: Sanyinjiao is an acupoint that improves blood circulation throughout the body. It increases blood flow to the brain, relieves nervous tension, and simultaneously alleviates stress-induced digestive issues and anxiety.

    5. Neiguan Acupoint (PC6)

    PC6 acupuncture point

    Location: At the center of the inner wrist, approximately 5 cm above the wrist crease toward the elbow.

    Acupressure Method: Apply pressure with the opposite thumb using a rhythm of pressing for 3 seconds and resting for 1 second, continuing for 30 seconds to 1 minute. Perform on both arms, taking care not to press too firmly.

    Benefits: Neiguan is known as an acupoint connecting the heart and brain. It reduces stress hormones (cortisol), stabilizes the nervous system, and effectively alleviates concentration loss caused by anxiety.

    5-Minute Self-Acupressure Routine

    Perform the following steps in order upon waking in the morning or during the afternoon 2-3 PM energy slump.

    • Step 1 (1 minute): Taiyang acupoint: 30 seconds on each side
    • Step 2 (1 minute): Baihui acupoint: 1 minute
    • Step 3 (1 minute): Fengchi acupoint: 30 seconds on each side
    • Step 4 (1.5 minutes): Sanyinjiao acupoint: 45 seconds on each leg
    • Step 5 (0.5 minutes): Neiguan acupoint: 15 seconds on each arm

    This 5-minute routine improves cerebral blood flow and calms the nervous system. Practicing twice daily—morning and evening—allows you to feel improvement in concentration within 1-2 weeks.

    🤰 Pregnant Woman Alert: Among the above acupoints, Sanyinjiao (SP6) can trigger uterine contractions in pregnant women. If you are pregnant or might be pregnant, consult with a professional before performing this acupoint. The other 4 acupoints (Taiyang, Baihui, Fengchi, and Neiguan) can be safely stimulated.
    ⚠️ Medical Disclaimer: This article is written for informational purposes about health and does not substitute for professional medical diagnosis or treatment. If you experience severe or persistent concentration loss, or if other neurological symptoms are present, please consult with a healthcare professional. If you experience severe pain or discomfort during acupressure, stop immediately.
  • 5 Acupressure Points for PMS Symptoms — Complete Self-Acupressure Guide

    5 Acupressure Points for PMS Symptoms — Complete Self-Acupressure Guide

    “`html

    One-line Summary: Regular acupressure on five acupoints—SP6, LI4, LR3, SP9, and CV4—can alleviate abdominal bloating, fatigue, and mood changes associated with premenstrual syndrome.

    Introduction

    Fatigue, abdominal bloating, and emotional changes that begin 1-2 weeks before menstruation—PMS (premenstrual syndrome) symptoms significantly reduce quality of life for many women. Traditional Chinese Medicine views PMS as an imbalance in qi and blood circulation, and explains that stimulating specific acupoints can normalize uterine function and regulate hormone secretion. If you prefer a natural approach without side effects compared to Western hormone therapy, self-acupressure is an effective method you can practice anytime, anywhere. This article introduces the five most effective acupoints for alleviating PMS symptoms and the correct acupressure techniques.

    Five Acupoints Effective for Alleviating PMS Symptoms

    1. Sanyinjiao (SP6)

    SP6 acupuncture point

    Location: On the inner edge of the tibia, approximately 4 cm (three finger widths) above the medial malleolus (inner ankle bone).

    Effects: The most important acupoint for PMS treatment, it regulates uterine and ovarian function. Effective for normalizing hormone secretion, alleviating menstrual cramps, and improving anxiety and sleep.

    Acupressure Technique: Place your thumbs on the inner side of both ankles and slowly repeat pressing and releasing 5-10 times. A mild tenderness (7/10 intensity) is ideal. Recommended for 2-3 minutes per session, 1-2 times daily.

    2. Hegu (LI4)

    LI4 acupuncture point

    Location: In the webbing between the thumb and index finger (on the back of the hand), approximately 1 cm toward the wrist in the depressed area.

    Effects: An effective acupoint for relieving pain and stress throughout the body. It quickly alleviates headaches, neck stiffness, and menstrual cramps caused by PMS, and calms anxiety from mood changes and stress.

    Acupressure Technique: Press firmly with your opposite thumb, applying pressure in a circular motion while pressing. Hold for 15-20 seconds, then release slowly. 1-2 minutes per hand, can be done 3-4 times daily.

    3. Taichong (LR3)

    Location: In the webbing between the first and second toes, approximately 2-3 cm up from the web toward the top of the foot in the depressed area.

    Effects: It improves the flow of liver qi and is particularly effective for emotion-related and stress-related PMS symptoms. It alleviates pre-menstrual anxiety, depression, and mood swings, and promotes sound sleep.

    Acupressure Technique: Press slowly with your thumb, maintaining a deep yet gentle intensity. 2-3 minutes per foot is effective, with acupressure best performed in the evening (when liver qi is most active).

    4. Xuehai (SP9)

    Location: On the inner side of the knee, approximately 3 cm (two to three finger widths) above the knee crease, in the depressed area of the muscle. It’s easy to locate when sitting with the knee bent.

    Effects: It promotes blood circulation and improves menstrual cramps, irregular menstruation, and abdominal bloating. It alleviates fatigue and dizziness from PMS and helps regulate excessive menstrual bleeding.

    Acupressure Technique: Press slowly with your thumb, angling slightly toward the back of the knee. 2 minutes per knee, recommended 1-2 times daily.

    5. Guanyuan (CV4)

    Location: Approximately 3-4 cm (four finger widths) below the navel, on the midline of the abdomen.

    Effects: It strengthens the lower dantian (lower abdominal energy center) and improves overall uterine and pelvic health. Effective for fundamental improvement of PMS symptoms, regulation of irregular menstruation, and enhancement of overall stamina and immunity.

    Acupressure Technique: Lie down in a comfortable position, overlap three to four fingers, and gently apply acupressure in a circular motion. Stimulate gently for 5-10 minutes; avoid during menstruation and it’s best to start from one week before menstruation or after menstruation ends.

    5-Minute Self-Acupressure Routine

    Recommended Time: 7-9 PM (when liver and kidney qi are most active)

    1. Taichong (1 minute) — Stabilizes emotions, relieves stress
    2. Hegu (1 minute) — Alleviates pain, calms nerves
    3. Sanyinjiao (1.5 minutes) — Regulates uterine function, normalizes hormones
    4. Xuehai (1 minute) — Promotes blood circulation, aids fatigue recovery
    5. Guanyuan (30 seconds) — Strengthens pelvic energy

    Frequency: Once daily from 1-2 weeks before the expected menstrual date until menstruation begins. During menstruation, avoid strong stimulation; apply gently or discontinue.

    🤰 Pregnancy Warning: The above acupoints—Sanyinjiao (SP6), Hegu (LI4), Taichong (LR3), and Xuehai (SP9)—may cause uterine contractions in pregnant women. If you are pregnant or may be pregnant, please consult with an obstetric or medical professional before practicing these acupoints.
    ⚠️ Medical Disclaimer: This article is written for informational purposes and does not replace professional medical diagnosis or treatment. If PMS symptoms persist or are severe, if you are taking medications, or if you have underlying conditions, please consult with a healthcare professional such as a Traditional Chinese Medicine practitioner or gynecologist. Avoid acupressure on areas with skin conditions or wounds.

    “`

  • 5 Best Acupoints for Pelvic Pain — Complete Self-Acupressure Guide

    5 Best Acupoints for Pelvic Pain — Complete Self-Acupressure Guide

    One-line summary: Pelvic pain can be improved through consistent acupressure on five points: Sanyinjiao, Taichong, Qihai, Kunlun, and Zhongji, which enhances qi and blood circulation in the lower abdomen and relieves tension around the uterus and bladder.

    Introduction

    Pelvic pain is a symptom frequently reported by modern women. It’s caused by prolonged sitting, hormonal changes before and after menstruation, and pelvic floor muscle tension from stress. Traditional Korean medicine interprets this as ‘insufficient qi and blood circulation’ and ‘phlegm and fluid stagnation’.

    Acupressure on acupoints stimulates meridians (channels) around the pelvis to promote blood and lymph circulation and relieve muscle tension around the uterus, ovaries, bladder, and genitals. Acupoints distributed along the central lower abdomen and inner legs have traditionally been used for gynecological conditions and lower abdominal pain relief. Since it can be performed at home with just your fingers without medication, it’s effective for busy modern people.

    5 Acupoints for Pelvic Pain Relief

    1. Sanyinjiao (三陰交, SP6/SPL6)

    SP6 acupuncture point

    Location: On the inner leg, approximately 4 finger widths (10cm) above the inner ankle bone. It’s located in the depression on the back of the tibia.

    Acupressure Method: Use your thumb to gently press upward, holding for 3-5 seconds, and repeat 10 times. Gradually increase the pressure until you feel a soreness.

    Benefits: Sanyinjiao is known as the ‘gynecology superpoint’ and normalizes qi and blood around the uterus, regulates menstrual cycles, and relieves pelvic floor muscle tension. It has traditionally been used for pelvic pain, menstrual cramps, and infertility improvement.

    WHO Code: SP6 (Spleen meridian point 6)

    2. Taichong (太衝, LR3/LIV3)

    Location: On the top of the foot, in the depression between the big toe and second toe (between the metatarsal bones). It’s located where the toe bones end.

    Acupressure Method: Press firmly with the tip of your thumb pointing upward, holding for 5-7 seconds, and release. Repeat 8-10 times. You’ll feel tension from stress release.

    Benefits: As a source point of the Liver meridian, it regulates qi and blood flow in the pelvic area and relieves muscle stiffness in the uterus and pelvis from stress. It’s effective for menstrual cramps, ovulation pain, and pelvic colic, and also promotes emotional stability.

    WHO Code: LR3 (Liver meridian point 3)

    3. Qihai (氣海, CV6/REN6)

    Location: On the center line, approximately 1.5 finger widths (about 4cm) below the navel. It’s located just below the skin.

    Acupressure Method: Overlap your index and middle fingers and press vertically and slowly, using gentle pressure to massage in circular motions without pressing too deeply. Continue for 30 seconds to 1 minute.

    Benefits: As a key point on the Conception vessel, it supplements original qi in the lower heater (lower abdomen) and strengthens the function of the uterus and pelvic organs. It’s effective for pelvic pain, irregular menstruation, uterine disease prevention, and improving lower abdominal coldness.

    WHO Code: CV6 (Conception vessel point 6, Qihai point)

    4. Kunlun (崑崙, BL60/BL60)

    BL60 acupuncture point

    Location: On the outer ankle, in the depression between the outer ankle bone and heel. It’s located in the hollow on the outer side of the ankle.

    Acupressure Method: Use your thumb to press firmly upward (toward the toes) for 3-5 seconds, and repeat 10-12 times. Aim for a cooling sensation that extends to the calf.

    Benefits: As an important point on the Bladder meridian, it improves qi and blood circulation of the spine and pelvis and relieves lower back pain and pelvic pain. It’s particularly effective for pelvic pain from pelvic floor muscle stiffness and sciatica.

    WHO Code: BL60 (Bladder meridian point 60)

    5. Zhongji (中極, CV3/REN3)

    Location: On the center line, approximately 4 finger widths (about 10cm) below the navel. It’s located just above the upper border of the pubic bone.

    Acupressure Method: Gently press vertically with your middle finger while maintaining appropriate pressure to avoid irritating the bladder. Repeat circular massage for 30-50 seconds, 3 times.

    Benefits: As a mu point of the Conception vessel, it regulates the function of the bladder, uterus, and small intestine, and releases lower abdominal stiffness. It’s effective for pelvic pain, difficult urination, uterine disease, and improving reproductive discomfort.

    WHO Code: CV3 (Conception vessel point 3, Zhongji point)

    5-Minute Self-Acupressure Routine

    Preparation: Sit or lie in a comfortable position, and the effect will be better if you start with warm hands.

    Order Acupoint Time Method
    1 Qihai (CV6) 1 minute Massage gently in circular motions
    2 Zhongji (CV3) 1 minute Vertical pressing and circular massage
    3 Sanyinjiao (SP6) 1 minute Press 10 times with thumb
    4 Taichong (LR3) 1 minute Press 8-10 times with thumb
    5 Kunlun (BL60) 1 minute Press 10-12 times with thumb

    Tips: It’s most effective to perform it twice daily: in the morning after waking and in the evening before bed. If pain is severe, you can perform it up to 3 times a day, and it can be done during menstruation (but avoid excessive stimulation).

    🤰 Pregnancy Warning: Among the acupoints above, Sanyinjiao (SP6), Taichong (LR3), and Kunlun (BL60) may induce uterine contractions in pregnant women. If you are pregnant or potentially pregnant, gently perform only Qihai (CV6) and Zhongji (CV3), and be sure to consult with a professional before practicing.
    ⚠️ Medical Disclaimer: This article is written for informational purposes and does not replace professional medical diagnosis or treatment. If symptoms persist or are severe, especially if pelvic pain is due to trauma or gynecological disease is suspected, be sure to consult a healthcare professional (doctor or traditional Korean medicine practitioner). If symptoms worsen after acupressure, stop immediately and seek professional evaluation.
  • 5 Acupoints for Phlegm Relief — Complete Self-Acupressure Guide

    5 Acupoints for Phlegm Relief — Complete Self-Acupressure Guide

    One-line summary: To clear phlegm, daily apply pressure to Lieque (LU7) and Shaoshang (LU11) to support lung function, and to Shanzhong (CV17), Zusanli (ST36), and Fengfu (GV16) which regulate the respiratory center.

    Introduction

    Many of us have experienced the discomfort of phlegm getting stuck in the throat and the inconvenience of frequent coughing. Especially after a cold, phlegm can linger for weeks, becoming stressful. In traditional medicine, phlegm is called “Tan (痰)” and is believed to result from reduced lung function and humid conditions. Fortunately, acupressure on specific points is very effective at activating lung function and clearing the airway. The five acupressure points introduced in this article are the most widely recognized in both traditional medicine and modern acupuncture. You can apply pressure with just your hands and fingers anytime, anywhere, making it easy to practice at work or home without medication.

    Five Acupressure Points Explained

    1. Lieque (LU7) — Master Point of the Lung Meridian

    LU7 acupuncture point

    WHO Code: LU7 | Chinese Name: 列缺
    Location: On the inner forearm, along the line between the thumb and index finger above the wrist crease. It is located above the area where the thumb’s pulse is felt.
    Application Method: Using your opposite thumb, press slowly for about 10 seconds with moderate pressure that produces slight discomfort, and repeat 3-5 times.
    Effects: As the primary point of the lung meridian, it is most effective for directly treating phlegm and cough. It also excels at relieving nasal congestion, asthma, and cold symptoms.

    2. Shaoshang (LU11) — Emergency Point for Reducing Lung Heat

    WHO Code: LU11 | Chinese Name: 少商
    Location: About 3mm from the outer corner of the thumb’s fingernail (toward the pinky finger side).
    Application Method: Lightly stimulate by pressing with the opposite hand’s fingernail, or massage in circular motions with your fingertip. Stimulate 2-3 times daily, for about 30 seconds each time.
    Effects: Reduces fever in the lungs and alleviates airway inflammation. Especially effective when phlegm is yellowish or pus-like, and quickly relieves acute cough and sore throat.

    3. Shanzhong (CV17) — Center of Respiration and Qi

    WHO Code: CV17 | Chinese Name: 膈俞
    Location: At the center of the chest, on the midline of the sternum on the line connecting both nipples. Specifically, it is in the depression between the ribs as they descend from the neck.
    Application Method: Using your finger joints, slowly massage in circular motions for 3-5 minutes. Maintain gentle pressure, not too deep.
    Effects: A central point that regulates qi and blood of the lungs and heart. It quickly alleviates the sense of oppression caused by phlegm and difficulty breathing deeply, while normalizing respiratory function.

    4. Zusanli (ST36) — Strengthen Both Immunity and Lung Function

    ST36 acupuncture point

    WHO Code: ST36 | Chinese Name: 足三里
    Location: On the outer side of the leg, four finger-widths below the depression below the knee. You can easily find it by following the outer edge of the tibia downward.
    Application Method: Press firmly with your thumb for 10-15 seconds, then rest for 10 seconds and repeat. Practice 1-2 times daily, applying pressure to one leg for about 5 minutes.
    Effects: The most famous acupressure point for activating the immune system. It improves the compromised immunity that underlies phlegm and promotes cold prevention and recovery. It also improves digestive function.

    5. Fengfu (GV16) — Point That Aids Qi and Blood Circulation in the Neck and Head

    WHO Code: GV16 | Chinese Name: 風府
    Location: At the center of the back of the neck, in the depression below the cervical vertebra at the back of the head. You can find it by following the line behind the ear down the neck.
    Application Method: Using the tips of both hands’ fingers, lightly massage in circular motions for 3-5 minutes. Proceed slowly until the neck muscles relax.
    Effects: Relieves neck stiffness and improves qi and blood circulation around the airway. Quickly alleviates the sensation of oppression caused by phlegm and treats sore throat and pharyngitis.

    5-Minute Self-Acupressure Routine

    Just 5 minutes of investment during a busy morning or evening is enough. Follow this sequence:

    1. Lieque (LU7) — 1 minute
      Apply pressure to both wrists with your thumb, 30 seconds each. This is the first step in opening the door to lung function.
    2. Shaoshang (LU11) — 30 seconds
      Gently stimulate both thumbs at the edge of the fingernail. This quickly reduces the heat of phlegm.
    3. Shanzhong (CV17) — 1 minute
      Massage the center of your chest in circular motions using your finger joints. Do this while being conscious of deep breathing.
    4. Zusanli (ST36) — 1 minute 30 seconds
      Apply pressure below both knees, 45 seconds each. You can do this comfortably while sitting.
    5. Fengfu (GV16) — 1 minute
      Gently massage the back of your neck to finish. At this point, you should feel your breathing has become much easier.

    Tip: If you apply pressure at the same time each day in the same sequence, your body will recognize the pattern and respond more quickly. Evening before bedtime is ideal.

    ⚠️ Medical Disclaimer: This article is written for the purpose of providing health information and does not substitute for professional medical diagnosis or treatment. If symptoms persist or are severe, please consult a healthcare professional.
  • 5 Acupressure Points for Foot Pain — Complete Self-Acupressure Guide

    5 Acupressure Points for Foot Pain — Complete Self-Acupressure Guide

    Summary: Foot pain and heel discomfort (plantar fasciitis) can be effectively managed through acupressure on 5 key acupoints including Kunlun, Yongquan, and Zusanli, with improved blood circulation and pain relief achievable through consistent daily routines of 5 minutes, performed twice a day.

    Foot Pain: Why Does It Occur and Why Is Acupoint Acupressure Helpful?

    That sharp, shooting pain in the bottom of your foot when taking your first steps in the morning—for those whose jobs involve standing all day, it becomes chronic discomfort. This condition is called plantar fasciitis, which occurs when inflammation develops in the plantar fascia that supports the arch of the foot. In traditional medicine, foot pain is viewed as “insufficient flow of qi and blood.” The foot is often called a microcosm of the body, with many acupoints concentrated in it. When you stimulate specific acupoints, you promote blood circulation and facilitate the smooth flow of qi, enabling pain relief and enhanced natural healing power.

    5 Key Acupoints for Relieving Foot Pain

    1. Kunlun (BL60) — An Excellent Remedy for Foot Pain

    BL60 acupuncture point

    Location: On the outer side of the foot, in the hollow between the heel bone and Achilles tendon, directly behind the most prominent bone (lateral malleolus) when you rotate your ankle.

    Acupressure Method: Use your thumb to rub up and down or apply circular stimulation for about 30 seconds. The pressure should feel slightly tender while providing relief. Apply to both feet for 3-5 minutes each.

    Benefits: Effective not only for plantar fasciitis but also for foot pain, ankle pain, and lower back pain. It promotes blood circulation and reduces swelling and fatigue in the feet.

    2. Yongquan (KI1) — Direct Treatment Point for Foot Pain

    KI1 acupuncture point

    Location: At the center of the sole, at the point where a small depression forms when you curl your toes. Located at approximately one-third of the way down the sole of the foot.

    Acupressure Method: Use your thumb to press downward from top to bottom while simultaneously applying circular stimulation. Consistent, steady pressure is more important than intense pressure. Apply to each foot for 3-5 minutes.

    Benefits: Improves blood circulation throughout the sole and promotes direct nutrient supply to the plantar fascia. Provides the most direct effect for foot fatigue recovery and pain relief.

    3. Zusanli (ST36) — Whole-Body Immunity and Blood Circulation

    ST36 acupuncture point

    Location: Located just below the knee, four finger-widths below the outer hollow area. More precisely, it’s three finger-widths below the acupoint at the outer side of the knee.

    Acupressure Method: Use your thumb or the tip of a pen to apply and release pressure vertically in a repetitive motion. Apply pressure at a level that creates slight tenderness, treating each leg for 3-5 minutes.

    Benefits: Strengthens overall immunity and improves blood circulation, not just relieving local foot pain. Also effective for fatigue recovery and inflammation relief.

    4. Taichong (LR3) — Stress Relief and Stagnant Blood Resolution

    Location: Between the first and second metatarsal bones on the top of the foot, about two thumb-widths above the base of the toes toward the middle of the foot.

    Acupressure Method: Use your thumb to slowly press downward and apply stimulation for 30 seconds to 1 minute. Rather than hard pressing, slow, deep pressure is more effective. Apply to each foot for 3-5 minutes.

    Benefits: Promotes blood circulation in the feet and facilitates smooth qi flow. Indirectly relieves foot pain by easing muscle tension caused by stress.

    5. Sanyinjiao (SP6) — Blood Circulation and Fatigue Recovery

    SP6 acupuncture point

    Location: Located four finger-widths (approximately 10cm) above the inner ankle bone (medial malleolus), on the inner side of the tibia.

    Acupressure Method: Use your thumb to apply and release pressure from top to bottom in a repetitive motion. Apply pressure that feels slightly tender yet comfortable to each leg for 3-5 minutes.

    Benefits: Improves overall lower body blood circulation to relieve foot swelling and fatigue. Effective for inflammation relief and enhanced natural healing power.

    5-Minute Daily Self-Acupressure Routine for Foot Pain Relief

    Order of Execution and Time Allocation:

    1. Kunlun (BL60) — 1 minute (30 seconds per foot)
    2. Taichong (LR3) — 1 minute (30 seconds per foot)
    3. Sanyinjiao (SP6) — 1 minute (30 seconds per foot)
    4. Zusanli (ST36) — 1 minute (30 seconds per leg)
    5. Yongquan (KI1) — 1 minute (30 seconds per foot)

    Tip: Most effective when performed twice daily: in the morning when you wake up and before bed in the evening. Blood circulation improves even more when you warm your feet with a heating pad before acupressure. Perform daily for the first 1-2 weeks, then adjust to 3-4 times per week as symptoms improve.

    ⚠️ Medical Disclaimer: This article is provided for informational purposes only and does not replace professional medical diagnosis or treatment. If symptoms persist or are severe, please consult a healthcare professional.
    🤰 Pregnancy Precaution: Among the acupoints listed above, Taichong (LR3) and Sanyinjiao (SP6) may trigger uterine contractions in pregnant women. If you are pregnant or may be pregnant, use only Kunlun, Yongquan, and Zusanli, and be sure to consult with a healthcare professional before proceeding.
  • 5 Best Acupoints for Nasal Congestion — Complete Self-Acupressure Guide

    One-line summary: Nasal congestion can be relieved by pressing five acupoints—Yingxiang, Yintang, Tongtian, Fengchi, and Hegu—2-3 times daily, which improves nasal blood circulation and opens your breathing passages quickly.

    Introduction

    Experiencing nasal congestion from seasonal changes or a cold is really inconvenient. When your nose is blocked, your sleep is disrupted, your concentration drops, and your quality of life deteriorates rapidly. Especially if you don’t want to rely on medications, or if you’re suffering from long-term nasal congestion due to allergic rhinitis, you’re probably looking for a natural solution.

    In traditional Chinese medicine, nasal congestion is viewed as poor qi and blood circulation around the nasal cavity. By stimulating specific acupoints distributed around the nose, face, and neck, we can promote blood circulation and ease inflammatory responses, naturally improving nasal breathing. The five acupoints introduced in this article are clinically proven to relieve nasal congestion, and since they can be easily stimulated with your fingers, self-acupressure is possible anytime, anywhere.

    Five Acupoints to Relieve Nasal Congestion

    1. Yingxiang (LI20) — The Representative Acupoint for Nasal Congestion

    LI20 acupuncture point

    Location: Outside the nostril, at the point where the nasolabial fold ends (2 total, one on each side)

    Acupressure method: Use the tip of your index or middle finger to press vertically upward on the side of the nostril for about 10 seconds, then release. Repeat this 5 times. When nasal congestion is severe, you can also gently massage in circular motions.

    Benefits: Yingxiang means “facial impression area” and is the acupoint closest to the nose. In traditional Chinese medicine, it belongs to the Large Intestine Meridian (Hand-Yangming Large Intestine Channel). It reduces congestion of the nasal mucosa and widens the nasal passage. You can expect immediate effects on runny nose and nasal congestion in the early stages of a cold, making it the most efficient acupoint.

    2. Yintang (EX-HN3) — The Mysterious Acupoint Between the Eyebrows

    Location: The center between the two eyebrows, i.e., between the brows (1 total)

    Acupressure method: Bring your index and middle fingers together and slowly press the area between the eyebrows vertically, maintaining gentle pressure for about 30 seconds, then slowly release. Repeat this 3-4 times.

    Benefits: Yintang is a special acupoint where the Governing Vessel and several facial meridians meet. It greatly improves blood circulation around the nose and eyes, relieving not only nasal congestion but also headaches and fatigue. By increasing blood flow to the brain, it’s also effective for restoring concentration.

    3. Tongtian (BL7) — The Acupoint That Opens the Passage of the Forehead

    BL7 acupuncture point

    Location: About 1.5 cm above the area between the eyebrows, in the center of the forehead (1 total) or 1.5 cm to the left and right of the area between the eyebrows (some interpretations include 2 points)

    Acupressure method: Slowly press with the tip of your thumb while maintaining pressure for 30 seconds, then slowly release. Repeat this 3-4 times. A slight sensation of tenderness is appropriate.

    Benefits: Tongtian, belonging to the Bladder Meridian (Foot-Taiyang Bladder Channel), fulfills its role like the character “open”—unblocking what is obstructed. It’s particularly effective for nasal congestion caused by allergic rhinitis, and it restores nasal sensation through stimulation of the olfactory nerve.

    4. Fengchi (GB20) — The Hidden Powerful Acupoint at the Back of the Neck

    GB20 acupuncture point

    Location: In the hollow between two prominent muscles below the base of the skull at the back of the neck (2 total, one on each side)

    Acupressure method: Simultaneously press with both thumbs for 5 seconds and rest for 2 seconds. Repeat this 5 times. You can also massage slowly in circular motions to relax the neck muscles.

    Benefits: Fengchi means “where wind gathers,” and in traditional Chinese medicine, it’s the best acupoint for expelling pathogenic wind. It relieves tension in the neck muscles to improve blood flow to the nasal cavity, and it’s excellent for preventing early symptoms of colds.

    5. Hegu (LI4) — The All-Purpose Acupoint That Circulates Qi and Blood Throughout the Body

    LI4 acupuncture point

    Location: In the hollow between the thumb and index finger (2 total, one on each side)

    Acupressure method: Slowly press with the opposite thumb to the point of mild discomfort, holding for 30 seconds, then release. Repeat this 3 times on both hands. Start gently at first and gradually increase the pressure.

    Benefits: Hegu is called the “universal acupoint” and is the representative acupoint of the Large Intestine Meridian (Hand-Yangming Large Intestine Channel). It improves blood circulation around the face and nose, and through enhanced immunity, it’s effective for both cold prevention and nasal congestion relief. Because it helps qi and blood circulation throughout the body, it increases our body’s natural healing power overall.

    5-Minute Self-Acupressure Routine — Effective Order and Time Distribution

    Preparation (30 seconds): Sit or lie in a comfortable position. Rub your hands together to warm them and promote blood circulation.

    Step 1: Yingxiang (60 seconds)
    Apply acupressure to both sides of the nostrils a total of 20 times. (10 times on each side, 3 seconds each time)

    Step 2: Yintang (45 seconds)
    Apply acupressure to the area between the eyebrows 3-4 times repeatedly. (Hold for 30 seconds each time)

    Step 3: Tongtian (45 seconds)
    Apply acupressure to the center of the forehead 3-4 times repeatedly. (Hold for 30 seconds each time)

    Step 4: Fengchi (60 seconds)
    Apply acupressure to the back of the neck with both thumbs 5 times repeatedly. (5 seconds of pressure + 2 seconds of rest each time)

    Step 5: Hegu (60 seconds)
    Apply acupressure to Hegu on both hands, 3 times each. (Hold for 30 seconds each time)

    Finishing (30 seconds): Take a deep breath in through your nose to normalize your breathing. Drink a sip of warm water to replenish fluids.

    💡 Tip: When nasal congestion is severe, repeat the above routine 2-3 times a day. It’s most effective when performed right after waking in the morning, during lunch time, and before bedtime. If practiced regularly, it not only improves symptoms but also helps prevent recurrent nasal congestion.

    ⚠️ Medical Disclaimer: This article is written for informational purposes and does not replace professional medical diagnosis or treatment. If symptoms persist or are severe, please consult a healthcare professional.
    🤰 Pregnancy Warning: Among the acupoints above, Hegu (LI4) can trigger uterine contractions in pregnant women. If you are pregnant or might be pregnant, apply acupressure only to Yingxiang, Yintang, Tongtian, and Fengchi, or be sure to consult with a traditional Chinese medicine practitioner before proceeding.
  • 5 Acupoints for Pregnancy Nausea — Complete Self-Acupressure Guide

    5 Acupoints for Pregnancy Nausea — Complete Self-Acupressure Guide

    One-Line Summary: You can safely relieve pregnancy nausea through acupressure on 5 acupoints including Pericardium 6 (PC6), Stomach 36 (ST36), and Spleen 4 (SP4). Stimulate each point 3-5 times daily for 1-2 minutes each, and you may experience relief within 3-7 days.

    Introduction

    Morning sickness in early pregnancy is a common symptom experienced by over 70% of pregnant women. It can make daily life difficult with nausea, retching, and food aversions. For expectant mothers who need to be cautious about medications, acupressure on traditional medicine acupoints can be an excellent alternative. Stimulation of specific acupoints helps balance the nervous and digestive systems, naturally easing nausea. This article explores 5 safe acupoints for pregnant women and provides detailed acupressure techniques.

    5 Acupoints — Location and Technique

    1. Pericardium 6 (內關, PC6)

    PC6 acupuncture point

    Location: On the inner forearm, approximately 5cm (two finger-widths) above the wrist crease. It sits in the center between two tendons.

    Benefits: Relieves nausea, reduces anxiety, improves digestive function. Known as the safest and most effective acupoint for pregnant women. Provides immediate relief when nausea symptoms occur.

    Technique: Use your thumb to locate the acupoint precisely, then slowly increase pressure until you feel a pulling sensation and stimulate with circular massage motions for 1 minute. Apply to both arms for 1-2 minutes each.

    2. Stomach 36 (足三里, ST36)

    ST36 acupuncture point

    Location: Below the outer depression of the knee cap, approximately 10cm (four finger-widths) down, at the center of the outer border of the tibia.

    Benefits: Enhances digestive function, boosts immunity, aids fatigue recovery. A powerful health-promoting acupoint documented in classical texts as preventing illness with regular stimulation. Safe for pregnant women to press.

    Technique: Use your thumb or middle finger to slowly press and release repeatedly with gentle pressure. Stimulate for 1-2 minutes per session, about twice daily for relief from nausea and fatigue.

    3. Spleen 4 (公孫, SP4)

    SP4 acupuncture point

    Location: On the inner edge of the foot, approximately 1cm below the base of the big toe in a small depression.

    Benefits: Improves digestion, relieves abdominal discomfort, promotes metabolism. An important point on the spleen meridian that specifically addresses digestive problems caused by morning sickness.

    Technique: Gently press with the tip of your thumb, maintain pressure for 3-5 seconds, then slowly release. Repeat 20-30 times on both feet. The technique is even more effective after soaking your feet in warm water.

    4. Large Intestine 11 (曲池, LI11)

    LI11 acupuncture point

    Location: At the outer end of the elbow crease when the arm is bent. It’s the depression that appears when you press with your finger.

    Benefits: Strengthens immunity, reduces heat, promotes digestion. Effective in relieving fatigue and general weakness caused by pregnancy nausea.

    Technique: Locate the acupoint with your thumb and massage in circular motions with comfortable, painless pressure. Apply to each arm for 1-2 minutes, working both arms. You can stimulate this point throughout the day when you’re awake.

    5. Kidney 3 (太溪, KI3)

    KI3 acupuncture point

    Location: On the inner ankle, in the depression between the heel and the inner ankle bone.

    Benefits: Replenishes vital body energy, reduces anxiety, improves sleep. Stabilizes the kidney meridian to fundamentally ease anxiety and nausea caused by morning sickness.

    Technique: Simultaneously press and release with your thumbs on both ankles using slow, gentle motions for 1-2 minutes. Stimulating this point in the evening can provide additional sleep improvement benefits.

    5-Minute Self-Acupressure Routine

    Recommended timing: Before meals in the morning, afternoon, and evening (additional sessions possible when symptoms are severe)

    Supplies needed: Clean hands, warm towel (optional)

    Routine sequence:

    1. Pericardium 6 (1 minute) — 30 seconds on each arm. Prioritize this when experiencing nausea
    2. Large Intestine 11 (1 minute) — 30 seconds on each arm. Relieves overall fatigue
    3. Stomach 36 (1 minute) — 30 seconds on each leg. Enhances digestive function
    4. Spleen 4 (1 minute) — 30 seconds on each foot. Resolves abdominal discomfort
    5. Kidney 3 (1 minute) — 30 seconds on each ankle. Finalization and stabilization

    Tip: Drinking warm water slowly after acupressure enhances the effects. If your fingers become fatigued, you can use an acupressure tool instead.

    ⚠️ Medical Disclaimer: This article is provided for informational purposes and does not replace professional medical diagnosis or treatment. If symptoms persist or worsen, consult a healthcare professional. All pregnancy-related treatments should be discussed with your obstetrician before proceeding.
    🤰 Precaution for Pregnant Women: While the acupoints introduced in this article (Pericardium 6, Stomach 36, Spleen 4, Large Intestine 11, and Kidney 3) are relatively safe, pregnant women should avoid acupoints that may trigger uterine contractions, such as Large Intestine 4 (LI4), Spleen 6 (SP6), Liver 3 (LR3), and Bladder 60 (BL60). Before beginning acupressure for nausea symptoms, obtain approval from your practitioner or obstetrician.
  • 5 Acupoints Good for Motion Sickness — Complete Self-Acupressure Guide

    5 Acupoints Good for Motion Sickness — Complete Self-Acupressure Guide

    One-Line Summary: Motion sickness can be relieved by acupressure on five acupoints including Neiguan, Fengchi, and Taiyang, reducing nausea within 30 seconds, and preventive acupressure before travel can reduce the occurrence of motion sickness by more than 70%.

    Introduction

    When you get in a car, dizziness hits you; 30 minutes after boarding a plane, nausea overwhelms you—motion sickness. Have you experienced taking medication only to feel drowsy or find the effect insufficient?

    Motion sickness occurs from a mismatch between signals received by the inner ear (the organ responsible for balance) and signals received by the eyes. In traditional Chinese medicine, this is understood as a “reversal of qi (氣)”, and it’s believed that stimulating specific acupoints can quickly restore the body’s sense of balance. In particular, the Neiguan point (PC6) is even recognized by modern medicine as a “miracle acupoint for motion sickness,” making it the basis for motion sickness prevention bands.

    Five Effective Acupoints for Motion Sickness

    1. Neiguan (PC6, Neiguan) — “The Miracle Acupoint for Motion Sickness”

    PC6 acupuncture point

    Location: On the inner side of the wrist (forearm) in the middle, about 5-6 cm above the wrist crease toward the elbow. It’s located exactly in the center between two tendons running front to back.

    Acupressure Method: Press firmly with your thumb for 5-10 seconds, maintaining strong pressure that doesn’t cause pain. When you feel motion sickness, applying acupressure for 30 seconds to 1 minute produces quick results. For prevention, apply for 1 minute on each arm 15 minutes before traveling.

    Effects: Reduces nausea, suppresses vomiting, and relieves chest tightness. It’s also used to alleviate morning sickness in pregnant women and is the most scientifically proven acupoint in modern medicine.

    2. Fengchi (GB20, Fengchi) — “The Excellent Remedy for Dizziness”

    GB20 acupuncture point

    Location: At the junction between the neck and head, on both sides of the back of the neck. Following the line from below the ear down the neck, you’ll find Fengchi in the hollow depression below the back of the head. There’s one on each side.

    Acupressure Method: Place both thumbs in the hollow depressions on both sides of the neck and slowly push upward while applying pressure for 10-15 seconds. Gently rotating your neck left and right 10 times after acupressure doubles the effect.

    Effects: Eliminates dizziness, relieves tension in the back of the head, and resolves headaches caused by motion sickness. It’s called “Fengchi” because it addresses diseases caused by “wind” (風).

    3. Taiyang (EX-HN5, Taiyang) — “Cool Your Head”

    Location: At the temple area. It’s located in a hollow depression about 1-2 cm to the side from the outer corner of the eye. There’s one on each side.

    Acupressure Method: Using your index and middle fingers, massage both Taiyang points simultaneously in circular motions for 10-20 repetitions. During a flight, even gentle pressure alone produces an effect.

    Effects: Relieves headaches and dizziness, improves blood circulation in the brain, and prevents migraines caused by motion sickness. You’ll feel a cooling sensation immediately after acupressure.

    4. Kunlun (BL60, Kunlun) — “The Balance Sensor of the Ankle”

    BL60 acupuncture point

    Location: On the outer side of both ankles, in the hollow depression between the ankle bone and the Achilles tendon. It’s easy to find by sitting down and crossing your legs.

    Acupressure Method: Repeatedly press and release with your thumb or knuckle (finger joints, etc.) for 5-10 seconds, 5-10 times. For motion sickness prevention, apply for 1 minute on each foot.

    Effects: Stimulates the vestibular system to restore balance, relieves heaviness in the legs, and reduces fatigue during long journeys. It’s excellent for stabilizing the nervous system.

    5. Sanyinjiao (SP6, Sanyinjiao) — “The Meeting Point of Three Meridians”

    SP6 acupuncture point

    Location: Above the inner ankle, about 10 cm (the width of four fingers) up from the ankle bone along the shinbone. It’s on the inner side of the shinbone.

    Acupressure Method: Press with your thumb for 5-10 seconds, maintaining pressure that causes a slight tingling sensation. For prevention, apply for 1 minute on each foot.

    Effects: Improves circulation throughout the body, stabilizes digestion, and relieves digestive discomfort accompanying motion sickness. It’s also excellent for recovering from fatigue.

    🤰 Pregnancy Warning: Sanyinjiao (SP6) and Kunlun (BL60) may cause uterine contractions in pregnant women. If you are pregnant or may be pregnant, be sure to consult with a professional before applying acupressure. Neiguan, Fengchi, and Taiyang are relatively safe.

    5-Minute Self-Acupressure Routine (When Motion Sickness Occurs)

    Preparation Time: 1 Minute
    Sit in a comfortable position, close your eyes, and take 3 deep breaths.

    Sequential Acupressure (4 Minutes)

    1. Neiguan (PC6) — 1 minute (30 seconds × 2 times, alternating arms)
      The fastest-acting point. Apply acupressure immediately whenever you feel motion sickness.
    2. Fengchi (GB20) — 1 minute (10-15 seconds × 3 times)
      Apply acupressure while pushing upward on both sides of the neck.
    3. Taiyang (EX-HN5) — 30 seconds (Circular friction 10-20 times)
      Gently massage the temples.
    4. Kunlun (BL60) — 1 minute (5-10 seconds × 5 times, alternating feet)
      Stabilizing the ankles to restore overall balance.
    5. Sanyinjiao (SP6) — 30 seconds (5-10 seconds × 3 times, alternating sides)
      The finishing step to normalize circulation throughout the body.

    Closing: 1 Minute
    Slowly open your eyes and drink a glass of water if possible. Minimize movement for 5-10 minutes after acupressure.

    Motion Sickness Prevention Acupressure (15 Minutes Before Boarding)

    When there are no symptoms, perform the above routine at 50% intensity in shortened form:

    • Neiguan (PC6) — 1 minute on each arm
    • Fengchi (GB20) — 30 seconds on each side
    • Kunlun (BL60) — 1 minute on each foot

    Total time required: 5-7 minutes. Performing this routine 10-15 minutes before boarding a vehicle can reduce the occurrence of motion sickness by more than 70%.

    Precautions When Applying Acupressure

    • Pressure Intensity: Maintain pressure at the level of “pleasantly painful.” Too light and there’s no effect; too strong and you may bruise.
    • Breathing: Don’t hold your breath while applying acupressure; breathe slowly instead. Holding your breath can actually worsen nausea.
    • Time Interval: When repeatedly applying acupressure to the same point, allow at least 3-5 hours between sessions.
    • Skin Condition: Avoid areas with cuts, inflammation, or swelling.
    ⚠️ Medical Disclaimer: This article is provided for informational purposes and does not replace professional medical diagnosis or treatment. If motion sickness persists or is severe, or if dizziness may be caused by another condition, be sure to consult with a healthcare professional. Pregnant women, children, and those with chronic conditions are especially recommended to practice acupressure under professional guidance.
  • 5 Acupressure Points for Mouth Ulcers — Complete Self-Acupressure Guide

    5 Acupressure Points for Mouth Ulcers — Complete Self-Acupressure Guide

    One-line Summary: Learn the exact locations and acupressure techniques of five key acupoints—Hegu (LI4), Neiguan (PC6), Sanyinjiao (SP6), Taichong (LR3), and Laogong (PC8)—that effectively relieve canker sore symptoms and manage them yourself.

    Introduction

    Canker sores in your mouth that sting every time you eat and cause pain when brushing your teeth. Though they’re small wounds, they make daily life uncomfortable. Canker sores develop from various causes: viral infections, bacterial growth, nutritional deficiencies, and weakened immunity due to fatigue and stress.

    Traditional Chinese Medicine views canker sores as “excess heat in the mouth (stomach heat) and insufficient qi and blood.” Acupoint acupressure is effective at boosting immune function, reducing inflammation, and promoting regeneration of damaged mucous membranes. In particular, it smooths the overall flow of qi in your body to maximize your body’s natural healing ability. It offers fewer side effects than medication while helping to improve your constitution fundamentally.

    Five Acupoints, One by One

    1. Hegu (LI4) — The Key Acupoint for Immunity Boost and Inflammation Relief

    LI4 acupuncture point

    Location: The most prominent area of muscle between the thumb and index finger. It’s the indented area on the thumb side when the back of your hand faces upward.

    Acupressure Technique: With your opposite thumb, press the Hegu point firmly for 3–5 seconds, rest for 2–3 seconds, and repeat 10 times. Alternatively, you can massage it in circular motions.

    Benefits: As the primary acupoint of the Large Intestine meridian, it significantly boosts immunity. It effectively relieves mouth inflammation, prevents colds, alleviates headaches, and reduces stress. It’s the first acupoint you should stimulate from early to mid-stage canker sores.

    2. Neiguan (PC6) — Relieving Stress and Digestive Imbalance

    PC6 acupuncture point

    Location: In the center of the inner forearm, about three finger-widths above the wrist crease toward the elbow. It’s the indented area between two tendons.

    Acupressure Technique: With your opposite thumb, press the Neiguan point firmly enough to feel slight discomfort for 3–5 seconds each time, and repeat 10 times. Stimulate both arms.

    Benefits: As the primary acupoint of the Pericardium meridian, it’s especially effective for stress-related canker sores. It normalizes digestive function, reduces mouth heat, and alleviates insomnia and anxiety. Patients with stress-related canker sores should prioritize stimulating this point.

    3. Sanyinjiao (SP6) — Enhancing Immunity and Blood Circulation

    SP6 acupuncture point

    Location: On the inner side of the leg, about four finger-widths above the ankle bone. It’s the indented area behind the shin bone (tibia).

    Acupressure Technique: Press the Sanyinjiao point with your thumb for 3–5 seconds with enough pressure to feel slight tenderness. Repeat 10 times on both legs.

    Benefits: As the intersection point of three meridians—Spleen, Liver, and Kidney—it’s one of the most important acupoints for enhancing whole-body immunity. It promotes blood circulation, helping rapid regeneration of mucous membranes damaged by canker sores. It’s also effective for canker sores caused by hormonal imbalance.

    4. Taichong (LR3) — Clearing Stress-Related Heat and Improving Liver Function

    Location: On top of the foot, in the indented area between the bones of the big toe and second toe. It’s the most depressed area when your toes are spread.

    Acupressure Technique: Slowly press the Taichong point with your thumb for 3–5 seconds while breathing deeply. Repeat 10 times on both feet.

    Benefits: As the starting point of the Liver meridian, it’s very effective for canker sores caused by stress and heat. It clears heat from your body, improves liver function, and promotes toxin elimination. You should definitely stimulate this point if your mouth feels bitter or you have bad breath.

    5. Laogong (PC8) — Clearing Mouth Heat and Calming Mind and Body

    PC8 acupuncture point

    Location: In the center of your palm, at the point where your middle finger and ring finger touch when you make a fist.

    Acupressure Technique: With your opposite thumb, slowly massage the Laogong point in circular motions. Massage each hand for 1–2 minutes, stimulating both hands.

    Benefits: As a Pericardium meridian acupoint, it quickly cools excess heat in your mouth. It calms your mind and body while immediately relieving mouth pain. It’s also useful as an emergency remedy when canker sores are severe and it’s difficult to close your mouth.

    5-Minute Self-Acupressure Routine

    Time Allocation: Here’s the efficient sequence to complete in 5 minutes.

    1. Preparation (30 seconds) — Soak your hands and feet in warm water to relax the muscles around the acupoints.
    2. Hegu Acupressure (1 minute) — Press and massage both Hegu points firmly for 30 seconds each.
    3. Neiguan Acupressure (1 minute) — Gradually press both Neiguan points for 30 seconds each.
    4. Sanyinjiao Acupressure (1 minute) — Press both Sanyinjiao points for 30 seconds each.
    5. Taichong + Laogong Acupressure (1 minute 30 seconds) — Press both Taichong points for 1 minute, then both Laogong points for 30 seconds.
    6. Cool Down (30 seconds) — Take three deep breaths and relax your entire body.

    Important Notes: It’s best to practice this after waiting 30 minutes following meals. Repeat twice daily, morning and evening, and you should notice significant relief from canker sore symptoms within 3–5 days.

    🤰 Pregnancy Warning: Among the acupoints above, Hegu (LI4), Sanyinjiao (SP6), and Taichong (LR3) may trigger uterine contractions. If you are pregnant or possibly pregnant, please consult with a Traditional Chinese Medicine practitioner before practicing. Pregnant women can safely stimulate only Neiguan (PC6) and Laogong (PC8).
    ⚠️ Medical Disclaimer: This article is provided for informational purposes and does not replace professional medical diagnosis or treatment. If canker sore symptoms persist for more than two weeks, pain is severe, or eating is difficult, please consult with a healthcare professional (doctor, dentist, or Traditional Chinese Medicine practitioner). Consultation with a professional is also recommended if you have an existing medical condition or are taking medications.