Author: Acupoint Guide Editorial Team

  • 5 نقاط ضغط لآلام الظهر — دليل التدليك الذاتي السريع

    5 نقاط ضغط لآلام الظهر — دليل التدليك الذاتي السريع

    “`html

    One-line summary: Back pain can be self-managed through regular acupressure on Jianjing, Fengchi, and Tianzhui acupoints, which relieves muscle tension and improves blood circulation.

    Back Pain: Why Does It Occur and How to Address It?

    Back pain has become a chronic condition in modern life. Prolonged sitting at work, smartphone use, and poor posture cause the muscles around the cervical and thoracic vertebrae to become stiff, leading to pain. The entire neck, shoulders, and back feel tense and heavy, which occurs because blood circulation is impaired and muscles lack oxygen.

    In traditional Chinese medicine, such back pain is addressed fundamentally through acupoint stimulation. When specific acupoints are pressed, muscle tension releases, and blood and qi (energy) circulation improves along the meridians, alleviating pain. Without medication, immediate relief can be felt using just your fingers, making this method ideal for modern self-care.

    5 Acupoints for Back Pain Relief — Precise Locations and Acupressure Techniques

    1. Jianjing (肩井, GB21) — Immediate Relaxation of Shoulder and Upper Back Muscles

    WHO Code: GB21 (Gallbladder Meridian 21)
    Location: The midpoint of the line extending from the back of the neck toward the shoulder tip. It is the highest point of the shoulder muscle that becomes most prominent when bending the neck forward.
    Acupressure technique: Press with your thumb for 3 seconds and rest for 2 seconds, repeating for 1 minute. Alternating acupressure on both Jianjing points quickly releases muscle tension throughout the shoulders and back.
    Effect: Most effective for releasing shoulder knots (hardened muscles), and excellent for neck stiffness, migraines, and upper body tension caused by stress. Immediately after acupressure, pain significantly decreases along with a warming sensation.

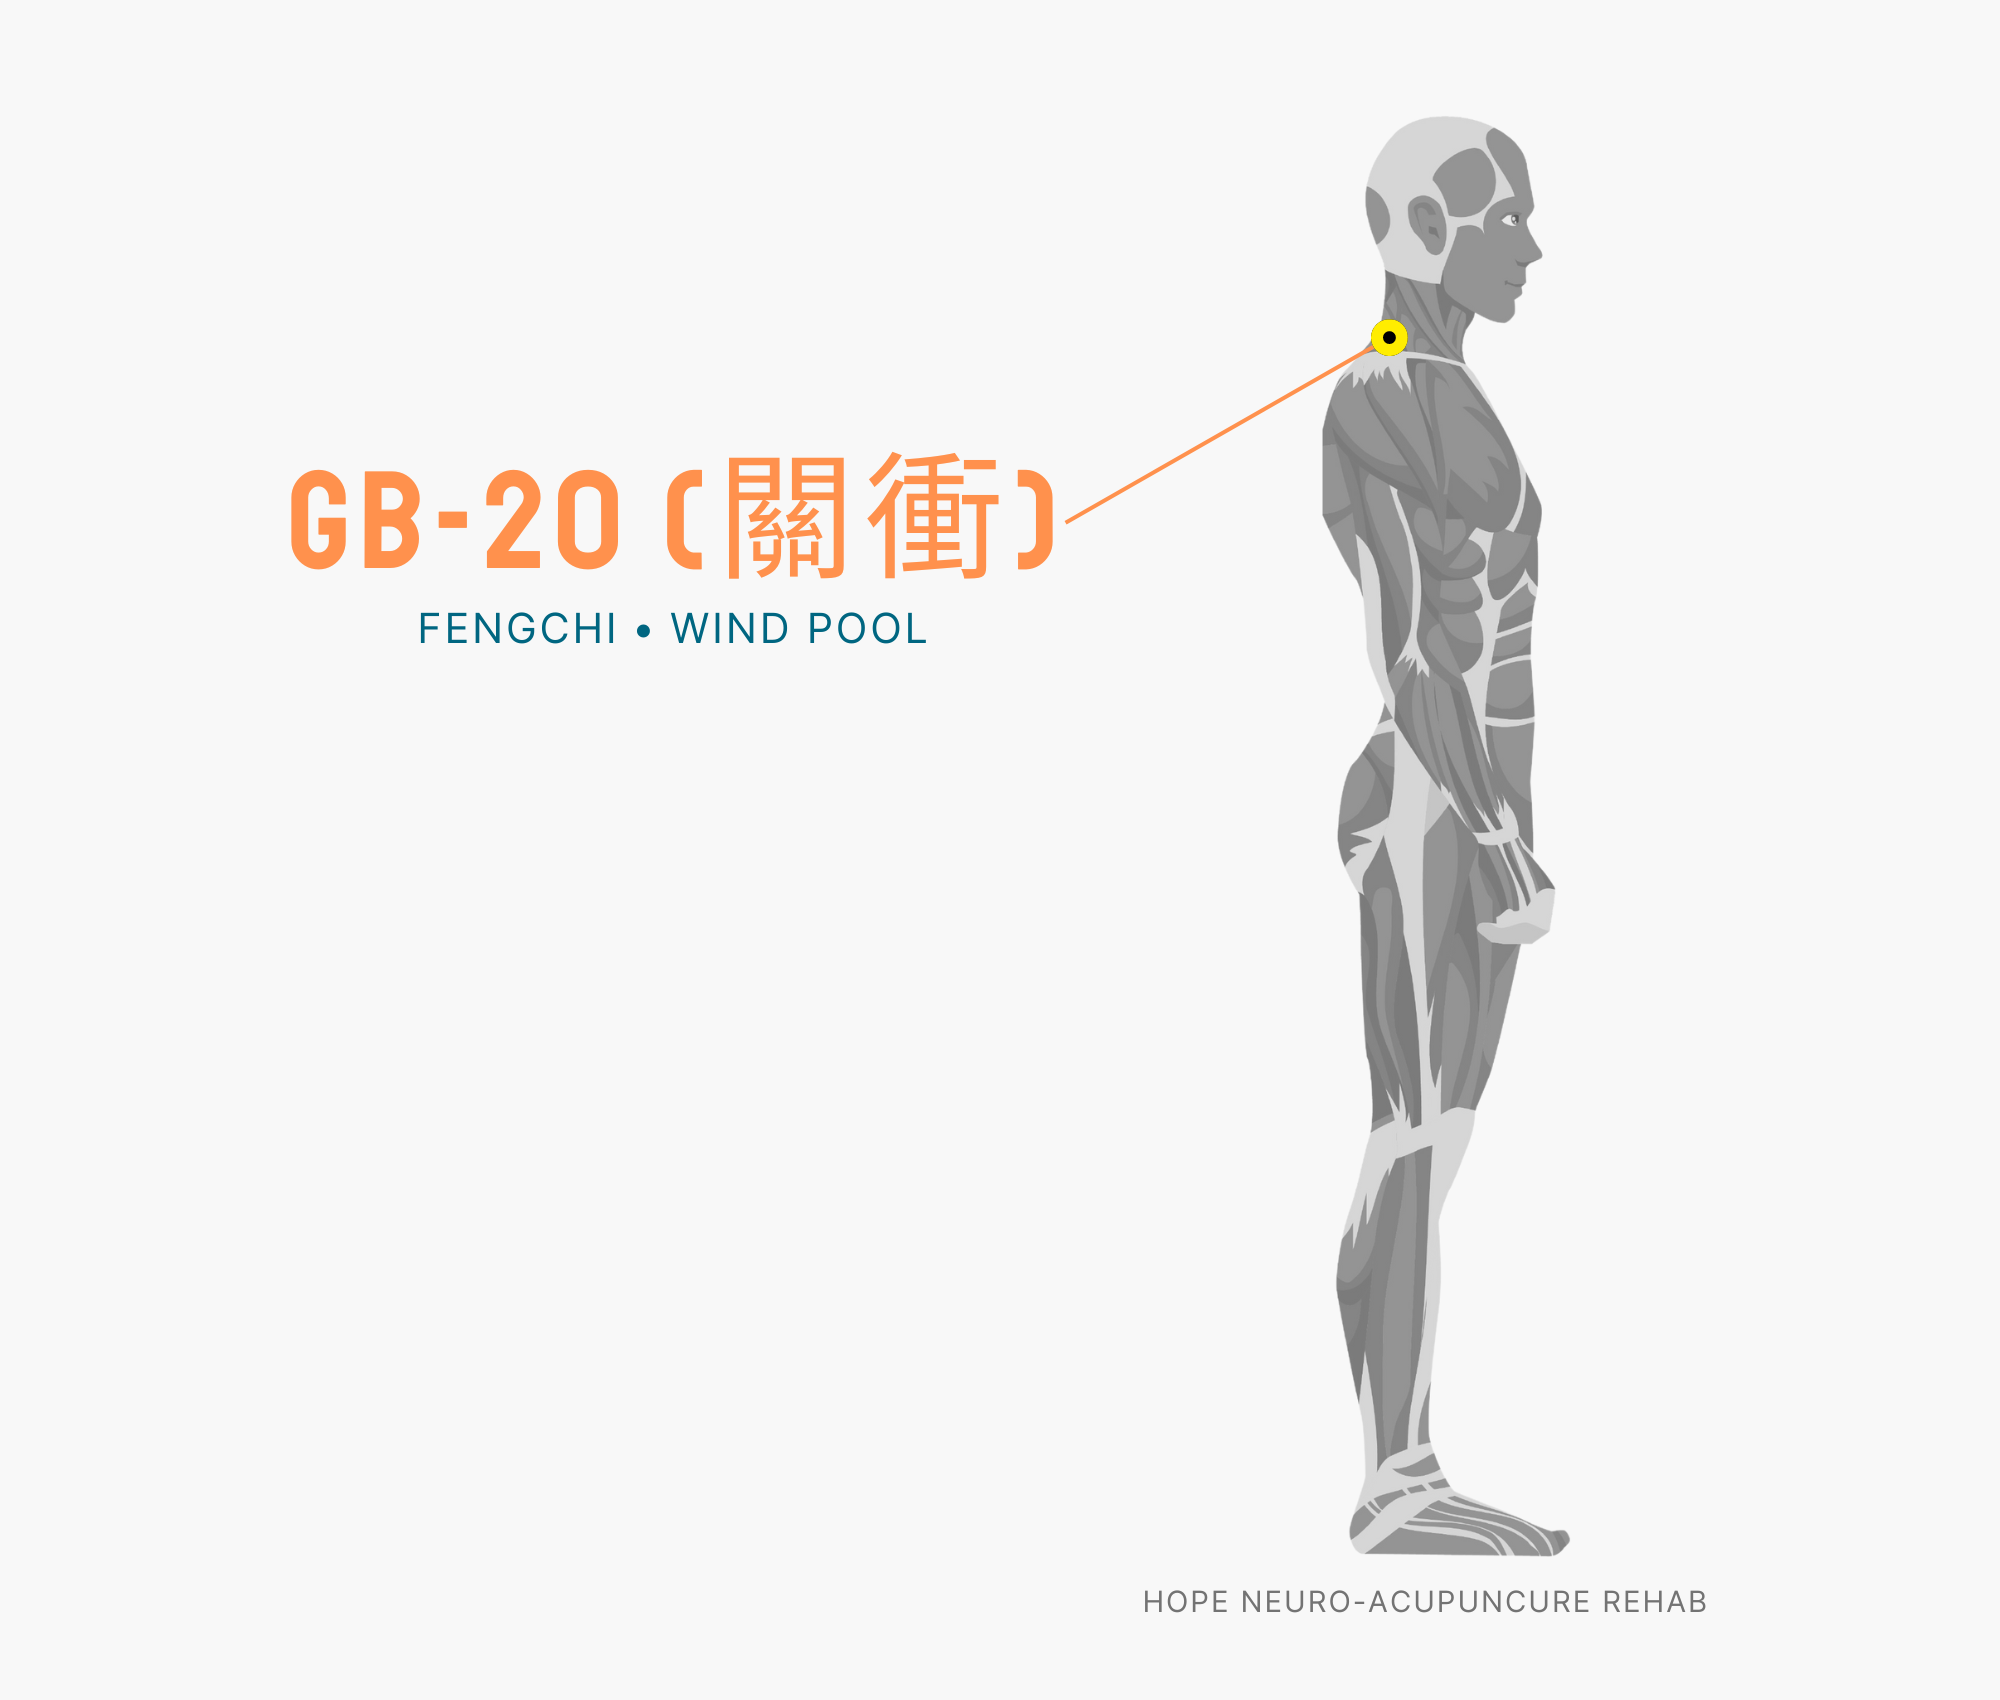
    2. Fengchi (風池, GB20) — Improved Blood Flow to Cervical Vertebrae and Brain

    GB20 acupuncture point

    WHO Code: GB20 (Gallbladder Meridian 20)
    Location: The back of the neck, in the hollow area between the cervical vertebra 7 and shoulder blade. Follow the back of your neck upward with your finger until you find the hollow area just below the hairline.
    Acupressure technique: Gently press simultaneously with both thumbs, using an upward pushing motion for 3 seconds, then rest for 2 seconds, repeating for 1 minute. Continue repeating until the stiffness in the neck releases.
    Effect: Improves blood circulation around the cervical vertebrae, quickly alleviating back of neck pain, cervical headaches, and neck stiffness. As blood flow to the brain increases, feelings of heaviness also ease.

    3. Tianzhui (天柱, BL10) — Lower Cervical and Upper Back Connection Area

    BL10 acupuncture point

    WHO Code: BL10 (Bladder Meridian 10)
    Location: The center of the back of the neck, located at the outer boundary of the sternocleidomastoid muscle (neck side muscle). It is the point directly below where the neck and shoulder meet when bending the neck slightly.
    Acupressure technique: Pinch with thumb and index finger while pressing for 3 seconds, then release for 2 seconds. Alternate sides for 1-2 minutes. A slight level of pain sensation is effective.
    Effect: Relieves tension in the muscle groups connecting the lower cervical vertebrae to the upper back, and is particularly effective when experiencing both neck and back pain. Fatigue is quickly relieved through improved blood circulation.

    4. Quchi (曲池, LI11) — Widespread Upper Body Pain Relief

    LI11 acupuncture point

    WHO Code: LI11 (Large Intestine Meridian 11)
    Location: The outer end of the elbow crease on the front of the elbow. It is the outermost point on the inner side of the elbow when the arm is bent.
    Acupressure technique: Press firmly with your thumb in a vertical direction for 3-5 seconds, then release. Repeat for 1 minute. Alternating between both arms increases the effect throughout the upper body.
    Effect: Since it stimulates nerve areas throughout the upper body along the Large Intestine Meridian, it relieves not only back pain but also arm numbness, elbow pain, and widespread upper body tension. Particularly effective for nerve-related pain.

    5. Feishu (肺兪, BL13) — Deep Relaxation of Central Back Muscle Groups

    BL13 acupuncture point

    WHO Code: BL13 (Bladder Meridian 13)
    Location: The center of the back, approximately 2 cm to the side of the thoracic vertebra 3 spinous process (the protruding part of the vertebra) on the Bladder Meridian. The precise location is approximately one finger width to the side of the vertebrae on both sides.
    Acupressure technique: Place a tennis ball under your back and lean against a wall for deep pressure, or lie flat and press firmly with your thumb in a vertical direction for 3-5 seconds, then release. Repeat for 1 minute.
    Effect: Most effective for releasing deep knots in the central back muscle groups, improving breathing comfort and relieving chest discomfort. Improved respiration deepens overall body relaxation further.

    5-Minute Self-Acupressure Routine — Effective Order and Time Distribution

    Preparation: Sit or lie down comfortably. It’s better to begin after a warm bath when muscles are already relaxed.

    1. Jianjing Acupressure (1 minute)
      Place your thumbs on both Jianjing points and repeat “press for 3 seconds and rest for 2 seconds.” You’ll feel the heaviness in your shoulders ease.
    2. Fengchi Acupressure (1 minute)
      Gently press simultaneously with both thumbs, using an upward pushing motion. You’ll notice the stiffness in the back of the neck ease and your mind becomes clearer.
    3. Tianzhui Acupressure (1 minute)
      Alternate sides, pinching with thumb and index finger, pressing for 3 seconds then releasing for 2 seconds.
    4. Quchi Acupressure (1 minute)
      Alternate between both arms, pressing firmly with your thumb in a vertical direction and then releasing, repeating this motion.
    5. Feishu Acupressure (1 minute)
      Lie flat and repeat vertical thumb pressing on both Feishu points on either side of the center back, or place a tennis ball underneath and lean against a wall to stimulate.

    After completion: Perform gentle neck stretches in 4 directions for 5-10 seconds each right after acupressure, and the effects will be even more pronounced.

    ⚠️ Medical Disclaimer: This article is provided for informational purposes and does not replace professional medical diagnosis or treatment. If back pain persists for more than 3 days, or if symptoms such as arm numbness, leg numbness, abnormal bowel/bladder function, or high fever accompany the pain, please consult a healthcare professional (medical doctor or acupuncturist). You may have serious conditions such as fractures, herniated discs, or spinal compression.

    “`

  • 5 نقاط ضغط لآلام المعصم — دليل التدليك الذاتي السريع

    5 نقاط ضغط لآلام المعصم — دليل التدليك الذاتي السريع

    One-line Summary: Wrist pain can be relieved by regularly stimulating the TE5, PC6, PC7, LI4, and TE5 acupoints to improve qi and blood circulation through the meridians. Self-acupressure is a cost-effective pain management method.

    Introduction

    Mouse clicks, smartphone touches, cooking, laundry—modern people’s wrists move constantly without rest. Symptoms such as “frequent tingling in the wrist,” “pain when bending the wrist,” and “stiffness and soreness in the wrist” are common discomforts among office workers and students.

    The causes of wrist pain are varied. Muscle fatigue from repetitive movements, carpal tunnel syndrome (CTS), sprains, or cervical spine issues can affect the wrist. In traditional Chinese medicine, wrist pain is viewed as an imbalance in meridian function, and improving qi and blood circulation through stimulation of specific acupoints is considered important.

    The five acupoints introduced in this article are particularly known to be effective for relieving wrist pain. Because they can be easily stimulated at the office, at home, or while traveling, they will become an essential self-care tool for office workers.

    5 Acupoints for Relieving Wrist Pain

    1. TE5, Waigguan (外關) — The Primary Acupoint for Wrist Pain

    Location: This acupoint belongs to the Triple Burner meridian. It is located on the back of the wrist, approximately 2-3cm above the wrist crease toward the forearm, in the space between the radius (thumb bone) and ulna (pinky bone). More precisely, when you extend your wrist, it is located approximately 2-3cm above the midpoint between the two bones on the back of your hand.

    Benefits: TE5 is effective for wrist pain, elbow pain, and brachial neuralgia. It is particularly excellent for alleviating pain that occurs when bending or extending the wrist, and in traditional Chinese medicine, it is also used to treat “external pathogenic diseases” (diseases caused by external pathogens).

    Technique: Apply vertical pressure to the TE5 area with the tip of your thumb. Press and release repeatedly for 3-5 seconds at an intensity where you feel soreness that is also refreshing. Perform this on both hands alternately, each for 3 minutes.

    2. PC6, Neiguan (內關) — Wrist Pain and Stress Relief

    Location: This acupoint belongs to the Pericardium meridian and is located on the inner side of the wrist (toward the fingers). From the inner wrist crease, go up toward the forearm approximately 2-3cm, positioning it at the center between the two tendons (palmaris longus and flexor carpi radialis). Simply, it is located one to two finger-widths above the inner wrist crease toward the forearm.

    Benefits: PC6 relieves not only wrist pain but also finger numbness, arm pain, and chest palpitations caused by anxiety and stress. It is a very suitable acupoint for stress-related wrist pain in modern people.

    Technique: Press directly with your thumb or massage by rubbing with the knuckle of your opposite hand’s finger. Use medium intensity, rubbing at a pace of approximately 60-80 strokes per minute. Perform this on both sides for 2 minutes each.

    3. PC7, Daling (大陵) — Wrist Pain and Sleep Improvement

    Location: This acupoint belongs to the Pericardium meridian and is located at the center of the wrist crease on the palm side. When you slightly extend your wrist, you will see two tendons on the inner side of the wrist, and Daling is located directly between them. When you bend your fingers toward the wrist, a crease appears, and Daling is at the center of that crease.

    Benefits: PC7 is effective for wrist pain, arm numbness, and improving insomnia and anxiety. It is particularly useful when wrist pain interferes with sleep, and it also has a calming effect on the mind.

    Technique: Press vertically with your thumb. Press and release repeatedly for 3-5 seconds at an intensity with slight discomfort. Particularly if you stimulate this for 1-2 minutes before bed, it can also help improve sleep.

    4. LI4, Hegu (合谷) — A Master Acupoint for Whole-Body Pain Relief

    Location: This acupoint belongs to the Large Intestine meridian and is located in the bony space between the thumb and index finger (between the 1st and 2nd metacarpal bones). When you open your hand, it is located on the back of the hand between the thumb and index finger, at the point above the muscle (first dorsal interosseous muscle) that rises when you bring your fingers together.

    Benefits: LI4 is called the “master acupoint for whole-body pain relief” and alleviates not only wrist pain but also headaches, neck pain, elbow pain, and various other pain throughout the body. It is also widely used for colds, fever, and stress relief.

    Technique: Press with the thumb of your opposite hand using moderate to strong pressure. Repeat pressing and releasing for 5-10 seconds, doing this 3-5 times. When pressing, you should feel an “achy but refreshing” sensation for the technique to be effective. Perform this on both hands for 2-3 minutes each.

    5. TE5, Waigguan (外關) — Forearm and Lateral Wrist Pain

    Location: This acupoint belongs to the Triple Burner meridian and is located approximately 2-3cm above the wrist crease on the back of the wrist toward the forearm. It is in the same area as TE5 but more precisely positioned closer to the radius (thumb bone). When you slightly extend your wrist, it is located above the space between the two bones on the back of the wrist, going up toward the forearm.

    Benefits: TE5 alleviates lateral forearm pain, lateral wrist pain, and stiffness in the neck. It is particularly effective when experiencing lateral wrist pain from mouse use.

    Technique: Press with your thumb at a right angle. Repeat pressing and releasing for 3-5 seconds using medium pressure. Perform this on both hands for 2-3 minutes each, 2-3 times a day.

    5-Minute Self-Acupressure Routine — A Simple Program You Can Do at the Office

    Preparation (30 seconds): Sit in a comfortable position and rest both hands on the desk. Take 3-4 slow, deep breaths before starting.

    Acupoint 1: TE5 (1 minute): Start with the left hand TE5. Repeat pressing for 30 seconds with your thumb, then perform the same technique on the right hand for 30 seconds.

    Acupoint 2: PC6 (1 minute): Stimulate the left hand PC6 by rubbing for 30 seconds, then perform the same on the right hand for 30 seconds.

    Acupoint 3: PC7 (1 minute): Repeat pressing the left hand PC7 for 30 seconds, then perform the same on the right hand for 30 seconds.

    Acupoint 4: LI4 (1 minute): Repeat pressing the left hand LI4 strongly for 30 seconds, then perform the same on the right hand for 30 seconds.

    Acupoint 5: TE5 (1 minute): Repeat pressing the left hand TE5 for 30 seconds, then perform the same on the right hand for 30 seconds.

    Cool-down (1 minute): Gently shake both hands and slowly rotate your wrists clockwise and counterclockwise. For even better results, immerse your wrists in cold water for 3-5 seconds and then wrap them with a warm towel.

    Recommended Times: Right after waking in the morning, 1 hour after lunch, and after leaving work in the evening—three times a day is ideal. When symptoms are severe, you can do this 4-5 times a day, but avoid excessive stimulation.

    Additional Tips for Wrist Pain Acupoint Acupressure

    Use Heat Therapy: Soaking your wrist in warm water for 1-2 minutes or applying a warm compress before acupressure can improve blood circulation and enhance the acupressure effects.

    Correct Intensity: Acupoint acupressure is most effective at an intensity that is “achy but refreshing.” Avoid excessive stimulation, and stop immediately if pain worsens.

    Maintain Consistency: Acupoint acupressure shows minimal effects from just one or two sessions. You need to perform it consistently for at least 2-3 weeks to feel improvement.

    Combine with Other Treatments: Acupoint acupressure is even more effective when combined with wrist stretching, physical therapy, and lifestyle improvements.

    ⚠️ Medical Disclaimer: This article is written for informational health purposes and does not replace professional medical diagnosis or treatment. If wrist pain persists for more than 2 weeks, or if severe pain, swelling, numbness, or weakness is present, please consult a medical professional (doctor, orthopedic specialist, or acupuncturist). This is especially important if you have or suspect an underlying condition such as carpal tunnel syndrome or rheumatoid arthritis.
    🤰 Pregnancy Warning: Among the acupoints introduced above, LI4 should be avoided during pregnancy as it can trigger uterine contractions. TE5, PC6, PC7, and TE5 are relatively safer; however, if you are pregnant or may be pregnant, please consult with an acupuncturist or medical professional before performing these techniques.
  • تقوية المناعة الضعيفة: 5 نقاط ضغط تعمل بالفعل

    تقوية المناعة الضعيفة: 5 نقاط ضغط تعمل بالفعل

    One-line summary: Stimulating five acupressure points—Zusanli (ST36), Qihai (CV6), Fengchi (GB20), Sanyinjiao (SP6), and Hegu (LI4)—for 3 minutes daily can boost immunity and help prevent colds.

    Introduction

    Catching a cold with every weather change, taking a long time to recover once sick, and experiencing constant fatigue and lack of energy—these are typical symptoms of weakened immunity. Modern people are experiencing declining immunity due to stress, irregular lifestyles, and sleep deprivation.

    In Traditional Chinese Medicine, this weakened immunity is seen as a state of insufficient Qi (vital energy). Fortunately, our body has special acupoints that can boost immunity. When you stimulate these acupoints, you can awaken your body’s natural healing ability and strengthen immunity. Revitalize your immune system through acupressure therapy that requires only your fingers—no medication needed.

    The Five Key Acupoints for Boosting Immunity

    1. Zusanli (ST36) — The Summit of Immunity

    ST36 acupuncture point

    Location: About 10 cm below the kneecap, on the outer side of the tibia. It’s approximately four finger-widths below the depression beneath the knee (Yanglingquan).

    Acupressure Technique: Use your thumb to slowly press in circular motions. Press for 3 seconds while exhaling, then release over 1 second. Stimulate each leg for 3 minutes, twice daily.

    Benefits: Known as the “leg’s tonic,” Zusanli simultaneously enhances digestion, blood circulation, and immunity. It’s most effective for preventing colds, recovering from fatigue, and boosting overall vitality. Ancient physicians believed that stimulating Zusanli alone was enough to maintain health.

    2. Qihai (CV6) — The Center of Yuan Qi Strengthening

    Location: About 1.5 cm (one finger-width) below the navel. It’s precisely the storage site of Qi on the Conception Vessel.

    Acupressure Technique: Use warm fingers to relax your abdomen, then gently press with the pad of your thumb. Make circular motions clockwise for 1 minute, twice daily—morning and evening.

    Benefits: Qihai is where your body’s Yuan Qi (original life energy) gathers. Stimulating it activates energy throughout your body, improves digestion, and promotes rapid recovery from fatigue. It’s the premier acupoint for activating your entire immune system.

    3. Fengchi (GB20) — The Shield Against Colds

    GB20 acupuncture point

    Location: In the hollows at the base of the skull where the large neck muscle (trapezius) meets. It’s about 2 cm to either side, below the most prominent vertebra when bending the neck forward.

    Acupressure Technique: Using both thumbs, gently press and make slow circular motions. Stimulate both sides simultaneously or one side at a time for 1 minute each, twice daily. Be careful not to press too hard, as excessive pressure can cause headaches.

    Benefits: Fengchi means “the gate that blocks external evil wind.” It improves blood circulation around the neck, strengthens the respiratory system, and defends against cold virus invasion. Regular stimulation during seasonal changes provides excellent cold prevention.

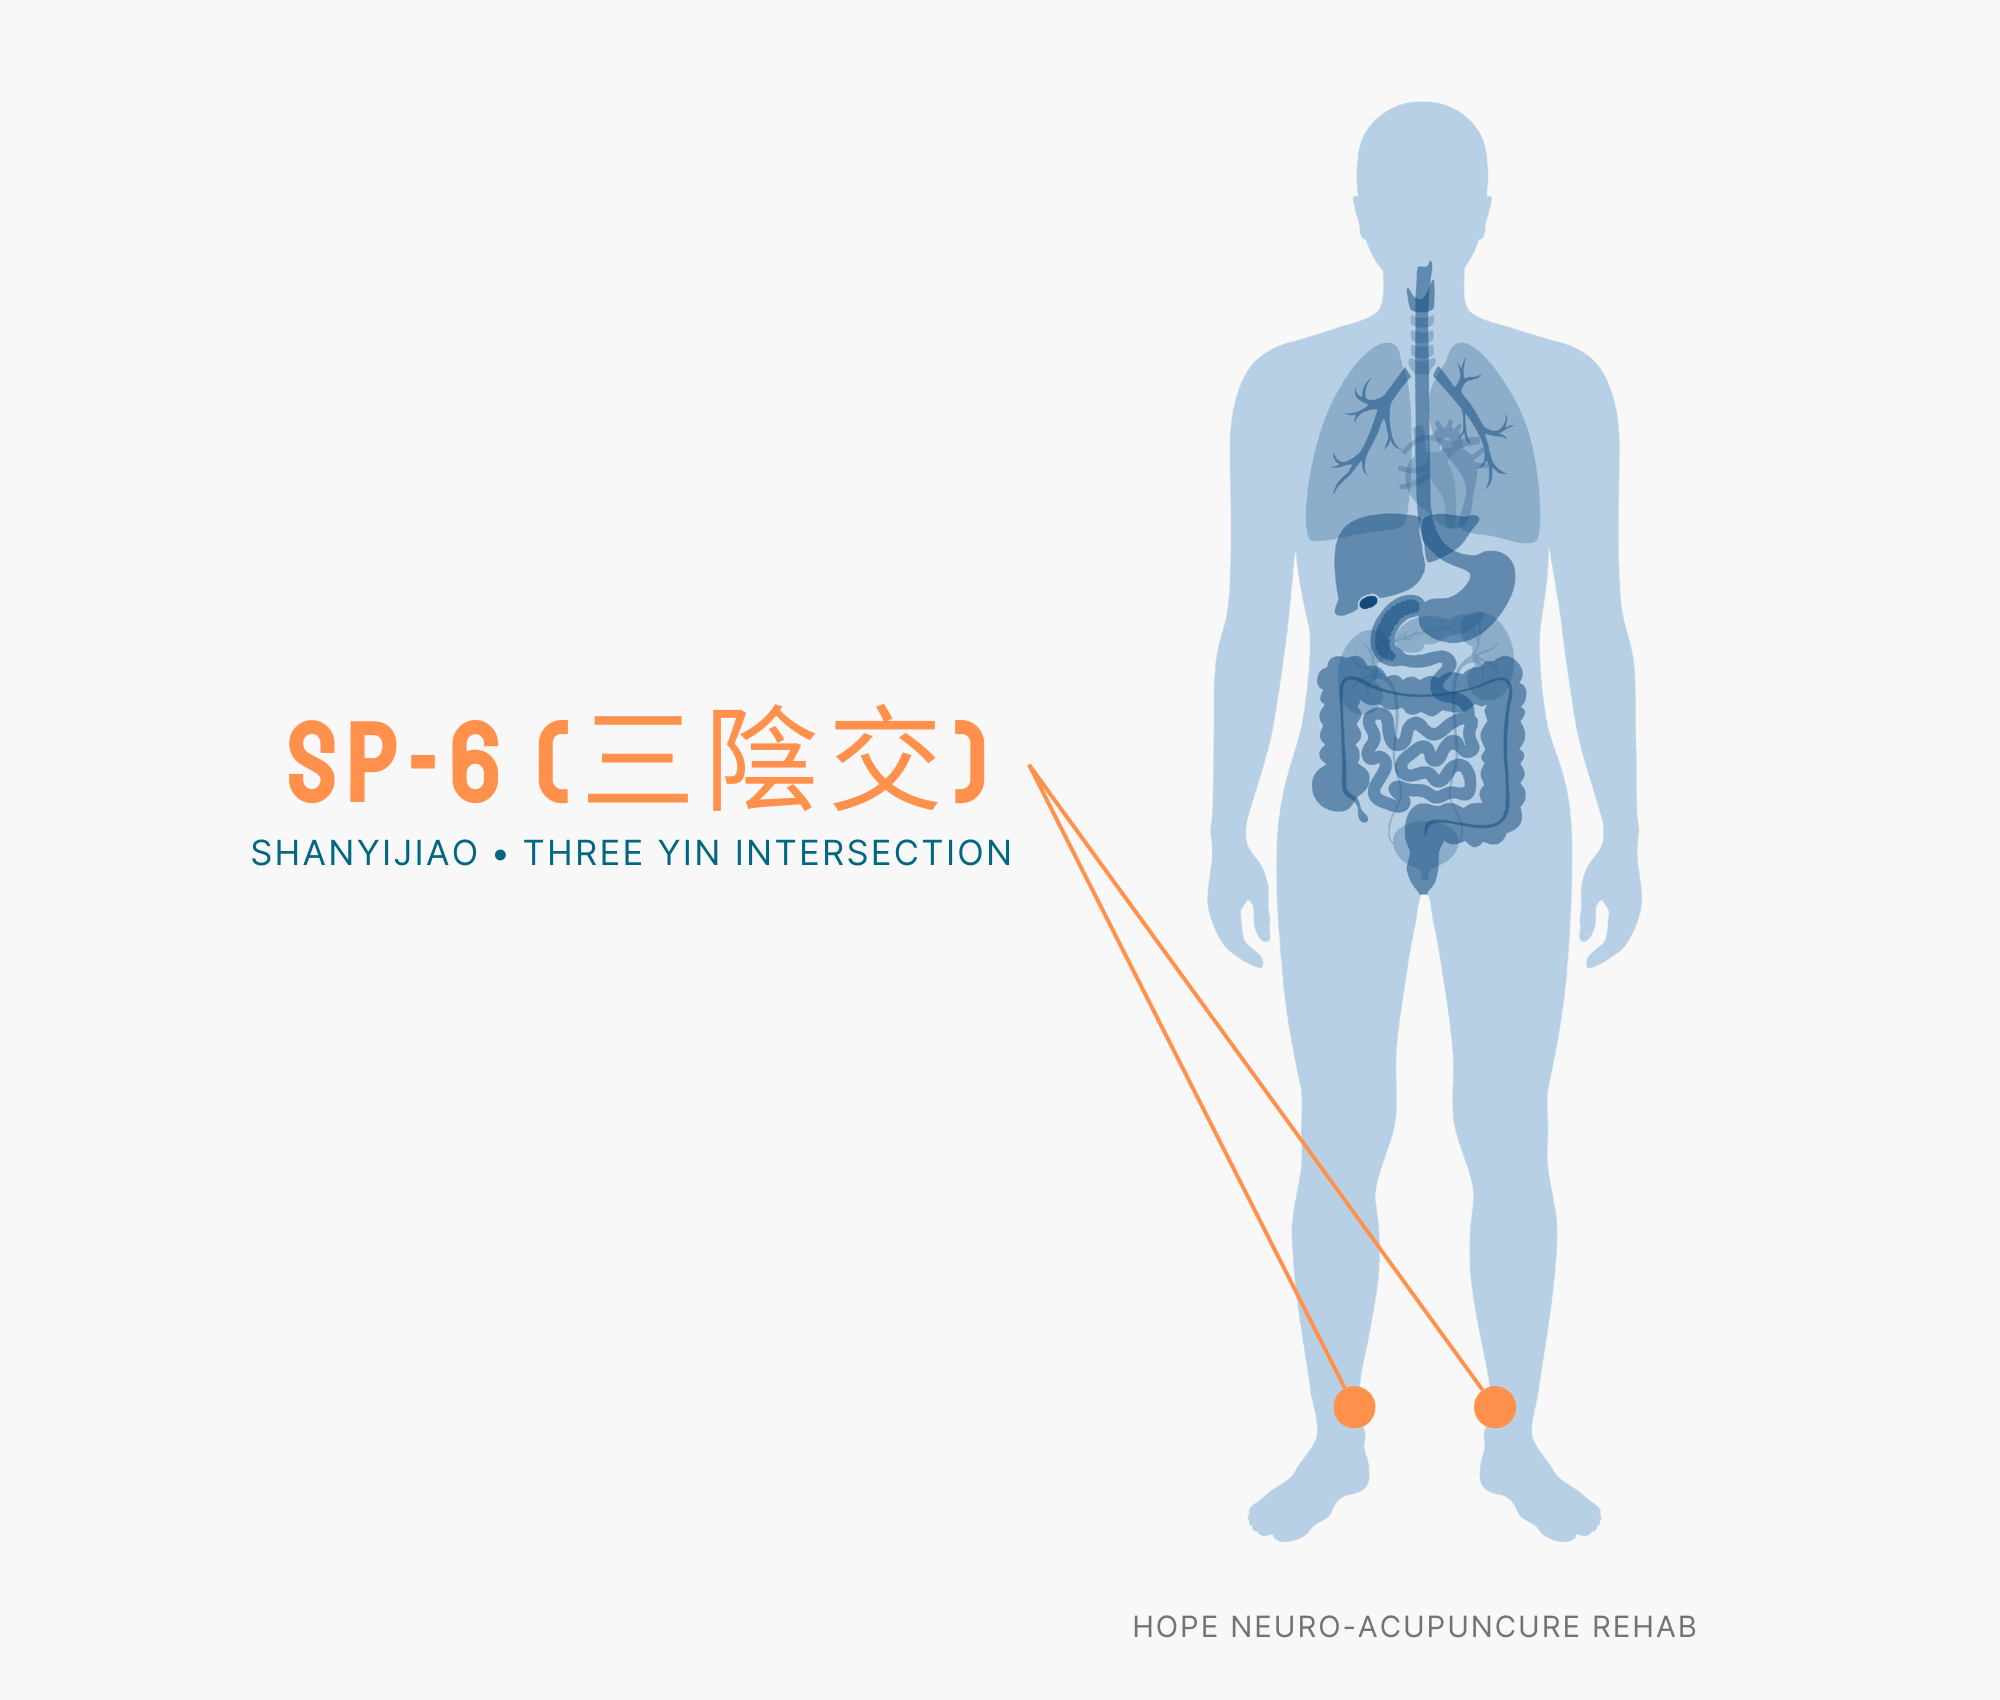
    4. Sanyinjiao (SP6) — The Crossroads of Internal Circulation

    SP6 acupuncture point

    Location: About 10 cm (four finger-widths) above the inner ankle bone, on the inner edge of the tibia. It’s in the depression behind the tibia.

    Acupressure Technique: Press slowly with your thumb, using a rhythm of 3 seconds of pressure followed by 1 second of rest. Stimulate each leg for 3 minutes. The effects are enhanced when stimulated in the evening (5-7 PM).

    Benefits: Sanyinjiao, where the Spleen, Liver, and Kidney meridians converge, regulates blood circulation, metabolism, and hormone balance. It’s highly effective for improving digestive problems, skin issues, and fatigue caused by weakened immunity.

    5. Hegu (LI4) — The Specific Remedy for Pain and Fatigue

    LI4 acupuncture point

    Location: In the webbing between the thumb and index finger on the back of the hand, at the point where the bones meet. It’s the highest point when tracing along the index finger bone toward the thumb.

    Acupressure Technique: Use the opposite thumb to press slowly. You should feel a slight, pleasant soreness (“refreshing soreness”) for the technique to be effective. Stimulate both hands simultaneously for 3 minutes each, 2-3 times daily.

    Benefits: Hegu affects the entire body through the Large Intestine meridian. It’s most effective for strengthening immunity, alleviating cold symptoms, and eliminating headaches and fatigue. It’s easy to stimulate anywhere, making it excellent for stress relief.

    5-Minute Self-Acupressure Routine — Start Every Morning

    This 5-minute routine can be done even during a busy morning. Consistent, regular practice is most important.

    1. Qihai (CV6) – 1 minute : Rub your hands together until warm, then massage your abdomen in clockwise circles. This is the opening stage to awaken your Yuan Qi.
    2. Hegu (LI4) – 1 minute : Stimulate both hands simultaneously. It clears your mind and improves focus.
    3. Zusanli (ST36) – 2 minutes : Sitting or lying down, stimulate each leg for 1 minute. Allocate generous time for this most important acupoint.
    4. Fengchi (GB20) – 0.5 minutes : Gently use both thumbs. Keep stimulation brief to avoid causing headaches.
    5. Sanyinjiao (SP6) – 0.5 minutes : While sitting, quickly stimulate both ankles.

    Best Time: The best time is within 30 minutes of waking up in the morning. For doubled immunity-boosting effects, do the routine again in the evening (5-7 PM).

    Lifestyle Habits to Enhance Acupressure Effectiveness

    • Adequate sleep: 7-8 hours daily. Sleeping before 11 PM helps recover immunity.
    • Warm water: Drinking warm water after stimulation enhances blood circulation.
    • Immunity-boosting foods: Frequently consume foods that enhance immunity, such as mushrooms, red ginseng, Chinese yam, and black beans.
    • Light exercise: Gentle activities like walking, yoga, and stretching enhance immunity.
    • Stress management: Reduce stress through meditation, breathing exercises, and mindfulness.
    ⚠️ Medical Disclaimer: This article is written for informational purposes about health and does not replace professional medical diagnosis or treatment. If symptoms persist or are severe, consult a healthcare professional.
    🤰 Pregnancy Warning: Among the acupoints above, Sanyinjiao (SP6) and Hegu (LI4) may trigger uterine contractions in pregnant women. If you are pregnant or could be pregnant, consult a professional before using these points.
  • أفضل 5 نقاط ضغط للغثيان (مع المواقع الدقيقة)

    أفضل 5 نقاط ضغط للغثيان (مع المواقع الدقيقة)

    One-line summary: Vomiting can be relieved by acupoint pressing of acupoints such as Neiguan, Hegu, and Zusanli to regulate gastrointestinal function and alleviate nausea.

    Introduction

    Sudden vomiting, dizziness, and nausea from digestive discomfort are uncomfortable symptoms that interfere with daily life. Especially when it’s difficult to take medicine or quick relief is needed, wouldn’t it be great to have a method you can do without moving from your seat?

    Traditional Chinese medicine views vomiting as an imbalance in the digestive system and believes that stimulating specific acupoints can calm the gastric nerves and normalize gastric peristalsis. Scientific research has also published results showing that stimulation of specific acupoints (particularly the Neiguan acupoint) alleviates chemotherapy-induced nausea. In this article, we’ll introduce the 5 most effective acupoints for relieving vomiting and self-massage techniques.

    5 Acupoints for Relieving Vomiting

    1. Neiguan (PC6, Neiguan) — The Strongest Barrier Against Nausea

    PC6 acupuncture point

    Location: On the inner wrist, located between the two tendons at the center of the forearm, about two finger-widths above the wrist crease. (About 5cm up from the inner wrist crease in the direction of the elbow)

    Benefits: Neiguan is the most well-researched acupoint for improving nausea and digestive discomfort. It directly regulates gastric nerves to suppress the gag reflex and is also effective for dizziness and nausea. It is widely used to relieve morning sickness during pregnancy.

    Technique: Using your thumb, apply pressure at a level where you feel slight discomfort and press for 3-5 seconds, then slowly release. Repeat this process for 1-2 minutes on each hand, doing both hands. Even when there is no discomfort, you can apply pressure every 5 minutes for prevention.

    2. Hegu (LI4, Hegu) — Normalizing Overall Digestive Function

    LI4 acupuncture point

    Location: Between the thumb and index finger, at the highest point of the hand (bone intersection). It’s the indented area between the thumb and index finger when your hand is open.

    Benefits: An important acupoint of the Large Intestine meridian, it regulates overall digestive function. It improves not only vomiting but also various digestive symptoms such as constipation and diarrhea, and also has pain-relieving effects. It’s a multipurpose acupoint that enhances overall bodily function.

    Technique: Apply pressure using the thumb of the opposite hand. Press for 10-15 seconds at a level where you feel slight discomfort, and repeat with 2-3 second rest periods. It’s effective to practice for 2 minutes on each hand.

    ⚠️ Caution: Pregnant women should consult with a traditional Chinese medicine doctor before practicing this, as there is a risk of uterine contractions.

    3. Zusanli (ST36, Zusanli) — Fundamentally Strengthening Digestive Power

    ST36 acupuncture point

    Location: About 4 cun (approximately 10cm) below the knee, on the outer side of the shinbone. It’s located about 10cm down from the outer indented area of the knee toward the ankle.

    Benefits: The most important acupoint for the gastrointestinal system, it fundamentally strengthens digestive function. It improves chronic vomiting, poor digestion, and fatigue, and regular acupressure increases digestive system resilience. It also has excellent preventative effects for vomiting.

    Technique: Sit comfortably and extend one leg. Apply pressure with your thumb or finger joint for 30 seconds to 1 minute at a level where you feel slight discomfort. Practice on each leg for 2-3 minutes. Heat therapy (moxibustion) is also effective.

    4. Zhongwan (CV12, Zhongwan) — Regulating the Gastric Center

    Location: Above the navel, located about 4 cun (10cm) above the xiphoid process (the border between the chest and abdomen). More precisely, it’s at the midpoint between the navel and the xiphoid process.

    Benefits: A central gastric acupoint on the Conception Vessel meridian, it directly regulates stomach function. It quickly alleviates poor digestion, abdominal bloating, and vomiting, and normalizes gastric acid secretion. It’s particularly effective for vomiting from food poisoning or overeating.

    Technique: Lie down comfortably and relax your abdomen. Gather three fingers and gently massage the Zhongwan area in circular motions. Massage slowly 50-100 times in a clockwise direction, or directly apply pressure with your thumb for 30 seconds to 1 minute.

    5. Taichong (LR3, Taichong) — Relieving Stress-Related Vomiting

    Location: On the top of the foot, in the indented area between the big toe and the second toe. It’s about 2 cun (5cm) up from between the toe bases on the top of the foot.

    Benefits: An important acupoint on the Liver meridian, it effectively alleviates vomiting caused by stress and tension. It improves digestive function along with emotional stability and also helps with nausea from headaches or fatigue. It’s particularly recommended for nervous digestive discomfort.

    Technique: Sit and place one foot on your knee. Using your thumb, press for 10-15 seconds at a level where you feel slight discomfort, and repeat with rest periods. By practicing on each foot for 2-3 minutes, you can feel emotional stability along with vomiting relief effects.

    ⚠️ Caution: Pregnant women should consult with a traditional Chinese medicine doctor before practicing this, as there is a risk of uterine contractions.

    5-Minute Self-Massage Routine

    Emergency vomiting situation — Order to relieve in 5 minutes:

    1. Neiguan (1 minute) — 30 seconds on each hand, highest priority for suppressing nausea
    2. Hegu (1 minute) — 30 seconds on each hand, overall digestive regulation
    3. Zhongwan (1.5 minutes) — Circular massage 50-100 times with three fingers, direct stimulation of the gastric center
    4. Zusanli (1.5 minutes) — 45 seconds on each leg, fundamental strengthening of digestive power

    Daily prevention routine — 5 minutes every morning:

    By proceeding in the order of Neiguan 1 minute → Hegu 1 minute → Zhongwan 1.5 minutes → Zusanli 1.5 minutes, you can prevent vomiting recurrence in advance. It’s especially recommended to practice daily for those with weak digestion or frequent dizziness.

    ⚠️ Medical Disclaimer: This article is written for informational purposes and does not substitute for professional medical diagnosis or treatment. If vomiting persists or is severe, is accompanied by abdominal pain, or includes blood, please consult with a healthcare professional (doctor or traditional Chinese medicine doctor). Especially children, elderly individuals, and those with chronic conditions should practice under professional guidance.
    🤰 Pregnancy Caution: Among the acupoints above, Hegu (LI4) and Taichong (LR3) can cause uterine contractions in pregnant women. If you are pregnant or could be pregnant, avoid these two acupoints and practice only Neiguan, Zusanli, and Zhongwan, or consult with a traditional Chinese medicine doctor before practicing. If the goal is to relieve morning sickness, Neiguan acupressure alone is sufficiently effective.
  • أفضل 5 نقاط ضغط لوجع الأسنان (مع المواقع الدقيقة)

    أفضل 5 نقاط ضغط لوجع الأسنان (مع المواقع الدقيقة)

    One-line summary: Precisely stimulating five acupoints—Hegu (LI4), Jiache (ST6), Xiaguan (ST7), Yingxiang (LI20), and Sanjian (LI3)—can alleviate acute tooth pain within 5-15 minutes.

    Introduction

    Few pains are as unbearable as a sudden toothache. Many people experience pain that strikes in the middle of the night or suffer while waiting for a dental appointment. Modern medicine and traditional Chinese medicine have long recommended acupoint stimulation for relieving facial pain. In particular, acupoints around the face have rich nerve distribution, so acupressure alone can provide quick relief. In this article, we’ll introduce five of the most effective acupoints for toothache relief and the correct acupressure techniques.

    Five Acupoints Effective for Toothache

    1. Hegu (LI4) — The Starting Point for Pain Relief

    LI4 acupuncture point

    Location: This point is located where the thumb and index finger meet, at the highest part of the muscle between the fingers. When your palm faces up, it’s located in the webbing between the thumb and index finger.

    Acupressure Technique: Using the thumb of the opposite hand, press firmly on the Hegu point and hold for 10 seconds, then slowly release. Repeat this 10 times, and perform the same technique on both hands. The pressure intensity should be firm enough to feel slight discomfort.

    Effects: As a primary acupoint on the Large Intestine meridian, it’s excellent for relieving pain throughout the face. It’s especially widely used for alleviating tooth pain, jaw pain, and headaches. It’s effective not only for toothaches but also for migraines and trigeminal neuralgia.

    2. Jiache (ST6) — The Specialty Acupoint for Jaw Pain

    ST6 acupuncture point

    Location: Located about 1cm above the lower jaw edge in the direction of the ear. It’s positioned directly above where the masseter muscle (chewing muscle) protrudes when your mouth is closed.

    Acupressure Technique: Locate the Jiache point with your index or middle finger, then apply pressure at a slight angle toward the ear. Press firmly for 10 seconds, then massage in circular motions about 10 times before slowly releasing. Perform this on both sides of the jaw.

    Effects: As an acupoint on the Stomach meridian, it’s especially effective for jaw joint pain and tooth pain around the lower teeth. Stimulating this point relieves muscle tension around the jaw, quickly alleviating pain.

    3. Xiaguan (ST7) — The Special Remedy for Lower Tooth Pain

    ST7 acupuncture point

    Location: Located in the depression below the cheekbone, approximately 1cm below the ear in the direction of the lower jaw. It’s positioned directly in front of where the joint moves when you slightly open your mouth.

    Acupressure Technique: Locate Xiaguan with your index or middle finger, then apply vertical downward pressure and press for 10 seconds. Perform circular massage motions 10-15 times, then slowly release. Repeat on both sides.

    Effects: As a primary acupoint on the Stomach meridian, it’s especially effective for lower incisor pain and jaw pain. It’s even more effective when stimulated together with Jiache (ST6).

    4. Yingxiang (LI20) — Relief for Pain Around the Nose and Mouth

    LI20 acupuncture point

    Location: Located in the area where the wrinkle beside the nostril deepens, slightly below the outer corners of the nose. It’s at the point where a vertical line drawn upward from the corner of the mouth meets this area.

    Acupressure Technique: Locate Yingxiang simultaneously with both index fingers, then apply pressure at a slight angle toward the nostrils and press for 10 seconds. Perform circular massage motions 10-15 times, then slowly release. Use light pressure since this area is sensitive.

    Effects: As an acupoint on the Large Intestine meridian, it’s effective for relieving tooth pain in the upper incisors and around the nose. It’s particularly beneficial for toothaches caused by maxillary swelling or those associated with sinusitis.

    5. Sanjian (LI3) — The Emergency Acupoint on Your Hand

    LI3 acupuncture point

    Location: Located between the index and middle finger metacarpals on the back of the hand, in the area where hand creases appear. It’s directly below where your index finger touches when you make a fist.

    Acupressure Technique: Locate the Sanjian point with the thumb of the opposite hand and press vertically for 10-15 seconds. Repeat this 5-10 times, then massage by moving your finger up and down. Perform this on both hands.

    Effects: As an acupoint on the Large Intestine meridian, when used together with Hegu (LI4), the pain-relieving effect is doubled. It’s very useful in emergencies since it can be easily stimulated anytime and anywhere.

    5-Minute Self-Acupressure Routine

    When toothache strikes suddenly, follow this routine in order:

    1. Hegu Acupressure (1 minute) — 30 seconds on each hand, medium-to-firm pressure
    2. Jiache Acupressure (1 minute) — 30 seconds on each side of the jaw, being mindful of the jaw joint
    3. Xiaguan Acupressure (1 minute) — 30 seconds on each side, maintaining downward pressure
    4. Yingxiang Acupressure (1 minute) — 30 seconds simultaneously on both sides, light pressure
    5. Sanjian Acupressure (1 minute) — 30 seconds on each hand, final step

    Tip: After performing the routine once, wait about 15 minutes and repeat if necessary. You can repeat up to 3-4 times per day.

    ⚠️ Medical Disclaimer: This article is written for informational health purposes and does not replace professional medical diagnosis or treatment. If symptoms persist or are severe, please consult a healthcare professional.
    🤰 Pregnancy Warning: Among the above acupoints, Hegu (LI4) and Xiaguan (ST7) can trigger uterine contractions in pregnant women. If you are pregnant or possibly pregnant, you must consult a professional before using these techniques. For pregnant women, it’s recommended to use only Yingxiang (LI20) and Jiache (ST6) acupressure.
  • ألم الفك؟ اضغط على هذه النقاط الـ 5 للحصول على راحة طبيعية

    ألم الفك؟ اضغط على هذه النقاط الـ 5 للحصول على راحة طبيعية

    “`html

    One-line summary: By applying acupressure to the Lower Jaw (ST7), Jaw Muscle (ST6), Temple (EX-HN5), Wind Pool (GB20), and Three Intervals (LI3) acupoints 2-3 times daily, you can relieve jaw muscle tension and alleviate temporomandibular joint pain.

    Introduction

    Does your jaw make a clicking sound when you chew, or do you feel pain when opening your mouth? Modern people frequently experience temporomandibular joint pain due to stress, poor posture, and teeth grinding. These symptoms can progress beyond simple discomfort and develop into chronic pain. Acupressure on meridian points in traditional medicine effectively relieves temporomandibular joint pain by relaxing tense muscles around the jaw joint and improving blood circulation. Here are 5 acupoints you can easily stimulate at home without medication.

    5 Acupoints for Temporomandibular Joint Pain Relief

    1. Lower Jaw (ST7, Xiaguan) — Key acupoint above the temporomandibular joint

    ST7 acupuncture point

    Location: The hollow depression below the cheekbone, on the upper part of the jawbone. This is the easiest acupoint to locate when your mouth is closed.
    WHO Code: ST7 (Stomach Meridian of Foot-Yangming)
    Acupressure technique: Repeatedly press slowly upward with your thumb for 3-5 seconds, then release. Be careful not to press too hard, as this can increase pain.
    Effects: Relieves tension around the temporomandibular joint and directly reduces pain with jaw movement. It is also related to facial neuralgia and headaches, making it effective for comprehensive pain relief in the facial area.

    2. Jaw Muscle (ST6, Jiache) — Relaxation point for lower jaw muscles

    ST6 acupuncture point

    Location: The edge of the lower jaw, at the muscle that bulges when clenching the teeth. It is approximately 2cm above the tip of the lower jaw.
    WHO Code: ST6 (Stomach Meridian of Foot-Yangming)
    Acupressure technique: Press simultaneously upward and inward using your index and middle fingers. Massage 3-5 times daily, 30 seconds per session for best results.
    Effects: Directly relieves excessive tension in the masticatory muscles, making it particularly effective for temporomandibular joint pain caused by teeth grinding or jaw clenching.

    3. Temple (EX-HN5, Taiyang) — Universal acupoint at the temple

    Location: Both temples, in the hollow depression approximately 1.5cm laterally from the end of the eyebrow.
    WHO Code: EX-HN5 (Extra-meridian acupoint)
    Acupressure technique: Simultaneously massage both sides with your thumbs in circular motions. Repeat 10 times clockwise and 10 times counterclockwise. Perform this in the morning upon waking and again in the evening for best results.
    Effects: Effective for headache and facial tension relief, while relaxing the temporal muscles connected to the temporomandibular joint. Particularly helpful for temporomandibular joint pain caused by stress.

    4. Wind Pool (GB20, Fengchi) — Connection point between the cervical spine and jaw

    GB20 acupuncture point

    Location: The back of the head, in the bilateral hollow depressions at the base of the neck. These are the two indented areas that become palpable when you bend your head forward.
    WHO Code: GB20 (Gallbladder Meridian of Foot-Shaoyang)
    Acupressure technique: Slowly press downward with your thumbs on both sides for 1-2 minutes. Maintain pressure until you feel the neck muscles relax.
    Effects: Relieves neck and shoulder tension, reducing stress transmitted to the temporomandibular joint. Effective for temporomandibular joint pain caused by cervical spondylosis or forward head posture.

    5. Three Intervals (LI3, Sangjian) — Remote treatment point on the hand

    LI3 acupuncture point

    Location: The webbing between the thumb and index finger on the hand, at the midpoint where the bones meet.
    WHO Code: LI3 (Large Intestine Meridian of Hand-Yangming)
    Acupressure technique: Press or massage in circular motions using the thumb of the opposite hand for 1-2 minutes. Treat both hands.
    Effects: Stimulates the Large Intestine meridian, which regulates digestive and facial-related nerves, alleviating systemic tension associated with temporomandibular joint pain. As a remote treatment point, you can stimulate it anytime, anywhere.

    5-Minute Self-Acupressure Routine

    Perform the following sequence daily, either morning or evening:

    1. Preparation (30 seconds): Sit comfortably and take 3 deep breaths
    2. Wind Pool (GB20) — 1 minute: Slow pressing with thumbs × 3 times
    3. Temple (EX-HN5) — 1 minute: Circular massage with both thumbs × 2 sets
    4. Lower Jaw (ST7) — 1 minute: Press upward with thumb and release × 5 times
    5. Jaw Muscle (ST6) — 1 minute: Massage upward with index and middle fingers × 30 seconds
    6. Three Intervals (LI3) — 1 minute: Press firmly with both thumbs × 30 seconds each
    7. Closing (30 seconds): Gently move your jaw 10 times, then take deep breaths

    ⏰ Total duration: Approximately 5-6 minutes
    💡 Tip: Warm compress therapy or applying a warm towel to the face before acupressure enhances the muscle-relaxing effects.

    🤰 Pregnancy Caution: The acupoints mentioned in this article (Lower Jaw, Jaw Muscle, Temple, Wind Pool) are generally safe; however, if you are pregnant or possibly pregnant, avoid strong stimulation and consult with a traditional medicine practitioner or obstetric specialist before proceeding.
    ⚠️ Medical Disclaimer: This article is provided for informational purposes and does not replace professional medical diagnosis or treatment. If temporomandibular joint pain persists for more than 3 weeks, you have difficulty opening your mouth, or your jaw frequently dislocates, please consult a dentist or orthopedic specialist. In particular, if pain develops after trauma, seek immediate medical attention.

    “`

  • أفضل 5 نقاط ضغط لآلام الرقبة من استخدام الهاتف (مع المواقع الدقيقة)

    أفضل 5 نقاط ضغط لآلام الرقبة من استخدام الهاتف (مع المواقع الدقيقة)

    “`html

    One-line summary: Stimulating five acupoints—GB20, BL10, GB21, LI4, and LR3—for 5 minutes daily can effectively relieve neck and shoulder pain caused by text neck.

    What is Text Neck Pain?

    With the increased use of smartphones and computers, the number of people suffering from text neck has significantly increased. Text neck is a condition where the neck is bent forward more than in a normal posture, placing continuous tension on the neck and shoulder muscles. This causes stiffness in the muscles around the cervical spine and nerve compression, resulting in various symptoms such as neck pain, shoulder tightness, headaches, and tingling in the arms. Traditional Chinese medicine believes that such neck pain can be alleviated through acupoint stimulation. Acupressure stimulates meridians to promote the circulation of qi and blood, relieve muscle tension, and is effective for pain relief and prevention.

    5 Effective Acupoints for Text Neck Pain

    1. GB20 (Fengchi) — The ‘Pain-Blocking Acupoint’ at the Back of the Neck

    GB20 acupuncture point

    Location: At the back of the neck, in the hollow area below the skull (on both sides of the boundary between the neck and head) | WHO Code: GB20

    Technique: Fix both thumbs on the GB20 acupoint and apply pressure upward for 2-3 seconds, then release. Repeat 10-15 times. It’s easier to locate the acupoint if you bend your neck slightly forward.

    Benefits: GB20 is an important meridian connecting the neck and head. Stimulating it promotes blood circulation around the neck and relieves muscle tension, simultaneously improving back-of-neck pain, headaches, and eye fatigue caused by text neck. It’s beneficial to stimulate this point frequently when your neck feels stiff in the afternoon.

    2. BL10 (Tianzhu) — The ‘Troublemaker Acupoint’ for Neck Pain

    BL10 acupuncture point

    Location: At the back of the neck, slightly below GB20, approximately 1.3 cm to the side of the center line at the back of the neck | WHO Code: BL10

    Technique: Place both thumbs on BL10 and slowly massage in circular motions 10-15 times. Alternatively, pressing with the thumbs for 2-3 seconds is also effective. Use a natural pressure level that creates a sensation of soreness.

    Benefits: BL10 directly alleviates stiffness in muscles around the cervical spine. It rapidly improves back-of-neck pain, stiff neck, and cervicogenic headaches, providing immediate relief for tension pain in the shoulders and neck caused by text neck.

    3. GB21 (Jianjing) — The ‘Emergency Acupoint’ for Shoulder-Neck Tension

    Location: At the midpoint where the neck and shoulder meet, at the highest point of the shoulder | WHO Code: GB21

    Technique: Pinch GB21 with the thumb and fingers of the opposite hand and apply pressure for 3-5 seconds. Repeat 10-15 times. Alternatively, pressing downward with the thumb is also effective.

    Benefits: The shoulder-neck boundary is the most tense area caused by text neck. Stimulating GB21 relieves widespread tension from the neck to the shoulders, improves blood circulation, and simultaneously resolves shoulder tightness, neck pain, and tingling sensations in the arms.

    4. LI4 (Hegu) — The ‘Universal Acupoint’ for Whole-Body Pain

    LI4 acupuncture point

    Location: In the center of the webbing between the thumb and index finger on the dorsum of the hand, in the hollow area | WHO Code: LI4

    Technique: Press LI4 firmly with the opposite thumb for 2-3 seconds, then release. Repeat 10-15 times. Pressure that creates slight discomfort is most effective. Stimulate both hands.

    Benefits: LI4 is the ‘king of pain relief’ that stimulates the nervous and immune systems. It comprehensively alleviates pain in the neck, shoulders, and arms, and also relieves muscle tension caused by stress. It also improves headaches and fatigue accompanying text neck pain.

    5. LR3 (Taichong) — The ‘Stress-Relief Acupoint’ for Whole-Body Relaxation

    Location: On the dorsum of the foot, in the center of the webbing between the big toe and second toe | WHO Code: LR3

    Technique: Apply pressure to LR3 with your thumb or a blunt object for 2-3 seconds, then release. Repeat 10-15 times. It’s important to stimulate both feet with equal pressure.

    Benefits: LR3 promotes relaxation throughout the entire body through the liver meridian. It alleviates muscle stiffness caused by stress and improves blood circulation, fundamentally resolving tension in the neck and shoulders. It’s particularly effective for text neck pain worsened by stress.

    5-Minute Self-Massage Routine

    Choose according to your situation:

    Quick Relief Mode (3 minutes):

    1. GB20 × 10 times (30 seconds)
    2. BL10 × 10 times (30 seconds)
    3. GB21 × 10 times (30 seconds)
    4. LI4 × 10 times (both hands, 1 minute)

    Complete Care Mode (5 minutes):

    1. GB20 × 15 times (1 minute)
    2. BL10 × 15 times (1 minute)
    3. GB21 × 15 times (1 minute)
    4. LI4 × 10 times (both hands, 1 minute)
    5. LR3 × 10 times (both feet, 1 minute)

    Recommended timing: After waking in the morning, around 3 PM after lunch, and after work in the evening, for a total of 1-2 times daily. With consistent daily practice, you can notice significant improvement within 1-2 weeks.

    ⚠️ Medical Disclaimer: This article is provided for informational purposes only and does not substitute for professional medical diagnosis or treatment. If symptoms persist or are severe, please consult with a healthcare professional.
    🤰 Pregnancy Warning: Of the acupoints mentioned above, LI4 and LR3 may trigger uterine contractions in pregnant women. If you are pregnant or may be pregnant, please consult with a healthcare professional before proceeding, and selectively use only GB20, BL10, and GB21.

    “`

  • تخفيف طنين الأذن: 5 نقاط ضغط تعمل بالفعل

    تخفيف طنين الأذن: 5 نقاط ضغط تعمل بالفعل

    “`html

    One-line summary: Tinnitus (ringing in the ears) can be alleviated by stimulating 5 acupoints—Tinghui, Yifeng, Fengchi, Baihui, and Kunlun—through regular acupressure, which promotes qi and blood circulation and stabilizes the nerves.

    Introduction: Understanding Tinnitus Symptoms and the Principles of Acupoint Treatment

    Are you bothered by unwanted sounds constantly ringing in your ears, disrupting your daily life? That’s tinnitus. It’s characterized by hearing ringing, buzzing, or hissing sounds in your ears even when there’s no external sound, and it can be accompanied by stress and anxiety.

    While modern medicine often finds it difficult to identify a clear cause of tinnitus, Traditional Chinese Medicine takes a different approach. It views tinnitus as resulting from insufficient qi and blood circulation, nervous sensitivity, and nerve fatigue caused by sleep deprivation, and believes it can be improved through stimulation of specific acupoints. In particular, stimulating the meridians (acupuncture channels) around the ear and those leading to the brain can calm the auditory nerve and improve blood circulation.

    The 5 Best Acupoints for Tinnitus Relief

    1. Tinghui (聽宮) – SI19 / Tinghui

    SI19 acupuncture point

    Location: In front of the ear, at the depression that appears when the mouth is closed (below the front of the earlobe).

    How to find it: Place your index fingers in front of your mouth, and when you open your mouth, the depressed point is Tinghui. It returns to prominence when you close your mouth.

    Acupressure technique: Using the tip of your thumb, apply gentle circular pressure for 30 seconds. Perform on both sides, 2-3 times per day.

    Benefits: Tinghui is a specific acupoint for ear disorders. It’s an essential point that directly alleviates tinnitus, hearing loss, and ear fullness, and is emphasized in classical Chinese acupoint texts.

    2. Yifeng (翳風) – TE17 / Yifeng

    TE17 acupuncture point

    Location: Below the ear, at the depression behind the earlobe (in the space between the mastoid bone and the jaw).

    How to find it: Press the earlobe with your finger and fold it backward; a deep groove will appear behind the ear. That’s where Yifeng is located.

    Acupressure technique: Apply gentle pressure with your thumb, using circular motions for 30 seconds, keeping the pressure within a range that doesn’t cause pain.

    Benefits: Yifeng is an essential point on the Triple Burner meridian (the channel that goes to the ear and face), relieving ear fatigue and stabilizing the auditory nerve. It’s effective for tinnitus, ear pain, and facial nerve paralysis.

    3. Fengchi (風池) – GB20 / Fengchi

    GB20 acupuncture point

    Location: At the back of the neck, below the base of the skull (at the depression between the neck muscles on both sides).

    How to find it: Tilt your head back to find the groove between two muscles; specifically, it’s at the movable bone beneath the skull.

    Acupressure technique: Using both thumbs, apply pressure toward the inside of the neck at a slight upward angle. Apply pressure for 30 seconds at each point, 3 times per day.

    Benefits: It promotes blood circulation to the brain and relieves nerve tension. It can simultaneously alleviate headaches, dizziness, and neck stiffness that often accompany tinnitus.

    4. Baihui (百會) – GV20 / Baihui

    Location: At the top of the head, at the point where the line connecting the highest points of both ears intersects with the midline.

    How to find it: Imagine a line connecting the highest points of both ears; where this line intersects the midline of the head is Baihui. When you press it with your finger, it feels slightly depressed.

    Acupressure technique: Using your thumb or middle finger, apply gentle pressure vertically, massaging in small circles for 20-30 seconds. Avoid excessive stimulation.

    Benefits: It calms brain nerves and clarifies the mind. It improves tinnitus, insomnia, and anxiety together, and is excellent for recovering from mental fatigue.

    5. Kunlun (崑崙) – BL60 / Kunlun

    BL60 acupuncture point

    Location: On the outer ankle, at the depression behind the outer ankle bone.

    How to find it: Kunlun is located in the groove between the outer ankle bone (lateral malleolus) and the Achilles tendon.

    Acupressure technique: Using your thumb, repeatedly press vertically toward the ankle and release for 1 minute. Apply enough stimulation to feel mild tenderness. Perform 1-2 times per day.

    Benefits: It relieves nerve tension and improves qi and blood circulation throughout the body. In particular, it relieves nerve fatigue in the ear and prevents tinnitus from worsening due to sleep deprivation.

    5-Minute Self-Acupressure Routine: Optimal Sequence and Time Distribution

    Perform the following sequence every morning after waking up or every evening before sleep:

    1. Tinghui (1 minute) — 30 seconds on each side, gentle circular pressure
    2. Yifeng (1 minute) — 30 seconds on each side, light to moderate pressure
    3. Fengchi (1 minute) — 30 seconds on each side, pressing toward the brain
    4. Baihui (1 minute) — 30 seconds centered on the midline
    5. Kunlun (1 minute) — 30 seconds on each side, stimulate to mild tenderness

    Tip: Perform this routine consistently 5-6 days per week, and do it twice daily (morning and evening) on days when symptoms are severe. You should continue for at least 3 months to notice the effects.

    ⚠️ Medical Disclaimer: This article is provided for informational purposes only and does not replace professional medical diagnosis or treatment. If tinnitus develops suddenly, is severe, is accompanied by hearing loss, or persists, please consult a specialist at an ENT clinic or Traditional Chinese Medicine clinic. A proper diagnosis is especially important to rule out the possibility of tinnitus caused by a brain tumor or vascular disease.
    🤰 Pregnancy Warning: Among the acupoints above, Kunlun (BL60) and Fengchi (GB20) may trigger uterine contractions in pregnant women. If you are pregnant or may be pregnant, avoid these two acupoints and perform only Tinghui, Yifeng, and Baihui, or consult a specialist before proceeding.

    “`

  • أفضل 5 نقاط ضغط لالتخفيف من الصداع التوتري (مع المواقع الدقيقة)

    أفضل 5 نقاط ضغط لالتخفيف من الصداع التوتري (مع المواقع الدقيقة)

    One-line summary: Tension headaches are primarily caused by poor blood circulation due to stiffness in the neck and scalp muscles, and stimulating five acupoints—GB20, LI4, Taiyang, GV20, and BL10—can provide immediate relief.

    Introduction: Resolve Tension Headaches with Acupoints

    Tension headaches are a chronic problem for modern people. Do you experience that bothersome pain that arrives in the afternoon, that urge to press your neck and head? Tension headaches occur when the muscles in the neck, shoulders, and scalp become excessively contracted due to stress and poor posture. As blood circulation within the muscles decreases and metabolic waste accumulates, the pain worsens.

    Traditional Chinese medicine views tension headaches as resulting from insufficient qi and blood circulation in the neck and head, and promotes muscle relaxation and blood circulation by stimulating specific acupoints. I’ll now introduce the secret to achieving immediate pain relief by investing just 5 minutes with a single finger, without medication.

    Acupoint 1: Fengchi (GB20)

    Location: On both sides of the back of the neck where the neck and head meet. It’s the indented area just above the hairline.

    Acupressure technique: Using both thumbs, press slightly upward while rubbing in circular motions 10-15 times. You can also repeat the pressing motion for 3-5 seconds, 10 times.

    Benefits: GB20 is known as the acupoint that “relieves neck tension” and directly alleviates muscle stiffness in the neck. It’s the most powerful acupoint for simultaneously relieving occipital and temporal headaches, neck stiffness, and back-of-neck tension.

    Acupoint 2: Hegu (LI4)

    Location: In the webbing between the thumb and index finger, at the indented area slightly below the end of the thumb bone, toward the index finger.

    Acupressure technique: Using your opposite thumb, apply firm pressure for 30 seconds to 1 minute, then release. Repeat 5 times. Rubbing in circular motions slowly is also effective.

    Benefits: Known as the “universal remedy for all pain” in Oriental medicine, LI4 regulates nerve signal transmission to broadly relieve upper body pain including headaches, facial pain, and toothaches. It’s particularly effective for tension headaches caused by stress.

    Acupoint 3: Taiyang (Extra Point)

    Location: At the temple. It’s the indented area roughly midway between the eye and ear when pressed.

    Acupressure technique: Using your index and middle fingers together, rub slowly in circular motions 15-20 times. Maintain slight pressure while making small circular motions. You can also do 10 circles in one direction and 10 in the opposite direction.

    Benefits: This is a specialized acupoint for temporal (temple area) headaches. It’s especially effective when tension headaches occur on one side of the head, and it also helps with eye fatigue and vision improvement.

    Acupoint 4: Baihui (GV20)

    Location: At the crown of the head. It’s the intersection point where a line connecting the highest points of both ears meets a line through the center of the face. When pressed with a finger, it’s a slightly indented area.

    Acupressure technique: Overlap your middle fingers to stimulate the GV20 point. Repeat pressing for 3-5 seconds 10 times, while simultaneously rubbing in small circles. Be careful not to press too hard.

    Benefits: This acupoint, whose name means “resolves a hundred problems,” clears overall mental energy. It relieves headaches at the crown and throughout the head, while simultaneously alleviating fatigue and lethargy. It’s particularly beneficial for stress-related headaches.

    Acupoint 5: Tianzhu (BL10)

    Location: At the center of the back of the neck, slightly below GB20. It’s on the upper part of the muscles on both sides where the neck and shoulders meet.

    Acupressure technique: Using both thumbs, press firmly downward and hold for 5 seconds. Repeat 8-10 times. It’s even more effective if you simultaneously gently stretch by tilting your head backward.

    Benefits: BL10 is an acupoint that relieves severely stiffened muscles at the back of the neck. It simultaneously relieves occipital headaches, neck stiffness, and shoulder tension, while improving blood circulation to the brain to treat the root cause of headaches.

    5-Minute Self-Acupressure Routine—Quick and Effective Method

    Here’s a routine you can complete in 5 minutes when tension headaches appear during a busy day:

    • 1 minute (Preparation): Sit in a comfortable position and take 3 deep breaths, exhaling slowly. Slowly rotate your neck and shoulders left and right 2-3 times.
    • 1 minute (GB20): Stimulate GB20 with both thumbs. Apply firm pressure and massage in circles 10-15 times.
    • 1 minute (Taiyang + LI4): With one hand, rub your temple (Taiyang) in circles, while with the other hand, press LI4 firmly. After 30 seconds, switch hands.
    • 1 minute (GV20 + BL10): While gently pressing the crown of your head (GV20) with your middle fingers, strongly stimulate the back of your neck (BL10) with your thumbs. Repeat 10 times.
    • 1 minute (Finishing): Again, slowly rotate your neck left and right, and breathe deeply to release tension.

    Tip: By doing the routine once in the morning as prevention and twice in the afternoon when symptoms appear, you can stay free from headache worries all day.

    ⚠️ Medical Disclaimer: This article is written for educational and informational purposes and does not replace professional medical diagnosis or treatment. If symptoms persist or are severe, please consult a healthcare professional.
    🤰 Pregnancy Warning: Among the acupoints above, LI4, BL10, and GB20 may trigger uterine contractions in pregnant women. If you are pregnant or may be pregnant, be sure to consult with a professional before performing these techniques.
  • كوع لاعب التنس؟ اضغط على هذه النقاط الـ 5 للحصول على راحة طبيعية

    كوع لاعب التنس؟ اضغط على هذه النقاط الـ 5 للحصول على راحة طبيعية

    One-Line Summary: To relieve tennis elbow pain, apply acupressure daily for 3–5 minutes to five acupoints—Quchi (LI11), Waiguan (TE5), Hegu (LI4), Jiquan (LI10), and Tianjing (BL38). This promotes blood circulation and calms elbow inflammation.

    Introduction

    Tennis elbow causes pain on the outer side of the elbow from racket sports or repetitive arm movements. The pain is intense enough that it interferes with daily activities—doesn’t it? If you feel sharp pain every time you lift your wrist or grasp an object, acupoint stimulation may help. In traditional Chinese medicine, outer elbow pain is viewed as insufficient qi and blood circulation in the Large Intestine meridian. Stimulating acupoints along this pathway can promote blood circulation to the inflamed area and relieve muscle tension. Try managing your symptoms through self-acupressure at home, alongside professional medical care.

    Five Acupoints Explained

    1. Quchi (LI11) — The Most Direct Acupoint for Elbow Inflammation

    LI11 acupuncture point

    WHO Code: LI11 (Large Intestine 11)
    Location: When you bend your elbow, this acupoint is located at the outer end of the elbow crease. Using your thumb and index finger, follow the elbow fold outward to find a slight depression—that’s Quchi.
    Application Method: Using the tip of your thumb, gently apply circular pressure for 1 minute. Start with light pressure and gradually increase the intensity, aiming for about 70–80% of your pain tolerance. Repeat on the opposite arm.
    Benefits: Quchi is an important acupoint on the Large Intestine meridian that directly relieves elbow inflammation and promotes blood circulation in the upper arm. It should be your first choice when addressing tennis elbow symptoms.

    2. Waiguan (TE5) — Relieves Tension in the Forearm Muscles

    TE5 acupuncture point

    WHO Code: TE5 (Triple Burner 5)
    Location: On the back of the wrist (opposite side of the palm), moving upward toward the elbow, between the radius and ulna, approximately three finger-widths above the wrist crease. When your arm is extended on a flat surface, it’s on the centerline of the back of the wrist.
    Application Method: Using your thumb, slowly press and hold for 30 seconds, then release. Repeat this 2 times. Follow with circular friction for 1 minute. You may feel discomfort, so adjust the pressure to a comfortable level.
    Benefits: This acupoint relieves muscle tension in the forearm, reducing stress transmitted to the elbow. Improved blood circulation in the area between the wrist and elbow helps ease tennis elbow pain.

    3. Hegu (LI4) — Regulates Whole-Body Pain and Strengthens Immunity

    LI4 acupuncture point

    WHO Code: LI4 (Large Intestine 4)
    Location: In the webbing between your thumb and index finger, at the center of the area where the two fingers meet. It’s located above the visible crease when your fingers are together, at the outer boundary of the index finger bone.
    Application Method: Using the thumb of the opposite hand, locate Hegu and slowly press downward toward the base of the finger. Perform circular friction for 1 minute, then repeat strong pressure for 10 seconds, 3 times. Some initial tenderness or a fresh sensation is normal.
    Benefits: Hegu is a vital acupoint that regulates qi and blood circulation throughout the body, easing not just elbow inflammation but overall inflammatory responses. It strengthens immunity and blocks pain signals, accelerating tennis elbow recovery.
    ⚠️ Pregnancy Caution: Hegu can trigger uterine contractions in pregnant women. If you are pregnant or may be pregnant, consult a specialist before using this acupoint.

    4. Jiquan (LI10) — Restores Upper Arm Strength and Relieves Arm Fatigue

    LI10 acupuncture point

    WHO Code: LI10 (Large Intestine 10)
    Location: With your arm extended, it’s located at the midpoint between your elbow and shoulder, along the centerline of the outer upper arm. Find the midpoint between your shoulder and elbow with your arm at rest—it’s a tender point within the muscle.
    Application Method: Using your thumb, slowly press and hold for 30 seconds, then release. Repeat 3 times. Follow with circular friction for 1 minute. If the muscle feels knotted, you can increase pressure and massage more vigorously.
    Benefits: This acupoint relieves upper arm muscle fatigue and improves blood circulation, supporting overall arm strength recovery. It’s effective for restoring arm function weakened by tennis elbow and preventing recurrence.

    5. Tianjing (BL38) — Enhances Meridian Circulation Around the Elbow

    BL38 acupuncture point

    WHO Code: BL38 (Bladder 38)
    Location: Slightly above the back of the elbow (on the extension side), approximately one finger-width above the elbow crease. With your arm extended, it’s at the top outer edge of the elbow.
    Application Method: Using your thumb, slowly press vertically and hold for 20 seconds. Repeat 3 times. Follow with circular friction around the surrounding area (entire elbow region) for 1 minute. Comprehensive stimulation of the area around the elbow pain is most effective.
    Benefits: The Bladder meridian is a major meridian on the back of the body. Stimulating Tianjing relaxes the tightened fascia around the elbow and significantly improves local blood circulation.

    5-Minute Self-Acupressure Routine

    Total Time: 5 minutes (both arms)
    Best Timing: After waking in the morning, before bed, or when your arms feel fatigued

    1. Preparation (30 seconds) — Sit comfortably and extend both arms. Gently stretch your arm muscles to warm them up.
    2. Quchi Stimulation (60 seconds) — Apply circular pressure to Quchi on both arms for 30 seconds each using your thumb. Start gently and gradually increase intensity.
    3. Waiguan Stimulation (60 seconds) — Stimulate Waiguan on both arms for 30 seconds each. Alternate between pressing and circular friction.
    4. Hegu Stimulation (60 seconds) — Stimulate Hegu on both hands for 30 seconds each. Include 3 sets of 10-second strong pressure.
    5. Jiquan Stimulation (60 seconds) — Stimulate Jiquan on both arms for 30 seconds each. Apply stronger massage to areas with knotted muscles.
    6. Tianjing Stimulation (60 seconds) — Stimulate Tianjing and the surrounding elbow area on both sides for 30 seconds each. Provide comprehensive massage to the entire elbow region.
    7. Cool-Down (30 seconds) — Bring your arms to your chest and gently tap them. Perform stretches by lifting both arms overhead and lowering them, 2 times.

    Precautions: If pain is severe, reduce the intensity and repeat more frequently, but do not exceed 3–5 minutes per session. If you work outdoors or exercise, wait 30 minutes for your arms to cool before stimulating the acupoints.

    ⚠️ Medical Disclaimer: This article is provided for health information purposes and does not replace professional medical diagnosis or treatment. If tennis elbow symptoms persist for more than 2 weeks, are severe, or are accompanied by swelling, fever, or finger numbness, consult an orthopedic specialist or traditional Chinese medicine practitioner. Acupoint stimulation may be inappropriate depending on your individual health condition, so proceed only after professional evaluation.
    🤰 Pregnancy Caution: Among the acupoints above, Hegu (LI4) can trigger uterine contractions in pregnant women. If you are pregnant or may be pregnant, consult a traditional Chinese medicine practitioner or obstetrician before using this acupoint. Quchi, Waiguan, Jiquan, and Tianjing are generally safe, but contraindications may exist depending on your individual pregnancy status. It is recommended to proceed under professional guidance.