Author: Acu Master

  • 5 Acupoints for Low Immunity — Complete Self-Acupressure Guide

    5 Acupoints for Low Immunity — Complete Self-Acupressure Guide

    One-line summary: Stimulating five acupressure points—Zusanli (ST36), Qihai (CV6), Fengchi (GB20), Sanyinjiao (SP6), and Hegu (LI4)—for 3 minutes daily can boost immunity and help prevent colds.

    Introduction

    Catching a cold with every weather change, taking a long time to recover once sick, and experiencing constant fatigue and lack of energy—these are typical symptoms of weakened immunity. Modern people are experiencing declining immunity due to stress, irregular lifestyles, and sleep deprivation.

    In Traditional Chinese Medicine, this weakened immunity is seen as a state of insufficient Qi (vital energy). Fortunately, our body has special acupoints that can boost immunity. When you stimulate these acupoints, you can awaken your body’s natural healing ability and strengthen immunity. Revitalize your immune system through acupressure therapy that requires only your fingers—no medication needed.

    The Five Key Acupoints for Boosting Immunity

    1. Zusanli (ST36) — The Summit of Immunity

    ST36 acupuncture point

    Location: About 10 cm below the kneecap, on the outer side of the tibia. It’s approximately four finger-widths below the depression beneath the knee (Yanglingquan).

    Acupressure Technique: Use your thumb to slowly press in circular motions. Press for 3 seconds while exhaling, then release over 1 second. Stimulate each leg for 3 minutes, twice daily.

    Benefits: Known as the “leg’s tonic,” Zusanli simultaneously enhances digestion, blood circulation, and immunity. It’s most effective for preventing colds, recovering from fatigue, and boosting overall vitality. Ancient physicians believed that stimulating Zusanli alone was enough to maintain health.

    2. Qihai (CV6) — The Center of Yuan Qi Strengthening

    Location: About 1.5 cm (one finger-width) below the navel. It’s precisely the storage site of Qi on the Conception Vessel.

    Acupressure Technique: Use warm fingers to relax your abdomen, then gently press with the pad of your thumb. Make circular motions clockwise for 1 minute, twice daily—morning and evening.

    Benefits: Qihai is where your body’s Yuan Qi (original life energy) gathers. Stimulating it activates energy throughout your body, improves digestion, and promotes rapid recovery from fatigue. It’s the premier acupoint for activating your entire immune system.

    3. Fengchi (GB20) — The Shield Against Colds

    GB20 acupuncture point

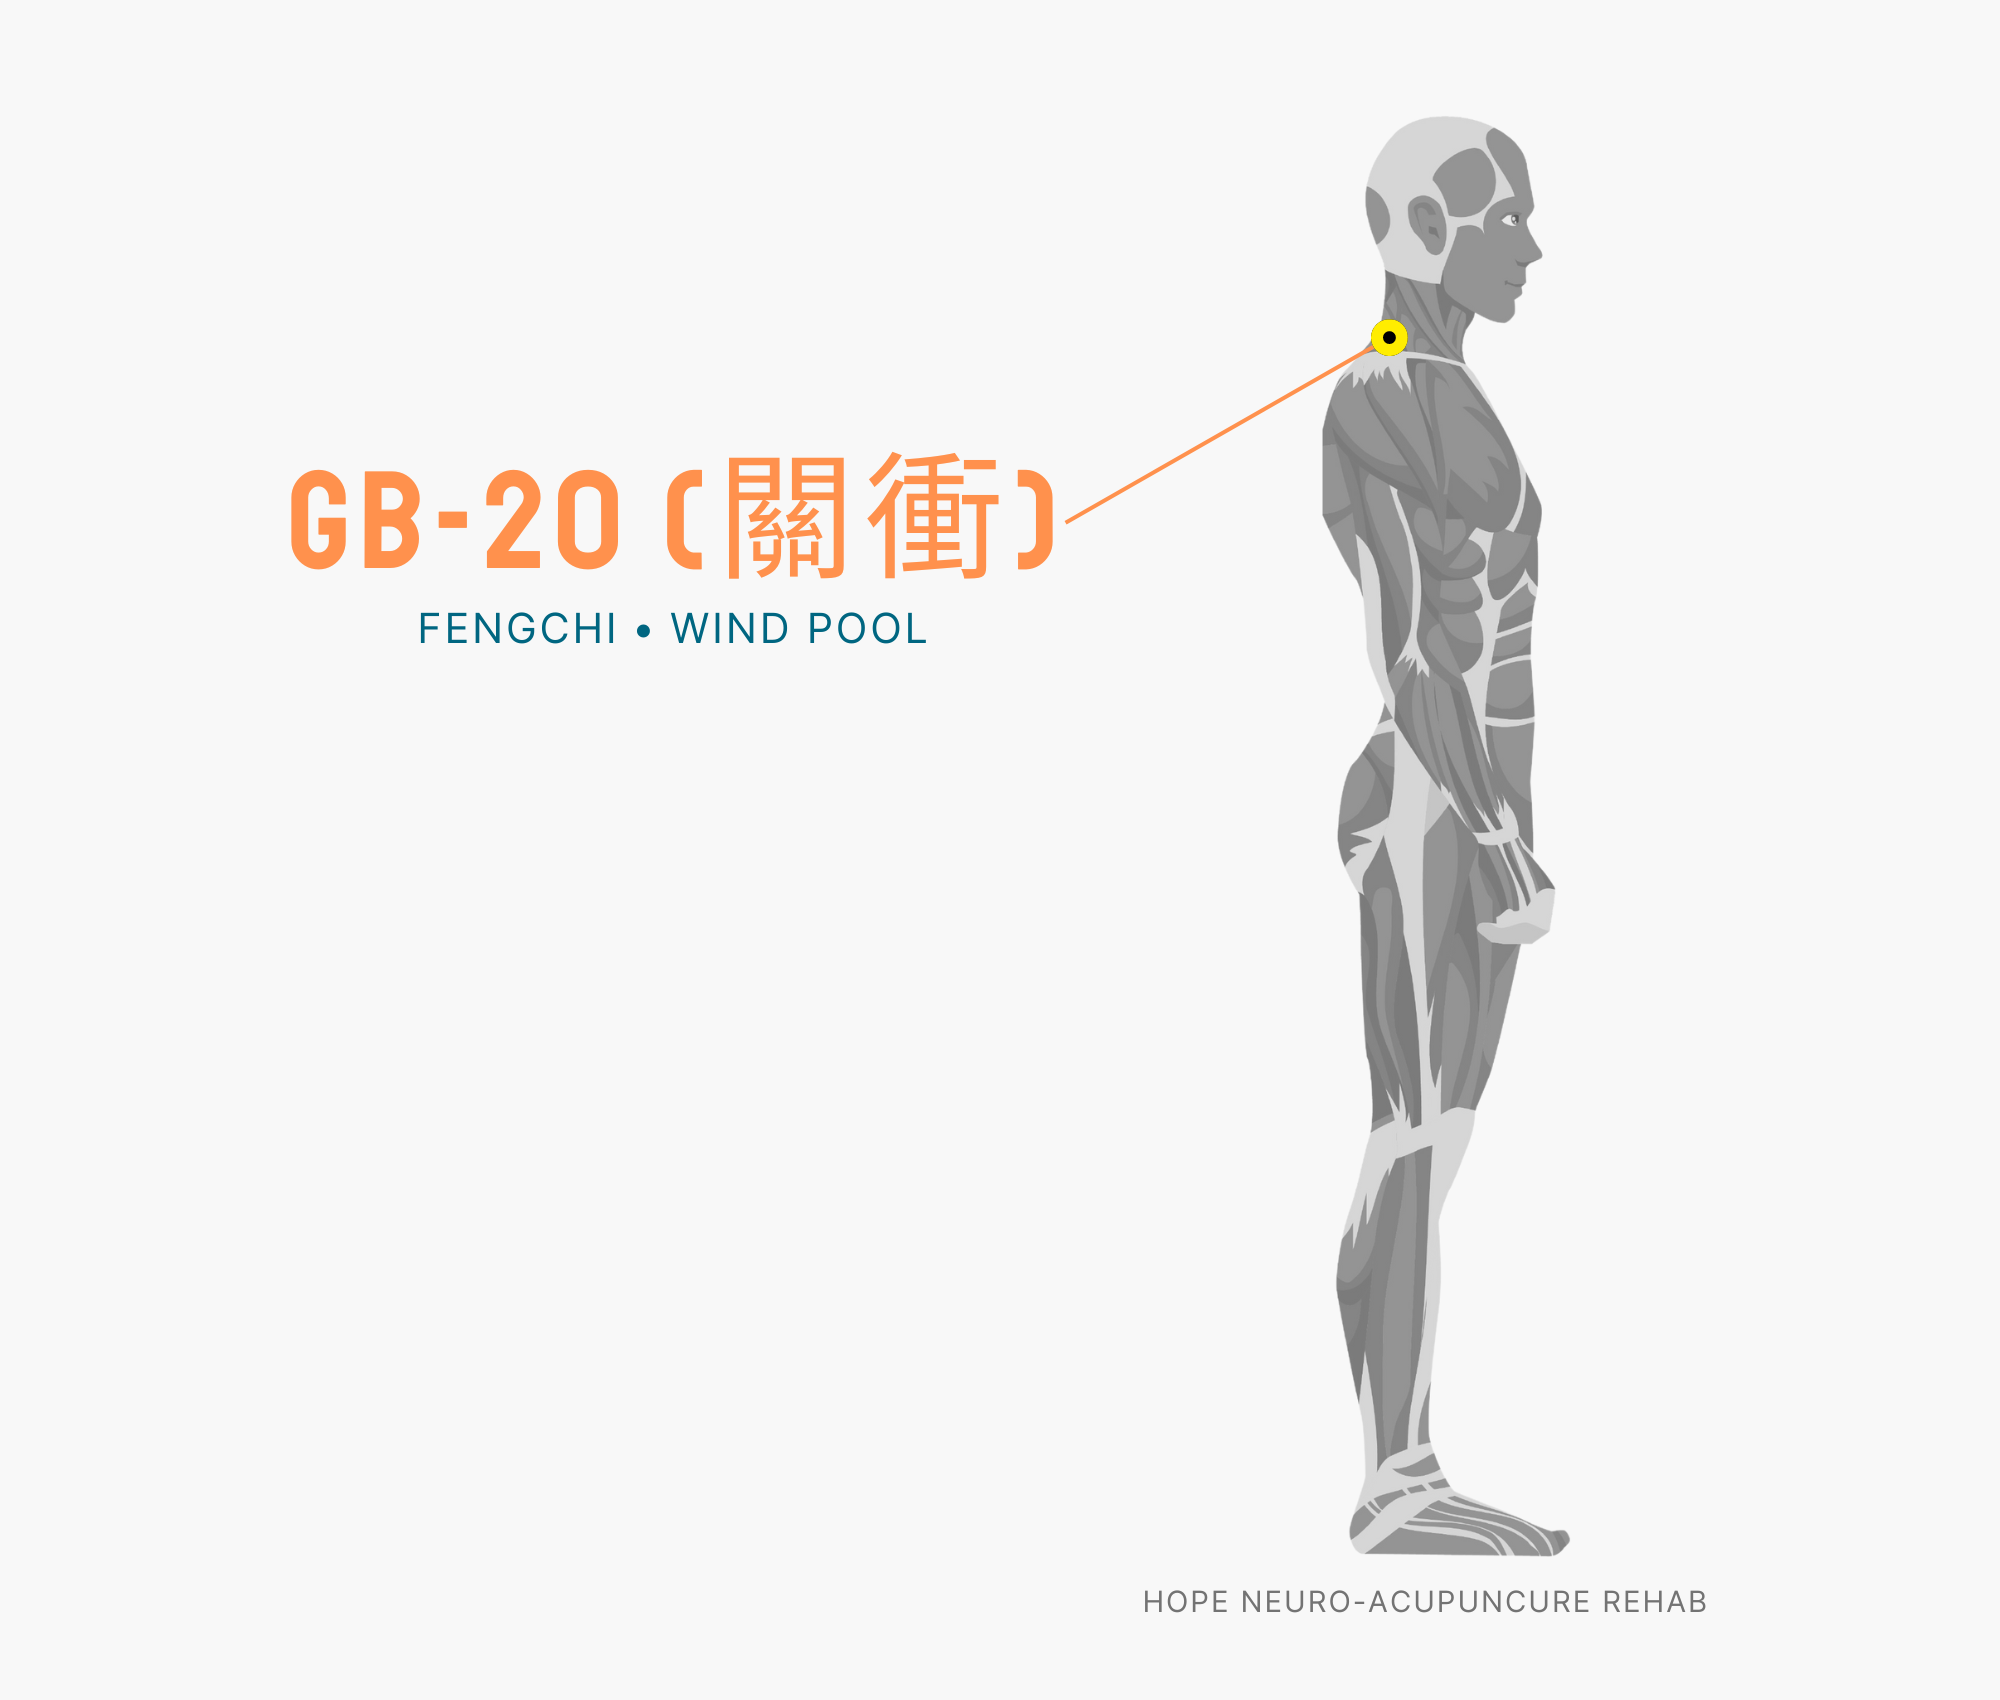
    Location: In the hollows at the base of the skull where the large neck muscle (trapezius) meets. It’s about 2 cm to either side, below the most prominent vertebra when bending the neck forward.

    Acupressure Technique: Using both thumbs, gently press and make slow circular motions. Stimulate both sides simultaneously or one side at a time for 1 minute each, twice daily. Be careful not to press too hard, as excessive pressure can cause headaches.

    Benefits: Fengchi means “the gate that blocks external evil wind.” It improves blood circulation around the neck, strengthens the respiratory system, and defends against cold virus invasion. Regular stimulation during seasonal changes provides excellent cold prevention.

    4. Sanyinjiao (SP6) — The Crossroads of Internal Circulation

    SP6 acupuncture point

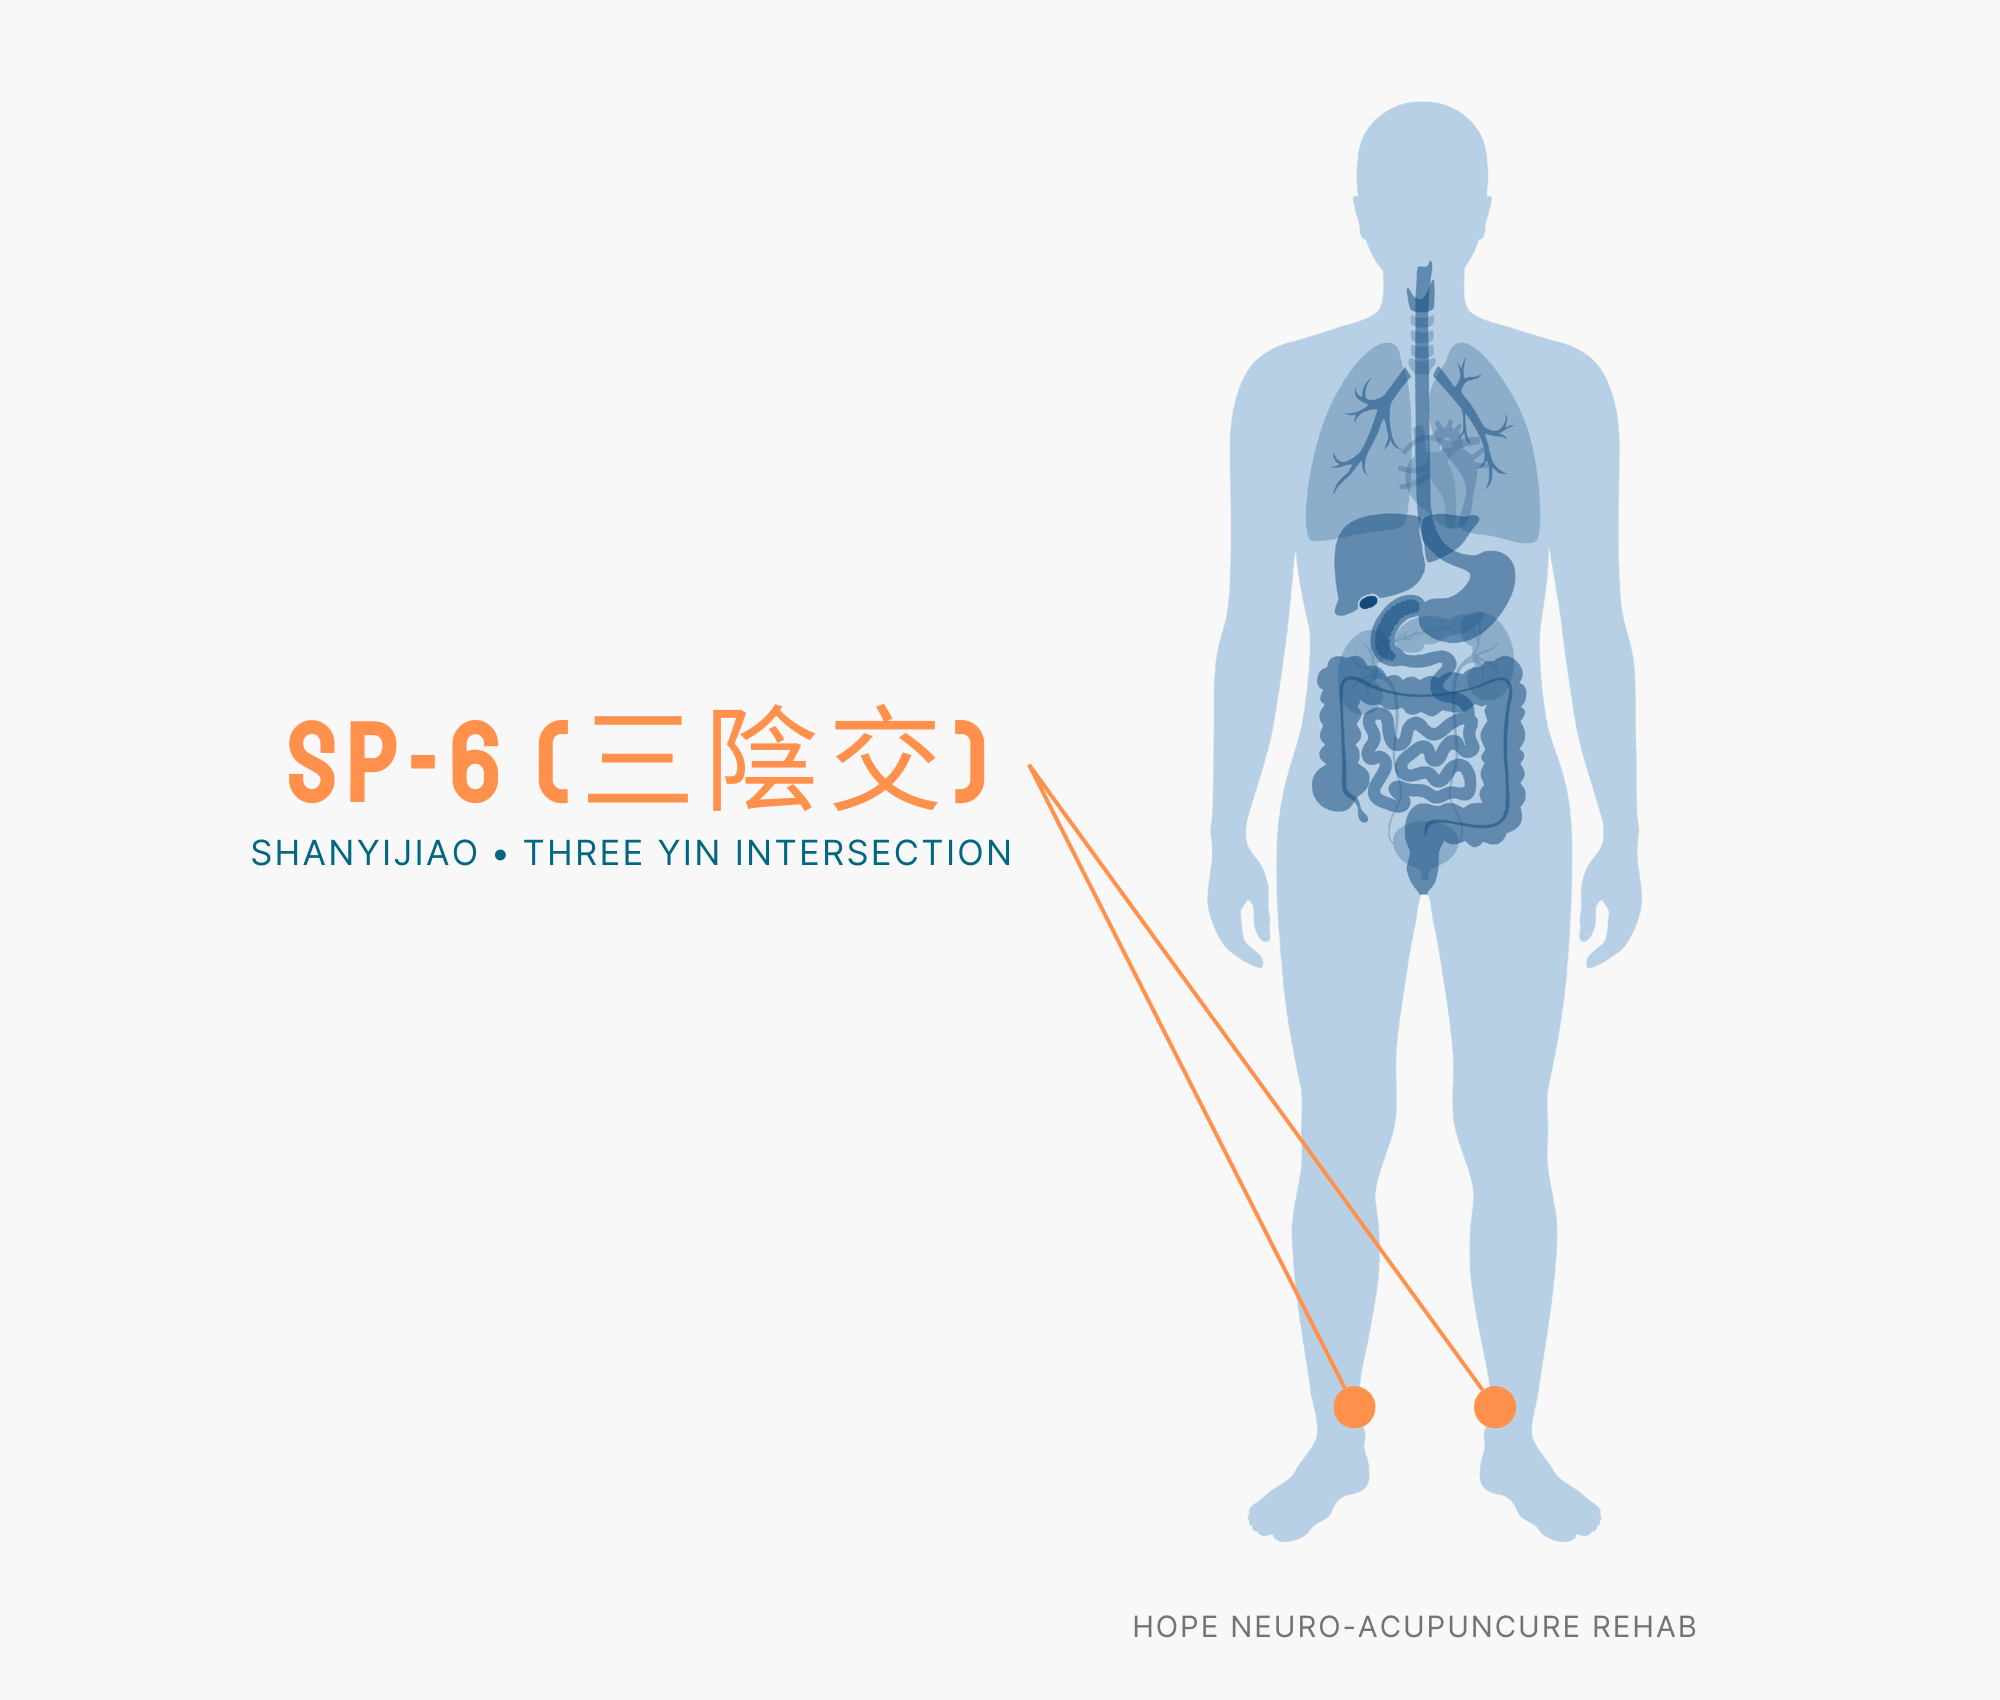
    Location: About 10 cm (four finger-widths) above the inner ankle bone, on the inner edge of the tibia. It’s in the depression behind the tibia.

    Acupressure Technique: Press slowly with your thumb, using a rhythm of 3 seconds of pressure followed by 1 second of rest. Stimulate each leg for 3 minutes. The effects are enhanced when stimulated in the evening (5-7 PM).

    Benefits: Sanyinjiao, where the Spleen, Liver, and Kidney meridians converge, regulates blood circulation, metabolism, and hormone balance. It’s highly effective for improving digestive problems, skin issues, and fatigue caused by weakened immunity.

    5. Hegu (LI4) — The Specific Remedy for Pain and Fatigue

    LI4 acupuncture point

    Location: In the webbing between the thumb and index finger on the back of the hand, at the point where the bones meet. It’s the highest point when tracing along the index finger bone toward the thumb.

    Acupressure Technique: Use the opposite thumb to press slowly. You should feel a slight, pleasant soreness (“refreshing soreness”) for the technique to be effective. Stimulate both hands simultaneously for 3 minutes each, 2-3 times daily.

    Benefits: Hegu affects the entire body through the Large Intestine meridian. It’s most effective for strengthening immunity, alleviating cold symptoms, and eliminating headaches and fatigue. It’s easy to stimulate anywhere, making it excellent for stress relief.

    5-Minute Self-Acupressure Routine — Start Every Morning

    This 5-minute routine can be done even during a busy morning. Consistent, regular practice is most important.

    1. Qihai (CV6) – 1 minute : Rub your hands together until warm, then massage your abdomen in clockwise circles. This is the opening stage to awaken your Yuan Qi.
    2. Hegu (LI4) – 1 minute : Stimulate both hands simultaneously. It clears your mind and improves focus.
    3. Zusanli (ST36) – 2 minutes : Sitting or lying down, stimulate each leg for 1 minute. Allocate generous time for this most important acupoint.
    4. Fengchi (GB20) – 0.5 minutes : Gently use both thumbs. Keep stimulation brief to avoid causing headaches.
    5. Sanyinjiao (SP6) – 0.5 minutes : While sitting, quickly stimulate both ankles.

    Best Time: The best time is within 30 minutes of waking up in the morning. For doubled immunity-boosting effects, do the routine again in the evening (5-7 PM).

    Lifestyle Habits to Enhance Acupressure Effectiveness

    • Adequate sleep: 7-8 hours daily. Sleeping before 11 PM helps recover immunity.
    • Warm water: Drinking warm water after stimulation enhances blood circulation.
    • Immunity-boosting foods: Frequently consume foods that enhance immunity, such as mushrooms, red ginseng, Chinese yam, and black beans.
    • Light exercise: Gentle activities like walking, yoga, and stretching enhance immunity.
    • Stress management: Reduce stress through meditation, breathing exercises, and mindfulness.
    ⚠️ Medical Disclaimer: This article is written for informational purposes about health and does not replace professional medical diagnosis or treatment. If symptoms persist or are severe, consult a healthcare professional.
    🤰 Pregnancy Warning: Among the acupoints above, Sanyinjiao (SP6) and Hegu (LI4) may trigger uterine contractions in pregnant women. If you are pregnant or could be pregnant, consult a professional before using these points.
  • 5 Acupoints for Tinnitus — Complete Self-Acupressure Guide

    5 Acupoints for Tinnitus — Complete Self-Acupressure Guide

    “`html

    One-line summary: Tinnitus (ringing in the ears) can be alleviated by stimulating 5 acupoints—Tinghui, Yifeng, Fengchi, Baihui, and Kunlun—through regular acupressure, which promotes qi and blood circulation and stabilizes the nerves.

    Introduction: Understanding Tinnitus Symptoms and the Principles of Acupoint Treatment

    Are you bothered by unwanted sounds constantly ringing in your ears, disrupting your daily life? That’s tinnitus. It’s characterized by hearing ringing, buzzing, or hissing sounds in your ears even when there’s no external sound, and it can be accompanied by stress and anxiety.

    While modern medicine often finds it difficult to identify a clear cause of tinnitus, Traditional Chinese Medicine takes a different approach. It views tinnitus as resulting from insufficient qi and blood circulation, nervous sensitivity, and nerve fatigue caused by sleep deprivation, and believes it can be improved through stimulation of specific acupoints. In particular, stimulating the meridians (acupuncture channels) around the ear and those leading to the brain can calm the auditory nerve and improve blood circulation.

    The 5 Best Acupoints for Tinnitus Relief

    1. Tinghui (聽宮) – SI19 / Tinghui

    SI19 acupuncture point

    Location: In front of the ear, at the depression that appears when the mouth is closed (below the front of the earlobe).

    How to find it: Place your index fingers in front of your mouth, and when you open your mouth, the depressed point is Tinghui. It returns to prominence when you close your mouth.

    Acupressure technique: Using the tip of your thumb, apply gentle circular pressure for 30 seconds. Perform on both sides, 2-3 times per day.

    Benefits: Tinghui is a specific acupoint for ear disorders. It’s an essential point that directly alleviates tinnitus, hearing loss, and ear fullness, and is emphasized in classical Chinese acupoint texts.

    2. Yifeng (翳風) – TE17 / Yifeng

    TE17 acupuncture point

    Location: Below the ear, at the depression behind the earlobe (in the space between the mastoid bone and the jaw).

    How to find it: Press the earlobe with your finger and fold it backward; a deep groove will appear behind the ear. That’s where Yifeng is located.

    Acupressure technique: Apply gentle pressure with your thumb, using circular motions for 30 seconds, keeping the pressure within a range that doesn’t cause pain.

    Benefits: Yifeng is an essential point on the Triple Burner meridian (the channel that goes to the ear and face), relieving ear fatigue and stabilizing the auditory nerve. It’s effective for tinnitus, ear pain, and facial nerve paralysis.

    3. Fengchi (風池) – GB20 / Fengchi

    GB20 acupuncture point

    Location: At the back of the neck, below the base of the skull (at the depression between the neck muscles on both sides).

    How to find it: Tilt your head back to find the groove between two muscles; specifically, it’s at the movable bone beneath the skull.

    Acupressure technique: Using both thumbs, apply pressure toward the inside of the neck at a slight upward angle. Apply pressure for 30 seconds at each point, 3 times per day.

    Benefits: It promotes blood circulation to the brain and relieves nerve tension. It can simultaneously alleviate headaches, dizziness, and neck stiffness that often accompany tinnitus.

    4. Baihui (百會) – GV20 / Baihui

    Location: At the top of the head, at the point where the line connecting the highest points of both ears intersects with the midline.

    How to find it: Imagine a line connecting the highest points of both ears; where this line intersects the midline of the head is Baihui. When you press it with your finger, it feels slightly depressed.

    Acupressure technique: Using your thumb or middle finger, apply gentle pressure vertically, massaging in small circles for 20-30 seconds. Avoid excessive stimulation.

    Benefits: It calms brain nerves and clarifies the mind. It improves tinnitus, insomnia, and anxiety together, and is excellent for recovering from mental fatigue.

    5. Kunlun (崑崙) – BL60 / Kunlun

    BL60 acupuncture point

    Location: On the outer ankle, at the depression behind the outer ankle bone.

    How to find it: Kunlun is located in the groove between the outer ankle bone (lateral malleolus) and the Achilles tendon.

    Acupressure technique: Using your thumb, repeatedly press vertically toward the ankle and release for 1 minute. Apply enough stimulation to feel mild tenderness. Perform 1-2 times per day.

    Benefits: It relieves nerve tension and improves qi and blood circulation throughout the body. In particular, it relieves nerve fatigue in the ear and prevents tinnitus from worsening due to sleep deprivation.

    5-Minute Self-Acupressure Routine: Optimal Sequence and Time Distribution

    Perform the following sequence every morning after waking up or every evening before sleep:

    1. Tinghui (1 minute) — 30 seconds on each side, gentle circular pressure
    2. Yifeng (1 minute) — 30 seconds on each side, light to moderate pressure
    3. Fengchi (1 minute) — 30 seconds on each side, pressing toward the brain
    4. Baihui (1 minute) — 30 seconds centered on the midline
    5. Kunlun (1 minute) — 30 seconds on each side, stimulate to mild tenderness

    Tip: Perform this routine consistently 5-6 days per week, and do it twice daily (morning and evening) on days when symptoms are severe. You should continue for at least 3 months to notice the effects.

    ⚠️ Medical Disclaimer: This article is provided for informational purposes only and does not replace professional medical diagnosis or treatment. If tinnitus develops suddenly, is severe, is accompanied by hearing loss, or persists, please consult a specialist at an ENT clinic or Traditional Chinese Medicine clinic. A proper diagnosis is especially important to rule out the possibility of tinnitus caused by a brain tumor or vascular disease.
    🤰 Pregnancy Warning: Among the acupoints above, Kunlun (BL60) and Fengchi (GB20) may trigger uterine contractions in pregnant women. If you are pregnant or may be pregnant, avoid these two acupoints and perform only Tinghui, Yifeng, and Baihui, or consult a specialist before proceeding.

    “`

  • 5 Acupoints for Sinusitis — Complete Self-Acupressure Guide

    5 Acupoints for Sinusitis — Complete Self-Acupressure Guide

    One-line summary: Nasal congestion and facial pain from sinusitis can be relieved within 3-7 days by applying acupressure to Yingxiang (LI20), Hegu (LI4), Yintang (GV29), Taiyang (EX-HN5), and Fengchi (GB20) 2-3 times daily.

    Why Sinusitis Worsens and the Benefits of Acupoint Pressure Therapy

    Sinusitis is not a simple cold. As inflammation in the paranasal sinuses becomes chronic, pus accumulates, causing nasal congestion, yellow nasal discharge, facial pain, headaches, and other symptoms that interfere with daily life. It is a common condition affecting more than 50% of modern people due to stress, environmental pollution, allergies, and other factors. In traditional Chinese medicine, sinusitis is viewed as a decline in the body’s defensive functions. Stimulating acupoints around the nose and throughout the body promotes the circulation of qi and blood while enhancing immunity. In particular, acupressure, which has fewer side effects than needling, can be performed at home anytime and can significantly speed up recovery when combined with medication.

    Five Effective Acupoints for Sinusitis Relief

    1. Yingxiang (Welcoming Fragrance) — LI20 (Large Intestine Meridian 20)

    LI20 acupuncture point

    Location: It is located below the point where the nostrils are most prominent and above the nasolabial fold (the crease between the mouth corner and the nose). When you touch the side of your nose with your finger, you’ll feel a slight depression.

    Acupressure Method: Using the index fingers of both hands, simultaneously press and release the Yingxiang points on both sides vertically. Apply pressure with enough intensity to feel refreshing without pain, pressing 30 times, then repeating another 30 times, which takes about 1 minute. For better results, repeat 3 times daily.

    Effects: This point directly relieves nasal congestion and nasal pain—the most direct symptoms of sinusitis. It promotes the drainage of blocked secretions from the paranasal sinuses and improves blood circulation to the nasal mucosa, reducing inflammation. This acupoint shows the fastest results when there is abundant yellow nasal discharge or severe nasal congestion.

    2. Hegu (Union Valley) — LI4 (Large Intestine Meridian 4)

    LI4 acupuncture point

    Location: It is located in the crease where the thumb and index finger meet, in the depression on the back of the hand. It is positioned slightly toward the thumb, just below the index finger bone. It is at the midpoint of the ‘V’ shape formed when the hand is open and spread.

    Acupressure Method: Slowly press the Hegu point using the thumbprint area of the opposite hand. Press for about 3-5 seconds, release for 3 seconds, and repeat. Perform 20-30 presses on each hand. Alternating pressure on both hands takes about 1 minute.

    Effects: It activates the body’s immune function and significantly enhances resistance. It is very effective at relieving headaches and facial pain caused by sinusitis and is widely used for cold prevention and recovery promotion. It is a “universal acupoint” that helps eliminate inflammation in facial areas, including the nasal mucosa.

    3. Yintang (Seal Hall) — GV29/DU23 (Governing Vessel 29/Conception Vessel 23)

    Location: It is located at the center between the eyebrows, in the glabella region. The exact location is the depression felt when the nose is wrinkled upward. Pressing it with a finger will cause a mild soreness.

    Acupressure Method: Using the index or middle finger of both hands, slowly press vertically and release repeatedly. The appropriate intensity is mild soreness, and perform 20-30 presses each time. Avoid excessively strong stimulation.

    Effects: It is particularly effective at relieving pain between the eyebrows and headaches caused by sinusitis. It improves blood circulation to the brain and relieves nervous tension. It is excellent not only for nasal conditions but also for improving migraines, eye fatigue, insomnia from stress, and reduced concentration.

    4. Taiyang (Great Sun) — EX-HN5 (Extra Point on Head and Neck)

    Location: It is located in the depression between the outer corner of the eye and the ear, at the temple. It can be easily found with the fingers of both hands, and pressing it will cause slight soreness.

    Acupressure Method: Gently massage the Taiyang point using the middle fingers of both hands in circular motions. Slowly repeat 10 times clockwise, then 10 times counterclockwise. Gentle and sustained circular massage is more effective than strong stimulation. Each session takes about 1 minute.

    Effects: It effectively relieves facial swelling and temple pain caused by sinusitis. It promotes qi and blood circulation in the head and face, reducing chronic inflammation around the nose and eyes. It is particularly useful for sinusitis patients who also experience migraines or stress-related headaches.

    5. Fengchi (Wind Pool) — GB20 (Gallbladder Meridian 20)

    GB20 acupuncture point

    Location: It is located at the base of the skull, where the hairline meets the neck. It is positioned on both sides of the center of the back of the neck, below and behind both ears, with a clear depression.

    Acupressure Method: Slowly press the Fengchi point with the thumbs of both hands, directing the pressure inward toward the body. Hold the pressure for about 3-5 seconds, release, and repeat. Perform 20-30 presses per session. Press precisely at the boundary between the neck and head, but be careful not to press too hard.

    Effects: It eliminates pathogenic wind (the cause of infectious diseases) and strengthens the body’s immune function. It is excellent at preventing the worsening of sinusitis from colds or allergic rhinitis and relieves tension in the neck and shoulders, improving overall blood circulation. It relieves headaches, neck stiffness, and shoulder tension simultaneously.

    5-Minute Self-Acupressure Routine — Recommended 3 Times Daily (Morning, Noon, Evening)

    Follow the order below for optimal results. Total time required is 5 minutes.

    1. Yingxiang (LI20) — 1 minute
      Press both Yingxiang points simultaneously with both index fingers 30 times. (30 seconds) → Repeat 30 more times. (30 seconds) → Gently massage in circular motions with both index fingers. (remaining time)
    2. Hegu (LI4) — 1 minute
      Press the left Hegu point with your right thumb 30 times. (30 seconds) → Perform the same on the opposite side (right hand). (30 seconds)
    3. Yintang (GV29) — 1 minute
      Slowly press and release the Yintang point with both index fingers, repeating 20 times. (30 seconds) → Repeat 10 more times. (30 seconds)
    4. Taiyang (EX-HN5) — 1 minute
      Massage the Taiyang point with both middle fingers in clockwise circular motions for 30 seconds. → Then massage in counterclockwise motions for 30 seconds.
    5. Fengchi (GB20) — 1 minute
      Press and release each Fengchi point with both thumbs, 30 times each. (Total 60 presses, takes about 1 minute)

    💡 Acupressure Tips: Drinking warm water or warm tea after acupressure enhances its effects. Avoid air conditioning drafts or sudden temperature changes immediately after acupressure. Performing acupressure 1 hour before bedtime helps ease symptoms during sleep. Reduce the intensity of pressure when under stress or overworked.

    ⚠️ Medical Disclaimer: This article is provided for informational purposes and does not replace professional medical diagnosis or treatment. If sinusitis symptoms persist for more than 2 weeks or are severe, if accompanied by fever, or if there is eye pain or vision changes, you must consult a medical professional (an ENT specialist or traditional Chinese medicine practitioner). Acupoint pressure is only a complementary therapy to medical treatment.
    🤰 Pregnancy Warning: The Hegu (LI4) acupoint among those listed above may trigger uterine contractions in pregnant women. If you are pregnant or might be pregnant, consult a professional before applying acupressure to Hegu. Yingxiang, Yintang, Taiyang, and Fengchi are relatively safe, but if you have any concerns, please consult a traditional Chinese medicine practitioner or physician beforehand.
  • 5 Acupoints for Panic Disorder — Complete Self-Acupressure Guide

    5 Acupoints for Panic Disorder — Complete Self-Acupressure Guide

    One-line summary: Stimulating 5 acupoints—Neiguan, Shenmen, Taichong, Hegu, and Dazhui—can quickly relieve panic disorder symptoms including heart palpitations, anxiety, and shortness of breath.

    Panic Disorder and the Effects of Acupoint Acupressure

    Sudden heart palpitations, a suffocating sensation, overwhelming fear of dying—the suffering of those experiencing panic disorder is very real. While modern medical treatment is important, acupoint stimulation from Traditional Chinese Medicine, proven over thousands of years, can provide rapid calming effects during acute symptom episodes. In particular, acupoints like Neiguan and Shenmen are very effective at stabilizing both mind and body, and regulating excessive nervous system responses. By managing acupoints through acupressure before stress and anxiety accumulate, you can significantly reduce the frequency and intensity of panic attacks.

    5 Effective Acupoints for Panic Disorder Relief

    1. Neiguan (內關) — PC6 (Pericardium 6)

    PC6 acupuncture point

    Location: On the inner forearm, in the slight depression between two tendons about 2cm above the wrist crease toward the elbow.

    Technique: Apply slow, steady pressure with your thumb for 5 seconds, then release for 5 seconds. A slight tenderness (tender point sensation) is appropriate. Repeat for 1 minute.

    Effects: Neiguan is the most important acupoint for stabilizing the heart and calming the spirit. It quickly relieves anxiety, heart palpitations, nausea, and insomnia. This is the first acupoint to press during or in anticipation of a panic attack.

    2. Shenmen (神門) — HT7 (Heart 7)

    HT7 acupuncture point

    Location: Located at the wrist crease on the pinky finger side. It is the slight depression when the wrist is flexed.

    Technique: Gently massage with your thumb in circular motions for 2-3 minutes. Avoid pressing too hard; a comfortable sensation is ideal.

    Effects: Shenmen means “the gate of the spirit,” and it addresses emotional unrest, insomnia, poor memory, and heart palpitations. Pressing it at night promotes better sleep, and stimulating it before stressful situations enhances psychological stability.

    3. Taichong (太衝) — LR3 (Liver 3)

    Location: On the top of the foot, in the depression between the first and second metatarsal bones, about 2cm up from the ankle toward the toes.

    Technique: Press firmly with your thumb for 5-10 seconds, then release. A slight soreness is normal. Apply for 1 minute on each foot.

    Effects: It normalizes liver function and relieves tension caused by stress. It improves throat discomfort, chest tightness, and irritability that appear in panic disorder. It also excels at emotional stabilization and anger management.

    4. Hegu (合谷) — LI4 (Large Intestine 4)

    LI4 acupuncture point

    Location: In the depression on the palm side between the thumb and index finger where the two bones meet.

    Technique: Press firmly with the opposite thumb, maintaining a pressure level where slight soreness is felt (7-8/10 intensity) for 1-2 minutes. Apply to both hands.

    Effects: It relieves overall body tension and stress-related pain (neck, shoulders, head). It boosts immunity and calms excessive nervous system responses. It quickly alleviates body stiffness and muscle pain caused by panic disorder. (Pregnant women must consult a professional.)

    5. Dazhui (大椎) — GV14 (Governing Vessel 14)

    Location: When bending the neck forward, it is in the slight depression just below the most prominent cervical vertebra (7th cervical vertebra).

    Technique: Sit and reach your opposite hand around the back of the neck. Slowly press with your thumb or two fingers (index and middle) for 2-3 minutes. It is more effective with assistance from another person.

    Effects: It promotes stability of the entire nervous system and strengthens immunity. It enhances bodily resistance weakened by stress and improves chronic fatigue and nervous irritability. It is effective at reducing the fundamental cause of panic disorder—nervous sensitivity.

    5-Minute Self-Acupressure Routine

    Every morning or evening, or when you feel panic symptoms, proceed in this order:

    1. Neiguan (PC6) — 1 minute: 30 seconds on each arm. Apply slow pressure while breathing deeply.
    2. Shenmen (HT7) — 1 minute: 30 seconds on each hand. Massage in circular motions at a comfortable intensity.
    3. Taichong (LR3) — 1 minute: 30 seconds on each foot. Apply firm pressure.
    4. Hegu (LI4) — 1 minute: 30 seconds on each hand. Stimulate with the strongest pressure.
    5. Dazhui (GV14) — 1 minute: Massage slowly in circular motions at the back of the neck.

    Tip: Combining deep breathing activates the parasympathetic nervous system, doubling the relaxation effect. It is good to rest for 10-15 minutes after acupressure.

    ⚠️ Medical Disclaimer: This article is written for informational health purposes and does not replace professional medical diagnosis or treatment. Panic disorder requires medical diagnosis and appropriate treatment, so if symptoms persist or are severe, consult a psychiatrist or healthcare professional. Acupoint acupressure should be used only as a complementary aid to medical treatment.
    🤰 Pregnancy Warning: Among the acupoints listed above, Hegu (LI4), Taichong (LR3), and some acupoints with bleeding risk may trigger uterine contractions in pregnant women. If you are pregnant or may be pregnant, consult a Traditional Chinese Medicine practitioner or obstetrician before applying these techniques.
  • 5 Acupoints for Skin Aging — Complete Self-Acupressure Guide

    5 Acupoints for Skin Aging — Complete Self-Acupressure Guide

    One-Sentence Summary: If you’re concerned about declining skin elasticity and increased wrinkles, try stimulating these 5 acupoints daily to improve blood circulation: LI4, SP6, ST36, LR3, and LI20.

    Introduction

    Don’t you sometimes sigh while looking at your face in the mirror, thinking “It wasn’t like this yesterday”? Skin aging is a natural process everyone wants to avoid, but it progresses faster than expected due to hormonal changes, stress, sleep deprivation, and environmental pollution. Wrinkles, sagging skin, and dull complexion can shake your confidence beyond being merely cosmetic concerns.

    In traditional Chinese medicine, the root causes of skin aging are seen as “Qi and blood deficiency” and “reduced blood circulation.” When blood flow to the face decreases, skin cells don’t receive adequate oxygen and nutrients, causing loss of elasticity, and impaired waste elimination accelerates aging. Fortunately, by consistently stimulating specific acupoints, you can dilate capillaries, improve facial blood flow, enhance your body’s natural healing capacity, and promote skin regeneration. You can see significant results from just a 5-minute self-massage routine, and the best part is you can do it anytime, anywhere, without any extra cost or special tools.

    5 Acupoints Effective for Skin Aging

    1. LI4 — The Starting Point for Immunity Enhancement and Skin Regeneration

    LI4 acupuncture point

    Location: The center of the webbing between your thumb and index finger (thumb-index webspace) where the bones meet
    WHO Code: LI4
    Technique: Use the thumb of the opposite hand to apply pressure the size of a coin in circular motions for 1 minute. Start with light pressure and gradually increase the intensity. Work on both hands, and pressing for 5 minutes before bed is also beneficial.
    Effects: Connected to the Large Intestine meridian, LI4 is known as the “universal acupoint” and excels at boosting immunity, reducing inflammation, and improving facial complexion. It accelerates metabolism, speeds up skin cell regeneration, and helps detoxify the body by improving constipation. With regular stimulation, you can achieve even skin tone and restore natural luster.

    2. SP6 — Hormone Balance and Skin Hydration

    SP6 acupuncture point

    Location: On the inner side of the leg, about 3 finger widths (approximately 10cm) above the inner ankle bone (medial malleolus)
    WHO Code: SP6
    Technique: Slowly press with your thumb while breathing deeply to promote blood circulation. Work on each leg for 1-2 minutes once a day. Stimulating this point in the evening also helps induce better sleep.
    Effects: SP6 is where the Liver, Spleen, and Kidney meridians meet, playing a crucial role in hormone regulation. For women, it normalizes estrogen secretion, alleviates dry skin, and increases skin’s moisture retention. Improved blood circulation reduces facial puffiness and restores skin elasticity.

    3. ST36 — Whole-Body Immunity Boost and Skin Vitality

    ST36 acupuncture point

    Location: On the outer side below the knee, about 3 finger widths (approximately 10cm) below the depression below the kneecap
    WHO Code: ST36
    Technique: Slowly press vertically with your thumb until you feel a slight warming sensation. Work on each leg for 1-2 minutes, 1-2 times daily. The effect is even greater when combined with moxibustion (heat therapy).
    Effects: Called the “leg’s tonic herb,” ST36 strengthens Qi and blood throughout the body. It improves digestion and nutrient absorption, and activates immune cells to effectively improve inflammatory skin conditions like acne and dermatitis. It promotes metabolism to help eliminate skin waste and slows the skin aging process with consistent stimulation.

    4. LR3 — Stress Relief and Skin Elasticity Recovery

    Location: On the top of the foot, in the valley between the first and second toe bones, about 2cm above the ankle
    WHO Code: LR3
    Technique: Slowly press with your thumb for about 1 minute. Avoid painful pressure; maintain a “firm yet comfortable” intensity. Work on both feet, and it’s best to stimulate this point daily, especially in the evening on stressful days.
    Effects: LR3 opens the Liver’s Qi and blood flow, making it an excellent point for stress relief. It improves dull and lifeless complexion caused by chronic stress and promotes detoxification by activating liver function. It relieves blood vessel constriction to increase facial blood flow, and with consistent stimulation, restores skin elasticity and radiance.

    5. LI20 — Maximized Skin Benefits Through Direct Facial Stimulation

    LI20 acupuncture point

    Location: Above the nasolabial fold (smile lines) beside the nose, about 1cm below the nostril
    WHO Code: LI20
    Technique: Gently massage in circular motions with your index or middle finger. Since facial blood vessels are delicate, avoid strong pressure and use light touch for about 1 minute. Apply a thin layer of essence after skincare and then stimulate this point to improve product absorption.
    Effects: LI20, the endpoint of the Large Intestine meridian, is the key point for improving facial complexion. It dilates capillaries around the nose and cheeks to directly improve facial blood flow and promotes even skin tone. It’s particularly effective for reducing nasolabial folds and brings vibrant, youthful expression back to facial skin with consistent stimulation.

    5-Minute Self-Massage Routine

    Morning Routine (Before work, about 5 minutes):

    1. LI4 (Both hands) — 1 minute: Extend your hands with the webspace facing upward, slowly massage in circles with the opposite thumb
    2. LI20 (Both sides) — 1 minute: Gently massage beside the nose in circles with your index finger to awaken facial complexion
    3. ST36 (Both legs) — 1.5 minutes: Sit in a chair, extend your legs, and slowly press vertically with your thumb
    4. LR3 (Both feet) — 1.5 minutes: Extend your feet and press firmly with your thumb

    Evening Routine (Before bed, about 5 minutes):

    1. SP6 (Both legs) — 1 minute: Lie in bed, bend your legs comfortably, and slowly press vertically with your thumb
    2. LR3 (Both feet) — 1 minute: Extend your feet and stimulate while stretching toward your legs
    3. LI4 (Both hands) — 1 minute: Bring your hands together at your chest and massage in circles with the opposite thumb
    4. ST36 (Both legs) — 1 minute: Extend your legs while lying down and slowly press to promote better sleep

    Key Tips: Combining deep belly breathing with acupressure increases relaxation response and doubles the effectiveness. Repeating the routine at the same time daily synchronizes with your body’s natural rhythm and hormone cycle for faster results.

    ⚠️ Medical Disclaimer: This article is provided for informational purposes only and does not replace professional medical diagnosis or treatment. If symptoms persist or are severe, consult a healthcare professional.
    🤰 Pregnancy Warning: Among the acupoints mentioned above, LI4, SP6, and LR3 may trigger uterine contractions in pregnant women. If you are pregnant or may be pregnant, consult a healthcare professional before practicing these techniques.
  • 5 Acupoints for Nausea — Complete Self-Acupressure Guide

    5 Acupoints for Nausea — Complete Self-Acupressure Guide

    Quick Summary: Nausea can be quickly relieved by acupressure at 5 key acupoints — Neiguan, Fengchi, Hegu, Zusanli, and Sanyinjiao — which improve circulation and normalize stomach function.

    Introduction

    Sudden nausea disrupts daily life and causes physical discomfort. It can stem from various causes including motion sickness, indigestion, stress, and migraines. Many people prefer natural methods to ease symptoms rather than relying on medication. In traditional Chinese medicine, nausea is understood as an imbalance in the body’s qi and blood circulation. By stimulating specific acupoints, we can normalize stomach function and alleviate digestive symptoms. Western medicine has also clinically proven that stimulating acupoints on the wrist effectively reduces nausea. This article introduces 5 essential acupoints for quick nausea relief and the correct acupressure techniques.

    5 Acupoints Explained

    1. Neiguan (PC6) — The Nausea-Fighting Champion

    PC6 acupuncture point

    Location: On the inner side of the wrist, located between two tendons approximately 3cm above the wrist crease in the direction of the elbow. Press gently on the wrist with your finger to find the hollow depression.

    Acupressure Method: Using your thumb, slowly press and release over 3–5 seconds, repeating this motion. Stimulate each wrist for 1–3 minutes, 2–3 times daily. You can also stimulate immediately whenever you feel nausea.

    Benefits: It directly acts on the Pericardium meridian, stabilizing the nervous system and promoting stomach movement. Airlines and hospitals recognize this point for its immediate nausea relief. It’s effective for pregnancy-related nausea, motion sickness, and nausea from indigestion.

    2. Fengchi (GB20) — Improves Brain Circulation

    GB20 acupuncture point

    Location: At the back of the neck, on both sides where the base of the skull meets the neck. It’s located about 1.5cm inward from the boundary between the neck and scalp when the head is tilted back.

    Acupressure Method: Using both thumbs, gently massage in circular motions for 1–3 minutes. Apply gentle pressure without pain and avoid excessive force on the neck.

    Benefits: Increases blood flow to the brain, relieving both dizziness and nausea simultaneously. Particularly effective for migraine-related nausea and stress-induced queasiness. It also relieves cervical tension and promotes natural recovery.

    3. Hegu (LI4) — Promotes Overall Body Energy Circulation

    LI4 acupuncture point

    Location: At the highest point of the fleshy area between the thumb and index finger. When the thumb and index finger are brought together, a small muscle protrudes on the back of the hand — this is Hegu.

    Acupressure Method: Using the opposite thumb, press slowly while maintaining slight tenderness. Apply pressure to each hand for 1–2 minutes. Stimulating both hands is more effective. Repeat 2–3 times daily.

    Benefits: Connected to the Large Intestine meridian (digestive system), it promotes stomach function and overall body energy circulation. It comprehensively improves nausea along with indigestion and constipation.

    ⚠️ Pregnancy Caution: Hegu can trigger uterine contractions in pregnant women. If you are pregnant or may be pregnant, consult a healthcare professional before stimulating this point.

    4. Zusanli (ST36) — The Key to Digestive System Strengthening

    ST36 acupuncture point

    Location: Below and outside the knee, approximately 10cm (about 4 finger widths) below the knee crease. It’s located on the muscle beside the outer bone of the calf. You’ll feel a slight hollow when pressing your finger.

    Acupressure Method: Using your thumb or knuckle, press slowly or massage in circular motions. Stimulate each leg for 2–3 minutes. Applying pressure to both legs is more effective. Evening stimulation also promotes better sleep.

    Benefits: The most important acupoint for strengthening digestive function. It activates peristalsis of the stomach and enhances digestive capacity. It improves not only nausea but also diarrhea, constipation, and general digestive discomfort. It also boosts immunity, making it valuable to stimulate regularly.

    5. Sanyinjiao (SP6) — The Whole-Body Harmony Acupoint

    SP6 acupuncture point

    Location: On the inner side of the ankle, approximately 10cm (about 4 finger widths) above the inner ankle bone (medial malleolus), just behind the shinbone. It’s located in the hollow area behind the inner edge of the tibia.

    Acupressure Method: Using your thumb, press slowly or stimulate in circular motions. Apply pressure to each leg for 1–2 minutes, stimulating both legs. Evening or pre-sleep stimulation can promote better sleep and faster symptom improvement.

    Benefits: Located at the meeting point of the three Yin meridians (Liver, Spleen, and Kidney), it harmonizes the body’s yin energy. It comprehensively improves nausea from digestive imbalance, stress-related queasiness, and menstruation-related nausea.

    ⚠️ Pregnancy Caution: Sanyinjiao can trigger uterine contractions in pregnant women. If you are pregnant or may be pregnant, consult a healthcare professional before stimulating this point.

    5-Minute Self-Acupressure Routine

    When to Do It: Perform this routine immediately when you feel nausea, or 2–3 times daily after meals (morning, lunch, and evening) for symptom prevention.

    5-Minute Routine Order and Time Allocation:

    1. Neiguan (PC6) — 1 minute 30 seconds
      Slowly press each wrist for 1–2 minutes. Start with this point as it delivers the fastest relief.
    2. Fengchi (GB20) — 1 minute
      Massage both sides for 30 seconds each in circular motions. Relieve neck tension while improving brain circulation.
    3. Hegu (LI4) — 50 seconds
      Press each hand for 25 seconds. (Skip if pregnant)
    4. Zusanli (ST36) — 1 minute 30 seconds
      Apply pressure to each leg for 45 seconds. Allocate sufficient time to strengthen the digestive system.
    5. Sanyinjiao (SP6) — 30 seconds
      Gently stimulate each leg for 15 seconds. (Skip if pregnant)

    Tip: With each acupoint, take a deep breath in and exhale slowly. Combining breathing with acupressure enhances relaxation and speeds up nausea relief. Drinking warm water before the routine boosts blood circulation.

    ⚠️ Medical Disclaimer: This article is provided for informational purposes only and is not a substitute for professional medical diagnosis or treatment. If symptoms persist or worsen, consult a healthcare professional. If you have serious medical conditions or are taking medications, consult your doctor before stimulating acupoints.
    🤰 Pregnancy Caution: Among the acupoints listed above, Hegu (LI4) and Sanyinjiao (SP6) can trigger uterine contractions in pregnant women. If you are pregnant or may be pregnant, consult a healthcare professional before proceeding. Neiguan (PC6) and Fengchi (GB20) are safe for pregnant women to use.
  • 5 Acupoints for Tension — Complete Self-Acupressure Guide

    5 Acupoints for Tension — Complete Self-Acupressure Guide

    One-Line Summary: Tension and anxiety arise from nerve sensitivity, heart instability, and qi stagnation. Pressing the LI4, HT7, LR3, BL60, and SP6 acupoints calms the nervous system and lowers stress hormones, bringing peace of mind within 5 minutes.

    Why Does Tension Arise and How Can Acupoints Help?

    Many of us have experienced our hearts sinking and our palms sweating before presentations, meetings, or exams. This is tension and anxiety. In traditional medicine, tension and anxiety are seen as stemming from three types of imbalance.

    • Heart-Spirit (Shen) Instability: When the Heart (Shen), which governs the mind, becomes unstable, it causes anxiety, restlessness, and heart palpitations.
    • Liver Qi Stagnation: When stress blocks the Liver’s energy flow, it results in muscle tension, chest oppression, and nervousness.
    • Nervous System Sensitivity: When the sympathetic nervous system becomes overactive, breathing becomes shallow and the body becomes tense.

    Acupoint pressure stimulates meridian points to facilitate energy flow, calm the nervous system, and balance the autonomic nervous system. You can experience immediate mental and physical calm without medication.

    The 5 Best Acupoints for Relieving Tension and Anxiety

    1️⃣ Hegu (LI4) — The ‘Emergency Calm Button’

    LI4 acupuncture point

    Location: In the webbing between the thumb and index finger, at the deepest point of the valley between them on the back of the hand.

    Pressure Technique: Using the opposite thumb, apply circular pressure slowly for 3-5 minutes. Start gently and gradually increase pressure while maintaining a tender pain level.

    Effects: Hegu is the ‘master point for nerve tension.’ It lowers the stress hormone cortisol and releases physical tension most quickly. It also alleviates headaches, shoulder stiffness, and facial heat sensations.

    2️⃣ Shenmen (HT7) — The ‘Gate of the Mind’

    HT7 acupuncture point

    Location: On the inner side of the wrist, about 0.5cm toward the pinky finger from the wrist crease, in a small depression. It’s at the pinky-side end of the inner wrist when the hand is open.

    Pressure Technique: Using the opposite thumb, apply gentle circular pressure for 2-3 minutes. Press slowly until you feel your heartbeat stabilizing.

    Effects: This is the most effective acupoint for calming the Heart-Spirit. It quickly soothes anxiety, restlessness, and insomnia, restoring mental peace.

    3️⃣ Taichong (LR3) — The ‘Liver Energy Release Point’

    Location: On the top of the foot, in the valley between the big toe and second toe, about 2cm up from the ankle toward the toes.

    Pressure Technique: Using your thumb, repeatedly press deeply and release for 2-3 minutes. It’s more effective when combined with abdominal breathing: exhale when pressing, inhale when releasing.

    Effects: It activates liver function and disperses energy blocked by stress. It alleviates nervousness, anger, chest oppression, and temporal headaches while promoting emotional stability.

    4️⃣ Kunlun (BL60) — The ‘Nerve Calming Point’

    BL60 acupuncture point

    Location: On the outside of the foot, in the depression directly behind the lateral ankle bone (lateral malleolus), at the midpoint between the heel and ankle bone.

    Pressure Technique: Using your thumb, apply slow circular pressure for 2-3 minutes. Start lightly and gradually increase pressure to reach the meridian sinew.

    Effects: It strengthens Kidney energy and reduces nervous system sensitivity. It also improves lower back pain caused by severe stress, nerve fatigue, and anxiety.

    5️⃣ Sanyinjiao (SP6) — The ‘Heart-Spirit Balance Point’

    SP6 acupuncture point

    Location: On the inner side of the lower leg, about 10cm above the inner ankle bone (medial malleolus). Find it by following the inner edge of the shin bone upward from the ankle toward the knee.

    Pressure Technique: Using your thumb, repeatedly press deeply and release for 2-3 minutes. Apply pressure so that the calf muscle relaxes at the same time.

    Effects: This is an ‘all-purpose point’ that regulates digestion, sleep, and emotions. It simultaneously alleviates digestive distress, stress-related bloating, and insomnia. It restores overall balance between mind and body.

    5-Minute Self-Massage Routine — Practical Guide Before Presentations

    📍 Usage by Situation

    • 5 Minutes Before a Presentation (Beginner): LI4 for 2 minutes + HT7 for 2 minutes → Immediate calming effect
    • Morning Anxiety (Standard): HT7 for 1 minute → LR3 for 1 minute → LI4 for 1 minute → SP6 for 1 minute → BL60 for 1 minute
    • Nighttime Insomnia (Advanced): SP6 for 2 minutes → HT7 for 2 minutes → BL60 for 1 minute → Deep abdominal breathing

    🎯 Pressure Timing and Technique

    • Pressure Intensity: Maintain a tender pain level, approximately 5-7 on a 10-point scale
    • Breathing: Exhale through the nose when pressing, inhale through the mouth when releasing
    • Frequency: 2-3 times daily, best performed 1 hour after eating
    • Duration: Daily practice for at least 2 weeks is needed to see proven results
    ⚠️ Medical Disclaimer: This article is provided for health information purposes only and does not replace professional medical diagnosis or treatment. If symptoms persist or are severe, please consult a healthcare professional.
    🤰 Pregnancy Warning: LI4, SP6, LR3, and BL60 may trigger uterine contractions in pregnant women. If you are pregnant or possibly pregnant, press only HT7 and consult a healthcare professional before proceeding.
  • 5 Acupoints for Shoulder Stiffness — Complete Self-Acupressure Guide

    5 Acupoints for Shoulder Stiffness — Complete Self-Acupressure Guide

    One-line summary: Shoulder stiffness can be quickly relieved through acupressure on 5 key acupoints: Jianjing (SI12), Quchi (LI11), Hegu (LI4), Fengchi (GB20), and Jianliao (TE14).

    Introduction

    Shoulder stiffness that comes from sitting and working for long periods is truly bothersome and inconvenient. Caused by various factors such as muscle tension, poor posture, and stress, shoulder stiffness greatly reduces your quality of daily life. In traditional medicine, shoulder stiffness is diagnosed as poor blood circulation and qi stagnation. By stimulating specific acupoints, you can relax tense muscles and promote blood circulation. In this article, I’ll explain in detail the 5 most effective acupoints for relieving shoulder stiffness and self-acupressure methods.

    The 5 Acupoints Explained

    1. Jianjing (肩井) — SI12
    Location: The highest point where the shoulder muscle rises (midpoint between the 7th cervical vertebra and the shoulder tip)
    How to find it: When you bend your neck forward, take the protruding bone below your neck as a reference point and move about 2-3cm toward the shoulder.
    Acupressure method: Tap and press with your thumb or rub in circular motions. Repeat pressing for 3-5 seconds and resting for 1 second.
    Benefits: The ‘representative acupoint’ for shoulder stiffness that immediately relaxes tense muscles around the scapula. Particularly effective for stubborn shoulder stiffness.

    2. Quchi (曲池) — LI11
    Location: The outer end of the elbow crease when your elbow is bent
    How to find it: Bend your arm so the inside of your elbow is visible, then locate the outer end of the elbow crease.
    Acupressure method: Press with your thumb, gently pushing your finger toward the elbow as you apply acupressure.
    Benefits: Promotes blood circulation in the upper arm and relieves tension extending to the shoulder. Excellent for shoulder stiffness caused by prolonged keyboard use.

    3. Hegu (合谷) — LI4
    Location: The webbing between the thumb and index finger, moving toward the thumb along the index finger bone
    How to find it: Spread your thumb and index finger apart and find the highest point between the two fingers.
    Acupressure method: Tap and press with the opposite thumb or rub in circular motions. Continue for 30 seconds to 1 minute.
    Benefits: A ‘universal’ acupoint that relieves pain and tension throughout the body. Improves blood circulation in the entire upper body from head to arms.

    4. Fengchi (風池) — GB20
    Location: The back of the neck, about 2-3cm below the hollow area beneath the ear
    How to find it: From the center of the back of your neck (cervical vertebra 1), move about 2-3cm to each side. Pressing with your finger creates a hollow sensation.
    Acupressure method: Press simultaneously with both thumbs, applying acupressure with a slight upward lift toward the head.
    Benefits: An acupoint that connects the neck and shoulder, particularly effective at relieving shoulder stiffness caused by neck tension. Also effective for headache relief.

    5. Jianliao (肩髎) — TE14
    Location: The back of the shoulder, the hollow area above the shoulder blade (scapula)
    How to find it: About 2-3cm back from the shoulder tip. This is the hollow area that appears when you raise your arm.
    Acupressure method: Tap and press with four fingers or apply acupressure by making circular motions with your finger joints.
    Benefits: Acts directly on the deep muscles around the shoulder blade and relieves severe shoulder stiffness. Particularly effective for shoulder tension after exercise.

    5-Minute Self-Acupressure Routine

    5-Minute Acupressure Program (Recommended morning/evening)

    Step 1 (1 minute): Jianjing (SI12) 30 seconds on each side
    → Release the most important acupoint first.

    Step 2 (1 minute): Fengchi (GB20) 30 seconds on each side
    → Simultaneously relieves tension in the neck and shoulders.

    Step 3 (1 minute): Jianliao (TE14) 30 seconds on each side
    → Releases tension in the deep muscle layers.

    Step 4 (1 minute): Quchi (LI11) 30 seconds on each side
    → Improves qi flow connecting the arm and shoulder.

    Step 5 (1 minute): Hegu (LI4) 30 seconds on each side
    → Finally circulates qi and blood throughout the body.

    Acupressure tips: It’s more effective to warm your hands with warm water before starting. Don’t press so hard that it causes pain—aim for an intensity that creates a ‘sore yet pleasant’ sensation.

    ⚠️ Medical Disclaimer: This article is written for informational health purposes and does not replace professional medical diagnosis or treatment. If symptoms persist or are severe, please consult with a healthcare professional.
    🤰 Pregnancy Warning: Of the above acupoints, Hegu (LI4) may trigger uterine contractions in pregnant women. If you are pregnant or may be pregnant, please consult with a professional before proceeding. Jianjing, Quchi, Fengchi, and Jianliao are safe for pregnant women to use.
  • 5 Acupoints for Obesity — Complete Self-Acupressure Guide

    5 Acupoints for Obesity — Complete Self-Acupressure Guide

    One-line summary: Pressing five acupoints—ST36, ST40, LI4, SP6, and CV9—for 5 minutes daily improves metabolism and digestive function, helping with weight management.

    Introduction

    Weight management is one of the most common concerns for people today. If you’ve tried various diets but found their effects limited, try acupressure using traditional medicine acupoints. In Eastern medicine, obesity is viewed as a metabolic slowdown caused by “phlegm accumulation” (accumulation of dampness and phlegm). Stimulating specific acupoints can activate digestive function, improve energy circulation in the body, and naturally regulate appetite. The five acupoints introduced in this article are the areas most commonly used in traditional medicine clinics for weight management treatment. Since you can practice using only your fingers anytime, anywhere without complicated equipment, try starting today.

    Five Acupoints Effective for Weight Management

    1. ST36 (Zusanli)

    ST36 acupuncture point

    Location: Below the outer side of the knee, approximately four finger-widths below the depression beside the tibia (shinbone). When the knee is bent, it is located approximately 10cm below the indentation beside the knee (ST36 point) in the direction toward the ankle.

    Acupressure technique: Press slowly with your thumb, maintaining pressure for 3-5 seconds. Repeat 3-5 times, gradually releasing pressure as you exhale. Avoid pressing too hard; a pressure level that creates a mild soreness is appropriate.

    Benefits: ST36 is known as the “longevity acupoint” because it promotes overall health. It particularly strengthens digestive function, promotes metabolism, and enhances immunity. Regular acupressure increases basal metabolic rate, aiding weight loss.

    2. ST40 (Fenglong)

    ST40 acupuncture point

    Location: On the outer side of the tibia, at the midpoint between the highest bone on the outer ankle (lateral malleolus) and the knee. Find it by tracing the tibia in the center of the outer calf.

    Acupressure technique: Press vertically with your thumb or middle finger, maintaining pressure for 5 seconds, then slowly release. Repeat this 5-10 times. If it’s difficult to press with one hand, overlapping your thumbs from both hands is more effective.

    Benefits: ST40 is also known as the “obesity acupoint.” It removes phlegm accumulation, normalizes spleen and stomach function, and improves digestive disorders and abdominal bloating. Additionally, it promotes metabolism and directly helps reduce body fat.

    3. LI4 (Hegu)

    LI4 acupuncture point

    Location: In the webbing between the thumb and index finger (on the back of the hand), at the highest point where the bones meet. It’s easy to find by facing your palm down and spreading your thumb and index finger.

    Acupressure technique: Press slowly with the thumb of your opposite hand, applying pressure as if penetrating about 1cm deep. Press for 3-5 seconds and slowly release. Repeat 5-10 times on both sides.

    Benefits: LI4 is a powerful acupoint that promotes energy circulation throughout the body. It accelerates metabolism, reduces overeating caused by stress, and improves digestive function. It is also effective for improving constipation. (⚠️ Avoid if pregnant)

    4. SP6 (Sanyinjiao)

    SP6 acupuncture point

    Location: At a point approximately four finger-widths (about 10cm) above the highest bone on the inner ankle (medial malleolus), in the direction toward the toes. Find it by tracing the inner edge of the tibia.

    Acupressure technique: Press gently with your thumb, maintaining pressure with a slight downward sensation. Press for 3-5 seconds while exhaling, then slowly release while inhaling. Repeat 5-10 times on each side.

    Benefits: SP6 is an important acupoint that regulates the function of the spleen, liver, and kidneys. It strengthens digestive function, balances hormones to improve swelling, and promotes metabolism. It is particularly effective for weight concentrated in the abdominal area. (⚠️ Avoid if pregnant)

    5. CV9 (Shuifen)

    Location: It is on the midline (centerline of the body) above the navel, at a point approximately two finger-widths (about 1.5-2cm) above the navel. It’s easy to find by lying down and feeling above the navel.

    Acupressure technique: It’s best to apply acupressure while lying down in a relaxed state. Gently press with your thumb or middle finger, then repeat slowly applying pressure. Avoid pressing hard; apply pressure at a level where warmth is transmitted for 3-5 minutes.

    Benefits: CV9 is an acupoint that regulates water metabolism in the abdomen, excelling at improving abdominal bloating and swelling. It also strengthens digestive function and promotes metabolism, directly helping to improve abdominal obesity.

    5-Minute Self-Acupressure Routine

    Recommended daily sequence and time allocation:

    1. LI4 – 30 seconds each side (1 minute total)

      → Awakens blood circulation when you wake up in the morning

    2. ST36 – 40 seconds each side (1 minute 20 seconds total)

      → 30 minutes after meals or before meals to promote digestion

    3. ST40 – 40 seconds each side (1 minute 20 seconds total)

      → Key point for weight management; allocate sufficient time

    4. SP6 – 30 seconds each side (1 minute total)

      → Stabilizes hormones in the evening

    5. CV9 – 1 minute

      → Finish slowly while lying down before bed

    Tip: If you don’t have time, pressing only ST36 and ST40 30 minutes after meals is also effective. Doing acupressure at the same time daily helps build the habit. If your fingers are tired, you can also use an acupressure stick or massage tool.

    ⚠️ Medical Disclaimer: This article is written for informational purposes and does not replace professional medical diagnosis or treatment. Acupressure is a complementary therapy; for weight loss, always combine it with a balanced diet and regular exercise. If symptoms persist, are severe, or if you have other conditions, consult with a medical professional (doctor or traditional medicine practitioner).
    🤰 Pregnancy Warning: Of the acupoints above, LI4 and SP6 may trigger uterine contractions in pregnant individuals. If you are pregnant or potentially pregnant, consult with a specialist (traditional medicine practitioner or obstetrician) before proceeding. For safety, it is recommended to press only ST36, ST40, and CV9.
  • 5 Acupoints for Rib Pain — Complete Self-Acupressure Guide

    5 Acupoints for Rib Pain — Complete Self-Acupressure Guide

    “`html

    Summary: Rib pain can be effectively relieved through daily acupressure on five acupoints: BL17, LV14, LV13, BL18, and GB34, which help alleviate pain and improve blood circulation.

    Introduction

    Rib pain that throbs on the sides and makes breathing difficult—this condition that can hamper daily activities is experienced by many people. Rib pain typically develops from a combination of factors including intercostal nerve irritation, muscle tension, poor postural habits, and stress. Fortunately, Traditional Chinese Medicine has long provided effective acupoints that can relieve this pain. In particular, five acupoints that can be easily stimulated at home promote blood circulation and help relax muscles, providing immediate relief. Self-care that you can do with your own hands without medication—let’s begin.

    Five Effective Acupoints for Rib Pain

    1. BL17 (Diaphragm Shu)

    BL17 acupuncture point

    Location: Below the 7th thoracic vertebra, approximately 1.5-2cm to the sides of the spine

    How to locate: Feel the lower edge of the rib cage below the epigastrium, then find the area next to the spine at that height.

    Acupressure technique: Use both thumbs to simultaneously stimulate both sides of the spine, pressing and releasing for 3-5 seconds repeatedly, or massage in circular motions. Start with gentle pressure and gradually increase the intensity.

    Benefits: BL17 is known as “the connecting point of the thorax” and is a primary acupoint for relieving chest pain, cough, and digestive discomfort. It effectively improves breathing difficulties and chest tightness caused by rib pain.

    2. LV14 (Cycle Gate)

    Location: Below the 6th rib, at the level of the nipple line (directly below the nipple)

    How to locate: When your arm is at your side, find the space between the ribs at the height of your nipple.

    Acupressure technique: Gently massage in circular motions with four fingers, or repeatedly press with your thumb for 3-5 seconds. Avoid excessive pressure and exhale deeply as you proceed.

    Benefits: As an important acupoint on the Liver meridian, it directly alleviates pain in the sides and around the ribs. It also relieves muscle tension caused by stress, providing comprehensive pain improvement.

    3. LV13 (Bamboo Gate)

    Location: At the end of the 11th rib, on the midaxillary line (the vertical line where the arm meets the body when lowered)

    How to locate: When you raise your arm to the side, find the end of the longest rib—this is LV13.

    Acupressure technique: Slowly press with your thumb or middle finger, holding the pressure for 3-5 seconds before releasing. It’s most effective to press while exhaling.

    Benefits: It strengthens spleen function and relieves the uncomfortable sensation and pain below the sides of the rib cage. It brings immediate relief, especially when lower rib pain is severe.

    4. BL18 (Liver Shu)

    BL18 acupuncture point

    Location: Below the 9th thoracic vertebra, approximately 1.5-2cm to the sides of the spine

    How to locate: Follow the lower edge of the rib cage and feel along the side of the spine to find BL18.

    Acupressure technique: Similar to BL17, simultaneously stimulate both sides of the spine with both thumbs, or perform rolling massage with a massage stick.

    Benefits: It strengthens liver function and relieves muscle tension caused by stress. It’s particularly effective for alleviating pain on the lateral side of the body and rib pain.

    5. GB34 (Yang Mound Spring)

    GB34 acupuncture point

    Location: On the outer side below the knee, in the small depression below the head of the fibula (calf bone)

    How to locate: Slightly bend your leg and feel the outer side below your knee—the soft area below the bone is GB34.

    Acupressure technique: Press with your thumb for 3-5 seconds, or apply deep pressure with a round massage stick. Alternate stimulating both legs.

    Benefits: Known as “the meeting point of the Gallbladder,” it regulates qi flow throughout the body. It’s a remote acupoint that comprehensively improves pain around the sides and ribs, as well as fatigue.

    5-Minute Self-Acupressure Routine

    Setup: Perform this in a comfortable seated or lying position. It helps to apply a thin layer of warm oil to your fingers to reduce friction.

    1. BL17 — 1 minute
      Simultaneously stimulate both sides of the spine with both thumbs. Press for 3-5 seconds × 8 repetitions
    2. LV14 — 1 minute
      Gently massage the side of the chest with your thumb. Repeat in circular motions 10 times
    3. LV13 — 1 minute
      Press deeply, holding for 3-5 seconds × 8 repetitions. Exhale slowly as you proceed
    4. BL18 — 1 minute
      Alternate stimulating both sides of the spine with both thumbs. Total of 10 repetitions
    5. GB34 — 1 minute
      Deeply press alternate calves × 8 repetitions each. Finish with gentle circular massage

    Precautions: If you feel pain, reduce the pressure, and don’t hold your breath. Daily acupressure at the same time produces better results.

    🤰 Pregnancy Warning: Among the acupoints above, LV14 and BL18 may trigger uterine contractions in pregnant women. If you are pregnant or might be pregnant, be sure to consult with a healthcare professional before practicing these techniques.
    ⚠️ Medical Disclaimer: This article is written for informational purposes and does not replace professional medical diagnosis or treatment. If symptoms persist or worsen, especially if thoracic disease is a possibility, please consult with a healthcare professional.

    “`