Author: Acu Master

  • 5 Best Acupoints for Tension Headaches — Complete Self-Acupressure Guide

    5 Best Acupoints for Tension Headaches — Complete Self-Acupressure Guide

    One-line summary: Tension headaches are primarily caused by poor blood circulation due to stiffness in the neck and scalp muscles, and stimulating five acupoints—GB20, LI4, Taiyang, GV20, and BL10—can provide immediate relief.

    Introduction: Resolve Tension Headaches with Acupoints

    Tension headaches are a chronic problem for modern people. Do you experience that bothersome pain that arrives in the afternoon, that urge to press your neck and head? Tension headaches occur when the muscles in the neck, shoulders, and scalp become excessively contracted due to stress and poor posture. As blood circulation within the muscles decreases and metabolic waste accumulates, the pain worsens.

    Traditional Chinese medicine views tension headaches as resulting from insufficient qi and blood circulation in the neck and head, and promotes muscle relaxation and blood circulation by stimulating specific acupoints. I’ll now introduce the secret to achieving immediate pain relief by investing just 5 minutes with a single finger, without medication.

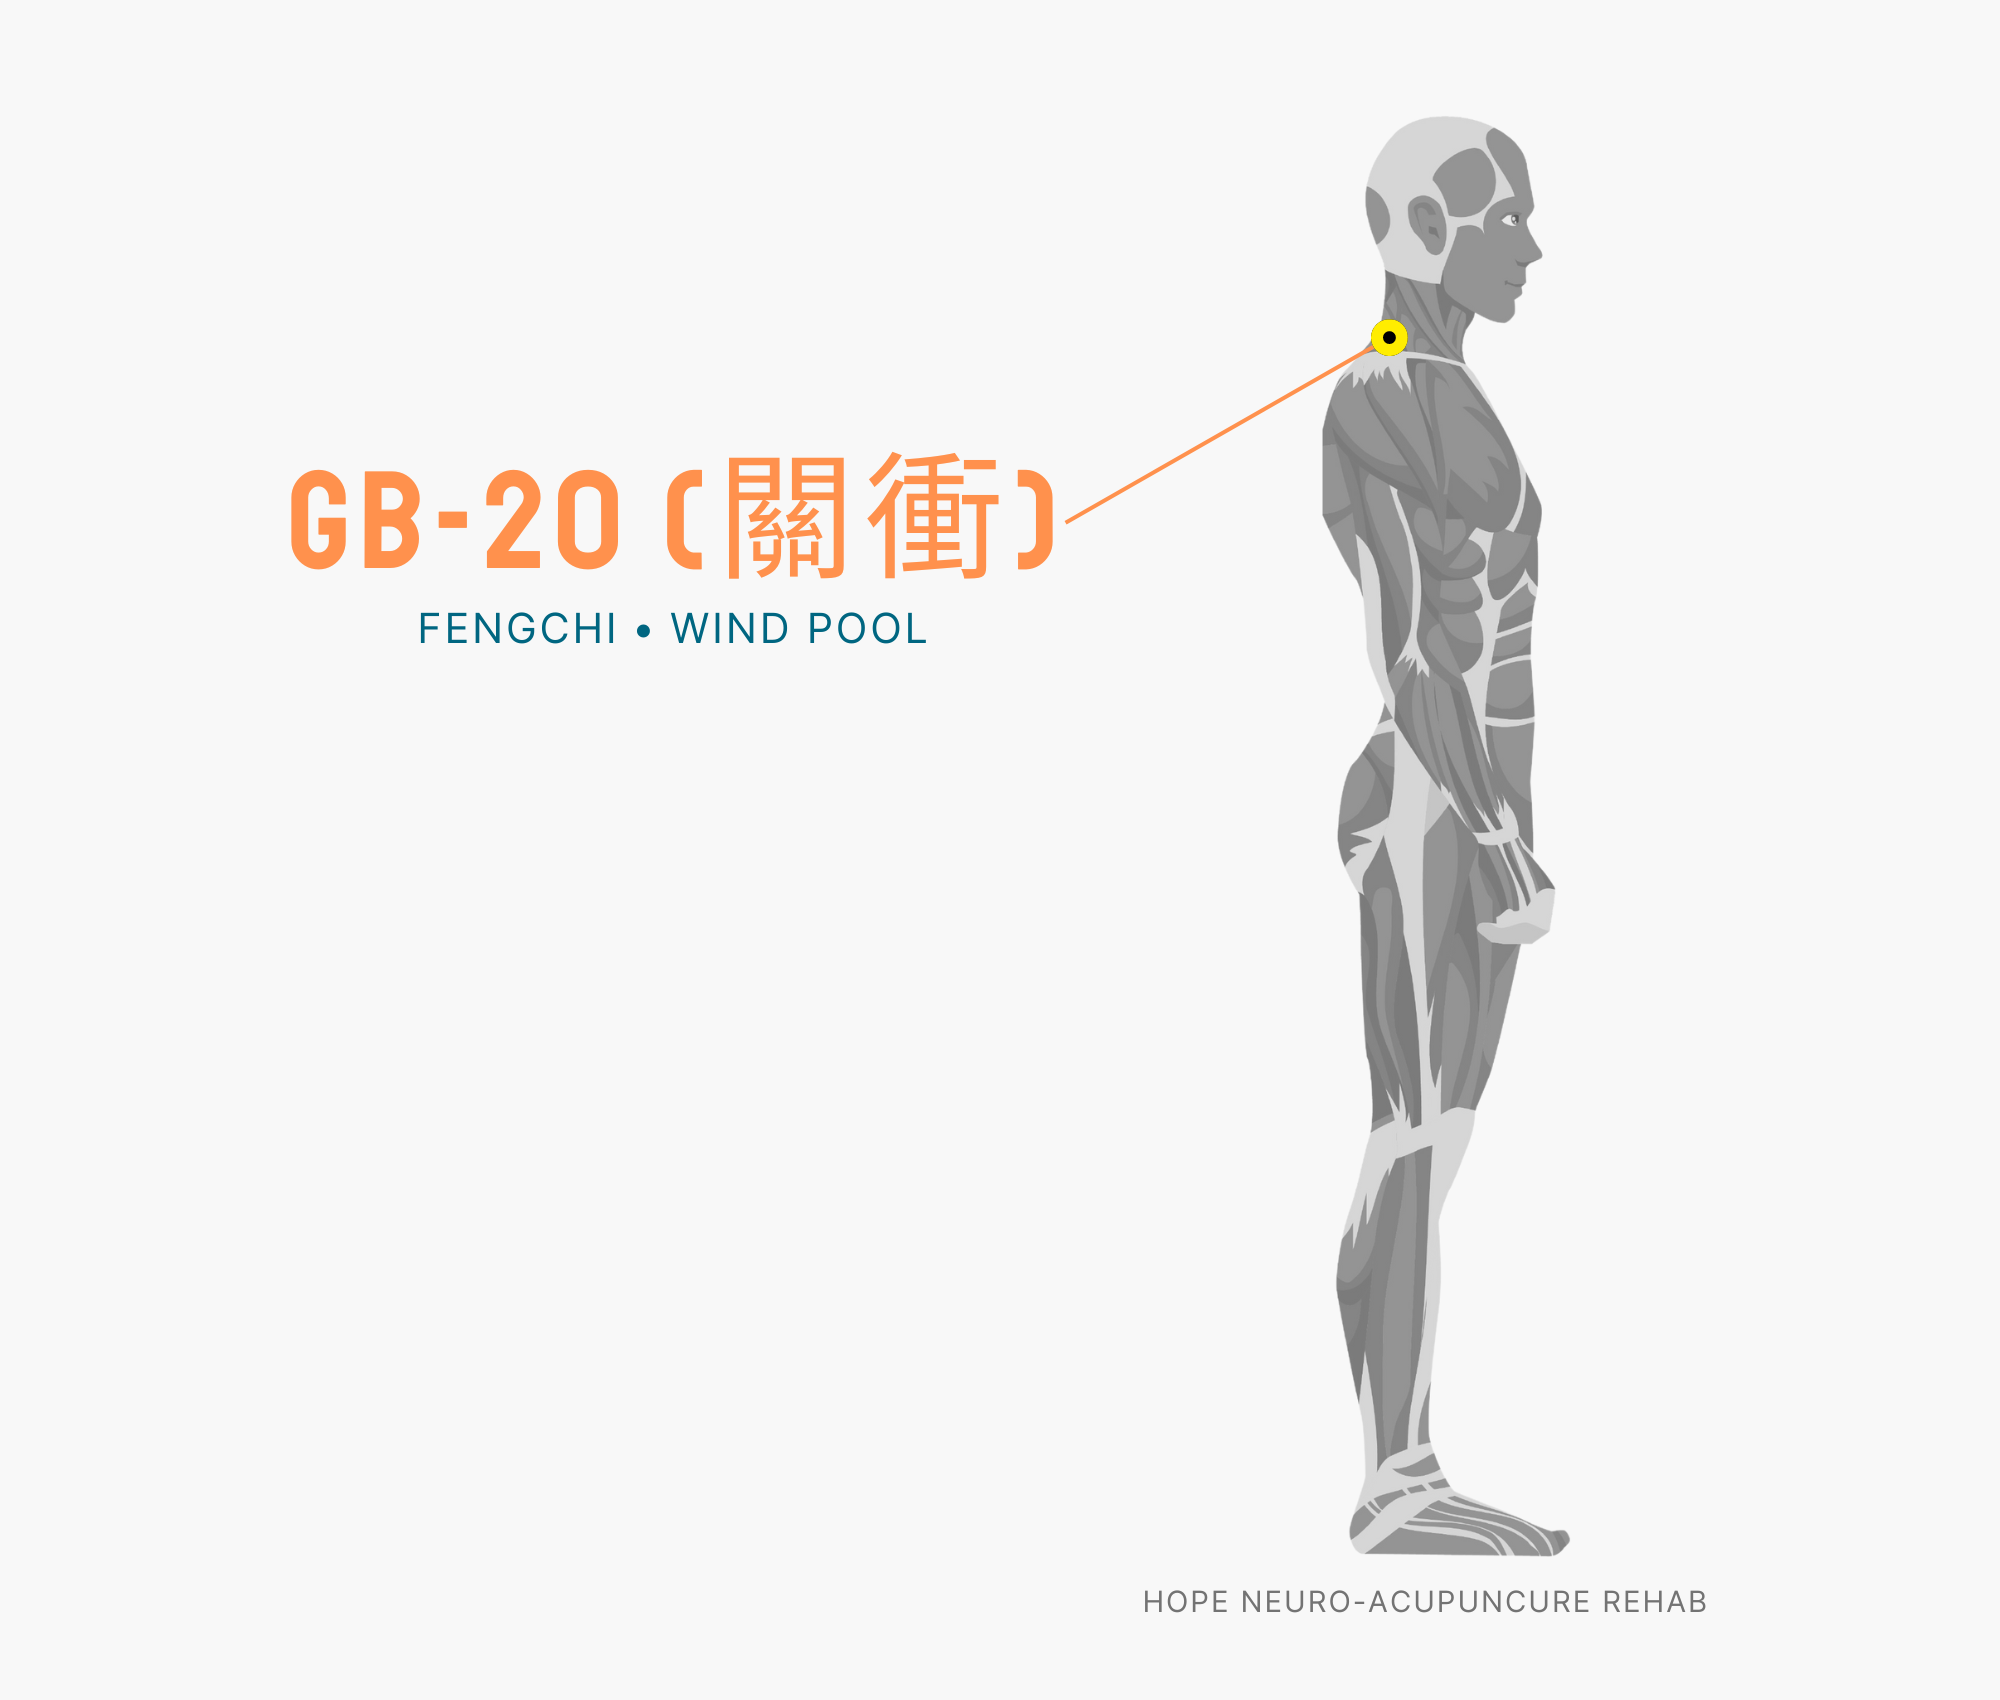
    Acupoint 1: Fengchi (GB20)

    Location: On both sides of the back of the neck where the neck and head meet. It’s the indented area just above the hairline.

    Acupressure technique: Using both thumbs, press slightly upward while rubbing in circular motions 10-15 times. You can also repeat the pressing motion for 3-5 seconds, 10 times.

    Benefits: GB20 is known as the acupoint that “relieves neck tension” and directly alleviates muscle stiffness in the neck. It’s the most powerful acupoint for simultaneously relieving occipital and temporal headaches, neck stiffness, and back-of-neck tension.

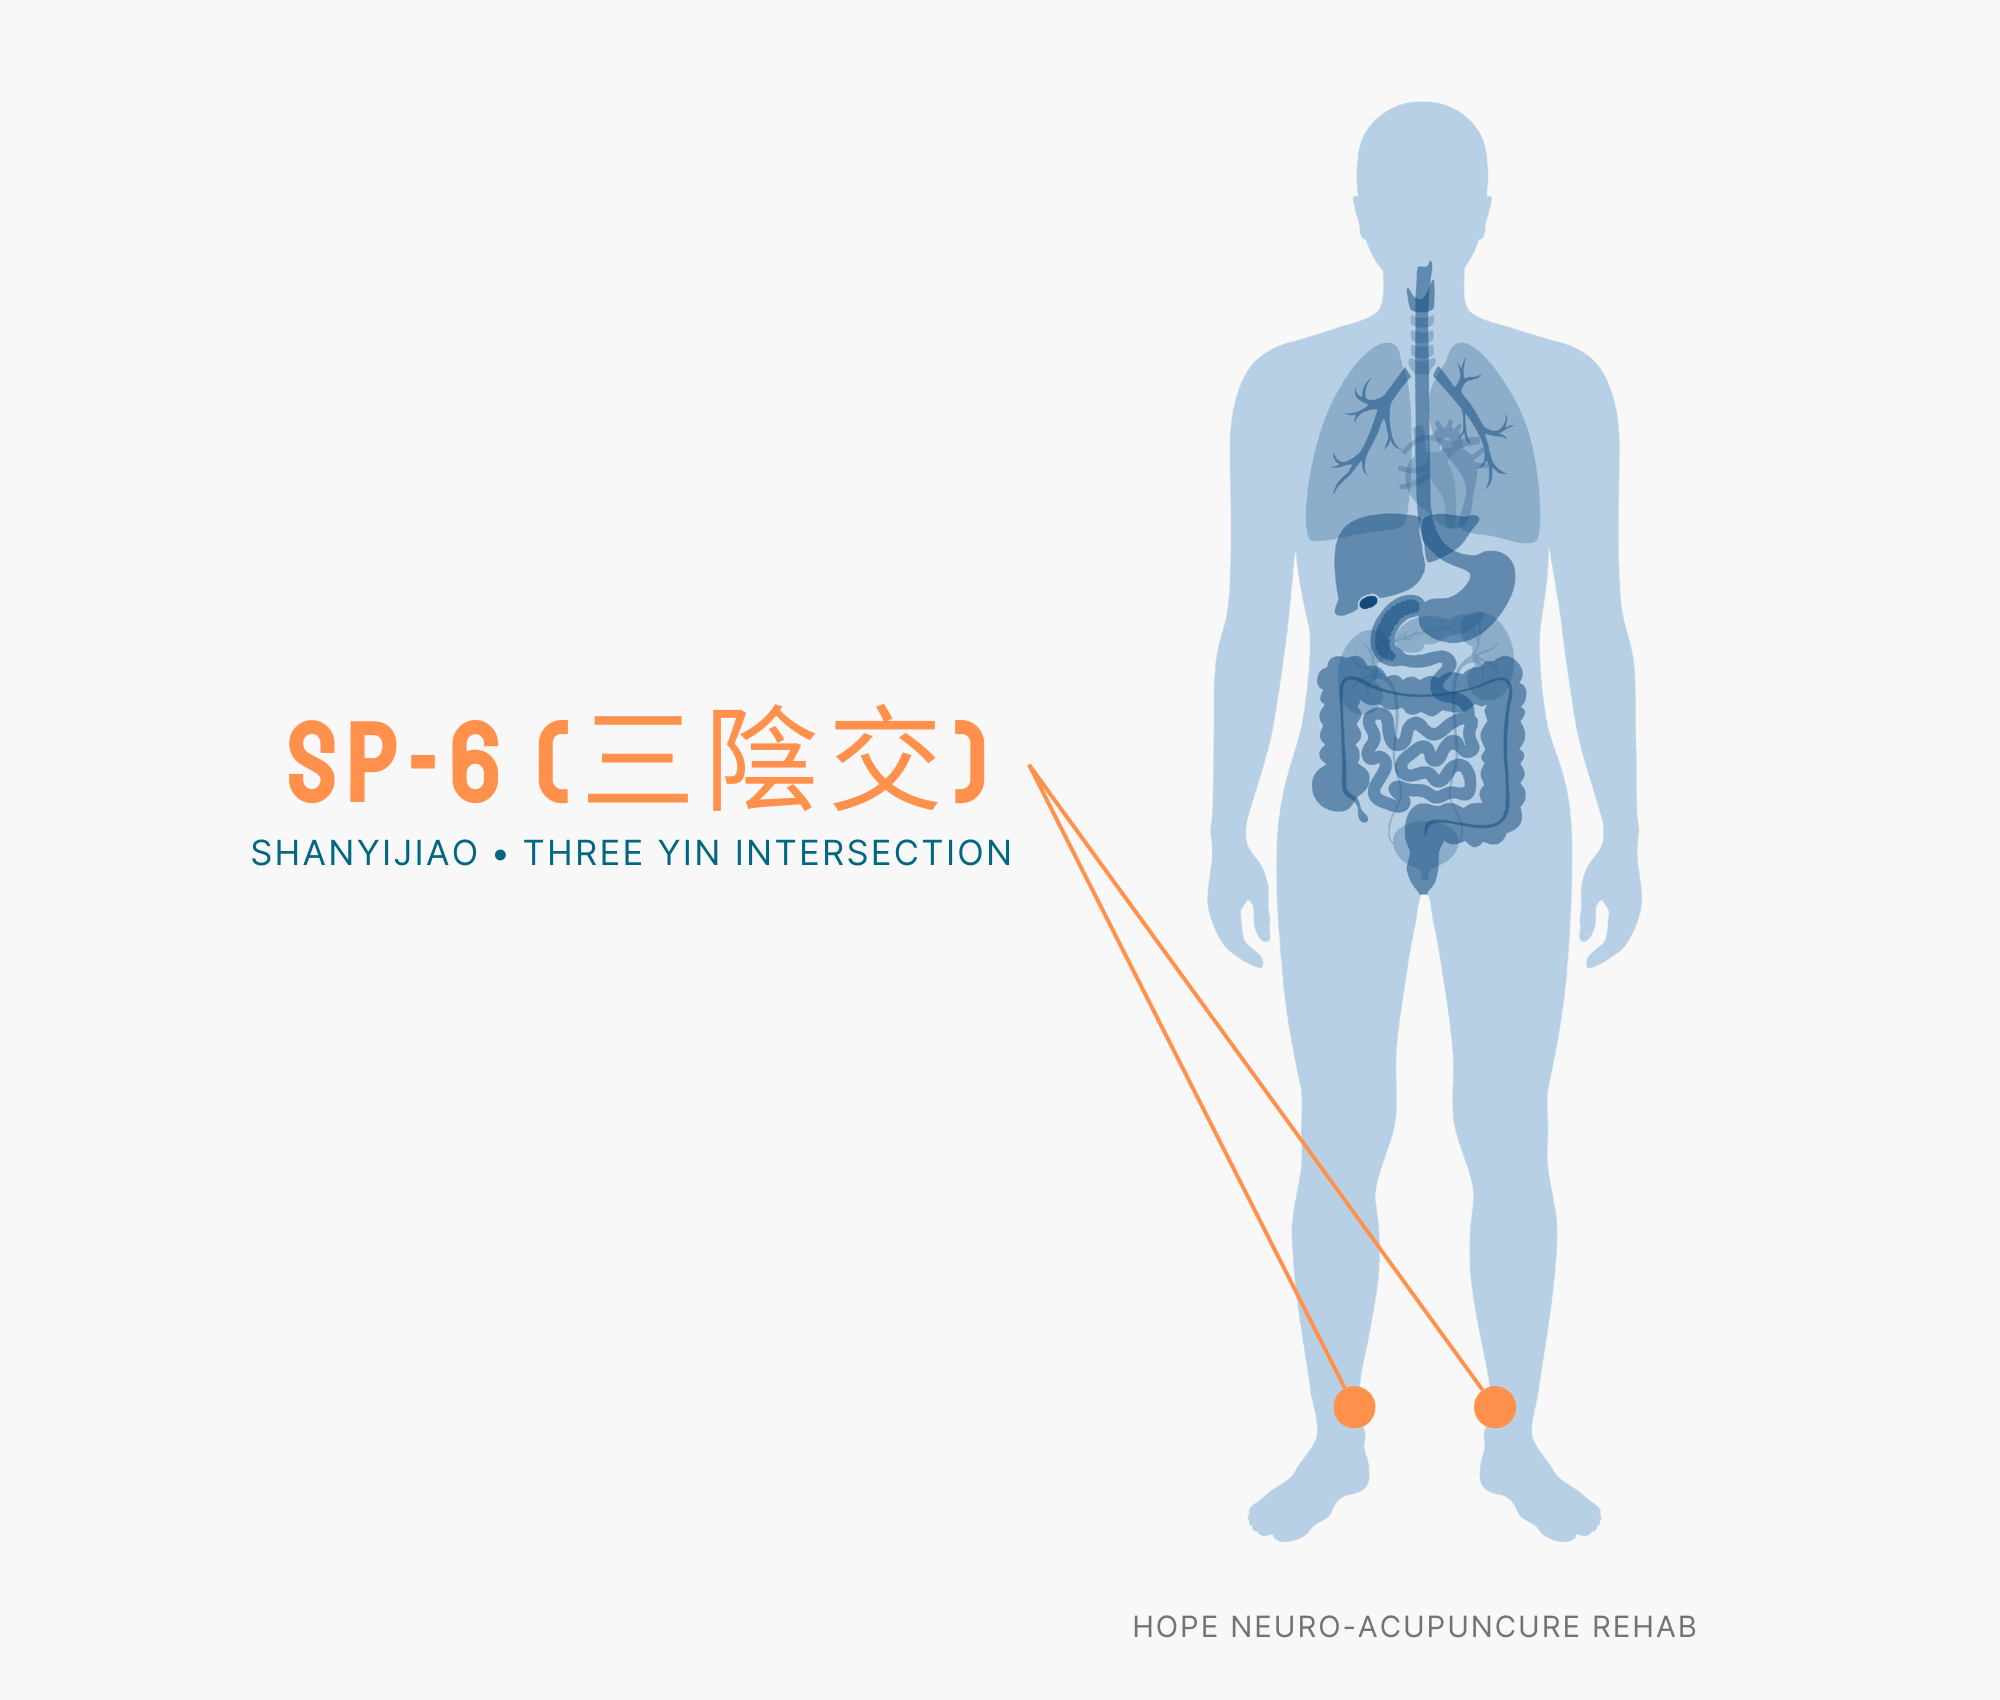
    Acupoint 2: Hegu (LI4)

    Location: In the webbing between the thumb and index finger, at the indented area slightly below the end of the thumb bone, toward the index finger.

    Acupressure technique: Using your opposite thumb, apply firm pressure for 30 seconds to 1 minute, then release. Repeat 5 times. Rubbing in circular motions slowly is also effective.

    Benefits: Known as the “universal remedy for all pain” in Oriental medicine, LI4 regulates nerve signal transmission to broadly relieve upper body pain including headaches, facial pain, and toothaches. It’s particularly effective for tension headaches caused by stress.

    Acupoint 3: Taiyang (Extra Point)

    Location: At the temple. It’s the indented area roughly midway between the eye and ear when pressed.

    Acupressure technique: Using your index and middle fingers together, rub slowly in circular motions 15-20 times. Maintain slight pressure while making small circular motions. You can also do 10 circles in one direction and 10 in the opposite direction.

    Benefits: This is a specialized acupoint for temporal (temple area) headaches. It’s especially effective when tension headaches occur on one side of the head, and it also helps with eye fatigue and vision improvement.

    Acupoint 4: Baihui (GV20)

    Location: At the crown of the head. It’s the intersection point where a line connecting the highest points of both ears meets a line through the center of the face. When pressed with a finger, it’s a slightly indented area.

    Acupressure technique: Overlap your middle fingers to stimulate the GV20 point. Repeat pressing for 3-5 seconds 10 times, while simultaneously rubbing in small circles. Be careful not to press too hard.

    Benefits: This acupoint, whose name means “resolves a hundred problems,” clears overall mental energy. It relieves headaches at the crown and throughout the head, while simultaneously alleviating fatigue and lethargy. It’s particularly beneficial for stress-related headaches.

    Acupoint 5: Tianzhu (BL10)

    Location: At the center of the back of the neck, slightly below GB20. It’s on the upper part of the muscles on both sides where the neck and shoulders meet.

    Acupressure technique: Using both thumbs, press firmly downward and hold for 5 seconds. Repeat 8-10 times. It’s even more effective if you simultaneously gently stretch by tilting your head backward.

    Benefits: BL10 is an acupoint that relieves severely stiffened muscles at the back of the neck. It simultaneously relieves occipital headaches, neck stiffness, and shoulder tension, while improving blood circulation to the brain to treat the root cause of headaches.

    5-Minute Self-Acupressure Routine—Quick and Effective Method

    Here’s a routine you can complete in 5 minutes when tension headaches appear during a busy day:

    • 1 minute (Preparation): Sit in a comfortable position and take 3 deep breaths, exhaling slowly. Slowly rotate your neck and shoulders left and right 2-3 times.
    • 1 minute (GB20): Stimulate GB20 with both thumbs. Apply firm pressure and massage in circles 10-15 times.
    • 1 minute (Taiyang + LI4): With one hand, rub your temple (Taiyang) in circles, while with the other hand, press LI4 firmly. After 30 seconds, switch hands.
    • 1 minute (GV20 + BL10): While gently pressing the crown of your head (GV20) with your middle fingers, strongly stimulate the back of your neck (BL10) with your thumbs. Repeat 10 times.
    • 1 minute (Finishing): Again, slowly rotate your neck left and right, and breathe deeply to release tension.

    Tip: By doing the routine once in the morning as prevention and twice in the afternoon when symptoms appear, you can stay free from headache worries all day.

    ⚠️ Medical Disclaimer: This article is written for educational and informational purposes and does not replace professional medical diagnosis or treatment. If symptoms persist or are severe, please consult a healthcare professional.
    🤰 Pregnancy Warning: Among the acupoints above, LI4, BL10, and GB20 may trigger uterine contractions in pregnant women. If you are pregnant or may be pregnant, be sure to consult with a professional before performing these techniques.
  • 咳に効く5つのツボ — セルフ指圧完全ガイド

    咳に効く5つのツボ — セルフ指圧完全ガイド

    一言まとめ: 肺兪、天突、膻中、列缺、太淵の5つのツボを1日2回、各5分間指圧すると呼吸器機能が改善され、咳の緩和に役立ちます。

    はじめに

    急に咳が出ると日常生活が不便で、夜間に咳で睡眠を妨害されると本当に辛いですね。特に風邪が治らずに残った咳や、季節変化による呼吸器の不快感は、多くの人が経験する症状です。

    漢方医学では、咳を肺機能の低下と呼吸器循環の不足と考えます。私たちの体には、肺機能を促進し呼吸器を強化する特定のツボがあります。これらのツボを継続的に刺激すると、肺の分泌液の分泌を活発にし、気道の緊張を緩和させて、咳の症状を自然に改善することができます。薬を飲むことなく、指で簡単に刺激できるため、いつでもどこでも実践可能です。

    咳の緩和に効果的なツボ5つ

    1. 肺兪(BL13)―肺機能の中心

    BL13 acupuncture point

    位置: 背の上部、3番目の脊椎下の横側約2cm離れた位置。明確に見つけるのが難しい場合は、肩甲骨の内側の高さから脊椎の両側に沿って人差し指の幅ほど離れた所です。

    指圧法: 横になっているか楽な姿勢で、親指でゆっくり10~15回押したり放したりを繰り返してください。痛みではなく爽やかな感覚を感じるまで進めます。

    効果: 肺経の最も重要なツボで、肺機能を強化し呼吸器疾患全般に効果的です。慢性咳、喘息、気管支炎による咳の緩和に特に有用です。

    2. 天突(BL11)―呼吸器の強化

    BL11 acupuncture point

    位置: 背の上部、首と肩の境界付近、1番目の脊椎下の横側約2cm離れた位置。首の後ろに指を入れて脊椎の両側に沿って下がっていくと見つけられます。

    指圧法: 両手の親指で同時に優しく約10回押します。一人でするのが難しい場合は、ミニマッサージローラーを使うこともできます。

    効果: 上気道炎症を鎮静させ、呼吸器機能を全般的に強化します。風邪の後遺症として残った咳や喉のかゆみを素早く緩和します。

    3. 膻中(REN17)―肺と胸部の中心

    位置: 胸部の正中線、両側の胸の中線上で腕を下ろして指が触れる高さです。正確には胸骨の中央から肋骨間の頂点です。

    指圧法: 立った姿勢で、親指または中指で胸部中央を軽く押すように10~15回刺激します。強く押しすぎないようにご注意ください。

    効果: 肺機能を直接刺激して呼吸を深く快適にします。息苦しい咳、胸部の不快感、呼吸困難を改善します。

    4. 列缺(LU7)―肺経の特効穴

    LU7 acupuncture point

    位置: 前腕内側の横紋から親指方向へ約1.5cm離れた位置。手首を曲げてみると2本の腱が見えるのですが、その間の凹んだ部分です。

    指圧法: 片方の腕を伸ばして、反対側の親指でゆっくり約1分間押すか、円を描くように刺激します。両側を交互に行います。

    効果: 肺経全体を調節する主要なツボで、咳はもちろん、くしゃみ、鼻の症状、皮膚症状まで広く改善します。特に急性咳に速い効果が見られます。

    5. 太淵(LU11)―肺熱除去の最後のツボ

    位置: 親指の爪の外側の縁、爪と指の肉が出会う地点です。正確には親指の先端から人差し指側の縁です。

    指圧法: 反対側の手の親指と人差し指で太淵の部位を軽くつまむように刺激します。10~15回繰り返しますが、強く押しすぎないようにしてください。

    効果: 肺の熱を取り除き、体の毒素を除去します。喉がチクチクしながら出る咳、熱感のある咳に特に効果的です。

    5分間のセルフ指圧ルーチン

    時間配分と順序:

    1. 肺兪(BL13) ―1分(両側30秒ずつ)
    2. 天突(BL11) ―1分(両側30秒ずつ)
    3. 列缺(LU7) ―1分(両側30秒ずつ)
    4. 膻中(REN17) ―1分(正中線上の地点1分)
    5. 太淵(LU11) ―1分(両側30秒ずつ)

    推奨時間: 朝起床後または夜寝る前。1日2回実施するとさらに効果的です。

    追加のヒント: 指圧の前に温かいお湯で手を洗って指を温めた後に開始すると、血液循環がさらに活発になり、効果が高まります。

    ⚠️ 医療免責事項: この記事は健康情報提供目的で作成されており、専門的な医療診断または治療に代わるものではありません。咳が2週間以上続いたり、痰に血が混じって出る場合、高熱が伴う場合など、症状が重い場合は、必ず医療専門家(病院、漢方医院)と相談してください。
    🤰 妊婦注意: 本記事で提示したツボは一般的に安全ですが、個人の体質と妊娠時期によって影響が異なる場合があります。妊娠中であるか妊娠の可能性がある方は、必ず専門家(医師、漢方医師)と相談後に実施してください。
  • 5 Acupoints for Sleep Apnea — Complete Self-Acupressure Guide

    5 Acupoints for Sleep Apnea — Complete Self-Acupressure Guide

    “`html

    One-line summary: Sleep apnea is a condition caused by interrupted breathing at night that leads to reduced sleep quality and daytime drowsiness, and acupressure on acupoints can improve respiratory function and sleep quality.

    Introduction

    Are you struggling with symptoms where your breathing keeps stopping and starting throughout the night? Sleep apnea is not simply snoring. It is a condition where the airway becomes partially or completely blocked during sleep, causing breathing to stop repeatedly, which can lead to oxygen deprivation in the brain, fragmented sleep, and chronic fatigue. Beyond CPAP machines and surgery, acupressure on acupoints from traditional medicine can help relieve symptoms through improved respiratory function, relaxation of neck muscles, and mental and physical calm. In this article, we introduce the precise locations of 5 acupoints effective for sleep apnea relief and self-acupressure methods.

    5 Acupoints Explained

    1️⃣ Anmian (An-mien, EX-HN22) — Sleep Relief Acupoint

    Location: Behind the ear, about 1.5 cm below the hollow area beneath the mastoid process (the bone behind the ear). There are 2 acupoints symmetrically located behind each ear.

    Pressing Method: Repeat slowly pressing and releasing with your thumb or middle finger for 3-5 seconds. Perform 2 times daily, 30 minutes before bedtime for best results.

    Effect: It promotes the secretion of sleep-inducing neurotransmitters and calms excessive brain activity to induce deep sleep. It is excellent for relieving conscious symptoms caused by sleep apnea and daytime drowsiness.

    2️⃣ Fengchi (Feng-chih, GB20) — Neck Tension Relief Acupoint

    GB20 acupuncture point

    Location: At the back of the neck where the neck and shoulder meet. Located about 2 cm lateral to the spine, roughly below the hollow area beneath the ear.

    Pressing Method: Press simultaneously on both sides with your thumbs while making circular massage motions. Maintain for about 1 minute and perform 2 times daily.

    Effect: It relieves tension in the muscles around the neck and throat area to alleviate airway constriction. It improves blood circulation around the cervical spine to strengthen respiratory function and reduce snoring and apnea episodes.

    3️⃣ Shenmen (Shen-men, HT7) — Key to Mental and Physical Calm

    HT7 acupuncture point

    Location: On the inner wrist, about 0.5 cm toward the pinky finger from the wrist crease. It is at the end of the flexor aspect of the inner wrist.

    Pressing Method: Slowly press with the thumb of your opposite hand for 3-5 seconds. Perform on both hands, 1-2 times daily.

    Effect: It calms the heart and nervous system to reduce anxiety and nighttime awakenings caused by sleep apnea. It improves sleep quality and increases the proportion of REM sleep (deep sleep).

    4️⃣ Tiantu (Tian-tu, CV22) — Direct Respiratory System Strengthening

    Location: At the front of the neck, in the hollow above the collarbone (upper center of the neck). It is located about 0.5 cm above the hollow where both collarbones meet.

    Pressing Method: Repeatedly press and release gently for 1-2 seconds vertically with your ring finger or middle finger. Press gently as pressing too hard may cause discomfort, and it is recommended to perform about 1 time daily.

    Effect: It directly stimulates the respiratory system and bronchi to reduce airway resistance. It alleviates upper airway constriction, the root cause of sleep apnea, and improves breathing depth and stability.

    5️⃣ Zusanli (Zu-san-li, ST36) — Overall Immune System Enhancement

    ST36 acupuncture point

    Location: Below the knee, on the outer side of the calf. About 4 finger widths (approximately 10 cm) below the hollow area under the knee. It is located on the central outer aspect of the tibia.

    Pressing Method: Press with your thumb for 3-5 seconds while making circular massage motions. Perform on both legs, maintaining for about 5 minutes once daily.

    Effect: It activates immune function to alleviate physical stress caused by sleep apnea. It helps improve digestive function, restore vitality, and reduce nighttime awakenings to enhance overall sleep quality.

    5-Minute Self-Acupressure Routine

    Recommended time: 30 minutes before bedtime or when waking up in the morning

    Sequence:

    1. Shenmen (HT7) — 1 minute: 30 seconds for each hand. First calm your mind and body.
    2. Anmian (EX-HN22) — 1 minute: 30 seconds for each side. Activate sleep pathways.
    3. Fengchi (GB20) — 1.5 minutes: 1 minute on both sides simultaneously, plus additional 30 seconds on each side individually. Release neck tension.
    4. Tiantu (CV22) — 0.5 minutes: Gentle 30-second pressing. Directly strengthen respiratory function.
    5. Zusanli (ST36) — 1 minute: 30 seconds for each leg. Complete the routine with overall immune system stimulation.

    Tip: A dull ache during acupressure is normal and indicates that the acupoint is being stimulated. With consistent practice 1-2 times daily, you can experience symptom improvement within 2-3 weeks.

    ⚠️ Medical Disclaimer: This article is written for informational purposes only and does not substitute for professional medical diagnosis or treatment. Sleep apnea can lead to serious complications (such as high blood pressure and cerebrovascular disease), so if symptoms persist or are severe, please consult a sleep medicine specialist or otolaryngology professional.

    “`

  • 5 Best Acupoints for Wrist Pain — Complete Self-Acupressure Guide

    5 Best Acupoints for Wrist Pain — Complete Self-Acupressure Guide

    One-line Summary: Wrist pain can be relieved by regularly stimulating the TE5, PC6, PC7, LI4, and TE5 acupoints to improve qi and blood circulation through the meridians. Self-acupressure is a cost-effective pain management method.

    Introduction

    Mouse clicks, smartphone touches, cooking, laundry—modern people’s wrists move constantly without rest. Symptoms such as “frequent tingling in the wrist,” “pain when bending the wrist,” and “stiffness and soreness in the wrist” are common discomforts among office workers and students.

    The causes of wrist pain are varied. Muscle fatigue from repetitive movements, carpal tunnel syndrome (CTS), sprains, or cervical spine issues can affect the wrist. In traditional Chinese medicine, wrist pain is viewed as an imbalance in meridian function, and improving qi and blood circulation through stimulation of specific acupoints is considered important.

    The five acupoints introduced in this article are particularly known to be effective for relieving wrist pain. Because they can be easily stimulated at the office, at home, or while traveling, they will become an essential self-care tool for office workers.

    5 Acupoints for Relieving Wrist Pain

    1. TE5, Waigguan (外關) — The Primary Acupoint for Wrist Pain

    Location: This acupoint belongs to the Triple Burner meridian. It is located on the back of the wrist, approximately 2-3cm above the wrist crease toward the forearm, in the space between the radius (thumb bone) and ulna (pinky bone). More precisely, when you extend your wrist, it is located approximately 2-3cm above the midpoint between the two bones on the back of your hand.

    Benefits: TE5 is effective for wrist pain, elbow pain, and brachial neuralgia. It is particularly excellent for alleviating pain that occurs when bending or extending the wrist, and in traditional Chinese medicine, it is also used to treat “external pathogenic diseases” (diseases caused by external pathogens).

    Technique: Apply vertical pressure to the TE5 area with the tip of your thumb. Press and release repeatedly for 3-5 seconds at an intensity where you feel soreness that is also refreshing. Perform this on both hands alternately, each for 3 minutes.

    2. PC6, Neiguan (內關) — Wrist Pain and Stress Relief

    Location: This acupoint belongs to the Pericardium meridian and is located on the inner side of the wrist (toward the fingers). From the inner wrist crease, go up toward the forearm approximately 2-3cm, positioning it at the center between the two tendons (palmaris longus and flexor carpi radialis). Simply, it is located one to two finger-widths above the inner wrist crease toward the forearm.

    Benefits: PC6 relieves not only wrist pain but also finger numbness, arm pain, and chest palpitations caused by anxiety and stress. It is a very suitable acupoint for stress-related wrist pain in modern people.

    Technique: Press directly with your thumb or massage by rubbing with the knuckle of your opposite hand’s finger. Use medium intensity, rubbing at a pace of approximately 60-80 strokes per minute. Perform this on both sides for 2 minutes each.

    3. PC7, Daling (大陵) — Wrist Pain and Sleep Improvement

    Location: This acupoint belongs to the Pericardium meridian and is located at the center of the wrist crease on the palm side. When you slightly extend your wrist, you will see two tendons on the inner side of the wrist, and Daling is located directly between them. When you bend your fingers toward the wrist, a crease appears, and Daling is at the center of that crease.

    Benefits: PC7 is effective for wrist pain, arm numbness, and improving insomnia and anxiety. It is particularly useful when wrist pain interferes with sleep, and it also has a calming effect on the mind.

    Technique: Press vertically with your thumb. Press and release repeatedly for 3-5 seconds at an intensity with slight discomfort. Particularly if you stimulate this for 1-2 minutes before bed, it can also help improve sleep.

    4. LI4, Hegu (合谷) — A Master Acupoint for Whole-Body Pain Relief

    Location: This acupoint belongs to the Large Intestine meridian and is located in the bony space between the thumb and index finger (between the 1st and 2nd metacarpal bones). When you open your hand, it is located on the back of the hand between the thumb and index finger, at the point above the muscle (first dorsal interosseous muscle) that rises when you bring your fingers together.

    Benefits: LI4 is called the “master acupoint for whole-body pain relief” and alleviates not only wrist pain but also headaches, neck pain, elbow pain, and various other pain throughout the body. It is also widely used for colds, fever, and stress relief.

    Technique: Press with the thumb of your opposite hand using moderate to strong pressure. Repeat pressing and releasing for 5-10 seconds, doing this 3-5 times. When pressing, you should feel an “achy but refreshing” sensation for the technique to be effective. Perform this on both hands for 2-3 minutes each.

    5. TE5, Waigguan (外關) — Forearm and Lateral Wrist Pain

    Location: This acupoint belongs to the Triple Burner meridian and is located approximately 2-3cm above the wrist crease on the back of the wrist toward the forearm. It is in the same area as TE5 but more precisely positioned closer to the radius (thumb bone). When you slightly extend your wrist, it is located above the space between the two bones on the back of the wrist, going up toward the forearm.

    Benefits: TE5 alleviates lateral forearm pain, lateral wrist pain, and stiffness in the neck. It is particularly effective when experiencing lateral wrist pain from mouse use.

    Technique: Press with your thumb at a right angle. Repeat pressing and releasing for 3-5 seconds using medium pressure. Perform this on both hands for 2-3 minutes each, 2-3 times a day.

    5-Minute Self-Acupressure Routine — A Simple Program You Can Do at the Office

    Preparation (30 seconds): Sit in a comfortable position and rest both hands on the desk. Take 3-4 slow, deep breaths before starting.

    Acupoint 1: TE5 (1 minute): Start with the left hand TE5. Repeat pressing for 30 seconds with your thumb, then perform the same technique on the right hand for 30 seconds.

    Acupoint 2: PC6 (1 minute): Stimulate the left hand PC6 by rubbing for 30 seconds, then perform the same on the right hand for 30 seconds.

    Acupoint 3: PC7 (1 minute): Repeat pressing the left hand PC7 for 30 seconds, then perform the same on the right hand for 30 seconds.

    Acupoint 4: LI4 (1 minute): Repeat pressing the left hand LI4 strongly for 30 seconds, then perform the same on the right hand for 30 seconds.

    Acupoint 5: TE5 (1 minute): Repeat pressing the left hand TE5 for 30 seconds, then perform the same on the right hand for 30 seconds.

    Cool-down (1 minute): Gently shake both hands and slowly rotate your wrists clockwise and counterclockwise. For even better results, immerse your wrists in cold water for 3-5 seconds and then wrap them with a warm towel.

    Recommended Times: Right after waking in the morning, 1 hour after lunch, and after leaving work in the evening—three times a day is ideal. When symptoms are severe, you can do this 4-5 times a day, but avoid excessive stimulation.

    Additional Tips for Wrist Pain Acupoint Acupressure

    Use Heat Therapy: Soaking your wrist in warm water for 1-2 minutes or applying a warm compress before acupressure can improve blood circulation and enhance the acupressure effects.

    Correct Intensity: Acupoint acupressure is most effective at an intensity that is “achy but refreshing.” Avoid excessive stimulation, and stop immediately if pain worsens.

    Maintain Consistency: Acupoint acupressure shows minimal effects from just one or two sessions. You need to perform it consistently for at least 2-3 weeks to feel improvement.

    Combine with Other Treatments: Acupoint acupressure is even more effective when combined with wrist stretching, physical therapy, and lifestyle improvements.

    ⚠️ Medical Disclaimer: This article is written for informational health purposes and does not replace professional medical diagnosis or treatment. If wrist pain persists for more than 2 weeks, or if severe pain, swelling, numbness, or weakness is present, please consult a medical professional (doctor, orthopedic specialist, or acupuncturist). This is especially important if you have or suspect an underlying condition such as carpal tunnel syndrome or rheumatoid arthritis.
    🤰 Pregnancy Warning: Among the acupoints introduced above, LI4 should be avoided during pregnancy as it can trigger uterine contractions. TE5, PC6, PC7, and TE5 are relatively safer; however, if you are pregnant or may be pregnant, please consult with an acupuncturist or medical professional before performing these techniques.
  • 冷え性に効く5つのツボ — セルフ指圧完全ガイド

    冷え性に効く5つのツボ — セルフ指圧完全ガイド

    一行要約:手足冷え性は末梢血液循環の不足から生じ、三陰交・太衝・合谷・関元・足三里の5つのツボ指圧で気血循環を促進して改善することができます。

    はじめに

    冬だけでなく、一年中手足が冷たく、しびれる症状を経験する人が多くいます。これが正に手足冷え性です。どんなに服を着ても手先と足先が冷たく、不便さを感じる方のために、東洋医学では気血循環を改善するツボ指圧をお勧めします。手足冷え性は根本的には末梢血液循環の不足と気(氣)の循環低下から生じます。ツボ指圧は経穴を刺激して気血の流れを促進し、体温を正常化するのに効果的です。この記事では、手足冷え性の改善に直接役立つ5つのツボとその指圧法を詳しく説明します。

    5つのツボそれぞれ

    1. 三陰交(SP6, Sanyinjiao)

    SP6 acupuncture point

    位置:足の内側、くるぶしの上から約10cm(指4本分)上がった部分、脛骨の内側縁
    WHOコード:SP6
    指圧法:親指を使ってゆっくり押したり離したりを繰り返します。若干の重だるさを感じる程度で30秒間指圧した後、10秒休むことを繰り返してください。両足で行います。
    効果:三陰交は脾臓と肝臓、腎臓の経絡が集まる地点で、気血循環を最も効果的に促進します。手足冷え性だけでなく、疲労回復と免疫力強化にも優れています。定期的な指圧で慢性冷え症を改善することができます。

    2. 太衝(LR3, Taichong)

    位置:足の甲の親趾と第2趾の骨の間、足首から約3cm上
    WHOコード:LR3
    指圧法:親指の指紋部分で強く押します。若干の痛みを感じる程度(痛快感)が最も効果的です。片側に1分間10回繰り返し指圧し、両側を行います。
    効果:太衝は肝の気(肝氣)を流通させるツボで、血液循環を直接的に改善します。手足の冷感だけでなく、ストレスによる血液循環低下を効果的に治療します。手足冷え性患者が最も早く改善を感じるツボの一つです。

    3. 合谷(LI4, Hegu)

    LI4 acupuncture point

    位置:親指と人差し指の骨の間、手の甲で確認できる筋肉の最も高い地点
    WHOコード:LI4
    指圧法:反対側の親指でゆっくり円を描いて押します。若干の重だるさを感じるまで30秒間指圧し、10秒休むことを繰り返します。両手で行います。
    効果:合谷は大腸経絡の重要なツボで、「万能ツボ」と呼ばれています。全身の気血循環を促進し、特に上半身と手の血液循環改善に優れています。手足冷え性だけでなく、頭痛、顔のほてりなど様々な症状を同時に緩和します。

    4. 関元(CV4, Guanyuan)

    位置:へその下3寸(約10cm)の地点、正中線上
    WHOコード:CV4
    指圧法:仰向けの姿勢で軽く3~4本の指を使って円を描きながら優しくマッサージします。強く押さず、温かさを感じる程度で2~3分間行います。
    効果:関元は「下丹田」と呼ばれる重要なツボで、腎臓の陽気を補充し、全身の基礎エネルギーを強化します。慢性手足冷え性は腎陽不足で生じることが多いですが、関元指圧はこれを根本的に改善します。

    5. 足三里(ST36, Zusanli)

    ST36 acupuncture point

    位置:膝の外側下から約10cm(指4本分)下がった部分、脛の前側
    WHOコード:ST36
    指圧法:親指でゆっくり押したり離したりを繰り返します。若干の重だるさを感じるまで30秒間指圧した後、10秒休むことを3~4回繰り返してください。両足で行います。
    効果:足三里は免疫力強化と全身循環改善で有名なツボです。胃腸機能を促進して消化吸収を改善し、これを通して気血生成を促進します。定期的な刺激で慢性冷え症と疲労を同時に改善します。

    5分間のセルフ指圧ルーティン

    最適な効果のための時間配分:

    1. 準備(30秒):温かいお水で手足を洗い、快適な姿勢(座った姿勢または仰向けの姿勢)をとります。
    2. 合谷(LI4)指圧(50秒):両手各25秒ずつ、円を描いて優しく
    3. 三陰交(SP6)指圧(60秒):両足各30秒ずつ、ゆっくり押したり離したり
    4. 太衝(LR3)指圧(60秒):両足各30秒ずつ、若干の痛みを感じる程度で
    5. 足三里(ST36)指圧(60秒):両足各30秒ずつ、重だるさを感じるまで
    6. 関元(CV4)マッサージ(50秒):仰向けの姿勢で優しく円を描いてマッサージ
    7. 仕上げ(20秒):温かいお水を飲むか、温かい服を着て体温を保ちます。

    推奨時間:朝起床後または夜寝る前に1日1~2回行ってください。最低3週間以上継続して実施すると、目立つ改善を感じることができます。

    ⚠️ 医療免責条項:この記事は健康情報提供の目的で作成されており、専門的な医療診断または治療に代わるものではありません。手足冷え性は甲状腺疾患、血液循環疾患、レイノー症候群など様々な基礎疾患により発生する可能性があります。症状が持続または悪化した場合、または手足に潰瘍または色の変化が伴う場合は、必ず医療専門家(医師、東洋医学医)に相談してください。
    🤰 妊婦注意:上記のツボの中で三陰交(SP6)、太衝(LR3)、合谷(LI4)は妊婦に子宮収縮を引き起こす可能性があります。妊娠中、または妊娠の可能性がある方は、必ず専門家に相談した後に実施してください。妊婦は関元(CV4)と足三里(ST36)を中心に指圧することが安全です。
  • 5 Acupoints for Skin Itching — A Complete Self-Acupressure Guide

    5 Acupoints for Skin Itching — A Complete Self-Acupressure Guide

    One-line Summary: Skin itching can be naturally relieved by applying acupressure to 5 acupoints—Quchi (LI11), Xuehai (BL55), Sanyinjiao (SP6), Hegu (LI4), and Fengshi (GB31)—for 5 minutes daily, which improves blood circulation and immune function.

    Introduction

    Have you ever stayed up at night due to sudden skin itching or found it difficult to concentrate on daily tasks? Skin itching is not just a simple symptom—it’s a signal from your body. In traditional Chinese medicine, skin itching is diagnosed as “heat from dampness” or “qi and blood deficiency.” When the body’s qi and blood become stagnant or heat accumulates due to stress, dry environments, or poor eating habits, skin itching appears. By consistently stimulating specific acupoints, you can promote blood circulation and strengthen immune function to relieve itching. This article introduces the 5 most effective acupoints for improving skin itching and how to perform self-acupressure.

    5 Acupoints Good for Skin Itching

    1. Quchi (LI11) — The Acupoint That Clears Heat and Boosts Immunity

    LI11 acupuncture point

    Location: Located at the end of the inner crease of the arm when the elbow is bent. Using the thumb of the opposite hand, follow the centerline on the inner side of the arm and find the point where it touches the inner elbow crease.

    Technique: Using your thumb, press slowly and deeply for 3 seconds, then slowly release over 3 seconds. Repeat this 10 times.

    Effects: Quchi is an acupoint on the “Large Intestine Meridian” that clears heat from the body and reduces inflammation. It is particularly effective for improving skin conditions such as skin itching, eczema, and hives, and also helps prevent colds by strengthening immunity.

    2. Xuehai (BL55) — The Acupoint That Promotes Blood Circulation

    BL55 acupuncture point

    Location: Located on the center of the back of the calf, about 3-4 cm below the knee. It is slightly to the inner side of the center of the calf muscle (gastrocnemius).

    Technique: Press vertically using your thumb or a knuckle joint. Apply pressure strong enough to feel slight discomfort for 10 seconds, then release. Repeat 10 times on each leg.

    Effects: As its name suggests, Xuehai is an acupoint related to “blood.” It activates blood circulation to supply nutrients and oxygen to the skin and promotes toxin elimination. It is effective not only for skin itching but also for improving skin tone and recovering from fatigue.

    3. Sanyinjiao (SP6) — Boosts Immunity and Improves Skin Tone

    SP6 acupuncture point

    Location: Located about 4 cm (4 finger widths) above the highest bone on the inner ankle (medial malleolus). Follow the inner edge of the tibia bone upward.

    Technique: Using your thumb, press deeply while breathing slowly, then release. Repeat 15 times on each ankle, twice daily.

    Effects: Sanyinjiao is where three meridians meet—the Spleen Meridian, Liver Meridian, and Kidney Meridian—which is why it is named “three yin.” It strengthens immunity, balances hormones, and improves skin tone and texture. By activating qi and blood circulation throughout the body, it addresses the root cause of skin itching.

    4. Hegu (LI4) — The Versatile Acupoint That Regulates Whole-Body Function

    LI4 acupuncture point

    Location: Located in the deep space between the thumb and index finger, at the point where the finger bones meet. You can find this sensitive area by slowly pressing with the opposite thumb.

    Technique: Using the opposite thumb, press vertically and deeply. You may feel slight discomfort. Press for 5 seconds and release for 3 seconds, repeat 10 times.

    Effects: Hegu is called the “universal acupoint” because it affects the whole body. In addition to skin health, it is effective for stress relief, immune enhancement, and promoting metabolism. It is particularly helpful for relieving stress-related symptoms that occur together with skin itching.

    5. Fengshi (GB31) — The Specialized Acupoint for Relieving Skin Itching and Eczema

    GB31 acupuncture point

    Location: Located on the outer side of the leg, about 10-12 cm above the knee (in the center of the thigh). It is at the point where your fingertips touch when your arms hang naturally at your sides.

    Technique: Overlap the middle and index fingers of both hands and press vertically. Gradually increase the pressure and press for 10 seconds, then release. Repeat 10 times on each leg.

    Effects: Fengshi is a specialized acupoint for “skin itching caused by dampness.” It shows quick results especially for itching caused by eczema, hives, and allergic dermatitis, and improves skin condition while preventing recurrence.

    5-Minute Self-Acupressure Routine

    Recommended Time: It is most effective to perform this routine twice daily—morning and evening—for 5 minutes each.

    Acupressure Order and Time Allocation:

    • [1 minute] Both Quchi (LI11) — 30 seconds × 2 rounds
    • [1 minute] Both Hegu (LI4) — 30 seconds × 2 rounds
    • [1 minute] Both Sanyinjiao (SP6) — 30 seconds × 2 rounds
    • [1 minute] Both Xuehai (BL55) — 30 seconds × 2 rounds
    • [1 minute] Both Fengshi (GB31) — 30 seconds × 2 rounds

    Precautions: After acupressure, drink warm water and avoid exposure to cold air for at least 30 minutes. When starting out, begin with light pressure and observe how your body responds before increasing intensity. If you have wounds on your skin or severe inflammation, consult a healthcare professional before performing acupressure.

    ⚠️ Medical Disclaimer: This article is provided for informational purposes and does not replace professional medical diagnosis or treatment. If skin itching persists or worsens for more than 2 weeks, consult a dermatologist or a traditional Chinese medicine practitioner. If infection symptoms (suppuration, swelling, high fever, etc.) are present, seek immediate medical attention.
    🤰 Pregnancy Caution: Among the acupoints above, Sanyinjiao (SP6) and Hegu (LI4) may trigger uterine contractions in pregnant women. If you are pregnant or possibly pregnant, consult a traditional Chinese medicine practitioner before performing acupressure. Instead, using only Quchi (LI11) and Xuehai (BL55) is safer.
  • 5 Acupoints Good for Toothache — Complete Self-Acupressure Guide

    5 Acupoints Good for Toothache — Complete Self-Acupressure Guide

    One-line summary: Precisely stimulating five acupoints—Hegu (LI4), Jiache (ST6), Xiaguan (ST7), Yingxiang (LI20), and Sanjian (LI3)—can alleviate acute tooth pain within 5-15 minutes.

    Introduction

    Few pains are as unbearable as a sudden toothache. Many people experience pain that strikes in the middle of the night or suffer while waiting for a dental appointment. Modern medicine and traditional Chinese medicine have long recommended acupoint stimulation for relieving facial pain. In particular, acupoints around the face have rich nerve distribution, so acupressure alone can provide quick relief. In this article, we’ll introduce five of the most effective acupoints for toothache relief and the correct acupressure techniques.

    Five Acupoints Effective for Toothache

    1. Hegu (LI4) — The Starting Point for Pain Relief

    LI4 acupuncture point

    Location: This point is located where the thumb and index finger meet, at the highest part of the muscle between the fingers. When your palm faces up, it’s located in the webbing between the thumb and index finger.

    Acupressure Technique: Using the thumb of the opposite hand, press firmly on the Hegu point and hold for 10 seconds, then slowly release. Repeat this 10 times, and perform the same technique on both hands. The pressure intensity should be firm enough to feel slight discomfort.

    Effects: As a primary acupoint on the Large Intestine meridian, it’s excellent for relieving pain throughout the face. It’s especially widely used for alleviating tooth pain, jaw pain, and headaches. It’s effective not only for toothaches but also for migraines and trigeminal neuralgia.

    2. Jiache (ST6) — The Specialty Acupoint for Jaw Pain

    ST6 acupuncture point

    Location: Located about 1cm above the lower jaw edge in the direction of the ear. It’s positioned directly above where the masseter muscle (chewing muscle) protrudes when your mouth is closed.

    Acupressure Technique: Locate the Jiache point with your index or middle finger, then apply pressure at a slight angle toward the ear. Press firmly for 10 seconds, then massage in circular motions about 10 times before slowly releasing. Perform this on both sides of the jaw.

    Effects: As an acupoint on the Stomach meridian, it’s especially effective for jaw joint pain and tooth pain around the lower teeth. Stimulating this point relieves muscle tension around the jaw, quickly alleviating pain.

    3. Xiaguan (ST7) — The Special Remedy for Lower Tooth Pain

    ST7 acupuncture point

    Location: Located in the depression below the cheekbone, approximately 1cm below the ear in the direction of the lower jaw. It’s positioned directly in front of where the joint moves when you slightly open your mouth.

    Acupressure Technique: Locate Xiaguan with your index or middle finger, then apply vertical downward pressure and press for 10 seconds. Perform circular massage motions 10-15 times, then slowly release. Repeat on both sides.

    Effects: As a primary acupoint on the Stomach meridian, it’s especially effective for lower incisor pain and jaw pain. It’s even more effective when stimulated together with Jiache (ST6).

    4. Yingxiang (LI20) — Relief for Pain Around the Nose and Mouth

    LI20 acupuncture point

    Location: Located in the area where the wrinkle beside the nostril deepens, slightly below the outer corners of the nose. It’s at the point where a vertical line drawn upward from the corner of the mouth meets this area.

    Acupressure Technique: Locate Yingxiang simultaneously with both index fingers, then apply pressure at a slight angle toward the nostrils and press for 10 seconds. Perform circular massage motions 10-15 times, then slowly release. Use light pressure since this area is sensitive.

    Effects: As an acupoint on the Large Intestine meridian, it’s effective for relieving tooth pain in the upper incisors and around the nose. It’s particularly beneficial for toothaches caused by maxillary swelling or those associated with sinusitis.

    5. Sanjian (LI3) — The Emergency Acupoint on Your Hand

    LI3 acupuncture point

    Location: Located between the index and middle finger metacarpals on the back of the hand, in the area where hand creases appear. It’s directly below where your index finger touches when you make a fist.

    Acupressure Technique: Locate the Sanjian point with the thumb of the opposite hand and press vertically for 10-15 seconds. Repeat this 5-10 times, then massage by moving your finger up and down. Perform this on both hands.

    Effects: As an acupoint on the Large Intestine meridian, when used together with Hegu (LI4), the pain-relieving effect is doubled. It’s very useful in emergencies since it can be easily stimulated anytime and anywhere.

    5-Minute Self-Acupressure Routine

    When toothache strikes suddenly, follow this routine in order:

    1. Hegu Acupressure (1 minute) — 30 seconds on each hand, medium-to-firm pressure
    2. Jiache Acupressure (1 minute) — 30 seconds on each side of the jaw, being mindful of the jaw joint
    3. Xiaguan Acupressure (1 minute) — 30 seconds on each side, maintaining downward pressure
    4. Yingxiang Acupressure (1 minute) — 30 seconds simultaneously on both sides, light pressure
    5. Sanjian Acupressure (1 minute) — 30 seconds on each hand, final step

    Tip: After performing the routine once, wait about 15 minutes and repeat if necessary. You can repeat up to 3-4 times per day.

    ⚠️ Medical Disclaimer: This article is written for informational health purposes and does not replace professional medical diagnosis or treatment. If symptoms persist or are severe, please consult a healthcare professional.
    🤰 Pregnancy Warning: Among the above acupoints, Hegu (LI4) and Xiaguan (ST7) can trigger uterine contractions in pregnant women. If you are pregnant or possibly pregnant, you must consult a professional before using these techniques. For pregnant women, it’s recommended to use only Yingxiang (LI20) and Jiache (ST6) acupressure.
  • 5 Acupoints for Back Pain — Complete Self-Acupressure Guide

    5 Acupoints for Back Pain — Complete Self-Acupressure Guide

    “`html

    One-line summary: Back pain can be self-managed through regular acupressure on Jianjing, Fengchi, and Tianzhui acupoints, which relieves muscle tension and improves blood circulation.

    Back Pain: Why Does It Occur and How to Address It?

    Back pain has become a chronic condition in modern life. Prolonged sitting at work, smartphone use, and poor posture cause the muscles around the cervical and thoracic vertebrae to become stiff, leading to pain. The entire neck, shoulders, and back feel tense and heavy, which occurs because blood circulation is impaired and muscles lack oxygen.

    In traditional Chinese medicine, such back pain is addressed fundamentally through acupoint stimulation. When specific acupoints are pressed, muscle tension releases, and blood and qi (energy) circulation improves along the meridians, alleviating pain. Without medication, immediate relief can be felt using just your fingers, making this method ideal for modern self-care.

    5 Acupoints for Back Pain Relief — Precise Locations and Acupressure Techniques

    1. Jianjing (肩井, GB21) — Immediate Relaxation of Shoulder and Upper Back Muscles

    WHO Code: GB21 (Gallbladder Meridian 21)
    Location: The midpoint of the line extending from the back of the neck toward the shoulder tip. It is the highest point of the shoulder muscle that becomes most prominent when bending the neck forward.
    Acupressure technique: Press with your thumb for 3 seconds and rest for 2 seconds, repeating for 1 minute. Alternating acupressure on both Jianjing points quickly releases muscle tension throughout the shoulders and back.
    Effect: Most effective for releasing shoulder knots (hardened muscles), and excellent for neck stiffness, migraines, and upper body tension caused by stress. Immediately after acupressure, pain significantly decreases along with a warming sensation.

    2. Fengchi (風池, GB20) — Improved Blood Flow to Cervical Vertebrae and Brain

    GB20 acupuncture point

    WHO Code: GB20 (Gallbladder Meridian 20)
    Location: The back of the neck, in the hollow area between the cervical vertebra 7 and shoulder blade. Follow the back of your neck upward with your finger until you find the hollow area just below the hairline.
    Acupressure technique: Gently press simultaneously with both thumbs, using an upward pushing motion for 3 seconds, then rest for 2 seconds, repeating for 1 minute. Continue repeating until the stiffness in the neck releases.
    Effect: Improves blood circulation around the cervical vertebrae, quickly alleviating back of neck pain, cervical headaches, and neck stiffness. As blood flow to the brain increases, feelings of heaviness also ease.

    3. Tianzhui (天柱, BL10) — Lower Cervical and Upper Back Connection Area

    BL10 acupuncture point

    WHO Code: BL10 (Bladder Meridian 10)
    Location: The center of the back of the neck, located at the outer boundary of the sternocleidomastoid muscle (neck side muscle). It is the point directly below where the neck and shoulder meet when bending the neck slightly.
    Acupressure technique: Pinch with thumb and index finger while pressing for 3 seconds, then release for 2 seconds. Alternate sides for 1-2 minutes. A slight level of pain sensation is effective.
    Effect: Relieves tension in the muscle groups connecting the lower cervical vertebrae to the upper back, and is particularly effective when experiencing both neck and back pain. Fatigue is quickly relieved through improved blood circulation.

    4. Quchi (曲池, LI11) — Widespread Upper Body Pain Relief

    LI11 acupuncture point

    WHO Code: LI11 (Large Intestine Meridian 11)
    Location: The outer end of the elbow crease on the front of the elbow. It is the outermost point on the inner side of the elbow when the arm is bent.
    Acupressure technique: Press firmly with your thumb in a vertical direction for 3-5 seconds, then release. Repeat for 1 minute. Alternating between both arms increases the effect throughout the upper body.
    Effect: Since it stimulates nerve areas throughout the upper body along the Large Intestine Meridian, it relieves not only back pain but also arm numbness, elbow pain, and widespread upper body tension. Particularly effective for nerve-related pain.

    5. Feishu (肺兪, BL13) — Deep Relaxation of Central Back Muscle Groups

    BL13 acupuncture point

    WHO Code: BL13 (Bladder Meridian 13)
    Location: The center of the back, approximately 2 cm to the side of the thoracic vertebra 3 spinous process (the protruding part of the vertebra) on the Bladder Meridian. The precise location is approximately one finger width to the side of the vertebrae on both sides.
    Acupressure technique: Place a tennis ball under your back and lean against a wall for deep pressure, or lie flat and press firmly with your thumb in a vertical direction for 3-5 seconds, then release. Repeat for 1 minute.
    Effect: Most effective for releasing deep knots in the central back muscle groups, improving breathing comfort and relieving chest discomfort. Improved respiration deepens overall body relaxation further.

    5-Minute Self-Acupressure Routine — Effective Order and Time Distribution

    Preparation: Sit or lie down comfortably. It’s better to begin after a warm bath when muscles are already relaxed.

    1. Jianjing Acupressure (1 minute)
      Place your thumbs on both Jianjing points and repeat “press for 3 seconds and rest for 2 seconds.” You’ll feel the heaviness in your shoulders ease.
    2. Fengchi Acupressure (1 minute)
      Gently press simultaneously with both thumbs, using an upward pushing motion. You’ll notice the stiffness in the back of the neck ease and your mind becomes clearer.
    3. Tianzhui Acupressure (1 minute)
      Alternate sides, pinching with thumb and index finger, pressing for 3 seconds then releasing for 2 seconds.
    4. Quchi Acupressure (1 minute)
      Alternate between both arms, pressing firmly with your thumb in a vertical direction and then releasing, repeating this motion.
    5. Feishu Acupressure (1 minute)
      Lie flat and repeat vertical thumb pressing on both Feishu points on either side of the center back, or place a tennis ball underneath and lean against a wall to stimulate.

    After completion: Perform gentle neck stretches in 4 directions for 5-10 seconds each right after acupressure, and the effects will be even more pronounced.

    ⚠️ Medical Disclaimer: This article is provided for informational purposes and does not replace professional medical diagnosis or treatment. If back pain persists for more than 3 days, or if symptoms such as arm numbness, leg numbness, abnormal bowel/bladder function, or high fever accompany the pain, please consult a healthcare professional (medical doctor or acupuncturist). You may have serious conditions such as fractures, herniated discs, or spinal compression.

    “`

  • 5 Acupoints for Runny Nose — Complete Self-Acupressure Guide

    5 Acupoints for Runny Nose — Complete Self-Acupressure Guide

    One-Line Summary: Runny nose can be improved within 2-3 days by applying acupressure to 5 points—Yingxiang (LI20), Hegu (LI4), Yintang (GV27), Fengchi (GB20), and Tongzhu (BL7)—three times daily for 5 minutes each. This method is effective for both early-stage cold and allergic rhinitis.

    Introduction

    Runny nose is a common symptom that everyone experiences due to colds, allergies, rhinitis, and other conditions. Continuously flowing nasal discharge makes daily life inconvenient, irritates the skin around the nose turning it red, and disturbs sleep. More people are seeking ways to enhance their body’s natural healing power rather than relying solely on medication.

    Acupoint acupressure in traditional medicine is an effective natural therapy that regulates the body’s qi (energy) flow and enhances immunity. In particular, stimulating specific acupoints located around the nose, face, arms, and back of the neck promotes blood circulation in the nose, alleviates inflammation, and reduces nasal discharge. The advantage is that it can be performed with just one finger in just 5 minutes without worrying about side effects from medication.

    5 Effective Acupoints for Relieving Runny Nose

    1. Yingxiang (LI20, Yingxiang) — Premier Acupoint for Runny Nose Symptoms

    LI20 acupuncture point

    Location: On the side of the nostril, at the point where the nasolabial fold meets the base of the nostril

    Acupressure Method: Position the index fingers of both hands on either side of the nose, then slowly stimulate by making small circular motions up and down for 3-5 seconds each, repeating 20-30 times. Each session should last about 1-2 minutes. Apply moderate pressure to avoid pain in the nasal bone.

    Benefits: Yingxiang stimulates the trigeminal nerve responsible for local nasal sensation, directly controlling mucus production. It is highly effective for early-stage cold runny nose, allergic rhinitis, and sinusitis-related nasal discharge. This is the acupoint that provides the fastest results.

    2. Hegu (LI4, Hegu) — Representative Acupoint for Enhancing Immunity

    LI4 acupuncture point

    Location: In the depression between the thumb and index finger, between the first and second metacarpal bones

    Acupressure Method: Place the opposite thumb on Hegu and press firmly at a 45-degree angle toward the bone for about 3-5 seconds. Repeat this 20-30 times, alternating between both hands. A slight soreness or fullness sensation is normal.

    Benefits: Hegu is an acupoint on the Large Intestine meridian that regulates the entire immune system. It can simultaneously alleviate runny nose, general cold symptoms, headaches, fever, and nasal congestion. Regular stimulation also provides cold prevention benefits.

    3. Yintang (GV27 or EX-HN3, Yintang) — Key Acupoint for Nasal and Head Symptoms

    Location: In the center between the two eyebrows, commonly called the glabella

    Acupressure Method: Overlap the thumbs of both hands on Yintang and apply pressure by moving slightly up and down or in circular motions. Each session should last 1-2 minutes, performed 3 times daily. Since this is in the center of the face, avoid pressing too hard.

    Benefits: Yintang is close to the pituitary gland, the immune regulation center of the brain. When stimulated, it rapidly decreases nasal mucus secretion. It also alleviates forehead pain, eye fatigue, and heaviness in the head that accompany runny nose.

    4. Fengchi (GB20, Fengchi) — Cold-Relief Acupoint at the Back of the Neck

    GB20 acupuncture point

    Location: At the back of the neck, in the two depressions below the occipital bone at the boundary between the neck and head

    Acupressure Method: Place both thumbs on either side of the back of the neck, then press firmly upward for 5 seconds each. Repeat 20-30 times for about 1-2 minutes per session. It is helpful to lower your head slightly during the procedure to prevent neck stiffness.

    Benefits: Fengchi is an acupoint on the Gallbladder meridian that blocks external pathogens (Wind Evil) from invading the body. It simultaneously improves early-stage cold sore throat, runny nose, nasal congestion, and laryngitis. It is particularly effective at eliminating the ‘wind’ symptoms of a cold.

    5. Tongzhu (BL7, Tongzhu) — Acupoint Responsible for Nasal Ventilation

    BL7 acupuncture point

    Location: On the outer side of the bridge of the nose, approximately 1 cm above the inner end of the eyebrow, next to the first and second cervical vertebrae

    Acupressure Method: Place the index fingers of both hands above the inner ends of the eyebrows, then press at a 45-degree angle toward the bridge of the nose for 3-5 seconds before releasing. Alternate between both sides, repeating 20-30 times for about 1-2 minutes per session.

    Benefits: Tongzhu is on the Bladder meridian and promotes blood circulation in the nose to regulate nasal discharge. It is particularly effective at alleviating nasal congestion and stuffiness, early-stage sinusitis symptoms, and allergic rhinitis.

    5-Minute Self-Massage Acupressure Routine

    ※ Optimal results are achieved by performing this routine three times daily (morning, lunch, and evening).

    Step Acupoint Time Required
    Step 1 Yingxiang (LI20) 1 minute
    Step 2 Hegu (LI4) – Both Hands 1 minute
    Step 3 Yintang (GV27) 1 minute
    Step 4 Fengchi (GB20) 1 minute
    Step 5 Tongzhu (BL7) 1 minute
    Total Time Required 5 minutes

    Implementation Tips:

    • Sit in a comfortable position and proceed slowly while breathing calmly, as rushing through the procedure reduces its effectiveness.
    • Warming your fingers before acupressure makes it more effective.
    • For severe symptoms, additional stimulation at 2-hour intervals is possible, with one additional treatment before bed particularly recommended.
    • Avoid exposure to cold air for 20-30 minutes after acupressure.
    ⚠️ Medical Disclaimer: This article is written for informational health purposes and does not replace professional medical diagnosis or treatment. If runny nose persists for more than two weeks or is accompanied by severe symptoms such as high fever, yellow nasal discharge, or foul odor, you must consult a medical professional such as an otolaryngologist or traditional medicine practitioner. In particular, acupressure should be avoided if there are wounds around the nose or eyes or if fracture is suspected.
    🤰 Pregnancy Warning: Hegu (LI4) can trigger uterine contractions in pregnant women. If you are pregnant or possibly pregnant, perform only the 4 acupoints excluding Hegu—Yingxiang (LI20), Yintang (GV27), Fengchi (GB20), and Tongzhu (BL7)—or consult a professional before proceeding.
  • 5 Best Acupoints for Sciatic Nerve Pain — Complete Self Acupressure Guide

    5 Best Acupoints for Sciatic Nerve Pain — Complete Self Acupressure Guide

    “`html

    One-line summary: To relieve leg pain and numbness caused by sciatica, it is effective to apply acupressure to the Weizhong (BL40), Kunlun (BL60), Fengshi (GB31), Chengfu (BL36), and Yanglingquan (GB34) acupoints for 5-10 minutes daily.

    Introduction

    Sciatica — pain that originates in the lower back, travels through the buttocks, and down the back of the leg. This painful condition, which suddenly occurs when sitting for long periods or lifting heavy objects, significantly interferes with daily activities. Often it becomes worse at night or causes numbness in the legs that prevents sleep.

    Traditional Chinese Medicine has designated several acupoints effective for relieving sciatica based on thousands of years of experience and theory. Stimulating these acupoints is known to relax muscle tension around the sciatic nerve, improve blood circulation and qi flow, and reduce pain. While professional treatment is best, in emergency situations or when time is limited, you can self-apply acupressure to these acupoints for rapid pain relief.

    5 Acupoints for Sciatica Relief

    1. Weizhong (委中, BL40) — A Powerful Acupoint Behind the Knee

    BL40 acupuncture point

    Location: In the center crease behind the knee, in the hollow area between the muscles on both sides of the leg. It is easy to locate when the knee is slightly bent.

    Acupressure Technique: Using your thumb, press slowly while maintaining a pressure that is tender but bearable. Press for 5 seconds and rest for 5 seconds, repeating 10 times. Apply to both legs.

    Effects: Weizhong is known as a specific acupoint for sciatica. Stimulating this point improves blood circulation throughout the leg and relieves nerve compression, providing immediate pain relief. It is also effective for fatigue recovery and reducing leg swelling.

    2. Kunlun (崑崙, BL60) — Pain-Relief Acupoint of the Ankle

    BL60 acupuncture point

    Location: On the outer side of the ankle, in the hollow area between the lateral malleolus and the Achilles tendon. You can feel the depression inside the bone when you press with your finger.

    Acupressure Technique: Press gently but firmly with your thumb or middle finger. It is effective to massage each ankle in circular motions for about 3-5 minutes.

    Effects: Kunlun is an acupoint that promotes blood circulation in the ankle and lower leg. It is particularly effective at relieving numbness in the foot and leg caused by sciatica, and also helps improve cold feet.

    3. Fengshi (風市, GB31) — Pain-Relief Acupoint on the Outer Leg

    GB31 acupuncture point

    Location: At the midpoint of the outer thigh, where your middle finger touches when standing with your arms at your sides. It is located at the center of the lateral surface of the femur.

    Acupressure Technique: Overlap your thumbs and press firmly. Repeat pressing for 10 seconds and resting for 5 seconds, applying to each leg for a total of 3-5 minutes. Initial soreness is normal and indicates effectiveness.

    Effects: Fengshi excels at relieving pain, numbness, and muscle cramps on the outer leg. It is especially effective for leg numbness or tightness on the lateral side caused by sciatica, and improves leg fatigue for those standing for long periods.

    4. Chengfu (承扶, BL36) — Specific Acupoint for Buttock Nerve Pain

    BL36 acupuncture point

    Location: Below the buttocks, at the midpoint of the line between the buttocks and leg. It is at the exact center of the crease you feel when sweeping your hand down across the buttocks.

    Acupressure Technique: While seated, press slowly with your thumb. Apply firm pressure but adjust to avoid severe pain. It is beneficial to massage continuously for about 5-10 minutes at a time.

    Effects: Chengfu is the acupoint closest to the origin of the sciatic nerve and directly relieves nerve compression in the buttocks. It relaxes muscle tension, a root cause of sciatica, and quickly soothes nerve irritation.

    5. Yanglingquan (陽陵泉, GB34) — Supportive Acupoint for Nerve Function Recovery

    GB34 acupuncture point

    Location: On the outside of the lower leg, in a hollow area in front of the fibula, about 3-4 cm below the knee.

    Acupressure Technique: Press gently with your thumb while making slow circular motions. Apply to each leg for 3-5 minutes. Start with light pressure and gradually increase intensity.

    Effects: Yanglingquan improves nervous system function and alleviates muscle cramps. It relieves leg weakness and numbness symptoms, and serves as a supporting acupoint that enhances the effects of other acupoint treatments.

    5-Minute Self-Acupressure Routine

    This is a 5-minute routine for quick results when time is limited.

    1. Weizhong (1 minute): Apply firm acupressure alternately to both sides behind the knees. You can expect rapid pain relief.
    2. Chengfu (1 minute): Slowly massage both sides below the buttocks. It works directly on nerve trigger points.
    3. Fengshi (1 minute): Apply focused pressure to both outer thighs. It relieves surface leg pain.
    4. Kunlun (1 minute): Massage both ankles in sequence. It improves circulation in the lower leg.
    5. Yanglingquan (1 minute): Gently apply acupressure to both calves. It normalizes nerve function.

    Tip: If it is difficult to locate the exact acupoints, you can still see results by applying acupressure to the entire 2-3 cm area around the location. Focus on the area where pain is most strongly felt.

    ⚠️ Medical Disclaimer: This article is written for informational purposes and does not replace professional medical diagnosis or treatment. If symptoms persist or are severe, be sure to consult a healthcare professional. If severe pain, discomfort, or worsening of symptoms occurs during acupressure, stop immediately and seek professional care.

    “`